background image

Oil Cooler 

10 

10

11 

11 

12 

13 

14 

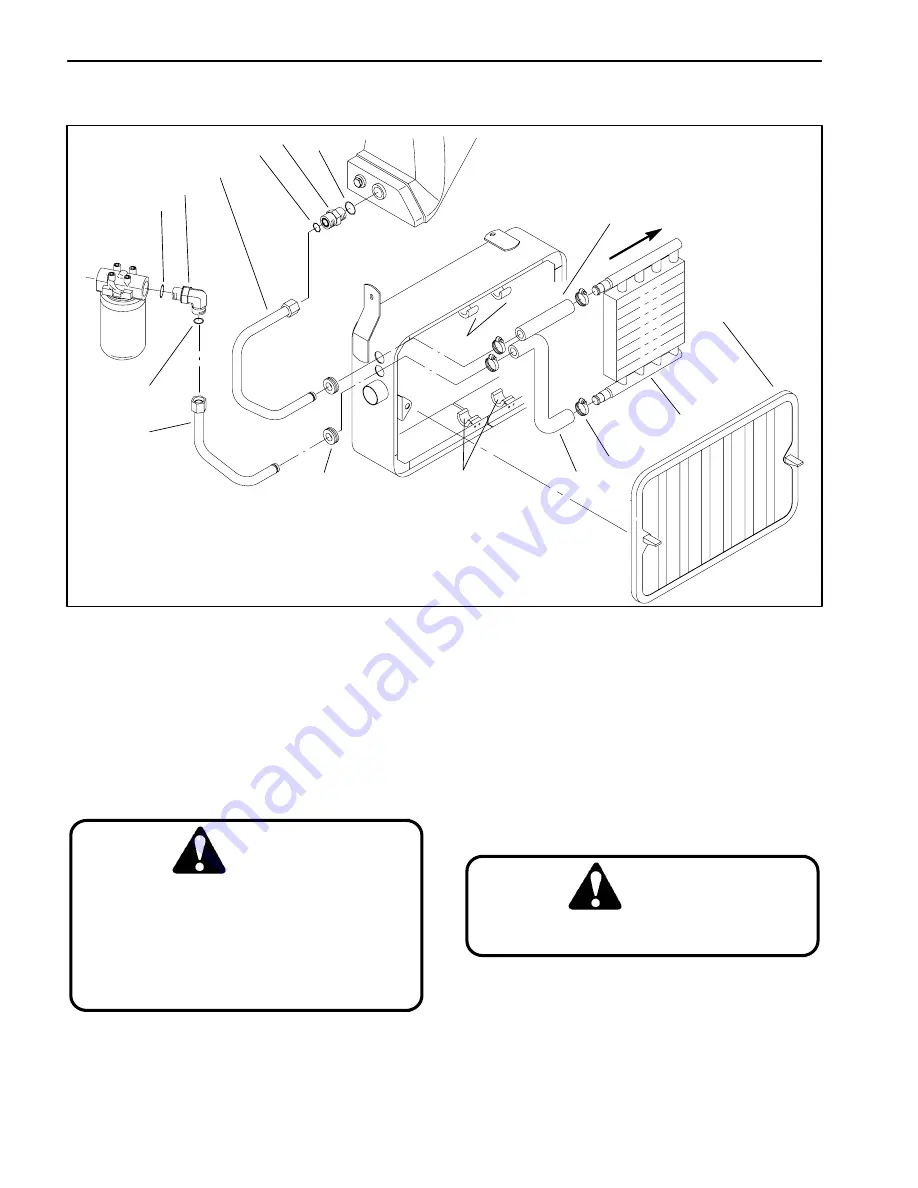
OIL FLOW 

Figure 58 

1. Oil 

cooler 

6. Tube 

assembly 

11. O–ring 

2.  Lower formed hose 

7. Tube 

assembly 

12. Radiator screen 

3.  Upper formed hose 

8. Hydraulic 

fitting 

13.  Upper cooler bracket 

4. Grommet 

9. Hydraulic 

fitting 

14.  Lower cooler bracket 

5. Hose 

clamp 

10. O–ring 

Removal (Fig. 58) 

4.  Lift oil cooler up from the cooler brackets. Remove 
oil cooler from the formed hoses. Allow hoses and cooler 
to drain into a suitable container. 

5.  To clean the oil cooler, back flush with cleaning sol-
vent. After the cooler is clean, make sure all solvent is 
drained from the cooler. 

CAUTION 

Use eye protection such as goggles when 
using compressed air. 

6.  Use compressed air in a direction opposite the oil 
flow to dry the cooler. 

7.  Plug ends of the oil cooler. Clean exterior of the 
cooler. 

8.  The oil cooler should be free of corrosion and exces-
sive pitting of tubes. 

1.  Before removing any parts from the hydraulic sys-
tem, park machine on a level surface, engage parking 
brake, lower cutting units, and stop engine. 

CAUTION 

Operate all hydraulic controls to relieve sys-
tem pressure and avoid injury from pressur-
ized hydraulic oil. Controls must be oper-
ated with the ignition switch in RUN and the 

when pressure has been relieved. Remove 
key from the ignition switch. 

engine OFF. Return ignition switch to OFF 

2.  Clamp upper and lower formed hoses to prevent 
draining of the hydraulic system and tank. 

3.  Remove loosen hose clamps securing the formed 
hoses to the oil cooler. 
Hydraulic System 

Page 5 – 74 

Greensmaster 3200/3200–D 

Summary of Contents for 3200

Page 1: ... the Operator s Manual and Parts Catalog are available on the internet at www Toro com The Toro Company reserves the right to change product specifications or this publication without notice This safety symbol means DANGER WARN ING or CAUTION PERSONAL SAFETY INSTRUCTION When you see this symbol carefully read the instructions that follow Failure to obey the instructions may result in personal inju...

Page 2: ...Greensmaster 3200 3200 D ...

Page 3: ...on 4 6 Adjustments 4 8 Service and Repairs 4 11 Perkins 100 Series Workshop Manual Chapter 5 Hydraulic System Specifications 5 2 General 5 3 Hydraulic Schematic 5 7 Hydraulic Flow Diagrams 5 8 Special Tools 5 16 Trouble Shooting 5 17 Testing 5 20 Adjustments 5 38 Service and Repairs 5 42 Chapter 6 Electrical System Wiring Schematics 6 2 Special Tools 6 12 Trouble Shooting GR3200 6 14 Trouble Shoot...

Page 4: ...Greensmaster 3200 3200 D ...

Page 5: ...eels and Cutting Units Brakes Table Of Contents continued Chapter 8 Cutting Units Introduction 8 2 Specifications 8 3 General Information 8 4 Special Tools 8 5 Troubleshooting 8 7 Adjustments 8 9 Service and Repairs 8 16 Cutting Units Greensmaster 3200 3200 D ...

Page 6: ...Greensmaster 3200 3200 D ...

Page 7: ...Operator s Manual are available on the internet at www Toro com 2 Never allow children to operate the machine Never allow adults to operate it without proper instructions 3 Become familiar with the controls and know how to stop the engine quickly 4 Keep all shields safety devices and decals in place If a shield safety device or decal is defective il legible or damaged repair or replace itbefore op...

Page 8: ... A at the operator position Ear protec tors are recommended for prolonged exposure to re duce the potential of permanent hearing damage 8 Raise the cutting units when driving from one work area to another 9 Do not touch engine muffler or exhaust pipe while engine is running or soon after it is stopped because these areas could be hot enough to cause burns 10 If a cutting unit strikes a solid objec...

Page 9: ...p the engine area free of excessive grease grass leaves and accu mulation of dirt Never wash a warm engine or electrical connections with water 7 Check all fuel lines for tightness and wear on a regu lar basis and tighten or repair as needed 8 If the engine must be running to perform a mainte nance adjustment keep hands feet clothing and any other parts of the body away from the cutting units at t...

Page 10: ...nstruction Decals Numerous safety and instruction decals are affixed to the traction unit If any decal becomes illegible or dam aged install a new decal Decal part numbers are listed in your Parts Catalog Order replacements from your Authorized Toro Distributor ...

Page 11: ...On Seat Back Part No 95 0501 On Control Panel GR3200 Part No 93 2232 Safety Greensmaster 3200 3200 D Page 1 5 Safety ...

Page 12: ...Safety Page 1 6 Greensmaster 3200 3200 D ...

Page 13: ...w Markings and Torque Values Metric 3 LUBRICATION 4 Traction Unit 4 Single Point Adjust Cutting Unit 5 4 Bolt Cutting Unit 5 MAINTENANCE 6 Product Records Insert a copy of the Operator s Manual and Parts Cata log for your Greensmaster 3200 or 3200 D at the end of this chapter Additionally if any optional equipment or accessories have been installed to your machine insert the Installation Instructi...

Page 14: ...Equivalents and Conversions Product Records and Maintenance Page 2 2 Greensmaster 3200 3200 D ...

Page 15: ...Product Records and Maintenance Greensmaster 3200 3200 D Page 2 3 Product Records and Maintenance Torque Specifications ...

Page 16: ...ainst handle IMPORTANT Do not apply too much pressure or grease seals will be permanently damaged 3 Wipe excess grease away Figure 4 4 Bolt Cutting Unit Each cutting unit has 6 grease fittings that must be lu bricated regularly with No 2 General Purpose Lithium Base Grease The grease fitting locations and quantities are Reel bearings 2 and front and rear rollers 2 ea IMPORTANT Lubricating cutting ...

Page 17: ...Product Records and Maintenance Page 2 6 Greensmaster 3200 3200 D ...

Page 18: ...ct Records and Maintenance Maintenance Maintenance procedures and recommended service in tervals for the Greensmaster 3200 and 3200 D are cov ered in the Operator s Manuals Refer to those publications when performing regular equipment main tenance ...

Page 19: ...ning Radiator and Screen 9 Torquing Cylinder Head Bolts 9 Changing Engine Oil and Filter 10 Replacing Fuel Filter 10 Replacing Spark Plugs 11 Muffler and Air Cleaner 12 Muffler Removal and Installation 13 Air Cleaner Removal and Installation 13 Radiator 14 Radiator Removal and Installation 15 Fuel Tank 16 Fuel Tank Removal and Installation 17 Engine 18 Engine Removal 19 Engine Installation 23 BRIG...

Page 20: ...C Repair Manual The use of some specialized test equipment is explained However the cost of the test equipment and the specialized nature of some repairs may dictate that the work be done at an engine repair fa cility Service and repair parts for Briggs and Stratton Van guard Vanguard 3 LC engines are supplied through your local Briggs and Stratton dealer or distributor If no parts list is availab...

Page 21: ...or Electronic Low Idle no load 1500 10 RPM High Idle no load 2800 10 RPM Intake and Exhaust Valve Seat Angle 30_ Intake and Exhaust Valve Clearance mm in 0 18 0 007 Carburetor Single Barrel Float Feed with Solenoid for After Fire Suppression Engine Oil SAE 10W 30 SG Oil Pump Gear Driven Trochoid Type Crankcase Oil Capacity liters U S qt 3 0 3 2 with filter Water Pump Belt Driven Centrifugal Type C...

Page 22: ...k and wipe it with a clean rag Push dipstick down into the dipstick tube Make sure stick is seated fully Pull dipstick out and check oil level If oil lev el is low add enough oil to raise level to the FULL mark on the dipstick Figure 2 3 If oil level is low remove oil fill cap Fig 3 and grad 1 Dipstick ually add small quantities of oil Check oil level frequent ly until level reaches the FULL mark ...

Page 23: ... feet tank to prevent the possibility of an explo up any spilled gasoline before starting the engine Use a funnel or spout to prevent spilling gasoline and fill tank to about 1 inch 25 mm below the filler neck Store gasoline gasoline in a cool well ventilated place and never in an enclosed area such as a hot stor fuel for internal combustion engines do not use it for any other purpose Since many c...

Page 24: ... surface 1 2 If engine has been running pressurized hot coolant can escape when the radiator cap is removed and may cause burns 2 Check coolant level Coolant should be between Figure 5 lines on the reserve tank when engine is cold 1 Reserve tank 2 Radiator cap 3 If the coolant level is low remove reserve tank cap and add a 50 50 mixture of water and permanent ethyl ene glycol antifreeze Do not ove...

Page 25: ...peration and every 400 hours thereafter 1 Remove cylinder head cover from the engine Note Adjust valves when engine is cold 2 Set No 1 cylinder to the top dead center and adjust the clearances of intake and exhaust valves of No 1 cyl inder exhaust valve of No 2 cylinder and the intake valve of No 3 cylinder Adjust clearances of both intake and exhaust valves to 0 007 inch 0 18mm 3 Turn crankshaft ...

Page 26: ...lter element Rinse filter from the clean side to dirty to side C Dry filter element using warm flowing air that dose not to exceed 160_F 71_C or allow element to air dry Do not use a light bulb to dry the filter ele ment because damage could result Compressed Air Method CAUTION Use eye protection such as goggles when using compressed air A Blow compressed air from the inside to the out side of the...

Page 27: ... not exceed 40 psi 2 8 bar because damage to the radiator fins may result 3 Working from the fan side of the radiator blow out radiator with compressed air 4 Clean screen Reinstall fan shroud and screen to the radiator support Secure latches 1 2 Figure 10 1 Radiator 2 Radiator support Torquing Cylinder Head bolts Initially check head bolt torque after first 50 hours of op eration and every 400 hou...

Page 28: ...ter every 800 hours Use the following procedures when replacement becomes necessary 1 2 Clamp both fuel lines that connect to the fuel filter so gasoline cannot drain when lines are removed CAUTION Since gasoline is highly flammable drain it outdoors and make sure engine is cool not drain gasoline near any open flame or where gasoline fumes may be ignited by a a pipe when handling gasoline Figure ...

Page 29: ...an around spark plugs and remove plugs IMPORTANT Replace any cracked fouled or dirty spark plug Do not sand blast scrape or clean elec trodes because engine damage could result from grit entering the cylinder 3 Set air gap between 0 028 and 0 031 inch 0 71 and Figure 14 0 79 mm Install gapped spark plug and tighten firmly 1 Spark plug wire to 180 in lb 207 kg cm Greensmaster 3200 Page 3 11 Vanguar...

Page 30: ... 7 Muffler 8 Spark arrestor 9 Hot surface decal 10 Clamp 11 Exhaust bracket 12 Exhaust pipe 13 Lock nut 14 Nut 15 Not used 16 Not used 17 Air cleaner hose 18 Air cleaner hose 19 Hose clamp 20 Plug 21 Cover 22 Valve 23 Air Cleaner element 24 Lock nut 25 Compression spring 26 Bolt 27 Pump plate FRONT RIGHT 3 17 6 4 19 18 2 19 8 4 11 13 9 12 4 4 10 5 7 20 21 22 24 25 26 27 14 10 ...

Page 31: ...ipe 12 Secure muffler 7 to the pump plate 27 with two cap screws 4 5 Secure exhaust pipe 12 to the muffler 7 with clamp 10 lock washers 13 and nuts 14 6 Secure muffler shield 8 to the muffler 7 with four cap screws 4 Air Cleaner Removal Fig 15 1 Park machine on a level surface lower the cutting units stop the engine engage parking brake and re move the key from the ignition switch 2 Loosen hose cl...

Page 32: ...Plug 15 Cap screw 16 Not used 17 Radiator hose 18 Cap screw 19 Fan shroud 20 Hose Clamp 21 Pop rivet 22 Cap screw 23 Not used 24 Breather hose 25 Expansion tank hose 26 R clamp 27 Thermostat housing 28 Lock nut 29 Alternator guard 30 Washer 31 Flat washer 32 Spring lock washer 33 Not used 34 Radiator cap 35 Not used 36 Hose clamp 37 Air cleaner hose 38 Cap screw 39 Drain petcock 3 20 5 20 1 7 18 1...

Page 33: ...o the frame tab 7 Remove the radiator support 8 from the frame and onto a workbench 8 Remove four cap screws 18 and lock nuts 9 se curing the radiator 4 to the radiator support 8 Slide radiator out of the support 9 Remove four cap screws 22 lock nuts 28 and flat washers 15 securing the fan shroud 19 to the ra diator 4 Separate the shroud from the radiator Radiator Installation Fig 16 1 Secure fan ...

Page 34: ...p 11 Fuel filter 12 Fuel hose 13 Mounting plate 14 Flat washer 15 Cap screw 16 Cap screw 17 Over flow tank hose 18 Fuel hose 19 Over flow tank cap 20 R clamp 21 Overflow tank 22 Hose clamp 23 Fuel hose 24 Hose clamp 25 Thermal pad 26 Over flow tank hose 27 Support bracket 9 10 11 16 3 4 2 1 19 17 21 26 22 25 13 6 14 15 18 24 12 24 23 6 20 24 6 20 6 20 6 13 27 14 6 30 to 60 in lb 35 to 69 kg cm ANT...

Page 35: ...el and hose to drain the fuel tank into a suit able container for storage D Drain fuel tank completely by opening the fuel shut off valve Close fuel shutoff valve when tank is drained 3 Gain access to the fasteners securing the fuel tank 2 to the mounting plate 13 as follows A Remove three cap screws 6 and two flat wash ers 14 securing mounting plate to the frame and support bracket 27 B Lift and ...

Page 36: ...d 24 Fan adapter 25 Screw 26 Cap screw 27 Pump plate 28 Upper spacer 29 Lower spacer 30 Cap screw 31 Flat washer 32 Lock washer 33 Backing plate 34 Carburetor adapter 35 Hose clamp 36 Negative battery cable 37 Wire harness 38 Fuel hose 39 Fuel pump 40 Air cleaner 41 Cap screw 42 Flat washer 43 Lock nut 44 Fuel hose 45 mount spacer 46 Cable tie 47 Dust shield 48 Whiz screw 49 Hose clamp 50 Electric...

Page 37: ...ner by releasing the clamp from the hose Plug hose and pump to prevent contamination CAUTION DO NOT open radiator cap or drain coolant if the engine or radiator is hot Pressurized hot coolant can escape and cause burns Ethylene gycol antifreeze is poisonous Dispose of it properly or store it in a proper ly labeled container away from children and pets 6 Drain radiator 4 as follows Fig 16 A Place a...

Page 38: ... hose leading to the radiator from the cleaner C Disconnect air cleaner bracket from the pump mount Remove air cleaner and bracket from the machine CAUTION The muffler and muffler tube may be hot To avoid possible burns allow the ex haust system to cool before working on the muffler and muffler tube 10 Remove muffler as follows Fig 24 A Remove four cap screws and lock washers se curing the exhaust...

Page 39: ...14 Separate hydrostat from the pump plate as follows A Loosen set screw securing the hydrostat shaft to the hub Fig 26 CAUTION Use caution when removing the lock nut from the pin The extension spring is un der tension and may cause personal inju ry during removal B Remove lock nut securing the pin and extension spring to the spring bracket Do not unscrew jam nut from the pin Release pin from the b...

Page 40: ...oils K The green green blue and red blue wires and connector to the alternator The red wire and con nector to the alternator 17 Remove both cap screws securing the ECU to the frame Position ECU away from the engine 18 Remove both whiz screws 48 securing the dust shield 47 to the front engine mount 13 Fig 18 19 Remove alternator 51 and fan adapter 24 from the engine for better clearance Fig 18 20 R...

Page 41: ...on the main harness near the ECU F The blue wire to the water temperature sender 3 G The green blue wire to the oil pressure switch H The black and white black wires and connector to the fuel pump 39 I The connector to the electric governor Secure main electrical harness to the frame with R clamps Fig 29 J The blue and white wires and connector to the al ternator 9 Connect choke link to the choke ...

Page 42: ...u lic hose to the hydraulic oil filter Fig 22 C Connect hydraulic hose to the welded fitting on the tube leading into rear bulkhead Fig 21 D Remove plug from the pump inlet hose and gear pump Install pump inlet hose to the gear pump with hose clamp Fig 19 E Connect expansion tank hose 25 to the radia tor elbow 27 Fig 16 F Make sure hoses are secured to the frame and supports with cable ties and ho...

Page 43: ...on 17 Checking Engine Oil 7 Air Cleaner Removal and Installation 17 Checking Cooling System 7 Radiator 18 ADJUSTMENTS 8 Radiator Removal and Installation 19 Alternator Belt Adjustment 8 Fuel Tank 20 Valve Clearance Adjustment 8 Fuel Tank Removal and Installation 21 Throttle Adjustment 9 Engine 22 SERVICE AND REPAIRS 11 Engine Removal 23 Inspecting Fuel Filter 11 Engine Installation 28 Bleeding Fue...

Page 44: ... in the Special Tools section The use of some specialized test equipment is explained How ever the cost of the test equipment and the specialized nature of some repairs may dictate that the work be done at an engine repair facility Service and repair parts for Perkins engines are sup plied through your local Toro Distributor If no parts list is available be sure to provide your dealer or distribut...

Page 45: ... Fuel Capacity liters gallons 22 7 6 0 Fuel Injection Pump Bosch type plunger Governor Mechanical Idle Speed no load 1500 50 RPM High Idle no load 3025 50 RPM Fuel Injector Nozzle Bosch throttle type Fuel Injection Working Pressure kg cm2 psi 115 to 125 1636 to 1778 Injection Timing 28 5 to 30 5_ B T D C Engine Oil SAE 10W30 SF CD Oil Pump Gear driven trochoid type Crankcase Oil Capacity liters U ...

Page 46: ...ith water and use solution to wash the Do naldson air cleaner element Figure 1 Diesel Engine Compression Test Kit This 0 to 1000 PSI gauge allows testing and checking the general operating condition of the engine The kit in cludes a case gauge with hose glow plug hole adapt ers and instructions Figure 2 Nozzle Tester This tests the condition and opening pressure of fuel in jection nozzles Figure 3...

Page 47: ...Nozzle Test Adapter This adapter is required to test the fuel injection nozzles in conjunction with the spray tester Figure 4 Perkins Diesel Engine Greensmaster 3200 D Page 4 5 Perkins Diesel Engine ...

Page 48: ...ling the fuel tank Do not fill fuel tank while ways fill fuel tank outside and wipe up any spilled diesel fuel before starting the en gine Store fuel in a clean safety approved diesel fuel for the engine only not for any other purpose Figure 7 1 1 storing or handling it Do not smoke while engine is running or in an enclosed area Al container and keep the cap in place Use Fuel cap 2 Remove fuel tan...

Page 49: ...l level reaches FULL mark on dipstick 4 The engine uses any high quality 10W30 detergent oil having the American Petroleum Institute API ser vice classification CD 1 Figure 9 1 Oil fill cap Checking Cooling System The cooling system is filled with a 50 50 solution of water and permanent ethylene glycol antifreeze Check level of coolant at beginning of each day before starting the engine Capacity o...

Page 50: ...lves after the first 50 hours of opera tion and every 400 hours thereafter 1 Remove breather hose and cylinder head cover from the engine Note Adjust valves when the engine is cold Set the No 1 cylinder to top dead center Adjust clearances of the intake exhaust valves of No 1 cylinder and exhaust valve of No 2 cylinder Then turn the crankshaft coun terclockwise 240_ viewed from front to adjust cle...

Page 51: ...eter to set engine speed High Speed Adjustment Fig 14 1 Park machine on a level surface engage parking brake and lower cutting units Allow engine to run for at least ten minutes to bring it to operating temperature 2 Lift up seat to access the engine 3 Remove wire and lead seal from the high speed set bolt Loosen lock nut on the high speed set bolt 4 Adjust maximum engine speed between 2975 and 30...

Page 52: ... seat to access the engine 4 Loosen cap screw and lock nut securing the throttle cable clamp to the throttle control cable and front engine mount 5 Loosen lock nut on the low speed set bolt 6 Adjust engine speed between 1450 and 1550 RPM by rotating the low speed set bolt Make sure throttle control lever is against the stop plate Tighten lock nut 7 Tighten cap screw and lock nut securing the throt...

Page 53: ...n a clean safety approved diesel fuel for the engine only not for any other purpose 2 1 storing or handling it Do not smoke while engine is running or in an enclosed area Al container and keep the cap in place Use 2 Unscrew nut securing bowl to filter head Remove water or other contaminants from bowl 3 Inspect fuel filter and replace if dirty Refer to Re placing Fuel Filter 4 Reinstall bowl to fil...

Page 54: ...uel filter mounting head Allow bowl to refill with fuel Close bleed screws when bowl is filled 4 Locate transfer pump inlet screw on the front of the engine by oil filter Note angle of the fitting on transfer pump inlet screw and loosen screw left screw only 5 When a steady stream of fuel flows out of transfer pump screw tighten screw Retain angle of the fitting before loosening 6 Loosen injection...

Page 55: ...inse filter from the clean side to the dirty side C Dry filter element using warm flowing air that dose not to exceed 160_F 71_C or allow element to air dry Do not use a light bulb to dry the filter ele ment because damage could result Compressed Air Method 6 Insert new filter properly into air cleaner body Make sure filter is sealed properly by applying pressure to out er rim of filter when insta...

Page 56: ...ng from fan side of radiator blow out the radia tor with compressed air 4 Clean screen Reinstall fan shroud and screen to the radiator support Secure latches 1 2 Figure 20 1 Radiator 2 Radiator support Changing Engine Oil and Filter Change oil and filter initially after the first 8 hours of op eration thereafter change oil every 50 hours and filter every 100 hours 1 Remove drain plug and let oil f...

Page 57: ...mmable Use caution when filling the fuel tank Do not fill fuel tank while ways fill fuel tank outside and wipe up any spilled diesel fuel before starting the en gine Store fuel in a clean safety approved diesel fuel for the engine only not for any other purpose storing or handling it Do not smoke while engine is running or in an enclosed area Al container and keep the cap in place Use 2 Unscrew nu...

Page 58: ...al 10 Clamp 11 Exhaust bracket to engine 12 Exhaust pipe 13 Lock washer 14 Nut 15 Bolt 16 Compression spring 17 Air cleaner hose to engine 18 Air cleaner hose to radiator 19 Hose clamp 20 Plug 21 Cover assembly 22 Valve 23 Air cleaner element not shown 24 Lock nut 25 Cap screw 26 Spring lock washer 27 Cap screw 28 Pump plate 12 10 11 7 4 5 25 2 3 17 19 6 19 18 4 4 10 8 20 21 22 24 16 15 9 13 14 25...

Page 59: ... exhaust pipe 12 Secure muffler 7 to the pump plate 28 with two cap screws 4 5 Secure exhaust pipe 12 to the muffler 7 with clamp 10 lock washers 13 and nuts 14 6 Secure muffler shield 8 to the muffler 7 with four cap screws 4 Air Cleaner Removal 1 Park machine on a level surface lower the cutting units stop the engine engage parking brake and re move the key from the ignition switch 2 Loosen hose...

Page 60: ...t 14 Plug 15 Flat washer 16 Not used 17 Radiator hose 18 Cap screw 19 Fan shroud 20 Hose clamp 21 Pop rivet 22 Cap screw 23 Radiator hose 24 Breather hose 25 Expansion tank hose 26 Radiator elbow 27 Lock nut 28 Cap screw 29 Alternator guard 30 Radiator cap 31 R clamp 32 Not used 33 Not used 34 Air cleaner hose 35 Hose clamp 36 Flat washer 37 Cable tie 38 Petcock 5 1 7 18 3 4 9 8 17 22 19 14 13 10 ...

Page 61: ...mp 31 to the frame tab 7 Remove the radiator support 8 from the frame and onto a workbench 8 Remove four cap screws 18 and lock nuts 9 se curing the radiator 4 to the radiator support 8 Slide radiator out of the support 9 Remove four cap screws 22 lock nuts 27 and flat washers 15 securing the fan shroud 19 to the ra diator 4 Separate the shroud from the radiator Radiator Installation Fig 26 1 Secu...

Page 62: ...e to fuel filter 21 Expansion tank 3 Grommet 13 Mounting plate 22 hose clamp 4 Flat washer 14 Flat washer 23 Fuel hose from fuel injectors 5 Expansion tank hose from radiator 15 Cap screw 24 Fuel hose 6 Cap screw 16 Cap screw 25 Grommet 7 Not used 17 Tank hose 26 Hose clamp 8 Not used 18 Fuel hose 27 Hose clamp 9 Fuel shut off fitting 19 Overflow tank cap 28 Support bracket 10 Hose clamp Perkins D...

Page 63: ...off valve 9 below the fuel tank B Close fuel shutoff valve on the fuel filter 49 Disconnect fuel hose 36 from the fuel filter Place hose into a suitable container for draining the tank Fig 27 C Drain fuel tank completely by opening the fuel shut off valve 3 Gain access to the fasteners securing the fuel tank 2 to the mounting plate 13 as follows A Remove three cap screws 6 and two flat wash ers 14...

Page 64: ...31 Flat washer 32 Lock nut 33 Throttle cable clamp 34 Hose clamp 35 Fuel hose to fuel tank 36 Fuel hose to fuel shut off valve 37 Negative battery cable 38 Wire harness 39 Positive battery cable 40 Throttle control cable 41 Mount spacer 42 Double hose clamp 43 Dust shield 44 Whiz screw 45 Flat washer 46 R clamp 47 Hose clamp 48 Flat washer 49 Fuel filter 50 Expansion tank hose 51 Governor lever 52...

Page 65: ...iner by releasing the clamp from the hose Plug hose and pump to prevent contamination CAUTION DO NOT open radiator cap or drain coolant if the engine or radiator is hot Pressurized hot coolant can escape and cause burns Ethylene gycol antifreeze is poisonous Dispose of it properly or store it in a proper ly labeled container away from children and pets 6 Drain radiator 4 as follows Fig 26 A Place ...

Page 66: ...raulic hose from the hydraulic oil filter Fig 32 F Make sure cable ties and hose clamps securing hoses to the frame and supports are removed G Lift mounting plate and tanks from the machine 9 Remove air cleaner as follows Fig 33 A Disconnect and remove hose leading from the cleaner to the engine valve cover at the engine and cleaner B Disconnect hose leading to the radiator from the cleaner C Disc...

Page 67: ...acket B Remove cable tie 37 from the breather hose 24 Disconnect breather hose and radiator hose 17 from the radiator elbow 26 C Disconnect radiator hose 2 from the bottom of the water pump D Disconnect hose 34 from air cleaner at the ra diator support 8 Remove hose from the machine E Remove screen 10 from the radiator support F Remove cap screws 7 from radiator support and frame Remove cap screw ...

Page 68: ...uring the pin and extension spring to the spring bracket Do not unscrew jam nut from the pin Release pin from the bracket Remove spring from neutral arm Fig 37 C Remove spring bracket from the pump plate Fig 37 D Remove both locknuts cap screws and flat washers securing the hydrostat to the pump plate Be careful not to lose the key Fig 36 2 3 1 6 4 5 7 8 Figure 36 1 Set screw 5 Cap screw 2 Hydrost...

Page 69: ...2 and crank shaft pulley 54 from the engine for better clearance Fig 28 18 Remove three whiz nuts 20 plate washers 21 and cap screws 19 securing the front engine mount 13 and rear engine mount 11 to the rubber mounts 18 Fig 28 CAUTION One person should operate the chain fall or hoist while the other person guides the engine out of the frame 19 Remove engine from the frame A Attach a short section ...

Page 70: ...efore releasing the 10 Connect throttle control cable 40 to the governor engine from the chain fall Fig 28 lever 51 Secure control cable with throttle tab 33 to the front engine mount 13 Tighten cap screw 22 and 4 Install alternator 52 water pump pulley 53 fan lock nut 23 to secure cable to the mount Fig 28 adapter 2 and crank shaft pulley 54 to the engine Fig 28 11 Install radiator as follows Fig...

Page 71: ... tank hose 50 to the support bracket 14 Connect fuel hose 35 to the number three fuel injector Fig 28 G Make sure hoses are secured to the frame and supports with cable ties and hose clamps H Connect fuel hose 36 to fuel filter 49 Fig 28 I Secure tank mounting plate 13 to the support bracket 28 and frame with three cap screws 6 and two flat washers 14 Fig 27 15 Connect hydraulic oil cooler if inst...

Page 72: ...Perkins Diesel Engine Page 4 30 Greensmaster 3200 D ...

Page 73: ... Gear Pump Flow P1 28 Test No 5 Manifold Relief Valve R1 Pressure 30 Test No 6 Manifold Relief Valve R2 Pressure 32 Test No 7 Reel Motor Case Drain 34 Test No 8 Steering Control Valve 36 ADJUSTMENTS 38 Adjusting Transmission for Neutral 38 Adjusting Transport Speed 38 Adjusting Cutting Unit Lift and Drop 39 Adjusting Implement Relief Valve 39 Adjusting Manifold Relief Valves 40 SERVICE AND REPAIRS...

Page 74: ...ed Maximum Operating Pressure and Rated Flow 309 RPM Wheel Motor Optional Rear Orbital rotor motor Maximum Operating Pressure 3000 PSI 207 bar Maximum Intermittent Pressure 4000 PSI 276 bar Rated Flow Rated Speed and Maximum Operating Pressure 20 GPM 76 LPM Rated Speed Maximum Operating Pressure and Rated Flow 182 RPM Reel Motor Gear motor Maximum Operating Pressure 2000 PSI 138 bar Maximum Interm...

Page 75: ... the injected into the skin it must be surgical ly removed within a few hours by a doctor Hydraulic fluid escaping under pressure skin and cause serious injury If fluid is familiar with this type of injury Gangrene may result from such an injury WARNING Hydraulic Fitting Installation O Ring Face Seal 1 Make sure both threads and sealing surfaces are free of burrs nicks scratches or any foreign mat...

Page 76: ... fitting into the port and tighten finger tight until the washer contacts the face of the port Step 2 6 by the required amount but no more than one full turn Step 3 7 Hold the fitting in the desired position with a wrench and turn the jam nut with another wrench to the correct Size 4 1 4 in nominal hose or tubing 1 00 25 6 3 8 in 1 50 25 8 1 2 in 1 50 25 10 5 8 in 1 50 25 12 3 4 in 1 50 25 16 1 in...

Page 77: ...do HD68 Union Unax AW 315 Using the Mobil 424 type fluids in the higher ambient temperatures may result in decreased efficiency in some of the hydraulic components compared to using the Mobil DTE 26 type fluids The Mobil DTE 26 type fluids are straight viscosity fluids which remain slightly more viscous at higher tempera tures than the multiviscosity fluids Using the Mobil DTE 26 type fluids in th...

Page 78: ... tow the machine faster than 2 to 3 mph because drive system may be damaged If machine must be moved a considerable distance transport it on a truck or trailer 1 Locate by pass valve on hydrostat and rotate it 90_ 2 Before starting engine close by pass valve by ro tating it 90_ Do not start engine when valve is open Figure 7 1 2 1 By pass valve 2 Hydrostat Check Hydraulic Lines and Hoses Inspect h...

Page 79: ...73 73 12 0 GPM LPM 2400 80 4 88 31 10 300 166 50 12 0 73 69 1000 R5 R5 V1 Hydraulic Schematic Greensmaster 3200 3200 D All solenoids are shown as de energized P1 P2 P3 P1 P2 P3 1 24 31 50 1 24 31 50 5 1 20 3 8 20 5 1 20 3 8 2 12 1 3 0 4 9 15 91 3 98 6 4 18 5 45 8 24 2 15 06 60 22 GASOLINE TRACTION 3WD 20 6 337 6 FLOW CONTROL Rev A VALVES LIFT CYLINDERS TRACTION WHEEL MOTORS FORWARD ST PT BY PASS V...

Page 80: ...ed out the bot tom port Hydraulic oil is supplied to the traction circuit from the gear pump P2 though the steering control valve and back through the charge circuit check valves This oil re places oil losses from flow through the case drains and small amounts of leakage Reverse The traction circuit operates essentially the same in re verse as it does in the forward direction However the flow thro...

Page 81: ...ANIFOLD BLOCK STEERING CONTROL L R PB T P MA MB M1 M2 M3 R5 V1 GASOLINE High Pressure Low Pressure Charge Return or Suction Flow Greensmaster 3200 3200 D All solenoids are shown as de energized TRACTION FLOW CONTROL VALVES LIFT CYLINDERS TRACTION WHEEL MOTORS BY PASS VALVE HYDROSTAT FILTER VALVE REEL MOTORS OPTIONAL KIT 2300 RPM MOW OR TRANSPORT 2800 RPM MOW OR TRANSPORT Traction Forward OPTIONAL ...

Page 82: ...valves to their original position and by passes flow back to the hydrostat stopping lift cylinder movement The cylinder position is locked in place since there is no com plete circuit of flow to and from the lift cylinders Lower Circuit operation for lowering the lift cylinders is similar to raising them However the solenoid valve S3 re mains de energized and in the down position and sole noid val...

Page 83: ...T P MA MB M1 M2 M3 R5 V1 GASOLINE All other solenoids are shown as de energized Solenoids S2 and S3 are shown in the energized position Raise Cutting Units High Pressure Low Pressure Charge Return or Suction Flow Greensmaster 3200 3200 D TRACTION FLOW CONTROL VALVES LIFT CYLINDERS TRACTION WHEEL MOTORS ST PT BY PASS VALVE HYDROSTAT FILTER VALVE REEL MOTORS OPTIONAL KIT 2300 RPM MOW OR TRANSPORT 28...

Page 84: ...hrough the 11 position reel speed control valve FC1 Flow across the speed control valve is pressure compensated by the logic cartridge valve LC1 The logic cartridge valve maintains a pressure differential of 75 PSI 5 2 bar across the speed control valve Any excess flow above what the speed control valve is set for is by passed to the reservoir through the logic cartridge valve With the backlap val...

Page 85: ...ING CONTROL L R PB T P MA MB M1 M2 M3 R5 V1 GASOLINE All other solenoids are shown as de energized Solenoid S1 is shown in the energized postion Mow High Pressure Low Pressure Charge Return or Suction Flow Greensmaster 3200 3200 D FLOW CONTROL Hydraulic System VALVES LIFT CYLINDERS TRACTION WHEEL MOTORS BY PASS VALVE HYDROSTAT FILTER VALVE REEL MOTORS OPTIONAL KIT 2300 RPM MOW OR TRANSPORT 2800 RP...

Page 86: ...through rotary meter V1 and out port R Pressure moves the piston in the direction for a right turn The rotary meter ensures that the oil flow to the cylinder is proportional to the amount of the turning on the steering wheel Fluid leaving the cylinder flows back through the spool valve then out port T and to the hydrostat The steering wheel and steering control valve return to the neutral position...

Page 87: ...ONTROL L R PB T P MA MB M1 M2 M3 R5 V1 GASOLINE All solenoids are shown as de energized Spool valve is positioned for a right turn High Pressure Low Pressure Charge Return or Suction Flow Greensmaster 3200 3200 D FLOW CONTROL Hydraulic System VALVES LIFT CYLINDERS TRACTION WHEEL MOTORS BY PASS VALVE HYDROSTAT FILTER VALVE REEL MOTORS OPTIONAL KIT 2300 RPM MOW OR TRANSPORT 2800 RPM MOW OR TRANSPORT...

Page 88: ...ace seal ORFS adapter fit tings for use on this machine 1 INLET HOSE Hose connected from the system cir cuit to the inlet side of the hydraulic tester 2 LOAD VALVE A simulated working load is created in the circuit by turning the valve to restrict flow 3 LOW PRESSURE GAUGE Low range gauge to provide accurate reading at low pressure 0 to 1000 PSI A protector valve cuts out when pressure is about to...

Page 89: ...ad or brakes applied Oil level in reservoir is low or inlet filter is loose or clogged Oil is contaminated or too light Heat exchanger when installed is damaged or plugged By pass relief is stuck open or air flow is obstructed Charge pressure is low Towing by pass valve is open or defective Wheel motor s or reel motor s are worn or damaged Traction pump is worn or damaged ÁÁÁÁÁÁÁÁÁÁÁÁÁ ÁÁÁÁÁÁÁÁÁÁÁ...

Page 90: ...ÁÁÁÁÁÁÁÁ Reel to bedknife adjustment is too tight Reel bearing s are damaged ÁÁÁÁÁÁÁÁÁÁÁÁÁ ÁÁÁÁÁÁÁÁÁÁÁÁÁ ÁÁÁÁÁÁÁÁÁÁÁÁÁ ÁÁÁÁÁÁÁÁÁÁÁÁÁ Reel motor case drain flow is exces sive Flow is greater than 0 5 GPM 1 9 LPM at 1000 PSI ÁÁÁÁÁÁÁÁÁÁÁÁÁÁÁÁÁÁÁÁÁÁ ÁÁÁÁÁÁÁÁÁÁÁÁÁÁÁÁÁÁÁÁÁÁ ÁÁÁÁÁÁÁÁÁÁÁÁÁÁÁÁÁÁÁÁÁÁ ÁÁÁÁÁÁÁÁÁÁÁÁÁÁÁÁÁÁÁÁÁÁ Excessive internal wear in wheel motor exists Reel bearing s are damaged ÁÁÁÁÁÁÁÁÁÁÁÁ...

Page 91: ...ÁÁÁÁÁÁÁÁÁÁÁÁÁÁÁÁ ÁÁÁÁÁÁÁÁÁÁÁÁÁÁÁÁÁÁÁÁÁÁ ÁÁÁÁÁÁÁÁÁÁÁÁÁÁÁÁÁÁÁÁÁÁ Leaf springs are broken or stuck Spool and sleeve are sticking to housing assembly ÁÁÁÁÁÁÁÁÁÁÁÁÁ ÁÁÁÁÁÁÁÁÁÁÁÁÁ ÁÁÁÁÁÁÁÁÁÁÁÁ ÁÁÁÁÁÁÁÁÁÁÁÁ Backlash results when turning steer ing wheel Á Á ÁÁÁÁÁÁÁÁÁÁÁÁÁÁÁÁÁÁÁÁÁÁ ÁÁÁÁÁÁÁÁÁÁÁÁÁÁÁÁÁÁÁÁÁÁ ÁÁÁÁÁÁÁÁÁÁÁÁÁÁÁÁÁÁÁÁÁÁ ÁÁÁÁÁÁÁÁÁÁÁÁÁÁÁÁÁÁÁÁÁÁ Cardan shaft fork is worn or broken Leaf springs are worn ...

Page 92: ...e disconnecting or performing any sure in the system must be relieved by or implements Keep body and hands away from pin hole leaks or nozzles that eject hydraulic fluid under high pressure Do not use hands to search for leaks use paper or cardboard can have sufficient force to penetrate the injected into the skin it must be surgical ly removed within a few hours by a doctor work on the hydraulic ...

Page 93: ...ugh to insure that they are not cross threaded before tightening them with a wrench 7 Position tester hoses so that rotating machine parts will not contact them and result in damage to the hoses or tester 8 Check oil level in the reservoir Make sure reservoir if full 9 Check the traction pedal linkage for improper ad justment binding or broken parts 10 All hydraulic tests should be made with the h...

Page 94: ...lic System Page 5 22 TEST NO 1 Hydrostat Flow P3 TRACTION WHEEL MOTORS M4 M5 DUMP VALVE R4 P3 HYDROSTAT FROM GEAR PUMP TO HYDRAULIC RESEROIR TESTER High Pressure Low Pressure Return or Suction Flow HOSE UPPER FRONT RIGHT FITTING HYDRAULIC ...

Page 95: ...series with the hydrostat and the dis connected hose Make sure the flow control valve is fully open 12 Make sure mode selector is in the transport position 13 Start engine and move the throttle to full speed A Units with diesel engine 3025 50 RPM B Units with gasoline engine 2800 28 RPM CAUTION Use extreme caution when taking gauge readings The front tire on the ground will be trying to move the m...

Page 96: ...P1 P2 ENGINE RPM GEAR PUMP R5 CIRCUIT CIRCUIT CIRCUIT FROM LIFT High Pressure Low Pressure Return or Suction Flow HOSE FROM TRACTION WHEEL MOTORS VALVE HYDROSTAT TO REEL MOTOR TO STEERING T CONNECTION AND GAUGE IMPLEMENT RELIEF Hydraulic System Page 5 24 Greensmaster 3200 3200 D ...

Page 97: ...onnector and gauge to the fitting and hose connection 5 Operate engine at full speed A Units with a diesel engine 3025 50 RPM B Units with a gasoline engine 2800 28 RPM 6 Make sure hydraulic oil is at operating temperature 7 Make sure that traction pedal and lift control are in neutral and the parking brake is engaged 8 Pressure gauge should read from 100 to 150 PSI 9 Shut off engine 10 If specifi...

Page 98: ...PUMP DISCHARGE TO REEL MOTOR CIRCUIT P1 P2 ENGINE RPM GEAR PUMP R5 CHARGE CIRCUIT AND CASE DRAIN CIRCUIT TESTER TO TRACTION FROM TRACTION CHARGE TO STEERING AND LIFT CIRCUITS High Pressure Low Pressure Return or Suction Flow Hydraulic System Page 5 26 Rev A Greensmaster 3200 3200 D ...

Page 99: ...asoline engine 2800 28 RPM 7 Make sure that traction pedal and lift control are in neutral and the parking brake is engaged 8 Watch flow and pressure gauges carefully while slowly closing the flow control valve until the pressure gauge reads 800 PSI 9 Minimum flow gauge reading should be 3 4 GPM If specification is not met repair or replace pump Check CAUTION Do not allow pressure to exceed 1200 P...

Page 100: ...ow CIRCUIT TO REEL MOTOR TO REEL MOTOR CIRCUIT P1 P2 ENGINE RPM GEAR PUMP R5 TESTER FROM LIFT CIRCUIT TO STEERING CIRCUIT TO TRACTION CHARGE CIRCUIT FROM HYDROSTAT CASE DRAIN Hydraulic System Page 5 28 Greensmaster 3200 3200 D ...

Page 101: ...alled make sure backlap knob on the valve block is in the mow position and reel speed is set to maximum starting the engine 8 Start engine and move throttle to full speed Do not engage the cutting units A Units with a diesel engine 3025 50 RPM B Units with a gasoline engine 2800 28 RPM 9 Watch pressure gauge carefully while slowly clos ing the flow control valve until 2000 PSI is obtained Verify w...

Page 102: ... REEL MOTOR TO AND FROM REEL MOTORS MA MB S4 RD1 OPTIONAL VALVES O1 R2 S3 L3B FC1 LC1 L3A S2 R1 L1B S1 TO AND FROM LIFT CYLINDERS L2B T TO OIL FILTER L2A P1 PT ST P2 MANIFOLD BLOCK FROM STEERING CIRCUIT FROM GEAR PUMP Hydraulic System Page 5 30 Rev A Greensmaster 3200 3200 D ...

Page 103: ...ake sure backlap knob on the valve block is in the mow position Make sure reel speed knob is set to maximum CAUTION Keep away from reels during test to pre vent personal injury from the rotating reel blades 8 Start engine and move throttle to full speed Engage the cutting units A Units with a diesel engine 3025 50 RPM B Units with a gasoline engine 2800 28 RPM 9 Watch pressure gauge carefully whil...

Page 104: ...OPTIONAL S1 T S2 S3 S4 R1 R2 FC1 LC1 RD1 O1 P1 P2 MANIFOLD BLOCK MA MB FROM STEERING FROM GEAR PUMP S4 S3 S1 S2 VALVES ST PT HOSE TO TO AND FROM REEL MOTORS CONTROL VALVE TO HYDROSTAT TO HYDRAULIC RESERVOIR PORT P2 Hydraulic System Page 5 32 Rev A Greensmaster 3200 3200 D ...

Page 105: ...the female connector violet and black located on the wiring harness for solenoid S3 7 Start engine and move throttle to full speed Engage the cutting units A Units with a diesel engine 3025 50 RPM B Units with a gasoline engine 2800 28 RPM 8 Watch pressure gauge carefully while holding the Raise Lower Mow Control lever at RAISE until the manifold relief opens Relief pressure should be 300 PSI Rele...

Page 106: ...TURN CASE DRAIN CASE DRAIN CASE DRAIN RETURN RIGHT REAR LEFT QUART CONTAINER PORT MA TO MANIFOLD PORT MB TO HYDRAULIC RESERVOIR RIGHT MOTOR LEFT MOTOR LEFT MOTOR RIGHT MOTOR REAR MOTOR REAR MOTOR MOTOR MOTOR MOTOR Hydraulic System Page 5 34 Greensmaster 3200 3200 D ...

Page 107: ...ional control lever is in NEUTRAL Start engine and move the throttle to full speed A Units with a diesel engine 3025 50 RPM B Units with a gasoline engine 2800 28 RPM CAUTION Keep away from reels during test to pre vent personal injury from the rotating reel blades 9 Engage reels by positioning the functional control lever to MOW position While watching pressure gauges slowly close flow control va...

Page 108: ...Steering Control Valve POWER L R PB T P V1 STEERING STEERING CYLINDER POWER L R PB T P V1 STEERING STEERING CYLINDER PLUG PLUG VALVE RIGHT TURN VALVE LEFT TURN Hydraulic System Page 5 36 Greensmaster 3200 3200 D ...

Page 109: ...ine A Again turn the steering wheel from stop to stop in each direction B Again count and record the number of times the steering wheel turns in each direction 7 Compare the difference in the number of turns in each direction with the engine running and off If the dif ference is 1 turn or greater in any direction leakage in the cylinder gear wheel set or suction valve is to large LEFT TURN RIGHT T...

Page 110: ...stment Verify the ad justment with throttle in SLOW and FAST position E From each side of bulkhead tighten locknuts evenly securing traction cable to bulkhead Do not twist cable Note If cable tension exists when in neutral machine may creep when the functional control lever is moved to the Mow or Transport position 1 4 2 3 5 Figure 11 1 Traction control cable 4 Eccentric 2 Bulkhead 5 Lock nut 3 Ja...

Page 111: ...After desired setting has be achieved tighten set screw Adjusting Implement Relief Valve R5 The hydraulic lift and steering circuits are equipped with a relief valve This valve is preset at the factory to 1000 is required proceed as follows Never adjust the relief valve with the hydraulic system pressurized Hydraulic oil will spray out of the valve with the cap install the cap and tighten before p...

Page 112: ... 3 5 bar or 1 turn is about 400 psi 27 6 bar Figure 15 Never adjust the relief valve with the hydraulic system pressurized Hydraulic oil may spray out of the valve with the cap install the cap and tighten before pressur izing the system CAP ADJUSTMENT HEX SOCKET off Personal injury may result Always WARNING 2 To increase pressure setting turn the adjustment socket inside the valve 1 8 of a turn cl...

Page 113: ...Hydraulic System Greensmaster 3200 3200 D Page 5 41 Hydraulic System ...

Page 114: ...d screw 21 90_ hydraulic fitting 22 Plug 23 Hose assembly 24 Pump inlet hose 25 Hose assembly 26 Hose assembly 27 Hose assembly 28 Gear pump 29 O ring 30 Not used 31 O ring 32 O ring 33 O ring 34 O ring 35 Hose assembly 36 T fitting 37 Hose assembly 38 90_ hydraulic fitting 39 O ring 40 Relief valve 41 Flat washer 42 Cap screw 43 T fitting 44 Hose assembly 45 Lock nut 46 Relief valve cartridge 47 ...

Page 115: ... secure neutral system assembly away from the hy drostat Fig 19 5 Clean gear pump hydrostat hydraulic fittings and hose assembly connection Label all hose connections for reassembly purposes Figure 18 CAUTION Operate all hydraulic controls to relieve sys tem pressure and avoid injury from pressur ized hydraulic oil Controls must be oper ated with the ignition switch in RUN and the when pressure ha...

Page 116: ... 5 on the pump hub 4 5 Lubricate all new O rings with clean hydraulic fluid 6 Remove plugs from the hydrostat 16 Install new O rings 29 and 34 and hydraulic fittings 3 and 17 to the hydrostat 7 Unplug hose connections Inspect threads and sealing surfaces of hydraulic fittings and hydraulic hose connectors Replace any damaged or worn fittings or connectors 8 Install O rings 30 and 32 and hose assem...

Page 117: ...ed jaws so the drive end is pointed up Clamp onto the mounting flange of the hydrostat 2 Remove cap screws 22 and 23 from the backplate assembly 16 3 Lift backplate assembly 16 up and off from the drive shaft 2 and housing assembly 29 Remove valve plate 13 from the backplate assembly or rotating kit assembly 11 Remove charge relieve valve and bleed off valve from back plate assembly see Fig 23 4 R...

Page 118: ...he flange end of the housing assembly 29 Press the shaft 2 shaft seal 34 and washer 33 from the housing assembly 10 Remove retaining ring 30 bearing race 31 thrust bearing 32 second bearing race 31 and se cond retaining ring 30 from the shaft 2 11 Remove screws 4 trunnion cover 25 trunnion O ring cover 26 O ring 27 washer 7 inner race 28 and thrust bearing 8 from the housing assembly Remove screws...

Page 119: ...e to the inside of the pump Install washer 7 and press shaft seal 6 into place Secure seal cover 5 with two screws 4 and torque them from 36 to 48 in lb 42 to 55 kg cm 6 Install retaining ring 30 towards the keyed end of the shaft 2 Slide bearing race 31 thrust bearing 32 second bearing race 31 and second retaining ring 30 into place over the splined end of the shaft 7 Position washer 33 and shaft...

Page 120: ...otected jaws Install gasket 12 and two dowel pins 15 into the housing assembly 29 13 If necessary press new bearing 14 or roll pin 24 into backplate assembly 16 to the proper dimension shown Fig 24 Bearing should be installed with num bered end outward Roll pin should be installed with split oriented away from the bearing 14 Install seat 20 and spring 19 into backplate as sembly 16 Install new O r...

Page 121: ...y switch engage starter for fifteen 15 seconds to the prime pump 8 On GR3200 reconnect spark plug leads 9 On GR3200 D reconnect electrical connector to the fuel stop solenoid 10 Make sure traction pedal is in neutral and the cut ting unit switch is off Start engine and run it at low idle The charge pump should pick up oil and fill the hydraulic system If there is no indication of fill in 30 second...

Page 122: ...10 Hydraulic wheel motor 11 Flat washer 12 Brake rod 13 Brake lever 14 Lock nut 15 Jam nut 16 Cap screw 17 Cap screw 18 Lock nut 19 Lock nut 20 Cap screw 21 Swivel clevis 22 Valve stem 23 Rim 24 Wheel hub 25 Drive stud 26 Brake cam 27 Brake shoe 28 Backing plate 29 Retaining clip 30 O ring 31 O ring 32 Frame 21 17 18 11 19 14 20 16 1 2 3 28 5 6 7 8 9 10 12 13 29 4 15 4 22 23 24 25 26 27 30 31 FRON...

Page 123: ...nd O rings 30 from the both hydraulic fittings 9 Allow hoses to drain into a suitable container 9 Remove hydraulic fittings 9 and O rings 31 from the hydraulic wheel motor 10 10 Put caps or plugs on disconnected hoses and motor ports to prevent contamination 11 Remove four cap screws 20 from brake bracket 6 and hydraulic wheel motor 10 Remove motor from the frame Front Wheel Motor Installation Fig...

Page 124: ...sure and avoid injury from pressur ized hydraulic oil Controls must be oper ated with the ignition switch in RUN and the engine OFF Return ignition switch to OFF when pressure has been relieved Remove key from the ignition switch 2 Block front wheels Lift rear wheel off the ground us ing a jack and place blocks beneath the frame Secure the rear wheel off the ground 3 Clean motor and hose connectio...

Page 125: ... 85 ft lb 11 8 kg m C Install capscrews 9 and lock nuts 10 to flan gettes Torque cap screws 9 to 30 ft lb 4 2 kg m 8 Apply loctite to both set screws 22 torque both screws from 80 to 100 in lb 92 to 115 kg cm 1 2 3 4 8 7 6 4 1 2 3 5 7 9 Hydraulic System Figure 27 1 Grease seal 4 Thrust washer 7 O ring 2 Retaining ring 5 Hub assembly 8 Hydraulic motor 3 Washer 6 Hydraulic fitting 9 Grease fitting M...

Page 126: ... End cover assembly Wheel Motor Disassembly Fig 28 If the wheel motor is not held firmly in the vise it could dislodge during service and 1 firmly on the sides of the housing 3 2 Scribe an alignment mark down and across the cause injury WARNING Place wheel motor in a soft jawed vice with the cou pling shaft 11 pointed down and the vise jaws clamping wheel motor components from the end cover 24 to ...

Page 127: ...tor set into wheel motor 8 Remove rotor set and wearplate 18 together and retain the rotor set in its assembled form with the same vane 20 to stator 21 contact surfaces The drive link 13 may come away from the coupling shaft 11 with the rotor set and wearplate You may have to shift the ro tor set on the wearplate to work the drive link out of the rotor 19 and wearplate Fig 31 9 Remove seal ring 5 ...

Page 128: ...ndi tions exist replace commutator and commutator ring 23 as a matched set 5 Inspect manifold 22 for cracks surface scoring peening chipping Replace manifold if any of these conditions exist A polished pattern on the ground sur face from commutator or rotor rotation is normal Note The rotor set consists of the rotor 19 vanes 20 and stator 21 Rotor set components may be come disassembled during ser...

Page 129: ...place coupling shaft A slight polish is permissible on the shaft bearing areas Fig 37 Note Do not remove inner bearing 10 thrust wash ers 8 thrust bearing 9 and outer bearing 2 from the housing 3 These parts should be inspected in place 12 Inspect housing 3 for cracks Inspect machined surfaces for nicks burrs peening and corrosion Re move burrs that can be removed without changing di mensional cha...

Page 130: ...seated and vertical to the counterbore and the new back up washer 4 new back up washer 6 and new seal 7 be worked around the thrust bearing package and placed into their respective counterbores Fig 41 and 40 The seal lip must face out of the seal counterbore and toward the inside of wheel motor Fig 42 Be sure the thrust bearing package is reseated cor rectly after assembly of the new seal and back...

Page 131: ...learance and to maintain the original rotor drive link spline contact A ro tor set without a counterbore and that was not etched before disassembly can be reinstalled using the drive link spline pattern on the rotor splines if apparent to de termine which side was down The rotor set seal ring groove faces toward the wear plate 18 13 Install assembled rotor set onto wear plate 18 with rotor 19 coun...

Page 132: ...tact side of manifold 22 16 Assemble the manifold 22 over the alignment studs and drive link 13 and onto the rotor set Be sure the correct manifold surface is against the rotor set 17 Apply clean petroleum jelly to a new seal ring 5 and insert it in the seal ring groove exposed on the man ifold 22 18 Assemble the commutator ring 6 over alignment studs onto the manifold 22 Fig 45 19 Assemble a new ...

Page 133: ...ed in the system Stop the machine and recheck the fluid level 5 Dispose of hydraulic fluid properly HOSE FILTER Figure 47 Lubrication CAUTION Before servicing or making adjustments to the machine stop engine and remove key from the switch 3 Wipe up excess grease 4 Apply grease to reel motor spline shaft and onto lift arm when cutting unit is removed for service 5 Apply a few drops of SAE 30 engine...

Page 134: ...ulic controls to relieve sys tem pressure and avoid injury from pressur ized hydraulic oil Controls must be oper ated with the ignition switch in RUN and the when pressure has been relieved Remove key from the ignition switch engine OFF Return ignition switch to OFF 2 Clamp pump inlet hose to prevent draining the hy draulic tank from the gear pump Allow hydraulic oil to drain from hose into a suit...

Page 135: ...cket head screws and flat washers Torque screws from 27 to 31 ft lb 3 7 to 4 3 kg m 6 Inspect threads and sealing surfaces of hydraulic fit tings and hydraulic hose connector Replace any dam aged or worn fittings or connector 7 Install O rings into gear pump Install fittings and tighten to positions noted during removal 8 Secure pump inlet hose and hose clamp to the gear pump Tighten hose clamp 9 ...

Page 136: ...ront body 4 Back body 5 Drive gear 6 Front idler gear 7 Back idler gear 8 Back up gasket 9 Wear plate 10 Pressure seal 11 Cap screw 12 O ring 13 Adapter plate 14 Key 15 O ring 16 Back gear 17 Washer 18 Plug 19 Suction fitting Figure 50 11 17 1 18 8 10 9 5 6 3 12 16 14 2 4 7 13 19 15 ...

Page 137: ... key from the drive gear shaft with a pencil excessive wear at bushing points and sealing magnet areas 10 Remove O ring from the adapter plate with a O C Gear shaft diameter in the bushing area should ring pick not be less than 0 748 inch 19 0 mm 11 Remove adapter plate from body by tapping adapt D Gears should be free of excessive scoring and er plate with a soft face hammer Remove O ring from we...

Page 138: ...e front plate Make sure mid section cut away of the wear plate is on the suction side of the pump 6 Dip drive gear and front idler gear into clean hydrau lic oil Install gear shafts into the front plate bushings so that the gears set inside the gear pockets 7 Install new O ring into the groove of the adapter plate on the side with the bushings below the surface 8 Align scribe marks on the body and...

Page 139: ...th hydraulic fittings Allow hoses to drain into a suit parking brake lower the cutting units and stop the en able container gine 5 Put caps or plugs on disconnected hoses to prevent contamination CAUTION Operate all hydraulic controls to relieve sys tem pressure and avoid injury from pressur ized hydraulic oil Controls must be oper ated with the ignition switch in RUN and the when pressure has bee...

Page 140: ...fices or seal areas causing malfunc tion B If sealing surfaces appear pitted or damaged the hydraulic system may be over heating or there may be water in the system CAUTION Use eye protection such as goggles when using compressed air 4 Clean relief valve cartridge using clean mineral spir its to flush out any contamination Submerge cartridge in clean mineral spirits to flush out contamination Par ...

Page 141: ...12 Spacer 13 Reel motor 14 Hose assembly 15 Hose assembly 16 Hydraulic fitting 17 Hose assembly 18 T block 19 Cap screw 20 Hydraulic tube 21 Hydraulic tube 22 Hydraulic tube 23 hydraulic tube 24 Rubber grommet 25 O ring 26 O ring 27 O ring 28 O ring 29 O ring 30 O ring Figure 55 4 20 23 22 21 16 5 18 15 14 17 7 6 8 13 7 12 19 24 10 11 11 7 17 6 13 8 14 15 1 3 2 3 25 26 27 28 28 27 30 29 30 29 FRON...

Page 142: ...void injury from pressur ized hydraulic oil Controls must be oper ated with the ignition switch in RUN and the engine OFF Return ignition switch to OFF when pressure has been relieved Remove key from the ignition switch 2 Remove reel motor from the cutting unit see Cut ting Unit Removal and Installation in Chapter 7 Cutting Units 3 Clean reel motor hydraulic fittings and hose con nections Note The...

Page 143: ...e remaining fit tings 6 Make sure hose connections are clean Inspect threads and sealing surfaces of connections Replace any worn or damaged connections 7 Install reel motor to the cutting unit see Cutting Unit Removal and Installation in Chapter 7 Cutting Units 8 Secure hose connection to the proper hydraulic fit ting on the reel motor Repeat this step for the remaining hose connections Greensmas...

Page 144: ...or Do not over tighten Parts may be distorted 2 Remove shaft seal as follows A Remove retaining ring with retaining ring pliers B Plug both motor ports 3 4 16 UNF 2B with threaded plugs Attach hydraulic hand pump to the external drain port 7 16 20 UNF 2B CAUTION Point shaft seal away from face and body to prevent possible injury IMPORTANT Do not chisel or pry the shaft seal out of its cavity This ...

Page 145: ...el pins into body assembly Note Make sure idler gear is installed into the gear pocket opposite the external drain port 3 Dip idler gear and drive shaft assemblies into clean hydraulic oil Install both assemblies into the cover as sembly gear pockets Make sure that both gears mesh 4 Coat new load plate assembly lightly with petroleum jelly Install load plate assembly onto idler gear and drive shaf...

Page 146: ...air 6 Use compressed air in a direction opposite the oil flow to dry the cooler 7 Plug ends of the oil cooler Clean exterior of the cooler 8 The oil cooler should be free of corrosion and exces sive pitting of tubes 1 Before removing any parts from the hydraulic sys tem park machine on a level surface engage parking brake lower cutting units and stop engine CAUTION Operate all hydraulic controls t...

Page 147: ...e formed hoses to the cooler Secure hoses by tighten ing the hose clamps 4 Clean radiator screen and reinstall age from the formed hoses 6 Fill hydraulic tank see Check Hydraulic System Fluid 7 Start machine Run machine at idle for 3 to 5 min utes to circulate hydraulic fluid and remove any air trapped in the system Stop machine and recheck hy draulic tank level Greensmaster 3200 3200 D Page 5 75 ...

Page 148: ... ignition switch in RUN and the when pressure has been relieved Remove key from the ignition switch engine OFF Return ignition switch to OFF 2 Label all hydraulic connections for reassembly 3 Disconnect hose assemblies and O rings from the hydraulic fittings Allow hoses to drain into a suitable container B Pull ram pivot pin from the frame spacer and hy draulic cylinder C Remove hydraulic cylinder...

Page 149: ...th the ignition switch in RUN and the when pressure has been relieved Remove key from the ignition switch engine OFF Return ignition switch to OFF 2 Label all hydraulic connections for reassembly 3 Disconnect hose assemblies and O ring from the hydraulic fittings Allow hoses to drain into a suitable container 4 Put caps or plugs on disconnected hoses and fit tings to prevent contamination 5 Remove...

Page 150: ...Barrel 2 Uni ring 3 O ring 4 PDF seal 1 Barrel 2 Uni ring 3 O ring 4 PDF seal Figure 61 5 O ring 6 Back up washer 7 Retaining ring 8 Dust seal Figure 62 5 O ring 6 Back up washer 7 Retaining ring 8 Dust seal 9 Lock nut 10 Shaft 11 Piston 12 Head 9 Lock nut 10 Shaft 11 Piston 12 Head Hydraulic System Page 5 78 Greensmaster 3200 3200 D ...

Page 151: ...t seal with with clean hydraulic oil Install Uni ring and O ring to the piston Install PDF seal O ring and back up washer to the head IMPORTANT Do not clamp vise jaws against the shaft surface Protect shaft surface before mount ing in a vice 2 Mount shaft securely in a vise by clamping on the clevis of the shaft Slide head onto the onto the shaft Install piston and lock nut onto the shaft Tighten ...

Page 152: ...sure has been relieved Remove key from the ignition switch engine OFF Return ignition switch to OFF fitting 4 Adjust flow control valve as follows A Turn adjustment knob in fully clockwise and then turn out counterclockwise 3 turns B Adjust knob no more than 1 2 turn in either direc tion until the number 8 is aligned with the dimple on the valve body Lock adjustment knob by tightening set screw 2 ...

Page 153: ...e new filter Screw filter on until gasket contacts mounting plate then tighten filter half a turn Note Use only hydraulic fluids including biodegrad able specified in Checking Hydraulic System Fluid in General section Other fluids could cause system dam age 6 Reconnect all hydraulic hoses and lines that were disconnected prior to draining Fill hydraulic reservoir 7 Disconnect electrical connector ...

Page 154: ...ly 21 O ring 22 Hose assembly 23 O ring 24 Hose assembly 25 Hose assembly 26 Hose assembly 27 Hydraulic tube 28 O ring 29 O ring 30 Hose assembly 31 O ring 32 O ring 33 Hose assembly 34 Hydraulic tube 35 Hydraulic fitting Port P1 36 Orifice fitting Ports L2B L3B Figure 67 9 36 11 8 12 3 2 5 35 10 7 13 6 14 1 24 15 16 17 18 19 20 21 22 21 23 23 21 21 21 25 23 21 26 28 27 29 30 33 31 32 23 16 17 16 ...

Page 155: ...suitable container 5 Put caps or plugs in disconnected hoses and man ifold ports to prevent contamination 6 Remove both cap screws 12 from the hydraulic manifold Remove manifold assembly from the ma chine 7 Disconnect hydraulic fittings and O rings from the manifold Installation Fig 67 1 Remove caps or plugs from manifold assembly Note Fitting orientation is determined by viewing the manifold asse...

Page 156: ...15 Cavity plug 16 O ring 17 Plug 18 Plug 19 Solenoid seal 20 Seal kit 21 Seal kit 22 Seal kit 23 Seal kit Figure 68 1 2 3 4 5 6 7 8 9 6 7 12 13 15 5 4 1 1 5 4 6 7 5 4 6 7 6 5 4 5 4 14 10 11 16 17 16 17 18 19 19 23 20 20 20 20 20 21 22 Note The ports on the manifold are marked for easy identification of components Example R1 is the reel circuit relief valve and P1 is the gear pump connection port S...

Page 157: ...ling the cartridge valve slight bending or distortion of the stem tube can cause binding and malfunction C Torque cartridge valve using a deep socket to 35 ft lb 4 8 kg m D Make sure a new O ring is at each end of the so lenoid coil Install solenoid coil to the cartridge valve Apply Loctite 242 or equivalent to the threads of the valve Torque nut to 15 in lb 17 kg cm E If problems still exit remov...

Page 158: ...e 15 Harness 16 Relay 17 Knob 18 Jam nut 19 Indicator plate 20 Spring 21 Spring 22 Detent plate 23 Set screw 24 Ball 25 Locating plate 26 Locating plate 27 Manifold Figure 69 2 1 3 4 6 5 9 10 12 11 8 7 13 14 15 16 25 23 22 18 17 24 21 19 20 26 27 Note The ports on the manifold are marked for easy identification of components Example LC1 is for the reel logic cartridge and RD1 is for the directiona...

Page 159: ...plicable port RD1 or FC1 The valve should go in easily without binding Torque valve to 35 ft lb 4 8 kg m 7 Reinstall knob assembly A Install applicable locating plate 25 or 26 so that the pin seats into the locating hole B Turn the threaded cartridge valve 7 or 13 stem carefully clockwise until it stops C Face detent plate 22 counterbore down Thread detent plate down onto the valve stem until it i...

Page 160: ...there may be water in the system CAUTION Use eye protection such as goggles when using compressed air 4 Clean logic cartridge valve 10 using clean mineral spirits Submerge valve in clean mineral spirits to flush out contamination Particles as fine as talcum powder can affect the operation of high pressure hydraulic valves Use compressed air for cleaning 5 Reinstall logic cartridge valve 10 A Lubri...

Page 161: ...Hydraulic System Greensmaster 3200 3200 D Page 5 89 Hydraulic System ...

Page 162: ... 15 Steering column assembly 16 Steering valve cover 17 Hydraulic fitting 18 Cap screw 19 Steering arm 20 Decal 21 Socket head screw 22 Set screw 23 Steering control valve 24 Thrust washer 25 Speed nut 26 Warning decal 27 Steering wheel cap 28 Screw 29 O ring 30 Hose assembly 31 Hose assembly 32 Hose assembly 33 Hose assembly 34 Hose assembly 35 O ring 36 O ring 37 Cable tie Figure 70 27 28 12 2 2...

Page 163: ...sembly 14 5 Clean steering control valve hydraulic fittings hose connections and hydraulic manifold block 6 Cut and remove cable tie 37 from the hose assem blies Label all hydraulic connections for reassembly 7 Disconnect hose assemblies 33 and 34 and re move O rings 35 from hydraulic fittings 17 Allow hoses to drain into a suitable container 8 Disconnect hose assembly 30 and remove O ring from 45...

Page 164: ...crews 13 and speed nuts 25 11 Install steering wheel nut 6 to the steering column assembly 15 Torque nut to 35 ft lb 4 8 kg m 12 Secure steering wheel cap 27 with screws 28 to the steering wheel 5 1 5 13 16 18 16 2 3 4 6 7 8 9 11 10 12 14 15 17 19 20 21 22 RIM GEAR WHEEL OUTER RACE INNER RACE BOTTOM Figure 74 1 Dust seal 9 Cross pin 16 O ring 2 Housing 10 Spring set 17 End cover 3 Ball 11 Sleeve 1...

Page 165: ...om the sleeve and spool Fig 75 Press spool carefully out of the sleeve 10 Press springs out of their slots in the spool 11 Remove dust seal and O ring kin ring from the housing Discard all seals O rings and washers 12 Remove all nicks and burrs from all parts with an emery cloth CAUTION Use eye protection such as goggles when using compressed air 13 Clean all parts with solvent Dry all parts with ...

Page 166: ...hreading in the bushing Make sure the top of the bushing lies just bellow the surface of the housing Fig 80 10 Coat new O ring lightly with petroleum jelly Install O ring into groove on housing surface 11 Mount distributor plate onto housing Make sure channel holes in plate match the hole of the housing 12 Insert cardan shaft carefully into the bore of the housing Make sure shaft slot is parallel ...

Page 167: ...aining screws with washers into control valve Torque all screws in a criss cross pattern from 18 to 27 ft lb 2 4 to 3 7 kg m 18 Install dust seal carefully into the housing SPECIAL SCREW Figure 82 SPECIAL SCREW Figure 83 Greensmaster 3200 3200 D Page 5 95 Hydraulic System Hydraulic System ...

Page 168: ...ic sys tions for reassembly purposes tem park machine on a level surface set brake lower cutting units and stop engine 3 Remove hose assemblies and O rings from hy draulic fittings Allow hoses to drain into a suitable con tainer Put caps or plugs on any hose connections left open or exposed CAUTION Operate all hydraulic controls to relieve sys tem pressure and avoid injury from pressur ized hydrau...

Page 169: ...frame Secure the frame with the wheel off the ground B Remove lock nut bolt spacers and wheel from the castor fork C Remove jam nuts and ball joint from the castor fork Installation Fig 84 1 f the rear ball joint was removed accomplish the fol lowing A Secure ball joint to the castor fork with jam nuts Torque nuts from 65 to 85 ft lb 9 0 to 11 8 kg m B Install wheel to the castor fork by inserting...

Page 170: ...29 O ring 30 Hose clamp 31 Pump inlet hose 32 Hose assembly 33 O ring 34 Tether 35 plug 36 Breather adapter Figure 85 v 22 10 7 9 21 16 4 16 12 13 31 30 32 2 1 23 19 24 20 17 5 18 15 18 3 6 8 25 26 29 29 28 29 27 33 34 35 9 23 36 15 11 14 Note The hydraulic reservoirs on the GR3200 and GR3200 D are identical on both models except for a few excep tions The gasoline model has Leak Detection installe...

Page 171: ...it able container Fig 87 5 Disconnectformed hose 21 from hydraulic barb fit ting 9 Allow hose to drain to a suitable container 6 Remove cap screw and flat washer securing the console shroud to the hydraulic tank Remove both cap screws and flat washers securing the console shroud to the lower panel Fig 88 7 Remove three hex head screws and flat washers securing the mounting plate 11 to the frame Tw...

Page 172: ... tank onto the mounting plate 11 3 Secure hydraulic tank to the mounting plate with four cap screws 16 and flat washers 12 Torque cap screws from 30 to 60 in lb 35 to 69 kg cm 4 Secure mounting plate 11 to the frame with three hex head screws and flat washers Two screws go on the top of the plate at the front corners of the fuel tank The third screw goes in front of the castor fork and below the p...

Page 173: ...Hydraulic System Greensmaster 3200 3200 D Page 5 101 Hydraulic System ...

Page 174: ...r 18 Valve assembly 19 Lock nut 20 O ring 21 Leak detector harness 22 R clamp 23 Oil level sensor 24 O ring 25 Cartridge valve with O ring 26 Formed inlet hose 27 Hydraulic barb fitting 28 O ring 29 Plug 30 Cap screw 31 Flat washer 32 Grommet 33 Hydraulic oil cap 34 Sight gauge 35 Toggle switch 36 Leak detector decal 37 Toggle switch boot 38 Socket head screw 39 Hydraulic tank Figure 89 31 32 28 3...

Page 175: ... from 2 pin plug with yellow orange and black wires on the main tractor har ness Pull leak detector harness out of the access hole on the hydraulic tank 7 Loosen four cap screws securing the valve assem bly to the fill neck on the hydraulic tank Lift leak detec tion tank from the hydraulic tank Remove O ring from fill neck boss Fig 91 Installation Fig 89 1 Top off main hydraulic tank until fluid i...

Page 176: ...re sight gauge 34 and new O ring 28 to the leak detection tank 11 Torque gauge from 100 to 125 in lb 115 to 144 kg cm 3 Secure both hydraulic barb fittings 6 and new O rings 7 to the leak detection tank Torque both fittings from 17 to 21 ft lb 2 4 to 2 9 kg m 4 Apply antiseize lubricant to threaded holes on bot tom of leak detection tank Secure mounting plate 14 to tank with two grommets 32 flat w...

Page 177: ...00 D 21 Cutting Unit Operating Problems GR3200 D 22 ELECTRICAL SYSTEM QUICK CHECKS 23 Battery Test Open Circuit 23 Glow Plug System Test 23 Starting System Test 23 COMPONENT TESTING 24 Ignition Switch 24 Electrical Relays 25 Solenoid Valve Coils 25 Seat Switch 26 Reed Switch and Actuator 26 Backlap Switch 27 Hour Meter 27 40 Ampere Thermal Breaker 28 Fuse Block 28 Leak Detector 29 Warning Light Cl...

Page 178: ...1A 1J 1K 1L 1M 3J 3K 2K 2L 3P 3R 3S E B C B 10A FUEL SHUT OFF SOLENOID WHITE ORA BLUE YEL BLK YELLOW WHITE S1 I1 BLUE RS232 TX GREEN PINK RS232 GND BLACK RED WHITE CAN BLACK WHITE CAN GROUND BLACK BLACK OUTPUTS INPUTS VIOLET RED GREEN BLUE WHITE RAISE SWITCH JOYSTICK VIOLET LOWER MOW SWITCH JOYSTICK PINK TRACTION SPEED MOW BROWN WHITE GREEN WHITE 680 OHM GREEN GREEN BLUE BLACK YELLOW RED YELLOW WH...

Page 179: ...A FUEL SHUT OFF SOLENOID WHITE ORA BLUE YEL BLK YELLOW WHITE S1 I1 BLUE RS232 TX GREEN PINK RS232 GND BLACK RED WHITE CAN BLACK WHITE CAN GROUND BLACK BLACK OUTPUTS INPUTS VIOLET RED GREEN BLUE WHITE RAISE SWITCH JOYSTICK VIOLET LOWER MOW SWITCH JOYSTICK PINK TRACTION SPEED MOW BROWN WHITE GREEN WHITE 680 OHM GREEN GREEN BLUE BLACK YELLOW RED YELLOW WHITE YEL BLK YEL LOWER RAISE YELLOW RED J ENGIN...

Page 180: ...BLK YELLOW WHITE S1 I1 BLUE RS232 TX GREEN PINK RS232 GND BLACK RED WHITE CAN BLACK WHITE CAN GROUND BLACK BLACK OUTPUTS INPUTS VIOLET RED GREEN BLUE WHITE RAISE SWITCH JOYSTICK VIOLET LOWER MOW SWITCH JOYSTICK PINK TRACTION SPEED MOW BROWN WHITE GREEN WHITE 680 OHM GREEN GREEN BLUE BLACK YELLOW RED YELLOW WHITE YEL BLK YEL LOWER RAISE YELLOW RED J ENGINE SPEED SIGNAL BLACK LEAK ELECTRIC GOVERNOR ...

Page 181: ...D1 D4 D2 D3 H D E C F G B A A B C D E F G H GROUND 3 AMP 3 AMP 3 AMP 3 AMP BLACK A B G F C E D H D1 D2 D4 D3 PINK YELLOW BROWN ORANGE RED VIOLET RED ORANGE BROWN WHITE VIOLET RED BLUE BLACK RED BLACK DIODE DIAGRAM DIODE CIRCUIT BOARD HOUSING 1 PINK PINK ORANGE VIOLET BLACK BLUE YELLOW BLACK ORANGE RED RED BLUE WHITE BLUE WHITE WHITE YELLOW GREEN RED OR YELLOW VIOLET BLACK BLACK RED BLACK OR RED BL...

Page 182: ...ARD HOUSING 1 PINK PINK ORANGE VIOLET BLACK BLUE YELLOW BLACK ORANGE RED RED BLUE WHITE BLUE WHITE WHITE YELLOW GREEN RED OR YELLOW VIOLET BLACK BLACK RED BLACK OR RED BLACK ORANGE YELLOW RED YELLOW YEL BR BROWN RED ORANGE GN BN RED BLUE BLACK RED RED WHITE BLUE BLUE BLUE WHITE RED WHITE R WH RED BLUE WHITE BLUE WHITE BLACK BLACK RED PK BLUE OR BK WHITE GN BU BLUE GREEN YELLOW BLACK ORANGE BLACK B...

Page 183: ...CK RED BLACK DIODE DIAGRAM DIODE CIRCUIT BOARD HOUSING 1 PINK PINK ORANGE VIOLET BLACK BLUE YELLOW BLACK ORANGE RED RED BLUE WHITE BLUE WHITE WHITE YELLOW GREEN RED OR YELLOW VIOLET BLACK BLACK RED BLACK OR RED BLACK ORANGE YELLOW RED YELLOW YEL BR BROWN RED ORANGE GN BN RED BLUE BLACK RED RED WHITE BLUE BLUE BLUE WHITE RED WHITE R WH RED BLUE WHITE BLUE WHITE BLACK BLACK RED PK BLUE OR BK WHITE G...

Page 184: ... BOARD HOUSING 1 PINK PINK ORANGE VIOLET BLACK BLUE YELLOW BLACK ORANGE RED RED BLUE WHITE BLUE WHITE WHITE YELLOW GREEN RED OR YELLOW VIOLET BLACK BLACK RED BLACK OR RED BLACK ORANGE YELLOW RED YELLOW YEL BR BROWN RED ORANGE GN BN RED BLUE BLACK RED RED WHITE BLUE BLUE BLUE WHITE RED WHITE R WH RED BLUE WHITE BLUE WHITE BLACK BLACK RED PK BLUE OR BK WHITE GN BU BLUE GREEN YELLOW BLACK ORANGE BLAC...

Page 185: ...DIODE DIAGRAM DIODE CIRCUIT BOARD HOUSING 1 PINK PINK ORANGE VIOLET BLACK BLUE YELLOW BLACK ORANGE RED RED BLUE WHITE BLUE WHITE WHITE YELLOW GREEN RED OR YELLOW VIOLET BLACK BLACK RED BLACK OR RED BLACK ORANGE YELLOW RED YELLOW YEL BR BROWN RED ORANGE GREEN BN RED BLUE BLACK RED RED WHITE BLUE BLUE BLUE WHITE RED WHITE R WH RED BLUE WHITE BLUE WHITE BLACK BLACK RED PK BLUE OR BK WHITE GN BU BLUE ...

Page 186: ...NK PINK ORANGE VIOLET BLACK BLUE YELLOW BLACK ORANGE RED RED BLUE WHITE BLUE WHITE WHITE YELLOW GREEN RED OR YELLOW VIOLET BLACK BLACK RED BLACK OR RED BLACK ORANGE YELLOW RED YELLOW YEL BR BROWN RED ORANGE GN BN RED BLUE BLACK RED RED WHITE BLUE BLUE BLUE WHITE RED WHITE R WH RED BLUE WHITE BLUE WHITE BLACK BLACK RED PK BLUE OR BK WHITE GN BU BLUE GREEN YELLOW BLACK ORANGE BLACK BLACK BLACK BLACK...

Page 187: ...DIODE CIRCUIT BOARD HOUSING 1 PINK PINK ORANGE VIOLET BLACK BLUE YELLOW BLACK ORANGE RED RED BLUE WHITE BLUE WHITE WHITE YELLOW GREEN RED OR YELLOW VIOLET BLACK BLACK RED BLACK OR RED BLACK ORANGE YELLOW RED YELLOW YEL BR BROWN RED ORANGE GN BN RED BLUE BLACK RED RED WHITE BLUE BLUE BLUE WHITE RED WHITE R WH RED BLUE WHITE BLUE WHITE BLACK BLACK RED PK BLUE OR BK WHITE GN BU BLUE GREEN YELLOW BLAC...

Page 188: ...OTE Toro recommends the use of a DIGITAL Volt Ohm Amp multimeter when testing electrical circuits The high impedance internal resistance of a digital me ter in the voltage mode will make sure that excess cur rent is not allowed through the meter This excess current can cause damage to circuits not designed to carry it Figure 1 Skin Over Grease Special non conductive grease which forms a light pro ...

Page 189: ...e diagnostic display is connected to the wiring harness connector located under the seat to help the Diagnostic user verfiy correct electrical functions of the machine ACE Display Fig 3 and 4 Decal Figure 3 Figure 4 Greensmaster 3200 3200 D Page 6 13 Electrical System Electrical System ...

Page 190: ...functioning properly for the ECU to properly control the machine The Diagnostic ACE display will help the user verify cor rect electrical functions of the machine Electrical System 1 2 Figure 6 1 Loopback connector 2 ECU Verify Input Function Fig 6 1 Park machine on a level surface lower the cutting units stop the engine and engage the parking brake 2 Lift up the seat Locate wire harness and loopb...

Page 191: ...on as specified with the machine not functioning properly a non electrical problem exits Repair as necessary If each input switch is in the correct position and func tioning correctly with the output LED s not correctly lighted an ECU problem exits If this condition occurs contact your Toro Distributor for assistance Retrieving Stored Faults Fig 6 1 Turn ignition switch to OFF Connect Diagnostic A...

Page 192: ... starter is faulty Starter solenoid is faulty Starter mounting bolts are loose or not supplying a sufficient ground for solenoid Starter is faulty causing incomplete circuit for solenoid Nothing happens when a start attempt is made Functional control lever is not in NEUTRAL Neutral or traction speed mow sensor is out of adjustment or faulty Battery is dead Battery cables are loose or corroded Batt...

Page 193: ...peed sensor ignition coils and spark plugs are faulty Fuel valve solenoid fuel pump or electric governor is faulty Engine or fuel system is malfunctioning see Chapter 3 Daihatsu Engine Engine cranks but should not with the Functional Neutral sensor is out of adjustment faulty or short Control Lever out of the NEUTRAL position circuited The ECU is faulty Greensmaster 3200 3200 D Page 6 17 Electrica...

Page 194: ...iring Schematics components is loose corroded or damaged Voltage regulator alternator is faulty 40 ampere thermal breaker is open The ECU is faulty Battery is dead Cutting Unit Operating Problems GR3200 Problem Possible Causes Cutting units run but should not when raised The mow sensor is faulty However they shut off with the cutting unit switch Cutting units do not engage Wiring to run mow backla...

Page 195: ...corroded Wiring at starter is faulty Starter solenoid is faulty Starter mounting bolts are loose or not supplying a sufficient ground for solenoid Starter is faulty and causing an incomplete circuit for the solenoid Relay R4 or R8 has intermittent ground Nothing happens when start attempt is made Battery is dead Wiring to the start circuit see Wiring Schematics components is loose corroded or dama...

Page 196: ...mperature relay is faulty High temperature switch is shorted ETR solenoid is faulty Glow plugs are faulty Engine or fuel system is malfunctioning see Chapter 4 Perkins Engine Engine and fuel may be to cold Engine cranks but should not with the Functional Neutral sensor is out of adjustment faulty or short Control Lever in the MOW or TRANSPORT position circuited Electrical System Page 6 20 Greensma...

Page 197: ... Seat switch wiring is loose corroded or damaged Battery does not charge Wiring to the charging circuit see Wiring Schematics components is loose corroded or damaged Voltage regulator alternator is faulty 40 ampere thermal breaker is open Ignition switch is faulty Battery is dead Engine kills during operation operator sitting on seat Operator moved too far forward on the seat seat switch not depre...

Page 198: ...aulty or grounded Raise switch and or joystick relay R7 is faulty or grounded Cutting units will not raise Wiring to run mow backlap circuits see Wiring Schematics components is loose corroded or damaged Fuse block or fuse is faulty Solenoid valve S3 and or S2 is faulty Diode D1 is open Raise switch and or raise relay is faulty or grounded Cutting units will not lower Wiring to run mow backlap cir...

Page 199: ...lug power supply wire s and read the meter prior to activating glow plug system Adjust the transducer to read zero if applicable Cycle the glow plug system at least two times per instructions in Operator s Manual and record the final results The Reelmaster 3200 D glow plug system should have a reading of about 21 Amps Starting System Test This is an excellent test to use when a slow crank no start...

Page 200: ...l components for continuity with a multimeter ohms set Ignition Switch The ignition key switch has three positions OFF RUN and START The terminals are marked as shown The circuitry of the ignition switch is shown in the chart With the use of a multimeter ohms setting the switch func tions may be tested to determine whether continuity ex ists between the various terminals for each position Verify c...

Page 201: ... 12 VDC is applied and removed from terminal 85 5 Disconnect voltage from and multimeter leads from relay terminals Figure 8 Solenoid Valve Coils Note Prior to taking small resistance readings with a digital multimeter short the test leads together The me ter will display a small resistance value usually 0 5 ohms or less This resistance is due to the internal re sistance of the meter and test lead...

Page 202: ...ximity to the switch These switches are used in conjunction with the Functional Control Lever to sense the lever in either the NEUTRAL or MOW position 1 Make sure the engine is off Disconnect electrical connectors to both switches Place the Functional Con trol Lever in the NEUTRAL position 2 Check the continuity of both switches by connecting a multimeter ohms setting across the connector termi Fi...

Page 203: ...ty should be made as the switch closes 4 Turn the backlap knob counterclockwise to the mow position while watching the multimeter Continuity should be broken as the switch opens 3 1 2 5 Reconnect the electrical connector Figure 13 1 Connector 3 Backlap knob 2 Switch Hour Meter 1 Connect the positive terminal of a 12 VDC source to the positive terminal of the hour meter 2 Connect the negative termi...

Page 204: ...8 1 The top 10 ampere fuse supplies power to terminals 1L and 1M of the solid state controller 2 The middle 10 ampere fuse supplies power to termi nals 1J and 1K of the solid state controller 3 The bottom 10 ampere fuse supplies power to termi Figure 18 nal B of the ignition switch For the GR3200 D fuses supply power tho the follow ing Fig 19 1 The top 10 ampere fuse supplies power to the run and ...

Page 205: ...il to transfer into the leak detection tank The oil is allowed to return to the main tank when the ignition switch is turned off see Fig 20 21 and 22 ÉÉÉ ÉÉÉ ÉÉ ÉÉ ÉÉ ÉÉ FLUID LEVEL COLD SOLENOID RETURN OPEN SIGHT WINDOW NO SOUND VALVE FLOAT RAISED SWITCH OPEN BEFORE START oil cold Figure 20 ÉÉ ÉÉ ÉÉ ÉÉÉ ÉÉÉ ÉÉ SWITCH OPEN NO SOUND FLUID LEVEL SOLENOID RETURN CLOSED NORMAL OPERATION oil warm FLOAT...

Page 206: ...ly push down on switch float Fig 23 Alarm should sound after one second delay ÉÉ ÉÉ ÉÉÉ ÉÉ BUZZER SOUNDS SCREWDRIVER PLUG REMOVED SOLENOID RETURN CLOSED WARNING VALVE ASSEMBLY VALVE PRESS DOWN ON SWITCH FLOAT 5 Release float alarm should stop sounding TESTING SWITCH FLOAT 6 If alarm fails to stop sounding turn ignition switch to Figure 23 OFF position Locate solenoid on leak detector Swap solenoid...

Page 207: ...m the circuit Connect 12VDC source in series with voltmeter to connector of timer Make sure to observe polarity 4 5 3 2 1 6 Figure 25 Electrical System 2 The voltmeter should jump from 0 to 12VDC after the 1 second delay Remove voltage source from the timer Reconnect timer to the circuit Audio Alarm 1 Isolate alarm from the circuit Connect 12VDC source to terminals Make sure to observe polarity 2 ...

Page 208: ...erature Water Shutdown Light When the coolant temperature is above 218_F 103_C the temperature light comes on as the high temperature shutdown switch and relay stopped the engine The igni tion switch must be in either the ON or START position for the light to come on Test this circuit using the diag nostic ACE see ACE Troubleshooting guide Glow Light The glow light is not connected to any circuit ...

Page 209: ... with at least 300mv range can be used in conjunction with the shunt Testing for DC Current Output Fig 30 1 Install the DC shunt on the negative terminal of the battery Make sure all connections are clean and tight for reliable amperage readings 2 Attach RED meter test lead to the POSITIVE post of the shunt 3 Attach BLACK meter test lead to the NEGATIVE post of the shunt 4 Place multimeter to the ...

Page 210: ...temperature switch can cool to room temperature of 70_F 21_C 1 Temperature sender Figure 31 Note When operating at normal engine tempera tures the temperature sender is extremely accurate To accurately test the sender requires an elaborate test setup and special calculations It might be more cost ef fective to replace the unit The following step is a quick check of the sender 3 Check the continuit...

Page 211: ...ermome ter and slowly heat the oil Fig 33 1 CAUTION Handle the hot oil with extreme care to pre vent personal injury or fire Figure 32 1 High temperature shutdown switch 3 Check the continuity of the switch with a multimeter ohms setting The switch is normally open and should close at 206 to 218_F 97 to 103_C 4 Allow the oil to cool The switch should open at 194_F 90_C Replace switch as necessary ...

Page 212: ... engine when the coolant temperature is above 206_F 97_C The ignition switch must be in either the ON or START position for the light to come on 1 Disconnect the blue wire from the high temperature shutdown switch 2 Ground the blue wire to the engine block 3 Turn the ignition switch to ON the light should come on and the high temperature shutdown relay should click 4 Turn the ignition switch to OF...

Page 213: ...ctrical Schematic 3200 D Testing with the engine on 1 If the lamp is on with the engine running shut off the engine immediately 2 Disconnect the brown wire from the switch 3 Turn the ignition switch to ON The oil pressure lamp should go out 4 If the light is still on check for short circuiting in the indication circuit see Indicating and Safety Circuits 5 Return ignition switch to OFF and connect ...

Page 214: ...C source and test load TIMING RESISTOR 3 2 1 4 5 LOAD Figure 38 Figure 37 Glow Relay GR 3200 D 1 Verify coil resistance between terminals 86 and 85 with a multimeter ohms setting Resistance should be from 41 to 51 ohms 2 Connect multimeter ohms setting leads to relay terminals 30 and 87 Ground terminal 86 and apply 12 VDC to terminal 85 The relay should make and break continuity between terminals ...

Page 215: ...the Functional Con trol Lever in NEUTRAL neutral sensor closed Also it allows the engine to continue to run with either the Func tional Control Lever in NEUTRAL Neutral Sensor closed or the operator sitting in the seat Seat switch closed Diode D6 Prevents a negative spike from damaging the Neutral Sensor and Seat switch by allowing a ground path for the Run relay when it de energizes Diode D7 Main...

Page 216: ...ng Figure 44 1 1 Disconnect the wires from the solenoid 1 ETR solenoid 2 Using a digital multimeter ground one lead to the engine block and connect the other to the solenoid ter minal 3 The resistance should be about 11 5 ohms 4 Connect the wire to the solenoid Live testing 1 Disconnect the wire from the solenoid Note The solenoid may be removed from the engine or tested in place Figure 45 2 Conne...

Page 217: ... shunt and test leads recon 1 with sky blue and white wires leading from the alternator Note Prior to taking small resistance readings with a ter will display a small resistance value usually 0 5 from from the measured value of the component you are testing HIGH IMPEDENCE SHUNT There are four terminals on the alternator electrical con the V belt to the alternator is in good operation condition Tes...

Page 218: ...49 equal to 3 Megohms 4 Place Functional Control Lever in NEUTRAL and start engine 5 Run engine so the alternator is running at 2365 rpm Read combinations between the sky blue and white wires criss cross on the connector from which conti nuity was found in step 2 Voltage across the connector terminals should be about 39 4 VAC 6 If the AC voltage output of the alternator is correct and the DC curre...

Page 219: ...rol Lever is moved to NEUTRAL or TRANSPORT 1 Sit on the seat engage parking brake and move Functional Control Lever to NEUTRAL Try to depress traction pedal If the pedal does not depress the inter lock system is operating correctly Correct problem if not operating properly 2 Sit on the seat engage parking brake keep traction pedal in neutral and place Functional Control Lever in MOW or TRANSPORT T...

Page 220: ...oil Clean the battery with a solution of baking soda 3 Make sure that the filler caps are on tightly and water then rinse it with clean water 4 Remove battery from the battery compartment to a D Check that the cover seal is not broken away service area This will minimize possible battery dam Replace the battery if the seal is broken or leaking age and allow better access for inspection and service...

Page 221: ...ruc tions Connect a digital multimeter to the battery terminals F Apply a test load of one half the Cranking Perfor mance see Battery Specifications rating of the bat tery for 15 seconds G Take a voltage reading at 15 seconds then re move the load Minimum Voltage Battery Electrolyte Temperature 9 6 70_F and up 21 1_C and up 9 5 60_F 15 6_C 9 4 50_F 10 0_C 9 3 40_F 4 4_C 9 1 30_F 1 1_C 8 9 20_F 6 7...

Page 222: ...injury Let the bat necting to a charger place to dissipate gases produced from keep open flame and electrical spark away from the battery Do not smoke 3 Following the manufacturer s instructions con nect the charger cables to the battery Make sure a good connection is made 4 Charge the battery following the manufacturer s instructions 5 Occasionally check the temperature of the battery electrolyte...

Page 223: ...Table of Contents SPECIFICATIONS 2 SERVICE AND REPAIRS 4 ADJUSTMENTS 3 Rear Wheel 2WD 4 Brake Adjustment 3 Rear Wheel 3WD 7 Front Wheel and Brake 10 Lubrication 10 Greensmaster 3200 3200 D Page 7 1 Wheels and Brakes Wheels Brakes ...

Page 224: ...Item Description Front tire pressure 8 to 12 PSI 0 55 to 0 83 bar Rear tire pressure 8 to 15 PSI 0 55 to 1 04 bar Wheel lug nut torque 40 to 50 ft lb 5 5 to 6 9 kg m Wheels and Brakes Page 7 2 Greensmaster 3200 3200 D ...

Page 225: ...ake pedal B Tighten clevis by exposing fewer threads on the brake rod to increase free travel of the brake pedal 6 Assemble clevis to the brake pedal by installing cle vis pin and cotter pin 7 Check the amount of free travel of the brake pedal when the adjustment is complete There should be from1 2 to 1 inch 1 3 to 2 5 cm of travel before the brake shoes make contact with the brake drums Read just...

Page 226: ...ssembly 15 Hydraulic fitting 16 Hose assembly 17 Jam nut 18 Bearing cone 19 Bearing cup 20 Cylinder spacer 21 Straight grease fitting 22 Decal 23 Rim 24 Shaft seal 25 Bearing cone 26 Bearing cup 27 Grease fitting 28 Drive stud 29 Valve stem with cap 30 O ring 31 O ring 32 Hex head screw 33 Hose clamp Figure 2 16 10 22 11 17 15 12 13 4 6 5 3 10 1 2 9 17 20 20 7 8 12 11 18 15 21 18 19 19 24 23 25 26...

Page 227: ... steering cylinder 13 E Inspect bearing cones 18 and bearing cups 19 for damage and replace if necessary F Remove bearing cones 18 and bearing cups 19 from the castor fork pivot housing on the frame 6 Remove lug nuts 8 from the drive studs 28 of the wheel hub 6 Separate wheel and hub assemblies 1 5 3 2 4 Figure 3 1 Bearing cup 4 Shaft seal 2 Wheel hub 5 Drive stud 3 Bearing cone Disassembly Fig 2 ...

Page 228: ...om under the plate 3 Install wheel and hub assemblies into the castor fork 4 Insert bolt 5 into one of the castor fork mounting holes Install a spacer 20 and slide bolt through the wheel and hub assemblies 4 Install another spacer 20 onto the bolt 5 Route the bolt through the remaining castor fork 4 mounting hole 5 Position bend of the bolt 5 head under the bottom edge of the castor fork 4 Install...

Page 229: ...rear wheel off the ground CAUTION Support wheel 24 and motor and hub as sembly 12 to prevent dropping them and causing personal injury while removing hex head screws 9 and socket head screws 11 3 Remove wheel 24 and hydraulic motor and hub assembly 2 from the castor fork 1 as follows A Remove hex head screws 9 and lock nuts 10 securing flangettes 6 and 7 and bearing tab 8 B Remove both socket head...

Page 230: ...h the end of the hub 1 Remove grease seal 1 and retaining ring 2 from the long end of hub 7 2 Remove washer 3 two thrust washers 4 and hub 7 from the hydraulic motor 8 shaft Remove re maining two thrust washers 4 washer 3 retaining ring 2 and grease seal 1 from the shaft 3 If drive studs 12 are bent or damaged press studs from the wheel hub 7 4 Press roller clutch bearings 5 from the hub 7 Assembl...

Page 231: ...5 and wheel 24 into the castor fork 1 Make sure hose fittings on the motor face the rear 5 Secure hydraulic motor and hub assembly 2 loosely to the left inside of the castor fork 1 with both socket head screws 11 lock nuts 12 6 Secure flangettes 6 and 7 with bearing 5 loosely to the right inside of the castor fork 1 A Position grease fitting 21 facing downward B Torque both socket head screws 11 t...

Page 232: ...sition 2 Lift front wheel off the ground using a jack and place blocks beneath the frame under the hydraulic wheel mo tor 10 Block front and rear of other wheels 3 Remove lug nuts 1 and tire 2 and rim 23 Re move lock nut 14 from hydraulic wheel motor 10 shaft IMPORTANT DO NOT hit wheel hub 24 with a ham mer during removal or installation Hammering may cause damage to the hydraulic wheel motor 10 4...

Page 233: ... studs Tight en lug nuts evenly in a crossing pattern to a torque from 40 to 50 ft lb 5 5 to 6 9 kg m 7 Check and adjust brakes see Brake Adjustment 1 Return spring 2 Brake shoe 3 Brake cam 4 Backing plate Figure 8 1 2 3 4 Lubrication CAUTION Before servicing or making adjustments to the machine stop engine and remove the key from the ignition switch The rear wheel has grease fittings that must be...

Page 234: ...Wheels and Brakes Page 7 12 Greensmaster 3200 3200 D ...

Page 235: ...pping Units with Backlap Variable Reel Speed Kit 19 Rollers and Bedbar Assembly Single Point Adjust Cutting Units 20 Front Roller Removal and Installation 21 Rear Roller and Height of Cut Adjuster Removal and Installation 23 Roller Bearing Replacement All Rollers except Wiehle Rear Roller 24 Wiehle Rear Roller Bearing Replacement 25 Bedbar Removal and Installation Single Point Adjust Cutting Units...

Page 236: ...ent meth ods of bedknife adjustment see Specifications Maintenance procedures for both cutting units are the same except where noted If a chapter subheading does not specify a particular type of cutting unit the pro cedure can be used for both types of units A particular unit may be illustrated but the component parts and maintenance procedures are the same for each type of unit Cutting Units Page...

Page 237: ...ng unit Bedknife This high carbon steel bedknife is replace able single edged and austempered to RC 48 55 It is fastened to a machined cast iron bedbar with 13 screws The tournament bedknife is supplied as the standard bedknife Part No 93 4263 Options Micro Cut Bedknife Part No 93 4262 Low Cut Bedknife Part No 93 4264 High Cut Bedknife Part No 94 6392 Fairway Bedknife Part No 94 6393 Bedknife Adju...

Page 238: ...the proper hole on the frame In sert hex head screw through the frame and roller Lower Hole for increased transport height Upper Hole standard transport height so the cut ting unit is level when it touches down upon lower ing 3 Secure hex head screw with the lock nut 1 Lift roller 2 Hex head screw Figure 2 2 1 Grass Basket Removal and Installation 1 Grasp basket by top rear lip and slide on or off...

Page 239: ... of cut Toro Part No 13 8199 Figure 5 Backlapping Brush Assembly TOR299100 Used to apply lapping compound to cutting units while keeping the operator s hands at a safe distance from the rotating reel Figure 6 Bedknife Screw Tool TOR510880 This screwdriver type bit is made to fit Toro bedknife at taching screws Use this bit with a torque wrench to se cure the bedknife to the bedbar DO NOT use and a...

Page 240: ...used to install bearings into the roller A drill bushing is used to drill into bearing shafts without a removal hole Figure 8 Plastic Plug This cap is used for placement into the bearing housing when the reel motor is removed It prevents dirt and de bris from entering the housing Toro Part No 2410 30 Figure 9 Cutting Units Page 8 6 Greensmaster 3200 3200 D ...

Page 241: ...eck bearings for wear and replace if necessary Make sure bearing housings are secured properly Keep bearings well lubricated See Reel and Bearing Removal and Installation Reel and bedknife sharpness A reel and or bedknife that has rounded cutting edges or rifling grooved or wavy appearance cannot be corrected by tightening the bedknife to reel contact Grind reel to remove taper and or rifling Grin...

Page 242: ...ge Cutting unit alignment and pull frame ground following Check pull frames and lift arms for damage binding or bushing wear Repair if necessary Roller condition Make sure rollers rotate freely Grease roller as recommended and repair bearings as necessary See Roller Bearing Replacement in Service and Repairs section Reel speed All reels must rotate at the same speed within 100 rpm All cutting unit...

Page 243: ...n turn bedknife adjusting knob clock wise one click at a time until light contact is felt and heard IMPORTANT Light bedknife to reel contact is pre ferred at all times If light contact is not maintained bedknife and reel edges will not sufficiently self sharpen and dull cutting edges will result after a period of operation Excessive contact can cause accelerated and or uneven bedknife and reel wea...

Page 244: ... Light bedknife to reel contact is pre ferred at all times If light contact is not maintained bedknife and reel edges will not sufficiently self sharpen and dull cutting edges will result after a period of operation Excessive contact can cause accelerated and or uneven bedknife and reel wear Thus quality of cut may be adversely affected Note As the reel blades continue to run against the bedknife ...

Page 245: ...both flange lock nuts secured to the frame tab Fig 11 Also loosen both flange lock nuts securing the pivot hub to the frame Fig 12 5 Rotate flange lock nuts on the top and bottom of the frame tab clockwise or counterclockwise to raise or lower the end of the bedbar as required Do not loosen the bottom flange nut tightened against the pivot hub Tighten both flange lock nuts against the frame tab to...

Page 246: ...en the reel and bed knife B While slowly rotating the reel forward adjust top and bottom hex head screws until the paper is pinched lightly all the way across the reel A slight drag should result when the paper is pulled This drag should be the same for the entire length of the bedknife 4 After adjusting bedknife to reel make sure that both top and bottom adjusting screws are secured against the b...

Page 247: ...The right front bracket is secured to the frame with an eccentric bolt while the left front bracket is se cured with a shoulder bolt The eccentric bolt has an off set which when rotated acts as an eccentric cam to raise or lower the roller On the bolt head there is an identification dot which denotes the offset of the bolt The dot indicates in which direction the right end of roller moves when bol...

Page 248: ...nd cut ting unit from lift arm see Cutting Unit Removal and Installation 2 Remove lock nuts from the eccentric shoulder bolt and carriage bolt securing both front brackets 3 Remove eccentric shoulder bolt and carriage bolt from both front brackets and the side plates 4 Position both front brackets as follows Note The top side plate hole and top bracket hole should yield Position 2 standard setting...

Page 249: ...epeat procedure on each end of bedknife Tighten lock nuts to secure rear roller brackets on each end 1 Gauge bar 2 Cap screw 3 Rear roller bracket 4 Height of cut adjuster Figure 18 1 2 4 3 Rear Roller Scraper Adjustment 1 Park machine on a clean and level surface lower cutting units stop engine engage parking brake and remove key from the ignition switch 2 Loosen flange nuts securing both bracket...

Page 250: ...er the pull frame Fig 21 Installation Note All cutting units are shipped with the counter weight mounted to left end and drive coupler mounted in the right end of cutting unit To mount the cutting unit in the right front position on a GR3200 proceed as fol lows 1 To mount a cutting unit in the right front position pro ceed as follows Fig 22 A Remove both flange head screws and lock washers securin...

Page 251: ...p from the bearing housing 6 Install hydraulic motor to bearing housing as follows Fig 2 A Coat spline shaft of the motor with clean No 2 multipurpose lithium base grease B Install motor by rotating the motor clockwise so the motor flanges clear the flange head screws C Rotate the motor counterclockwise until the mo tor flanges are encircling the flange head screws Tighten flange head screws Cutti...

Page 252: ...to the splined coupling at right end of cutting unit If coupling is in the left end of cutting unit move coupling the right end for backlapping 3 Attach backlap motor or drive to the socket exten sion 4 Follow instructions and procedures on Backlapping are in the TORO Sharpening Reel Rotary Mowers Manual Form No 80 300PT 5 If the splined coupling was moved from the left side of the cutting unit fo...

Page 253: ...ly lapping compound with a long handled brush see Special Tools CAUTION Be careful when backlapping the reel be cause contact with the reel or other moving parts can result in personal injury 9 To make an adjustment to the cutting units while backlapping turn reels OFF by moving the RAISE LOWER MOW control to the RAISE position Shut off engine After the adjustments have been completed re peat step...

Page 254: ...Hex head flange screw 29 Quad ring 30 Eccentric bolt 31 Not used 32 Rubber bushing 33 Steering links bushing 34 Bedbar pivot 35 Grease fitting 36 Nylon thrust washer 37 Thrust washer 38 Not used 39 Height of cut H O C adjustment bracket 40 Roller tube 41 Screw 42 Not used 43 Compression spring 44 Flat washer 45 Flat washer 46 Flange lock nut 47 Locking nut 48 Set screw 49 Ball stud used on old sus...

Page 255: ...lt and car riage screw Fig 27 5 On either end of the roller remove eccentric bolt shoulder bolt carriage screw and lock nuts securing the front bracket to the frame Fig 27 6 Remove the front brackets and roller from the cut ting unit Remove the front brackets from the roller shaft Fig 27 7 If the front roller position is to be changed the re maining front bracket may be removed from the frame usin...

Page 256: ... front bracket Secure screw and ec centric bolt shoulder bolt with lock nuts 3 Place roller shaft into the front bracket Slide second front bracket on the other end of roller Secure bracket as in step 2 Fig 27 4 Apply Loctite 242 or equivalent to the cap screw threads Center roller in the front brackets and secure into place with the cap screws Fig 27 5 Level front roller to the reel see Leveling ...

Page 257: ...me tab Installation Fig 25 1 Place cutting unit on a level working surface 2 If the H O C adjusters 21 or H O C adjustment brackets 39 were removed reinstall brackets as fol lows A Apply loctite 242 or equivalent to the threads of the H O C adjusters about 1 4 inch 6 mm below the hex and to the threads of the set screw 48 Start set screw into locking nut 47 B Place H O C adjuster through the holes...

Page 258: ...r should be free of dirt and debris 2 Press bearing into the roller with the seal side facing outward Make sure bearing is recessed from the end of the roller as described in the table above 5 Retaining Ring ROLLER TORO PART NO BEARING RECESS Full Rear 93 2465 0 220 to 0 240 in 5 89 to 6 10 mm Narrow Wiehle 94 8171 0 020 to 0 040 in 0 508 to 1 02 mm Full Front 94 3478 0 210 to 0 250 in 5 33 to 6 3...

Page 259: ... Remove roller bearing with bearing puller 1 Roller bearing 3 Grease fitting 2 Roller Wiehle 3 Clean roller bearing cavity and remove any rust with a crocus cloth 4 Repeat above steps for the other roller bearing Install New Bearings 1 Make sure roller bearing cavity is clean and free of dirt Apply No 2 multipurpose lithium based grease to the roller bearing 2 Press roller bearing into roller so t...

Page 260: ...ot hubs 7 and 26 from the bedbar 2 Replace bushings 6 and 9 if they are worn or dam aged Fig 25 Installation 1 Apply antiseize lubricant to both bedbar pins Tap pivot hub 7 to the bedbar pin on the left side of the bed bar 2 with a soft hammer Tap pivot hub 26 to the bed bar pin on the right side of the bedbar with a soft hammer Fig NO TAG 2 Position bedbar 2 to the cutting unit Insert car riage s...

Page 261: ...Cutting Units Greensmaster 3200 3200 D Page 8 27 Cutting Units ...

Page 262: ...ck nut 13 Eccentric bolt 14 Screw 15 Lock nut 16 Flat washer 17 Bracket position decal 18 Lock washer 19 Shoulder bolt 20 Hex head screw 21 Not used 22 Not used 23 Not used 24 Not used 25 Not used 26 Not used 27 Not used 28 Not used 29 Ball stud used on old suspensions 30 Lock nut 31 Set screw 32 Bedknife 33 Special screw 34 Shaft 35 Bearing 36 Retaining ring 37 Grease fitting 38 Wiehle roller sha...

Page 263: ...dbar 2 and frame Fig 33 1 Top hex head screw 3 Bottom hex head screw 2 Adjustment bracket 5 Remove bedbar 2 from the cutting unit Fig NO TAG Installation 1 Apply antiseize lubricant to the threads of both wheel bolts 6 Fig 33 2 Position bedbar 2 to the cutting unit Insert wheel bolts 6 through the frame and screw into the bedbar Fig 33 3 Torque both wheel bolts 6 from 20 to 40 ft lbs 2 8 to 5 5 kg...

Page 264: ... of the bedknife Fig 37 Figure 36 Grinding Since there can be variations in the mounting surface of the bedbar a new bedknife will not be perfectly flat after it is installed Because of this it is necessary to backlap or grind a new bedknife after installing it to the bedbar Follow the existing angle that was ground into the bed knife and grind only enough to make sure the top sur face is true Fig...

Page 265: ...e spring arm to the pivot housing with both hex head screws 2 Place thrust washer new nylon thrust washer and second thrust washer onto the adjustor Insert adjustor through the pivot housing 3 Slide nylon thrust washer onto adjustor Slide thrust washer onto adjustor and over nylon washer Slide com pression onto adjustor Figure 39 2 4 4 3 1 6 3 7 5 Installation 1 Compression spring 5 Spring arm 2 A...

Page 266: ... Hex head screw 20 Rear shield assembly 21 Lock nut 22 Spring pin 23 Not used 24 Not used 25 Shield rod 26 Plastic cap 27 Bearing spacer 28 Retaining ring 29 Drive coupler 30 Washer 31 Seal strip 32 Small spring clip 33 Large spring clip 34 Pop rivet Figure 40 18 34 34 33 32 19 4 5 6 20 16 1 7 8 9 10 11 12 13 15 17 3 22 10 26 27 29 28 8 7 21 2 25 30 31 FRONT RIGHT Note The counterweight 13 and dri...

Page 267: ...ring housings 10 by removing A Seals must be free of cracks and tears Replace the tapered nuts 12 and tapered screws 16 securing seals as necessary the housings to the frame Pull both housings away from the frame and away from the reel ends B Bearing roller balls must be free of deformation and scoring Replace bearing if necessary 7 Remove reel 1 with the bearings 8 and grease seals 7 from the cut...

Page 268: ...wo tapered screws 16 C Insert both tapered screws 16 through the side plate and bearing housing 10 Start tapered nuts 12 onto screws D Place bearing spacer 27 into the bearing hous ing 10 3 Position reel 1 into the cutting unit frame Slide end of reel into bearing housing 10 while keeping the bear ing 8 straight 4 Install left bearing housing 10 as follows A Insert bearing housing 10 into the left...

Page 269: ...e small amounts of material with each pass of the grinder 3 After completing the grinding process A Install parts removed to mount cutting unit into grinder B Install bedbar assembly see Bedbar Removal and Installation C Complete cutting unit set up and adjustment se quence see Adjustments section Cutting Units Reel Grinding Specifications Nominal Reel Diameter 5 in 126 mm Service Limit Reel Diame...

Page 270: ...bracket and collar B Insert carriage screws M8 1 25 x 20 through both H O C adjustment brackets and collars to se cure the rear roller to the brackets Secure screws with lock nuts 1 If the rear roller scraper was not previously installed remove carriage bolt and nut securing the rear of each roller collar to roller bracket 2 Insert a 8mm hex head screw through holes in height of cut tab and H O C ...

Page 271: ... assembly 21 Lock nut 22 Hex head screw 23 Spring pin 24 Not used 25 Not used 26 Shield rod 27 Plastic cap 28 Bearing spacer 29 Retaining ring 30 Drive coupler 31 Washer 32 Seal strip 33 Small spring clip 34 Large spring clip 35 Pop rivet Figure 45 FRONT RIGHT 1 20 3 4 19 5 6 16 22 7 8 9 10 11 12 13 17 15 18 23 10 27 28 30 29 8 7 21 2 26 32 31 35 35 34 33 Note The counterweight 13 and drive couple...

Page 272: ...ngs and two on both the front and rear roller IMPORTANT Lubricate cutting units immediately after washing helps purge water out of bearings and increases bearing life Grease immediately af ter washing regardless of the service interval listed 1 Wipe each grease fitting with a clean rag IMPORTANT Do not apply too much pressure or the grease seals will be permanently damaged Use only a hand pumped g...

Page 273: ......

Page 274: ...Commercial Products FORM 96 900 SL E The Toro Company 1997 Printed in U S A ...

Reviews: