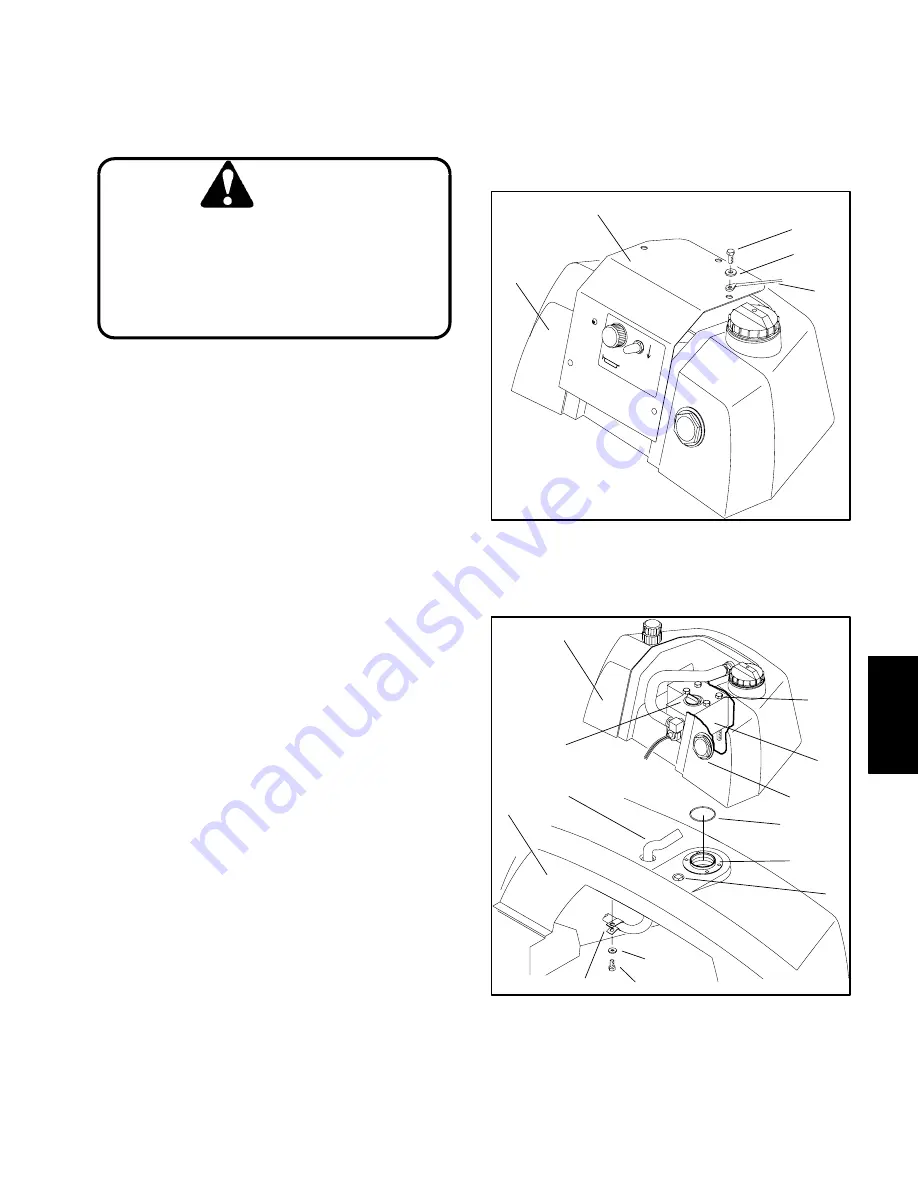
Removal (Fig. 89)
1. Before removing any parts from the hydraulic sys-
tem, park machine on a level surface, set brake, lower
cutting units, and stop engine.
CAUTION
Operate all hydraulic controls to relieve sys-
tem pressure and avoid injury from pressur-
ized hydraulic oil. Controls must be oper-
ated with the ignition switch in RUN and the
when pressure has been relieved. Remove
key from the ignition switch.
engine OFF. Return ignition switch to OFF
2. Clean oil filter assembly. Place clean container,
large enough to collect 2 gallons (7.6 liters), under the
oil filter assembly to collect hydraulic oil.
3. Crack open oil filter and allow at least 2 gallons (7.6
liters) of hydraulic oil to drain into the container, then
tighten oil filter to stop drainage. Uncap hydraulic oil tank
and allow enough time for the hydraulic oil to drain out
of the leak detection tank into the hydraulic oil tank.
4. Remove five cap screws and flat washers securing
the cover plate and cap tether to the leak detection tank.
Remove cover plate from tank (Fig. 90).
5. Remove cap screw and flat washer securing R–
clamp and leak detector harness to the underside of the
hydraulic tank. Pull clamp free of harness (Fig. 91).
6. Unplug leak detector harness from 2–pin plug, with
yellow/orange and black wires, on the main tractor har-
ness. Pull leak detector harness out of the access hole
on the hydraulic tank.
7. Loosen four cap screws securing the valve assem-
bly to the fill neck on the hydraulic tank. Lift leak detec-
tion tank from the hydraulic tank. Remove O–ring from
fill neck boss (Fig. 91).
Installation (Fig. 89)
1. Top off main hydraulic tank until fluid is visible at
base of breather port. This will ensure that the maximum
amount of air is purged from the main tank before instal-
ling the leak detector.
2. Make sure filler screen is placed in neck of auxiliary
tank.
3. Make sure five capscrews and washers securing
the cover plate to auxiliary hydraulic tank are removed
with the cover plate (Fig. 90).
4. Clean mating surfaces of block and fill neck with a
clean, dry rag. Carefully place new O–ring over fill neck
boss (Fig. 91).
5. Route wire harness through access hole in hydrau-
lic tank. Align valve assembly with fill neck. Secure valve
to hydraulic tank fill neck with four capscrews (Fig. 91).
3
5
1
2
4
Figure 90
1. Cap
screw
4. Cap
tether
2. Flat
washer
5. Leak detection tank
3. Cover
plate
11
10
8
1
2
3
4
12
1
5
6
9
7
Figure 91
1. Cap
screw
7. Valve
assembly
2. Flat
washer
8. Fill
neck
3. R–ring
9. Leak detection tank
4. Leak detector harness
10. O–ring
5. Hydraulic
tank
11. Plug
6. Cap
screw
12. Sight gauge
Hydraulic
System
Greensmaster 3200/3200–D
Page 5 – 103
Hydraulic System
Summary of Contents for 3200
Page 2: ...Greensmaster 3200 3200 D ...
Page 4: ...Greensmaster 3200 3200 D ...
Page 6: ...Greensmaster 3200 3200 D ...
Page 12: ...Safety Page 1 6 Greensmaster 3200 3200 D ...
Page 14: ...Equivalents and Conversions Product Records and Maintenance Page 2 2 Greensmaster 3200 3200 D ...
Page 17: ...Product Records and Maintenance Page 2 6 Greensmaster 3200 3200 D ...
Page 72: ...Perkins Diesel Engine Page 4 30 Greensmaster 3200 D ...
Page 113: ...Hydraulic System Greensmaster 3200 3200 D Page 5 41 Hydraulic System ...
Page 161: ...Hydraulic System Greensmaster 3200 3200 D Page 5 89 Hydraulic System ...
Page 173: ...Hydraulic System Greensmaster 3200 3200 D Page 5 101 Hydraulic System ...
Page 234: ...Wheels and Brakes Page 7 12 Greensmaster 3200 3200 D ...
Page 261: ...Cutting Units Greensmaster 3200 3200 D Page 8 27 Cutting Units ...
Page 273: ......
Page 274: ...Commercial Products FORM 96 900 SL E The Toro Company 1997 Printed in U S A ...


