background image

Mo

di

fic
ac

de
 la
 c

o

n

fig
u

ra

c

n

Configuración

99

• [Hora de verano]

Pulse este botón para indicar si la hora del cuadro 
[Hora] se ajusta teniendo en cuenta el horario de 
verano. Con el ajuste en [ON], la hora se ajusta 
automáticamente al horario de verano en función de la 
fecha establecida anteriormente.

Idiomas

Se pueden seleccionar los idiomas de visualización.

• [Predeterminado] y lista de idiomas adicionales

Seleccione el idioma [Predeterminado] y hasta 5 
idiomas adicionales de la lista.

• Lista de idiomas

Seleccione los idiomas deseados en esta lista.

• [Marcar pantalla]

Pulse este botón para activar ([ON]) o desactivar 
([OFF]) la visualización de la bandera del país asociada 
a cada uno de los idiomas seleccionados para [Idioma 
(1)] a [Idioma (5)].

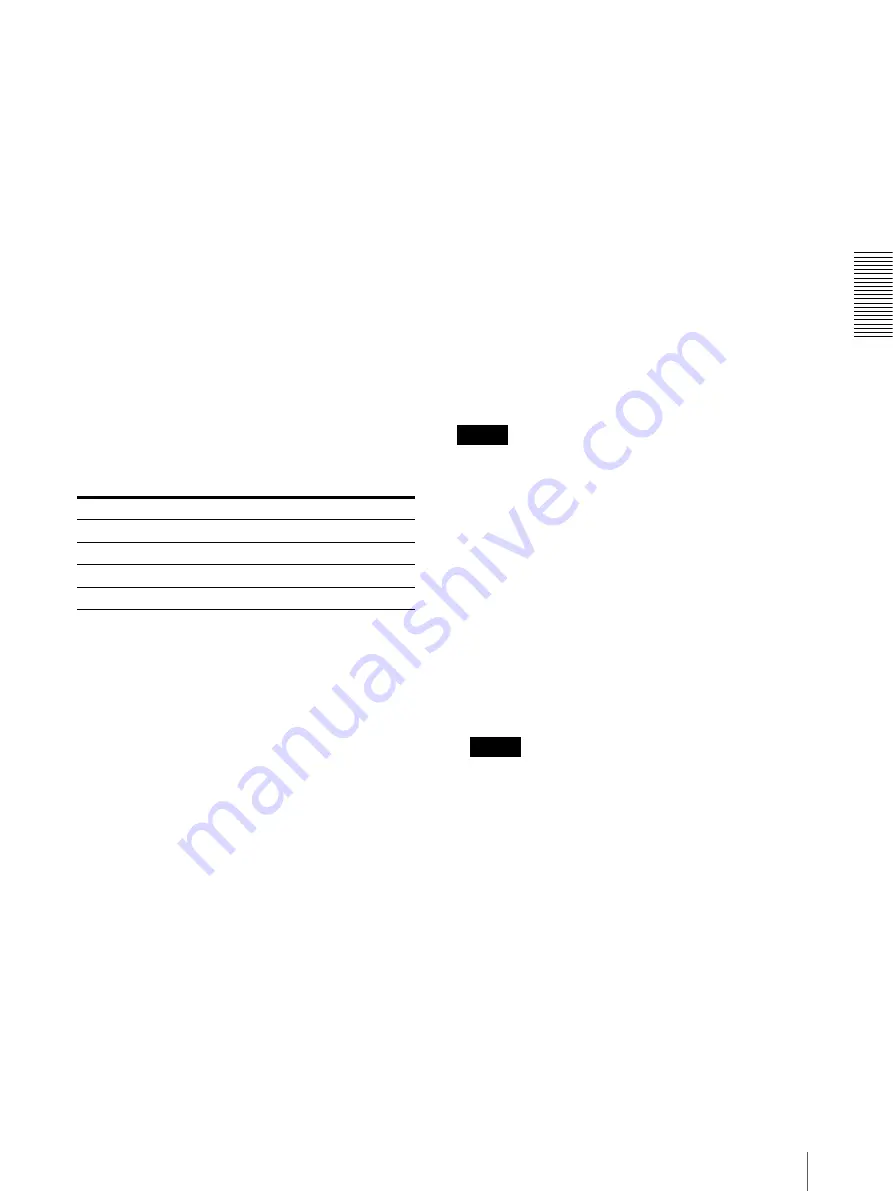
• [Format]

Seleccione la fecha del sistema. Por ejemplo:

Contraseñas

• [Administrador]

Este cuadro de texto contiene la contraseña del 
propietario. Esta contraseña le proporciona acceso a la 
pantalla de administración. No es posible modificar la 
configuración de la pantalla de administración 
mediante la contraseña del personal de ventas. Para 
modificar la contraseña, pulse el cuadro 
correspondiente para resaltarlo y, a continuación, 
utilice el teclado numérico para escribir la contraseña 
deseada. Para aplicar la contraseña, pulse el botón 
[Aplicar].

• [Operador]

Este cuadro de texto contiene la contraseña del 
personal de ventas. Esta contraseña solamente permite 
al usuario de la misma utilizar los cuatro botones que 
se describen en “Botones de la pantalla de 
administración”. No es posible modificar la 
configuración de la pantalla de administración 
mediante la contraseña del personal de ventas. Para 
modificar la contraseña, proceda como se indica 
anteriormente.

• [Contraseña de salida]

Con este ajuste en [ON], el personal de ventas debe 
introducir una contraseña después de confirmar un 
pedido, para que el pedido pueda continuar. Pulse el 
botón de ajuste para activar ([ON]) o desactivar 
([OFF]) la introducción de una contraseña de salida.

• [Contraseña modo demostración]

Defina una contraseña para la función de impresión de 
demostración. Introduciendo la contraseña para la 
impresión de demostración en la pantalla 
[Comprobar], se puede imprimir la cantidad definida 
en el cuadro [Límite de impresión modo 
demostración] sin cargo alguno.

• [Límite de impresión modo demostración]

Defina la cantidad, de 0 a 9, que se puede imprimir con 
la función de impresión en modo de demostración. Si 
intenta imprimir una cantidad superior a la definida, 
aparece un mensaje de error y no podrá imprimir.

Nota

Para la impresión en modo de demostración sólo están 
disponibles los formatos 9 × 13, 10 × 15, 13 × 18, 
15 × 20 y 20 × 25 / 20 × 30. La función de impresión de 
demostración no se puede utilizar con otros formatos de 
destino.

Actualización del sistema

• Botón [Software]

Pulse este botón para actualizar el software del 
sistema. Al pulsar el botón, aparece un mensaje que le 
solicita que confirme si desea actualizar el software. 
Siga las instrucciones de la pantalla para proceder. 
Pulse el botón [Cancelar] para regresar a la pantalla de 
administración. Para más información, póngase en 
contacto con su proveedor.

Nota

Una vez finalizada la actualización de la versión, 
asegúrese de desconectar todas las impresoras 
conectadas a la unidad y la propia unidad y, a 
continuación, vuelva a encender el equipo. Siga las 
instrucciones de la pantalla.

• Botón [Impresoras]

Pulse este botón para actualizar el firmware de las 
impresoras conectadas al sistema. Al pulsar el botón, 
se le solicita que seleccione una impresora y aparece 
un mensaje solicitándole que confirme si desea 
actualizar el firmware. Siga las instrucciones de la 
pantalla para proceder. Pulse el botón [Cancelar] para 
regresar a la pantalla de administración. Para más 
información, póngase en contacto con su proveedor.

Formato

Septiembre 15, 2004

AAAAMMDD

2004/09/15

DDMMAAAA

15/09/2004

MesDDAA

Septiembre 15, 04

MMDDAAAA

09/15/2004

Summary of Contents for UPA-PC100

Page 1: ...A C3Q 100 81 1 Digital Photofinishing System 2005 Sony Corporation User s Guide Version 4 250 GB Guía del usuario Versión 4 250 ES IT Sony Corporation ...

Page 2: ...usting Skin Complexion 19 Enhancing a Picture 19 Selecting Sepia or Black and White 20 Removing Red Eye 21 Add Text to Pictures 22 Output Services 24 Specifying Paper Sizes 24 Creative Printing 25 Using Index Printing 29 Print All Pictures on Your Media 30 Print Packages 30 Writing Pictures to a CD R 31 Changing the Settings Changing Settings 35 Settings 37 Administration Screen Buttons 37 Screens...

Page 3: ...pictures to CD R For details see Output Services page 24 Editing Pictures Pictures can be edited before printing using cropping color correction and so on For details see Editing Pictures page 14 Configuring Settings Use the Administration screen to set up passwords prices for output services and so on For details see Changing Settings page 35 Guides for This Unit The following guides are supplied...

Page 4: ...ite pictures to a CD R and selecting other output services see Output Services page 24 Customer Data Output Services Scanning Memory Stick Memory Stick Pro CompactFlash card SmartMedia card SD card MultiMediaCard PC Card xD Picture Card Floppy disk CD ROM Pictures Loading pictures Selecting pictures to output Scanning Selecting pictures to output Printing or writing to CD R Editing Pictures Croppi...

Page 5: ...rage media you can use will differ depending on the hardware you are using Selecting the Media Containing Pictures and Inserting It into the Unit 1 Touch the screen once Note Depending on the settings made in the Administration screen the buttons appearing on the screens that follow may vary Touch the appropriate buttons For details about see Screens Tab page 38 The media selection screen appears ...

Page 6: ...rmats compatible with this display up to a size of approximately 8000 6000 pixels Exif version 2 1 or later JPEG standard file extension jpg BMP uncompressed 24 bit Windows format file extension bmp TIFF uncompressed file extension tif The thumbnails approximate the printed result Depending on the data loaded to the unit some thumbnails may appear slightly cropped horizontally or vertically Select...

Page 7: ...f copies to print touch the OK button Data is loaded from the storage media and then a screen appears allowing you to verify your order Verifying the Order and Entering a Password You must enter a password to print The default password is the sales clerk password 0000 Note You can use the Administration screen to set whether a password must be entered before printing and to change passwords For de...

Page 8: ...ings necessary for printing receipts have been made within the Administration screen When output finishes the receipt is automatically printed Printing Pictures Stored on the System Along with pictures on storage media you can also print pictures imported to the system and stored in the Photo Library You can add and or delete Photo Library data with the Import button in the Administration screen F...

Page 9: ...r order From here the procedures are the same as those for pictures stored on media Proceed to step 1 of Verifying the Order and Entering a Password page 7 Scanning Pictures and Printing This section describes how to scan pictures and print them Notes A compatible printer UP DR100 etc and scanner sold separately must be connected to this system to scan and print pictures For details refer to the h...

Page 10: ...u want to completely cancel the current operation and return to the start screen If you touch the OK button the display returns to the screen in step 1 Help Touch to display online Help for a description of procedures that apply to the current screen Selecting the Output Service Touch the appropriate button to select the output service For details see Output Services page 24 For example touch 5 7 ...

Page 11: ...step you can also perform the following procedure If all the images cannot be displayed touch b or B to display the previous or next page Specifying the Number of Copies to Print 1 Specify the number of copies to print Touch a picture to select it and then touch the or button to increase or decrease the number of copies To select all the scanned pictures touch the Select All button To deselect all...

Page 12: ...word If you need to cancel password entry and start again touch the Clear button Output 1 Touch the Enter button The print job starts and the following screen appears After a moment the display returns to the screen in step 1 of Selecting the Scanner as the Input Device page 10 Notes If you use the Administration screen to set the unit to inhibit all other operations during printing Background Pri...

Page 13: ...ntered prior to printing To correct the entry clear it by touching the Clear button and reenter the password 4 Touch the Enter button The Administration screen appears The screen differs according to the password that you enter administrator or sales clerk password 5 Touch the Cancel Job button A screen allowing you to verify the cancellation appears 6 Select the items that you want to cancel If y...

Page 14: ... Text Adjusting the picture composition Correcting colors brightness contrast color balance backlight compensation Correcting complexion Correcting red eye Printing matte pictures Selecting sepia or black and white Stamping dates Note Certain of the functions described here are not available with some output services Adjusting the Picture Composition Cropping a Picture The composition of a picture...

Page 15: ... The display returns to the screen at step 3 8 Touch the OK button The display returns to the screen at step 1 You can continue editing other pictures or return to the output operation Picture Orientation Change the printing orientation of pictures without having to rotate them 1 To select a picture for reorientation touch the image in the screen used to specify the number of copies For details se...

Page 16: ...res or return to the output operation Rotating a Picture Follow this procedure to rotate a picture relative to the direction of printing 1 To select a picture for rotation touch the picture in the screen used to specify the number of copies For details see Selecting the Pictures and Specifying the Number of Copies to Print page 6 step 2 or Specifying the Number of Copies to Print page 11 step 1 No...

Page 17: ...l the Selected Pictures 1 On the screen used to specify the number of copies touch the Select All button For details see Selecting the Pictures and Specifying the Number of Copies to Print page 6 step 2 All pictures are selected 2 Touch the Add DATE button The date is added to all selected pictures and the DATE icon appears beneath them If you want to remove the date simply touch the Add DATE butt...

Page 18: ...r size but the DATE icon will not reflect this For details on adding paper sizes see Specifying Additional Paper Sizes When Selecting Pictures page 25 Printing Matte Pictures You can adjust your pictures so that they are matte when printed Note This function can only be used with 8 10 8 12 size paper 1 To select a picture for matte printing touch the picture in the screen used to specify the numbe...

Page 19: ...e You cannot see the result of the correction on this screen It will appear in the prints 4 When you are finished touch the OK button The display returns to the screen at step 1 You can continue editing other pictures or return to the output operation Enhancing a Picture The following items can be adjusted Backlight Brightness Color balance Contrast Notes This function cannot be used with the CD C...

Page 20: ...splayed 5 When you are finished with color correction touch the OK button The display returns to the screen at step 3 6 Touch the OK button The display returns to the screen at step 1 You can continue editing other pictures or return to the output operation Selecting Sepia or Black and White Sepia or black and white can be selected as the picture color 1 To select a picture for sepia or black and ...

Page 21: ...to the screen at step 1 You can continue editing other pictures or return to the output operation Removing Red Eye You can reduce red eye in pictures 1 To select a picture for red eye correction touch the picture in the screen used to specify the number of copies For details see Selecting the Pictures and Specifying the Number of Copies to Print page 6 step 2 or Specifying the Number of Copies to ...

Page 22: ... 3 9 Touch the OK button The display returns to the screen at step 1 You can continue editing other pictures or return to the output operation Add Text to Pictures You can annotate pictures with any text that you want You can at a maximum of 4 blocks of text each up to 30 characters long to picture Note If you select Landscape portrait Picture Rotation or Add Border after adding text to a picture ...

Page 23: ...r appears around text immediately after it is added indicating that the text is selected 6 Select the style of the text You can change the attributes of the selected text using the following buttons Move Touch the arrow buttons to change the position of the text Color Touch the buttons to change the color of the text Size Touch the or button to change the size of the text Text Style Touch the b or...

Page 24: ...tem 3 5 5 size 90 130 mm 4 6 size 100 150 mm 5 7 size 130 180 mm 6 8 size 150 200 mm 8 10 size 200 250 mm 8 12 size 200 300 mm Notes To print on the selected paper size the paper must already be set in a printer the UP DR100 or UP D70A that uses this paper size For example if 5 7 size paper is in the printer you can also print 3 5 5 size pictures You cannot use the 8 10 and 8 12 sizes at the same ...

Page 25: ...s contrast etc 4 Touch the OK button The display returns to the screen at step 1 The next procedures are the same as those for a normal print job To print stored pictures Step 2 of Selecting the Pictures and Specifying the Number of Copies to Print page 6 To scan pictures and print them Step 1 of Specifying the Number of Copies to Print page 11 Creative Printing This feature allows you to create a...

Page 26: ...es To print stored pictures The pictures on the media inserted into the unit are loaded Proceed to the next step To scan pictures and print them Steps 1 to 6 of Scanning Pictures page 10 6 Touch the pictures to be combined for printing then touch the OK button To cancel the selection touch the picture again If all the pictures cannot be displayed on one page touch the b or B button to display more...

Page 27: ...cted a Different Pictures layout in step 2 you may have to repeat steps 3 to 7 depending on the number of pictures that you selected for composition When you are done proceed to step 9 8 If necessary edit the composite image At this step you can perform the following procedures Add text to pictures Enhance picture backlight correction not available Print sepia or black and white pictures For detai...

Page 28: ... copies For details see Selecting the Pictures and Specifying the Number of Copies to Print page 6 step 2 or Specifying the Number of Copies to Print page 11 step 1 2 Touch the Edit Magnify button The picture editing screen appears 3 Touch A screen allowing you to compose the picture appears 4 Touching the category tabs will switch to the next category of templates 5 Select the desired template an...

Page 29: ... to the next step To print an index of scanned pictures Steps 1 to 6 of Scanning Pictures page 10 4 Touch the pictures that you want to include in the index To cancel the selection touch the pictures again To select all the pictures touch the Select All button To select or deselect more than one picture but not all touch them individually one at a time If all the pictures cannot be displayed on on...

Page 30: ...Note If you touch the Review Order button a screen allowing you to browse all pictures on your media From here on the procedure is the same as the one outlined from step 1 of Verifying the Order and Entering a Password page 7 Print Packages This system includes two types of package Portrait Package and Value Package that enable you to print one or more selected pictures according to preset package...

Page 31: ...itten to a CD R they cannot be edited and the number of copies cannot be specified 1 Perform one of the following procedures To write stored pictures to a CD R Step 1 of Selecting the Media Containing Pictures and Inserting It into the Unit page 5 to step 2 of Selecting the Output Service page 6 At this time touch CD Creation in Selecting the Output Service page 6 To scan pictures and write them t...

Page 32: ...s and Specifying the Number of Copies to Print page 6 5 Depending on the number of times that you want to change media repeat steps 1 to 4 as many times as necessary Note The amount of image data you can load is determined by the CD R Media Type setting in the Custom tab on the Administration screen 4 Touch the OK button The screen allowing you to verify your order appears Note If you configured t...

Page 33: ...be viewed easily on other computers Viewing Pictures with a Windows Computer Pictures can be viewed on a Windows computer with CD Viewer software written to the CD R When the CD R containing the pictures is inserted into the CD ROM drive of your computer CD Viewer starts automatically and thumbnails of the images on the CD R appears Notes If CD Viewer does not start automatically access the CD R w...

Page 34: ... name and save it To Thumbnail Screen Click to go to the thumbnail screen Viewing Pictures with a Web Browser Images can be viewed with a Web browser Simply open the HTML file on the CD R Insert the CD R containing the pictures into the CD ROM drive of your computer and then open the index htm file in the Mac folder of the CD R with your Web browser Thumbnails of the pictures on the CD R appears N...

Page 35: ...wn the unit The two modes are accessed with specific passwords The default administrator password is 7669 and the default sales clerk password is 0000 These passwords can be changed in the administrator mode 1 Touch the screen twice successively at the location indicated below 2 Touch the number buttons to enter the administrator or sales clerk password To correct the entry clear it by touching th...

Page 36: ... related settings Custom tab By touching this tab you can set default values for number of prints CD R media type and the output size for the Print all pictures function Cancel Job button Touch this button to cancel the printing job in progress Note This button is available in sales clerk mode Logs button Touch this button to copy the sales logs to a storage media or print them Note This button is...

Page 37: ...ge appears Touch the OK button to return to the Administration screen Logs Button Touch this button to view or copy the sales logs to a storage media or print them Note This button is available in sales clerk mode Previous Next buttons Touch these buttons to display the previous or next sales log The sales log displayed varies depending on the Summary Log setting made on the Accounting tab Export ...

Page 38: ...n the Input Media screen and proceed according to the instructions on the Notice screen This function may not work with some mobile phone models even those that feature Bluetooth Technology Output Icons 3 5 5 4 6 5 7 6 8 8 10 8 12 Index CD Creation Borders Collage Value Package Portrait Package Print all pictures With these settings ON the output services above can be selected after selecting the ...

Page 39: ...m from CD ROM or Memory Stick Notes You can use the following file formats for the screensavers bmp for still images avi or mpg MPEG 1 format only file formats for movies Up to four files can be selected for the initial screensaver and the print screensaver Still image or movie files used as screensavers must be 1024 768 pixels The file names must be Startup1 to Startup4 for the initial screen scr...

Page 40: ...value range 1 to 999 To apply the desired value touch the Apply button Prints Remaining Touch this button to limit the maximum number of consecutive prints per order to the number of prints remaining in the printer at the selected size Tax Sales Tax 1 Sales Tax 2 Set the tax rate used in calculating the price of an order in the text box Touch the text box to highlight it and then use the keypad to...

Page 41: ...ut for 1st Qty and 2nd Qty Templates Tab On this tab you can import and delete templates for use in creative printing Imported categories This box shows the list of imported templates Menu Display This box shows the list of templates that are displayed on the creative printing menu You can display up to 18 templates on the creative printing menu Import button When you touch the Import button it ta...

Page 42: ... 1 to Line 6 Use these boxes to type text strings that will appear on receipts You can type up to six text strings that fit on your receipts approx 46 characters each line and will appear at the bottom of your receipts To type text touch the Keyboard button Bar Code With this setting ON you can print bar codes on your receipts Touch this button to enable ON or disable OFF bar code printing Import ...

Page 43: ...ou touch the complexion button Touch this button to enable ON or disable OFF this function Print Spool Background Printing With this setting ON another user can use the system while pictures are being printed Touch the setting button to enable ON or disable OFF background printing Print mode You can select the operation method when multiple printers are connected to the unit and the same paper siz...

Page 44: ...of the picture Start Switches to the Calibration screen Follow the steps to perform the operation Reset Returns the color table to the factory settings Use this option when the print color is unsatisfactory after performing calibration Note Only the Epson Perfection 1660 or 4180 scanners can be connected when performing calibration For details about other models consult your dealer or a Sony repre...

Page 45: ...pply the password touch the Apply button Operator This text box contains the sales clerk password This password only allows the user of this password to use the four buttons described in Administration Screen Buttons It is not possible to modify the settings in the Administration screen with the sales clerk password To modify the password proceed as described above Checkout Password When this sett...

Page 46: ...he Administration screen settings or reinitialize the Administration screen When you touch the button a message appears prompting you to confirm whether you want to import or export the Administration screen settings or reinitialize the Administration screen Touch the Cancel button to return to the Administration screen Custom Tab By touching this tab you can set default values for number of print...

Page 47: ...er to 1 CD Index Page Print all pictures Size This sets the default output size for the Print all pictures function ID Print Size Select the size of the ID Print sheet from the list When you select a print size the ID Print option is added to the Selecting the Output Service screen When OFF is selected the ID print cannot be used ID Print templates When you touch the Import button it takes you to ...

Page 48: ... on the Custom Tab For details see Custom Tab page 46 This output service can only be selected from the output service selection screen You cannot specify it midway 1 Touch ID Print in the output service selection screen For details see Selecting the Output Service pages 6 and 10 The border selection screen opens 2 Touch the border you want to use Subsequent procedures are the same as for creative...

Page 49: ... Stick Reinitializing formatting Memory Stick Before using your Memory Stick for the first time make sure that you use your digital camera to format it Formatting the Memory Stick with a device other than your digital camera may make data on the Memory Stick unreadable for the system Notes on using Memory Stick To use a Memory Stick insert it directly into the Memory Stick slot of the system Do no...

Page 50: ...othly do not try to force it in Instead make sure that the card is oriented correctly with the v mark pointing towards the slot For details refer to the user s manual accompanying your card SD card The parts of an SD card are shown below For details either visit the SD Card Association Web site or refer to the user s guide accompanying your card http www sdcard org Write protecting SD card data In...

Page 51: ...e unit Inserting any media in the wrong direction may damage the unit and or media and cause malfunctions Do not remove the media or turn off this unit while data is being written to the media Doing so could cause the data that is being recorded to be deleted or damaged About Error Message Error Messages If the unit malfunctions a message is displayed on its screen Read the message and follow the ...

Page 52: ...nformation from the IC seal on the ink ribbon loaded in the printer Replace the ink ribbon and paper in the printer with new ones UNKNOWN ERROR tAn error of unknown cause occurred Confirm that the connections at the unit and printer are secure then touch the Retry button If the same message appears again touch the Cancel button to cancel the operation shut down the system then switch the main unit...

Page 53: ... imagen 71 Selección de sepia o blanco y negro 73 Eliminación de ojos rojos 73 Introducción de texto en las imágenes 75 Formatos de destino 77 Indicación de los tamaños de papel 77 Impresión creativa 78 Uso de la impresión de índices 81 Impresión de todas las imágenes del soporte 82 Paquetes de impresión 83 Grabación de imágenes en un CD R 84 Modificación de la configuración Modificación de la con...

Page 54: ...matos de destino página 77 Edición de imágenes Las imágenes se pueden editar antes de la impresión mediante recorte corrección de color etc Para más información remítase a Edición de imágenes página 66 Parámetros de configuración Utilice la pantalla de administración para definir contraseñas precios para los formatos de destino etc Para más información remítase a Modificación de la configuración p...

Page 55: ...tino Escaneado Memory Stick Memory Stick Pro Tarjeta CompactFlash Tarjeta SmartMedia Tarjeta SD MultiMediaCard Tarjeta PC Tarjeta xD Picture Disquete CD ROM Imágenes Carga de imágenes Selección de imágenes para la generación del destino Escaneado Selección de imágenes para la generación del destino Impresión o grabación en CD R Edición de imágenes Recorte Giro Reorientación Estampación de fechas E...

Page 56: ...la remítase al Manual de instrucciones Diagrama de operaciones A continuación se describe el procedimiento general para la impresión de imágenes almacenadas en distintos soportes 1 Debe utilizar un soporte del mismo tipo que el que se ha extraído 2 Para más informacióin acerca de cómo realizar este procedimiento remítase a Impresión de imágenes almacenadas en el sistema página 60 Seleccione el sop...

Page 57: ...a que introduzca el soporte en la unidad Una vez haya introducido el soporte en la unidad ésta lo detecta automáticamente Continúe con Elección del formato de destino Para más información acerca de los soportes admitidos por el sistema remítase al Manual de instrucciones Nota Dispone de los siguientes botones en esta pantalla y en las pantallas siguientes Pulse los botones según sea necesario Si p...

Page 58: ...us valores a cero mediante el botón Si no se pueden visualizar todas las imágenes en una sola pantalla pulse el botón b o B para ver más páginas Notas Si las imágenes cargadas por la unidad contienen formatos de archivo no soportados o archivos que no se pueden leer se representan por medio del icono siguiente y no es posible seleccionarlos Si las imágenes tienen un tamaño inferior al tamaño mínim...

Page 59: ...i extrae el soporte de la unidad mientras se visualiza la pantalla de confirmación del pedido no se le solicita que extraiga el soporte Vaya al paso 3 Si ha utilizado la pantalla de administración para configurar la impresión sin introducción de contraseña aparece la pantalla del paso 1 de Destino página 59 3 Pulse las teclas correspondientes para introducir la contraseña Si se necesita anular la ...

Page 60: ...rabación pulse Biblioteca de fotografías Para más información remítase a Selección del soporte que contiene las imágenes e introducción en la unidad página 57 2 Pulse el botón correspondiente al formato de destino Para más información remítase a Formatos de destino página 77 Por ejemplo pulse 13 18 3 Pulse en las imágenes que desea imprimir para seleccionarlas Para anular una selección vuelva a pu...

Page 61: ...oducción de una contraseña página 59 Escaneado e impresión de imágenes Esta sección describe cómo escanear imágenes e imprimirlas Notas Para escanear e imprimir imágenes se debe conectar al sistema una impresora compatible UP DR100 etc y un escáner se venden por separado Para obtener más información remítase al manual de instrucciones del hardware Para escanear la opción IMPRIMIR Escáner de Iconos...

Page 62: ... Iniciar aparece un mensaje solicitándole que confirme que desea anular completamente la operación en curso y volver a la pantalla de inicio Si pulsa el botón OK aparece de nuevo la pantalla del paso 1 Ayuda Pulse esta opción para visualizar la ayuda en línea y obtener una descripción de los procedimientos relacionados con la pantalla actual Elección del formato de destino Pulse el botón correspon...

Page 63: ...ara indicar el número de copias Vaya al paso 1 de Indicación del número de copias a imprimir remítase más abajo En esta fase también se puede realizar el procedimiento siguiente Si no se pueden visualizar todas las imágenes pulse b o B para visualizar la página anterior o siguiente Indicación del número de copias a imprimir 1 Indique el número de copias a imprimir Pulse en una imagen para seleccio...

Page 64: ...1 de Destino remítase más abajo 2 Pulse las teclas correspondientes para introducir la contraseña Si se necesita anular la introducción de contraseña y empezar de nuevo pulse el botón Eliminar Destino 1 Pulse el botón Entrar Se inicia el trabajo de impresión y aparece la pantalla siguiente Tras unos instantes vuelve a aparecer la pantalla del paso 1 de Selección del escáner como dispositivo de ent...

Page 65: ... introducido antes de imprimir Para corregir lo introducido bórrelo pulsando el botón Eliminar y vuelva a introducir la contraseña 4 Pulse el botón Entrar Aparece la pantalla de administración La pantalla varía según la contraseña que haya introducido contraseña del administrador o del personal de ventas 5 Pulse el botón Cancelar trabajo Aparece una pantalla que permite confirmar la anulación 6 Se...

Page 66: ...de la composición de la imagen Corrección de colores brillo contraste equilibrio de color compensación de contraluz Corrección de complexión Corrección de ojos rojos Impresión de imágenes en mate Selección de sepia o blanco y negro Estampación de fechas Nota Algunas de las funciones que aquí se describen no están disponibles con algunos formatos de destino Ajuste de la composición de la imagen Rec...

Page 67: ...a aparecer la pantalla del paso 3 8 Pulse el botón OK Vuelve a aparecer la pantalla del paso 1 Se pueden seguir editando otras imágenes o regresar a la operación de generación de destino Orientación de la imagen Permite modificar la orientación de la impresión de las imágenes sin necesidad de girarlas 1 Para seleccionar una imagen para reorientarla pulse la imagen en la pantalla utilizada para ind...

Page 68: ...ación de destino Rotación de una imagen Siga este procedimiento para girar una imagen con relación a la dirección de impresión 1 Para seleccionar una imagen para girarla pulse la imagen en la pantalla utilizada para indicar el número de copias Para más información remítase al paso 2 de Elección de las imágenes e indicación del número de copias a imprimir página 58 o al paso 1 de Indicación del núm...

Page 69: ...os formatos de destino Marco Collage ni Creación CD Introducción de fechas en todas las imágenes seleccionadas 1 En la pantalla utilizada para indicar el número de copias pulse el botón Selecc todos Para más información remítase al paso 2 de Elección de las imágenes e indicación del número de copias a imprimir página 58 Se seleccionan todas las imágenes 2 Pulse el botón Añadir DATE Se añade la fec...

Page 70: ...apel seleccionado durante Elección del formato de destino página 57 Si se indican tamaños de papel adicionales al seleccionar las imágenes todavía se puede establecer la estampación de fecha para cada tamaño de papel adicional pero el icono DATE no lo reflejará Para más información sobre la adición de tamaños de papel remítase a Indicación de tamaños de papel adicionales al seleccionar las imágene...

Page 71: ...liar Aparece la pantalla de edición de la imagen 3 Pulse en Se corrige la complexión del sujeto de la imagen Para cancelar este ajuste pulse el botón de complexión una vez más Nota No se puede ver el resultado de la corrección en esta pantalla Aparecerá en las copias impresas 4 Cuando haya terminado pulse el botón OK Vuelve a aparecer la pantalla del paso 1 Se pueden seguir editando otras imágenes...

Page 72: ... colores Pulse el botón Compensación de contraluz para compensar una iluminación excesiva detrás del sujeto Si desea anular los ajustes de corrección del color pulse el botón Cancelar Nota Si Pantalla RGB está ajustada en OFF en Personal botón no se mostrarán los botones de ajuste de RGB 5 Cuando haya terminado con la corrección del color pulse el botón OK Vuelve a aparecer la pantalla del paso 3 ...

Page 73: ... y negro 4 Seleccione sepia o blanco y negro Sepia Convierte la imagen a un tono sepia B N Convierte la imagen a blanco y negro Para anular la selección pulse el botón Cancelar 5 Cuando haya terminado pulse el botón OK Vuelve a aparecer la pantalla del paso 3 6 Pulse el botón OK Vuelve a aparecer la pantalla del paso 1 Se pueden seguir editando otras imágenes o regresar a la operación de generació...

Page 74: ...atisfactoriamente siga con el paso 8 En caso contrario siga con el paso 5 y corríjalo manualmente 5 Pulse en la pantalla o en los botones de flecha Mover para mover el marco verde y colocarlo sobre el ojo en cuestión 6 En Zoom pulse el botón Alinee la cruz del marco verde con el centro del ojo rojo afectado 7 Pulse el botón Aplicar Se corrige el efecto de ojos rojos Nota Con algunas imágenes es po...

Page 75: ...ués de añadir texto a una imagen el texto que haya añadido se perderá Asegúrese de realizar estas operaciones antes de añadir texto a una imagen 1 Para seleccionar una imagen para realizar anotaciones en ella pulse la imagen en la pantalla utilizada para indicar el número de copias Para más información remítase al paso 2 de Elección de las imágenes e indicación del número de copias a imprimir pági...

Page 76: ...nir el texto en negrita Vuelva a pulsarlo para regresar a texto normal Cursiva Pulse para definir el texto en cursiva Vuelva a pulsarlo para regresar a texto normal Subrayado Pulse para subrayar el texto Vuelva a pulsarlo para borrar el subrayado Notas Para añadir otro bloque de texto pulse en la ubicación que desee y a continuación pulse el botón Introduzca el texto Cuando aparezca la pantalla de...

Page 77: ...Pulse en el tamaño de papel deseado en la pantalla de selección del formato de destino Para más información remítase a Elección del formato de destino página 57 Nota Según la configuración de la pantalla de administración es posible que el icono de formato Otros tamaños aparezca en la pantalla de selección del formato de destino En este caso al pulsar este botón aparece otra pantalla donde se pued...

Page 78: ...ite crear varias versiones con el mismo tamaño de la misma imagen en una hoja Disposición de varias imágenes Collage Permite crear varias imágenes distintas en una hoja Notas Se puede utilizar la pantalla de administración para añadir y suprimir plantillas Para más información remítase a Separador Plantillas página 95 Cuando se imprimen imágenes utilizando la disposición de varias imágenes Collage...

Page 79: ...la pantalla pulse el botón b o B para ver más páginas En esta fase también se puede realizar el procedimiento siguiente Pulse el botón Volver para regresar a la pantalla del paso 2 y seleccionar una plantilla distinta Aparecerán las imágenes y la plantilla 7 Indique la disposición de la imagen compuesta Si no se pueden visualizar todas las imágenes pulse b o B para visualizar la página anterior o ...

Page 80: ...ación indique el número de copias a imprimir Pulse en una imagen para seleccionarla y continuación pulse el botón o para aumentar o disminuir el número de copias En esta fase también se puede realizar el procedimiento siguiente Pulse el botón Seleccionar más borde para volver a la pantalla del paso 2 y seleccionar una plantilla adicional para la imagen 9 Pulse el botón OK Aparece la pantalla que p...

Page 81: ... de imágenes página 66 6 Pulse el botón OK Vuelve a aparecer la pantalla del paso 1 Se pueden seguir editando otras imágenes o regresar a la operación de generación de destino Uso de la impresión de índices Se puede imprimir un índice una hoja de foto miniaturas de las imágenes seleccionadas dispuestas en filas En el índice se puede imprimir la fecha e información diversa Notas Para la impresión d...

Page 82: ...iente y no es posible seleccionarlas 5 Pulse el botón OK Aparece la pantalla que permite confirmar el pedido Lleve a cabo alguno de los procedimientos siguientes Impresión de un índice de las imágenes almacenadas Paso 1 de Confirmación del pedido e introducción de una contraseña página 59 Impresión de un índice de las imágenes escaneadas Paso 1 de Confirmación del pedido e introducción de una cont...

Page 83: ...el contenido para este paquete en la pantalla de administración Para más información remítase a Separador Promociones página 94 Pulse Paquete de valor en la pantalla de selección del formato de destino Para más información remítase a Elección del formato de destino página 57 A continuación lleve a cabo alguno de los procedimientos siguientes Impresión de imágenes almacenadas Paso 1 de Elección de ...

Page 84: ...ión sustituya copia impresa por CD R 2 Pulse en las imágenes que desea grabar en CD R Para anular la selección vuelva a pulsar en la imagen Para seleccionar todas las imágenes pulse el botón Selecc todos Para seleccionar o cancelar la selección de más de una imagen pero no todas púlselas de forma individual de una en una Si no se pueden visualizar todas las imágenes en una sola pantalla pulse el b...

Page 85: ...e imprima automáticamente un índice cuando se graban imágenes en un CD R en la pantalla de administración aparece un mensaje que le solicita que confirme si desea imprimir páginas de índices adicionales porque se genera un coste cuando el índice tiene más de una página Pulse el botón Sí para proceder a la generación del destino del índice al precio indicado en el mensaje Pulse el botón No para pro...

Page 86: ...nes se pueden ver en un ordenador con sistema operativo Windows y un visor de CD software grabado en el CD R Cuando se introduce en la unidad de CD ROM del ordenador el CD R que contiene las imágenes el visor de CD se inicia automáticamente y aparecen las foto miniaturas del CD R Notas Si el visor de CD no se inicia automáticamente acceda al CD R mediante el Explorador de Windows y pulse dos veces...

Page 87: ...en Pulse para ir a la pantalla de foto miniaturas Visualización de imágenes con un explorador Web Las imágenes se pueden visualizar con un explorador Web Sólo tiene que abrir el archivo HTML del CD R Introduzca el CD R que contiene las imágenes en la unidad de CD ROM del ordenador y a continuación abra el archivo index htm de la carpeta Mac del CD R con su explorador Web Aparecen foto miniaturas d...

Page 88: ...nidad A ambos modos se accede mediante contraseñas específicas La contraseña de administrador predeterminada es 7669 y la contraseña predeterminada para el personal de ventas es 0000 Estas contraseñas se pueden cambiar en el Modo administrador 1 Pulse dos veces consecutivas la pantalla en el lugar que se indica a continuación 2 Pulse los botones numéricos para introducir la contraseña del administ...

Page 89: ...as activar desactivar avisos configurar el modo de impresión y otros ajustes relacionados con el sistema Separador Personalizada Pulse este separador para definir valores predeterminados para el número de copias tipo de CD R y el tamaño de destino para la función Imp todas imág Botón Cancelar trabajo Pulse este botón para cancelar el trabajo de impresión en curso Nota Este botón está disponible en...

Page 90: ... está disponible en el modo de personal de ventas Si no hay trabajos en curso aparece el mensaje No hay trabajos en la cola Pulse el botn OK para regresar a la pantalla de administración Botón Registros Pulse este botón para ver o copiar los registros de ventas en un soporte de grabación o imprimirlos Nota Este botón está disponible en el modo de personal de ventas Botones Previous Next Pulse esto...

Page 91: ...l salvapantallas e importar imágenes en la Biblioteca de fotografías Iconos de entrada MEMORY STICK CD ROM COMPACT FLASH SMART MEDIA SD CARD MMC DISQUETE IMPRIMIR Escáner BIBLIOTECA DE FOTOGRAFÍAS TARJETA PC TARJETA xD PICTURE Tecnología Bluetooth Utilice estos ajustes para activar o desactivar las ranuras o unidades de la unidad principal Cuando un botón se encuentra en ON el soporte correspondie...

Page 92: ...lvapantallas y los tipos de archivos compatibles remítase a Salvapantallas página 92 Pantalla de impresión Tiempo de inicio secs Con el ajuste de Pantalla de impresión en ON aparece un salvapantallas cuando el sistema está imprimiendo una vez transcurrido el intervalo de tiempo especificado en el cuadro Tiempo de inicio secs Solamente se pueden utilizar imágenes fijas como salvapantallas de impres...

Page 93: ... necesario para utilizar cada formato de destino Pulse el cuadro de texto para resaltarlo y a continuación utilice el teclado numérico para escribir el precio deseado intervalo 0 00 a 99 99 Para aplicar el precio deseado pulse el botón Aplicar Moneda Este ajuste permite seleccionar la divisa utilizada de forma predeterminada por el sistema Para modificar este ajuste pulse el botón de flecha y sele...

Page 94: ...nuación utilice el teclado numérico para escribir el valor deseado intervalo 0 00 a 99 99 Para aplicar el precio deseado pulse el botón Aplicar 9 13 CANT 10 15 CANT 13 18 CANT 15 20 CANT 20 25 20 30 CANT Defina la cantidad de cada formato de salida impreso utilizando el paquete de valor de los cuadros de texto anteriores Pulse un cuadro de texto para resaltarlo y a continuación utilice el teclado ...

Page 95: ...tillas póngase en contacto con su distribuidor Separador Contabilidad En este separador se puede indicar la información que desea que aparezca en sus recibos También se puede importar un logotipo para los recibos y efectuar otros ajustes relacionados con los recibos Registro de resumen Se puede cambiar el formato de los registros visualizados al pulsar el botón Registros de la parte inferior de la...

Page 96: ...e le solicita que seleccione si desea importar las imágenes de códigos de barras desde CD ROM o desde Memory Stick Siga las instrucciones en pantalla para realizar esta operación Logo instalación Se puede importar un logotipo para que se imprima en sus recibos La imagen debe tener las siguientes características Escala de grises de 8 bits o binaria en blanco y negro 300 150 píxeles L A Guardado en ...

Page 97: ...eamente todas las impresoras disponibles Hardware Botón Configuración Pulse este botón para configurar y ejecutar la diagnosis de los dispositivos periféricos conectados al sistema Al pulsar el botón aparece la pantalla Configuración de hardware en la pantalla de administración Cuando haya terminado de efectuar ajustes en esta pantalla pulse el botón OK Impresora Utilice estos parámetros para ajus...

Page 98: ... imágenes Pulsando este botón la selección cambia entre los tamaños disponibles Nota Los tamaños disponibles varían en función del modelo Orientación del gráfico Se puede modificar la pantalla de guía que aparece cuando se escanea una fotografía para que coincida con el escáner que está utilizando Al pulsar el botón Importar se accede a la pantalla de instalación de una pantalla de guía desde un C...

Page 99: ...dido pueda continuar Pulse el botón de ajuste para activar ON o desactivar OFF la introducción de una contraseña de salida Contraseña modo demostración Defina una contraseña para la función de impresión de demostración Introduciendo la contraseña para la impresión de demostración en la pantalla Comprobar se puede imprimir la cantidad definida en el cuadro Límite de impresión modo demostración sin ...

Page 100: ... solicitándole que confirme si desea importar o exportar la configuración de la pantalla de administración o reinicializar la pantalla de administración Pulse el botón Cancelar para regresar a la pantalla de administración Separador Personalizada Pulse este separador para definir valores predeterminados para el número de copias tipo de CD R y el tamaño de destino para la función Imp todas imág Aju...

Page 101: ... crear un CD Para más información remítase a Página de índice de 1 CD Tamaño Imp todas imág Define el tamaño de destino predeterminado para la función Imp todas imág Tamaño Impresión ID Seleccione en la lista el tamaño de la hoja de impresión de ID Al seleccionar un tamaño de impresión la opción Impresión ID se añade a la pantalla Elección del formato de destino Si se selecciona OFF la impresión d...

Page 102: ...da Para más información remítase a Separador Personalizada página 100 Este formato de destino sólo se puede seleccionar en la pantalla de selección del formato de destino No se puede indicar a la mitad 1 Pulse Impresión ID en la pantalla de selección del destino Para más información remítase a Elección del formato de destino páginas 57 y 62 Se abre la pantalla de selección de marcos 2 Pulse el mar...

Page 103: ...ición derecha es posible leer los datos del Memory Stick pero no sobreescribirlos Cuando introduzca un Memory Stick en esta unidad para leer los datos deslice el interruptor de protección contra escritura para situarlo en la posición de protección Nota La ubicación y la forma del interruptor de protección contra escritura varía según el tipo de Memory Stick de que se trate Reinicialización formate...

Page 104: ...adhesivo de protección contra escritura en la posición que se indica en la figura zona de protección contra escritura Si se coloca un adhesivo en la zona de protección contra escritura la tarjeta SmartMedia no se podrá utilizar para guardar fotografías tomadas con una cámara digital Para poder volver a grabar datos en la tarjeta sólo tiene que retirar el adhesivo de protección contra escritura No ...

Page 105: ...o a que los soportes son vulnerables a la humedad recomendamos que no se utilicen en condiciones de humedad Evite almacenar o utilizar soportes en las condiciones siguientes En una ubicación con temperaturas elevadas como dentro de un vehículo expuesto al sol o en el exterior durante un día caluroso Bajo luz solar directa En una ubicación húmeda o donde se produzca corrosión con facilidad En una u...

Page 106: ...ROUBLE tSe ha producido un problema de funcionamiento de la impresora Si el mensaje vuelve a aparecer después de pulsar el botón Reintento pulse el botón Cancelar para cancelar la operación cierre el sistema y a continuación apague y vuelva a encender la unidad principal y la impresora NO PAPER tNo hay papel de impresora en la impresora Introduzca papel y una cinta de tinta en la impresora NO RIBB...

Page 107: ... USB está conectado correctamente Pulse el botón Reintento Si vuelve a aparecer el mismo mensaje pulse el botón Cancelar para cancelar la operación cierre el sistema y a continuación apague y vuelva a encender la unidad principal y el escáner Mensaje Significado Solución Imposible inicializar Inserte un nuevo CD tFalló la operación de grabación en el CD R Introduzca un nuevo CD R y pulse el botón ...

Page 108: ...A C3Q 100 81 1 Digital Photofinishing System 2005 Sony Corporation User s Guide Version 4 250 GB Guía del usuario Versión 4 250 ES IT Sony Corporation ...

Reviews: