C
h
an
gi
ng
th
e
S
e
tt
in
gs
Settings
42
Summary Log
You can change the format of logs displayed by touching
the [Logs] button at the bottom of the Administration
screen.
• [Range]
Select the sales log display interval from the list.
Touching the list allows you to select [Daily],
[Weekly], [Monthly], [Manual] or [OFF].
Note
Setting this option to [OFF] deactivates the [Logs]
button and you will no longer be able to display logs.
– [Start Point] (only appears when you select
[Weekly] or [Monthly])
Select the start point for the display of weekly or
monthly sales logs from the list. When displaying
weekly sales logs, select the start day. In the case of
monthly sales logs, touch the text box to highlight it,
use the keypad to input the start date, and then touch
the [Apply] button.
Note
When you touch the [Logs] button, the sales log is
displayed in such a way as to include the present
day.
– [From: Year/Month/Day], [To: Year/Month/Day]
(only appears when you select [Manual])
Specify the interval of the sales log. The sales log is
displayed from the date specified in [From: Year/
Month/Day] to the date specified in [To: Year/
Month/Day]. Touch the text box that you want to set
to highlight it, use the keypad to input the desired
numerical value, and then touch the [Apply] button.
Transaction Details
• [Export] button
Touch this button to copy daily sales logs to a
“Memory Stick” as text files. Follow the instructions
on the screen to complete the procedure. Logs are
saved in the “saleslog” folder on the “Memory Stick”
and their names are in a YYYYMMDD format (e.g.:
20040327a.txt).
Receipt
• [Line 1] to [Line 6]
Use these boxes to type text strings that will appear on
receipts. You can type up to six text strings that fit on
your receipts (approx. 46 characters each line) and
will appear at the bottom of your receipts. To type text,
touch the [Keyboard] button.
• [Bar Code]
With this setting [ON], you can print bar codes on
your receipts. Touch this button to enable ([ON]) or
disable ([OFF]) bar code printing.
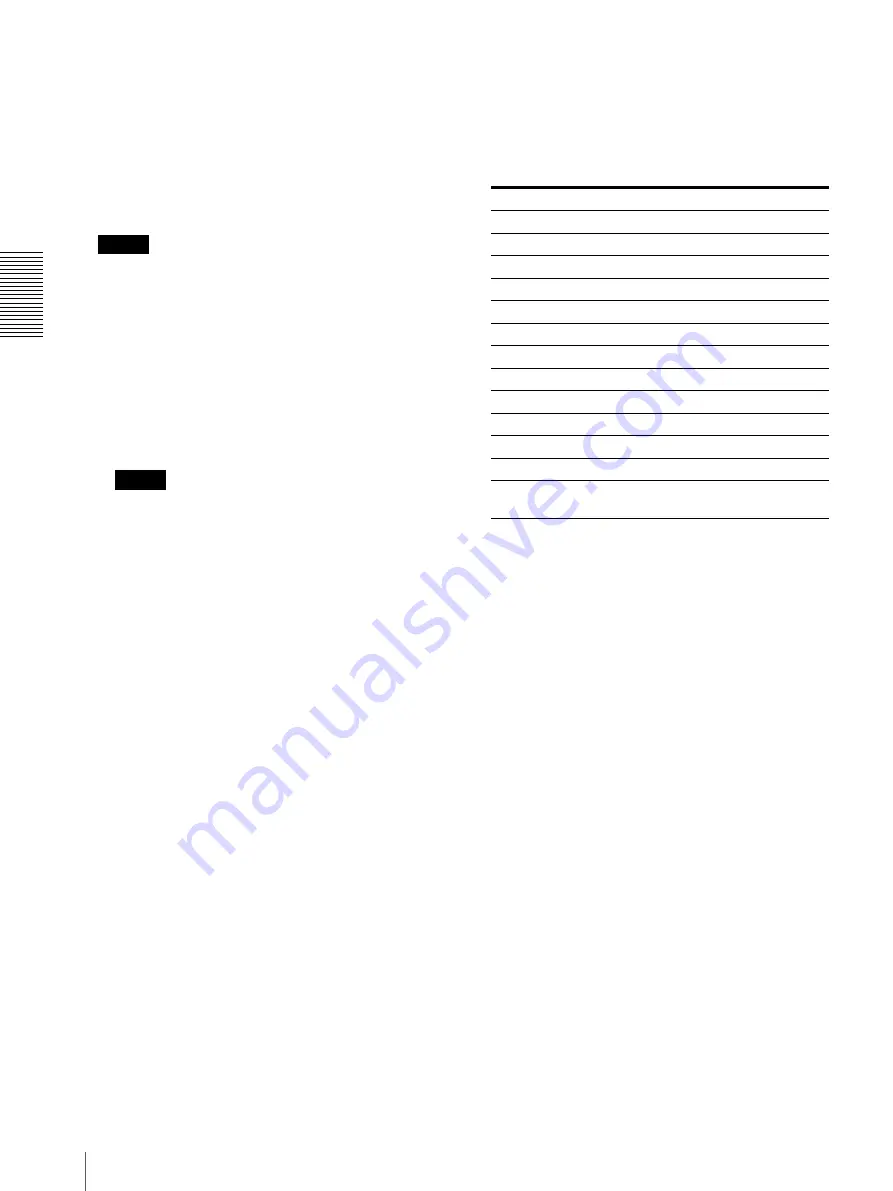
• [Import Bar Code] button
Use this button to import bar code images that you can
print on your receipts. You can import 300
×
100 pixels
(W
×
H) bitmap files to be used as bar codes. The
names of the files that you import vary depending on
the output service.
Bar code bitmap files can be imported from a
“Memory Stick” or CD-ROM. Place the images in the
folder named “barcode” in the root folder of the
“Memory Stick” or CD-ROM. When you touch this
button, you are prompted to select whether you want
to import your bar code images from CD-ROM or
“Memory Stick”. Follow the instructions on the screen
to complete the operation.
• [Import Logo]
You can import a logo that will be printed on your
receipts. The image must be:
– 8-bit grayscale or binary black and white
– 300 × 150 pixels (W × H)
– Saved on a “Memory Stick”
– Bitmap file named “logo_bw.bmp”
When you touch the button, a message appears
prompting you to insert your “Memory Stick”. Touch
the [Cancel] button to return to the Administration
screen.
• [Test Print]
Touch this button to perform a receipt printing test.
Output service
File name
3.5
×
5
prt35.bmp
4
×
6
prt46.bmp
5
×
7
prt57.bmp
6
×
8
prt68.bmp
8
×
10 / 8 × 12
prt81.bmp
ID Print
id.bmp
CD Creation
cd.bmp
InitialFee
init.bmp
Borders - Collage
collage_ex.bmp
Index
index_ex.bmp
Photo library
library_ex.bmp
Portrait Package
pp.bmp
Value Package
vp_a.bmp (Set A)
vp_b.bmp (Set B)


