Not for
Reproduction
www.snapper.com
20
ENGINE
First 5 Hours
Change engine oil
Every 8 Hours or Daily
Check engine oil level
Every 25 Hours or Annually *
Clean engine air filter and pre-cleaner **
Every 50 Hours or Annually *
Change engine oil
Replace oil filter
Annually
Replace air filter
Replace pre-cleaner
See Dealer Annually to
Inspect muffler and spark arrester
Replace spark plug
Replace fuel filter
Clean engine air cooling system
* Whichever comes first
** Clean more often in dusty conditions or when airborne
debris is present.
Engine Maintenance
WARNING
DO NOT attempt any adjustments, maintenance, service
or repairs with the engine running. STOP engine. STOP
blade. Engage parking brake. Remove key. Remove
spark plug wire from spark plug and secure away from
plug. Engine and components are HOT. Avoid serious
burns, allow all parts to cool before working on machine.
Fuel Filler Cap and vent must be closed securely to pre-
vent fuel spillage.
!
!
Change Engine Oil
Used oil is a hazardous waste product and must be dis-
posed of properly. Do not discard with household waste.
Check with your local authorities, service center, or dealer
for safe disposal/recycling facilities.
1. Place bricks or wooden blocks under the front wheels
to lower the rear of the engine.
2. Loosen or remove the oil fill cap on the engine.
3. Place a 2 quart minimum capacity container under the
end of the oil drain
(Figure 20)
.
4. Remove or open the oil drain plug
(A or B, Figure
20)
, depending upon the type of oil drain plug the
engine is equipped with.
5. After all the oil has drained, replace or close the
drain plug, and wipe up any oil that may have spilled.
Dispose of used oil properly.
6. Fill the engine with new oil. Refer to “How To Check/
Add Oil” in the Operation Section.
Change Oil Filter (if equipped)
Some models are equipped with oil filter. For replacement
intervals, see the Maintenance chart.
1. Drain the oil from the engine. Refer to “Change Engine
Oil”.
2. Remove the oil filter
(A, Figure 21)
and dispose of
properly.
3. Before you install the new oil filter, lightly lubricate the
oil filter gasket with fresh, clean oil.
4. Install the oil filter by hand until the gasket contacts
the oil filter adapter, then tighten the oil filter 1/2 to 3/4
turns.
5. Add oil. Refer to “How to Check/Add Oil” in the
Operation section.
6. Start and run the engine. As the engine warms up,
check for oil leaks.
7. Stop the engine and check the oil level. It should be at
the top of the full indicator on the dipstick.
Service Air Filter
WARNING
Fuel and its vapors are extremely flammable and explo-
sive.
Fire or explosion can cause severe burns or death.
• Never start or run the engine with the air cleaner
assembly (if equipped) or the air filter (if equipped)
removed.
!
!
NOTICE:
Do not use pressurized air or solvents to clean
the filter. Pressurized air can damage the filter and solvents
will dissolve the filter.
The air filter system uses either a flat or a cylindrical car-
tridge air filter. Some models are also equipped with a pre-
cleaner that can be washed and reused.
Flat Air Filter
1. Pull up on the cover handle
(A, Figure 22)
. Rotate the
cover handle toward the engine and then remove the
cover
(B)
.
2. Remove the pre-cleaner
(C, Figure 22)
, if equipped,
and the filter
(D)
.
3. To loosen debris, gently tap the filter on a hard surface.
If the filter is excessively dirty, replace with a new filter.
4. Wash the pre-cleaner in liquid detergent and water.
Then allow it to thoroughly air dry. Do not oil the pre-
cleaner.
5. Assemble the dry pre-cleaner and the filter into the
engine base
(E, Figure 22)
.
6. Align the tabs
(F, Figure 22)
on the cover with the
slots
(G)
in the blower housing. Rotate the cover han-
dle back and push down to lock in place.
Cylindrical Cartridge Air Filter
1. Remove the fasteners
(A, Figure 23)
and the air filter
cover
(B)
.
2. To remove the filter
(C, Figure 23)
, lift the end of the
filter and then pull the filter off the intake
(D)
.
3. Remove the pre-cleaner
(E, Figure 23)
, if equipped,
from the filter.
Summary of Contents for 2691382-00
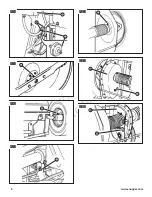
Page 3: ...N o t f o r R e p r o d u c t i o n 3 B A 4 A 5 A 6 A B 7 A 8 A B 9 A 10 A B 11 ...
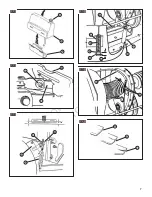
Page 4: ...N o t f o r R e p r o d u c t i o n www snapper com 4 A B 12 A 13 B A 14 A B 15 A B 16 A 17 ...
Page 51: ...N o t f o r R e p r o d u c t i o n 29 es ...
Page 73: ...N o t f o r R e p r o d u c t i o n 29 fr ...
Page 95: ...N o t f o r R e p r o d u c t i o n 29 pt ...
Page 117: ...N o t f o r R e p r o d u c t i o n 29 sw ...
Page 121: ...N o t f o r R e p r o d u c t i o n 3 B A 4 A 5 A 6 A B 7 A 8 A B 9 A 10 A B 11 ...
Page 122: ...N o t f o r R e p r o d u c t i o n www snapper com 4 A B 12 A 13 B A 14 A B 15 A B 16 A 17 ...
Page 126: ...N o t f o r R e p r o d u c t i o n A B 41 C A B 42 A D C B 38 A B 39 A B 40 ...

