background image

 59 62 134 D 3407

26

D 3407

.

208.01.10

.

02 07.2009

3 Operation

Sirona Dental Systems GmbH

Exam concept

Operator’s Manual SIDEXIS XG

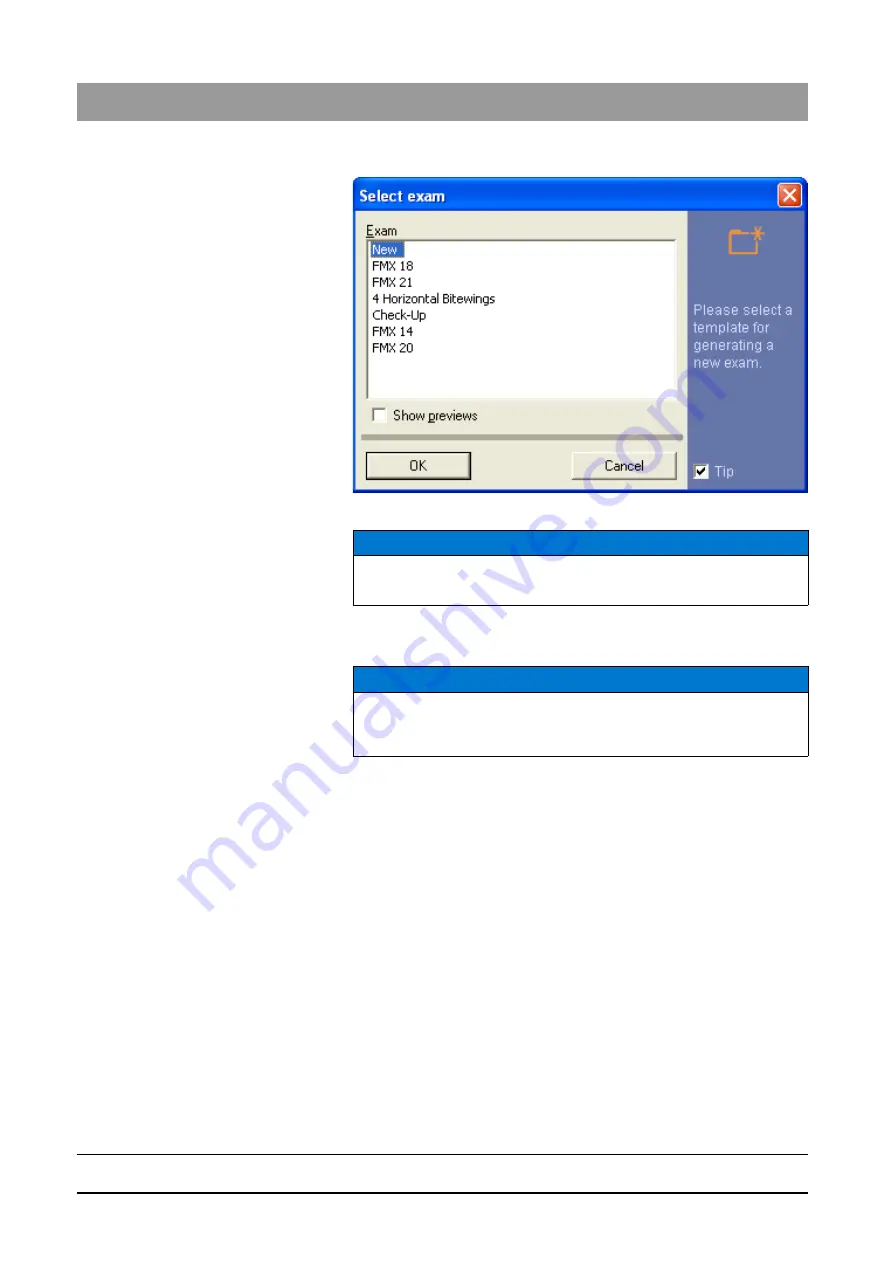
Selection dialog box

All templates saved for an 

"Exam"

 are displayed in the selection dialog box.

Function

The 

"New"

 template appears in the first line. This template consists of an 

empty workspace.

The 

"Show previews"

 check box can be used to display the templates 

graphically.

NOTICE

The use of this drawing function is explained in Section "Templates [

 37]".

NOTICE

It is recommended to select this template for daily routine operation if you 

do not want to use a saved template. 

Summary of Contents for SIDEXIS XG

Page 1: ...MTKOMMV pfabufp ud l j k W b...

Page 2: ...59 62 134 D 3407 2 D 3407 208 01 10 02 07 2009 Sirona Dental Systems GmbH Operator s Manual SIDEXIS XG...

Page 3: ...gging on option 15 3 1 3 Screen layout 16 3 1 4 Functional description and workflows 17 3 1 5 Working with exams 18 3 1 6 Workflow assistance 18 3 1 7 Multi workstation support for exams 19 3 1 8 Chan...

Page 4: ...a patient 46 3 5 Image management 47 3 5 1 Saving original images 47 3 5 2 Save image views 47 3 5 3 Opening images from the SIDEXIS database 48 3 5 4 Image description and findings 56 3 5 5 Removing...

Page 5: ...g raw data manually 133 4 5 2 Deleting raw data automatically 133 4 5 3 Deletion process 134 4 6 Internet connection to SIDEXIS XG 135 5 System setup 136 5 1 Exposure settings 136 5 2 Editing an expos...

Page 6: ...7 Help toolbar 165 7 Appendices 166 7 1 DICOM Export Wrap Go 166 7 2 Backup copies 167 7 2 1 Database backup 168 7 2 2 File based backup 168 7 2 3 Database restoration 169 7 3 Customizing the user int...

Page 7: ...D ROM with manual Warranty passport Intraoral X ray components Wall mounted X ray box for image acquisition PC slide in module for image acquisition USB X ray box Two X ray sensors Full Size and Unive...

Page 8: ...ergonomic findings Some special ergonomic features of SIDEXIS XG Information SIDEXIS XG always displays the current application status Warning Prior to important decisions the user is advised about th...

Page 9: ...minations enables new possibilities for preparing printouts New features of SIDEXIS XG Version 1 4 Overview Restriction of access rights The functionality can be restricted in SIDEXIS XG by using user...

Page 10: ...Service Pack 1 of SQL Server 2005 is used for new installations The administration of templates has been extended The positions of docked toolbars can be fixed New features of SIDEXIS XG Version 2 2...

Page 11: ...her stations You have the option of displaying a ruler for X ray images 1 4 Structure of the documents Structure of the documents The symbols and character formats used in the present manual have the...

Page 12: ...mouse cursor to the time How can I change the system time The current time setting can be changed in a dialog box which opens when you double click the time display The date is set on the left half of...

Page 13: ...software components on the PC Example For instance this is the case when installing a new X ray sensor or a service disk In such cases you must insert the disk included in delivery in the floppy disk...

Page 14: ...ed after some time prompting you to turn off your PC i e you can turn off the PC then or the computer shuts down automatically 2 4 Creating backup copies Why make backup copies To prevent a possible l...

Page 15: ...omatically after a couple of seconds 3 1 2 Logging on option Explanation If the access rights have been restricted the Login dialog box appears after the welcome screen The user must enter his or her...

Page 16: ...ered 3 1 3 Screen layout After SIDEXIS XG is started the program window with the specific program components appears Workspace The working and diagnosing processes of all exams are displayed together...

Page 17: ...ently active function For example the angle during an angle measurement 3 1 4 Functional description and workflows Explanation The functions and workflows of SIDEXIS XG are described in several chapte...

Page 18: ...ession can be saved as an Exam Processing also describes the act of merely opening exposures which are saved in the image database Newly generated exposures are automatically included in the image dat...

Page 19: ...ent Another activation of the key exits the SIDEXIS XG program altogether Continuing an interrupted workflow with the next step Activation Click the button or From the menu bar E x am S teps select th...

Page 20: ...eryworkstation for subsequent diagnostics The SIDEXIS workstations in the treatment rooms do not support X ray image acquisition and are therefore also referred to asviewing stations 3 1 7 1 Generatin...

Page 21: ...on Female represents a female person Enter possible pregnancy only relevant for X ray in the Existing pregnancy check box Reason for image acquisition and or notes The reasons for image acquisition an...

Page 22: ...r whom orders are pending is already pre selected in the patient registration dialog box Scope This function can be used for X ray and video images Activating the function Click the button or In the m...

Page 23: ...exposures are started in the usual way by removing the camera from its holder To make the system ready for panoramic and Ceph X rays proceed as usual Orders which are not processed are considered obso...

Page 24: ...can make an email connection to the SIRONA hotline using the Mail to button on the left side The button on the right side starts the Internet browser installed on your system and connects you to the...

Page 25: ...on Click the button or Click the button on the title bar or Hotkey Activate the key combination Alt F4 or Use the E x am menu bar to select the E xit menu item 3 2 Exam concept 3 2 1 Generating a new...

Page 26: ...n the selection dialog box Function The New template appears in the first line This template consists of an empty workspace The Show previews check box can be used to display the templates graphically...

Page 27: ...exam Explanation This function is used to open a saved Exam If no patient is registered yet the patient selection dialog box opens See also Section How do I use the patient selection dialog box 40 Ac...

Page 28: ...order in which they were created In addition the last saved exam is displayed in the first line 3 2 3 Saving an exam Explanation All objects of the examination window can be saved as an Exam Activati...

Page 29: ...tion can be modified Use the OK button to save the Exam 3 2 4 Printing an exam Explanation When the Exam is printed all of the objects in the workspace are printed on one page There are two ways to pr...

Page 30: ...n be displayed with an SVG viewer Extended functionality Compressed SVG as ZIP for sending via email See section Send examination via email 37 for more information Activating the function Click the bu...

Page 31: ...ns configurable patient data See appendix Options 176 When you click an image it opens directly in the Internet browser window To return to the Exam view press the Back button of the Internet browser...

Page 32: ...ly Via a double click in the Explorer Import For registered patients SIDEXIS XG compares the patient data of the registered patient with that of the imported exam If the patient data is not identical...

Page 33: ...e software asks whether the current view should be saved as Exam see Section Saving an exam 28 This option can also be configured so that this query appears only if at least two images are located in...

Page 34: ...urement see section Angle measurement 93 Bone density measurement see section Bone density measurement 94 Explanation These objects consist of individual node points that are connected by lines In mos...

Page 35: ...e color Fill color Stroke width Function 1 Select the desired object 2 Activate the Attributes function 3 Change the properties as required 4 Confirm with OK Applying settings as default values f the...

Page 36: ...e the key combination Ctrl C or Select Copy from the pop up menu or Use the E dit menu bar to select the C opy menu item 3 2 13 Pasting images from the Windows clipboard Explanation SIDEXIS XG offers...

Page 37: ...ting an examination 30 section Operation In the menu bar E x am Export select the menu item Send exam by e mail The email standard application is opened with the compressed Zip file in the attachment...

Page 38: ...orkspace and the order of exposure as a template All image types Intraoral Panoramic Ceph TSA Video and 3D can thus be saved in the available templates 3 3 2 1 Saving a template Activating the functio...

Page 39: ...en to be able to assign the image to the patient and then display a saved image on the screen Data security Since a newly taken X ray is saved automatically to the patient database immediately after t...

Page 40: ...ut The Register patient dialog box is divided into the following areas Patient selection list box 40 Exam selection list box 42 Buttons 42 Example screen 3 4 2 1 Patient selection list box Explanation...

Page 41: ...k search check box 2 Select the desired search criterion 3 Type the personal data into the search box according to the search criteria 4 Click on the Search button The desired patient selection then a...

Page 42: ...xam saved for the selected patient will be opened Thirdly the Templates folder is displayed It contains ready to use templates of special exam types and self created templates See Section Templates 37...

Page 43: ...the text boxes of the relevant dialog box Activating the function Click the button or In the menu bar E x am P atient select the menu item N ew The New patient window is displayed Example screen Enter...

Page 44: ...dy registered patient will be replaced by the new patient The new patient is now set up in the system 3 4 4 How can I modify patient data Explanation The data of the currently registered patient can b...

Page 45: ...n the menu bar E x am P atient select the menu item Dele t e The Delete patient window is displayed NOTICE To prevent inadvertent deletion a message prompting you to reconfirm the command is displayed...

Page 46: ...ion Click the button or In the menu bar E x am P atient select the menu item C heck out The patient is checked out Control If you have processed existing images or taken new video exposures of the pat...

Page 47: ...d as well The original image will at no time be overwritten by a new view In this way it is possible to generate different views from one image which then can also be displayed simultaneously The name...

Page 48: ...displayed here Scope This function can be used for X ray and video images but not for live and still images This function applies only to the active image Activating the function Click the button or H...

Page 49: ...as preview images with the related image type Tab List The images are displayed as a list The list includes the image type date and a short description of each image List field View By using the View...

Page 50: ...e image accordingly at an earlier point in time usually immediately after the exposure or during the findings This allocation process is described in Section Image description and findings The number...

Page 51: ...nal odontogram e g 16XI The number of available images is shown below or above each tooth button Each of the symbols located next to the tooth symbols can be clicked to display one quarter of the teet...

Page 52: ...eral and carpus exposures is offered The procedure is identical to that for intraoral images The image type code above the list box is then detailed further according to the selected type e g 01XC Dur...

Page 53: ...ed using the structural tree Pan Ceph TSA etc This limits you to the selected view in 2D image selection Upon opening the 3D processing software GALAXIS this has no effect on the selected GALILEOS sca...

Page 54: ...e clicking with the left mouse button on the preview window The image is loaded to the workspace 3 5 3 3 Multiple selection Explanation With multiple selection several images are selected from the lis...

Page 55: ...iew window The images are loaded to the workspace 3 5 3 4 Patient data discrepancies Explanation If the patient data saved for the image you have selected are not identical to the current patient data...

Page 56: ...can be used for X ray and video images but not for live and still images This function applies only to the active image Activating the function Click the button or Use the A nalysis menu bar to selec...

Page 57: ...active X ray Image type The image type is displayed here For intraoral TSA and video images the image type is determined by the tooth selected in the displayed odontogram For panoramic and ceph expos...

Page 58: ...sed then this can be noted by activating the associated check box Images marked as not diagnosable are identified by in the image type They are displayed only when all image types are displayed by cli...

Page 59: ...radiation time tube current tube voltage stand height temple support width and forehead support For all other exposures this information is grayed out 3 5 5 Removing objects from an exam Scope This fu...

Page 60: ...ou to save are issued before the image is removed from the workspace With live video images or if no changes have been made to an image that was already saved in the past the associated image window i...

Page 61: ...ou to reconfirm the command is displayed before permanent deletion 3 5 8 Identification of images Explanation X ray images are provided with a code to enable clear identification of copies and origina...

Page 62: ...ion 4 Image created with the present SIDEXIS system Imported file Scanner TWAIN Imported from clipboard Imported via SLIDA Position 5 No compression Compression type JPEG Position 6 JPEG compression p...

Page 63: ...and modified brightness contrast then exported Coding SIDEXIS 5 35 M Example 2 A new image was saved with compression in dental practice A and a modified version of it was exported as a compressed fil...

Page 64: ...in the case of a referral is facilitated with the Export function An image is copied to another storage medium e g USB stick CDR DVD R conventional diskette or network drive and can then be imported v...

Page 65: ...data is capable of reading this compression format This is always the case if the same or a newer SIDEXIS version than the exporting SIDEXIS version is being used The version is shown in the window Mo...

Page 66: ...d by another SIDEXIS system before For images that have already been exported using SIDEXIS all available image information such as exposure date and findings are also exported with the image The imag...

Page 67: ...item Imp o rt Function The path and name of the file to be loaded must be specified in the dialog box Long file names can be used Example Importing the previously exported image named Exchange tif fro...

Page 68: ...sufficient space for the image and the associated description so that when the active image is printed both are printed on one page The printout can be checked using the Print preview function See Se...

Page 69: ...age is output to the default printer The print setup dialog box of the operating system appears The window Set up page is displayed The size and position of an image can be changed there See Section P...

Page 70: ...ly utilized Option buttons Variable The size can be adjusted Check box Limit to printable size When the check box Limit to printable size is activated the size of the print out is limited to the maxim...

Page 71: ...ormed the length must be calibrated by means of a reference measure on the X ray image Select scanner function Click the button or Use the I mage menu bar to select the S e lect scanner menu item 3 5...

Page 72: ...work with SIDEXIS XG while the image is transmitted Check box Report after sending After the e mail has been successfully sent a confirmation message appears on screen Command button Send Is used to...

Page 73: ...aced to SIDEXIS in this way then you select the desired target application in a dialog box 3 5 16 Move image Explanation This command makes it possible to move images that were created for the wrong p...

Page 74: ...the PC is ready for exposure and SIDEXIS is ready to take an X ray a dialog box appears on the monitor as control In an X ray exposure the dose area product can be entered immediately following image...

Page 75: ...ription and findings 56 3 6 3 Intraoral X rays 3 6 3 1 Single intraoral X ray exposures Explanation The first alternative serves for producing a single intraoral image In this case readiness for expos...

Page 76: ...all X rays are taken the process is completed by canceling the ready dialog box Activating the function Click the button or Hotkey Activate the key combination Ctrl Shift M or In the menu bar I mage I...

Page 77: ...indings dialog box explained in detail in the chapter on image description is displayed Click the desired tooth in the lower part of the dialog box and confirm with OK The rest of the box is not yet r...

Page 78: ...ion mark are possibly not switched on Acquisition units which are crossed out are possibly busy After the X ray acquisition unit has been selected further dialog boxes show how the connection between...

Page 79: ...box lights up the exposure can be taken as in conventional radiography The X ray sensor is then put into a ready status Signal transmission starts as soon as the X rays hit the sensor Readiness for ex...

Page 80: ...r dialog boxes show how the connection between the acquisition unit and the calling computer is established These dialog boxes can provide important information in case of connection errors Image acqu...

Page 81: ...re has been started it can only be stopped via the ORTHOPHOS Acquisition dialog box for ORTHOPHOS DS units Acquisition dialog box for ORTHOPHOS XG DS units While the X ray data is being transferred fo...

Page 82: ...er is established These dialog boxes can provide important information in case of connection errors Image acquisition As soon as the message Waiting for X ray appears the X ray unit is enabled by the...

Page 83: ...ra all relevant commands refer to the SIROCAM as long as it is removed from its holder When the SIROCAM is in its holder then the extraoral camera has priority However you can also switch between the...

Page 84: ...rdware 3 6 7 4 Taking an exposure Video still image Save Explanation There are several possibilities depending on the type of system or the treatment center in which the SIROCAM is integrated Activati...

Page 85: ...Video live and still image Hotkey Press the Del key 3 6 7 6 Overview The following illustrations provide a further overview of the relationships SIROCAM After the SIROCAM has been removed from its ho...

Page 86: ...n Operator s Manual SIDEXIS XG Full face camera After the SIROCAM has been removed from its holder it has priority over an additionally connected extraoral full face camera However you can switch to t...

Page 87: ...lysis tools b 3 7 Analysis tools Explanation Analysis tools help to make the interpretation of X ray and video exposures easier 3 7 1 Selecting objects in the workspace Explanation The standard mouse...

Page 88: ...e left mouse button draw a selection frame around the desired objects 2 Release the left mouse button 3 7 2 Restore original image Explanation The Starting image function allows you to discard all pre...

Page 89: ...e for length measurements intraoral exposures and ORTHOPHOS exposures See Section Correcting the results of a length measurement 91 NOTICE The indicated lengths are relative values They depend on the...

Page 90: ...pointer to the desired end point Both points are connected by a line 4 Confirm the measured length by double clicking the left mouse button Measuring the length across several interpolation points 1 D...

Page 91: ...sembly during an intraoral exposure but is slightly inclined then the measured distances are too large A projection correction is provided for this case Scope This function can only be selected if at...

Page 92: ...factor 4 Close the dialog box by clicking the OK button For all subsequent length measurements in this image the calculated correction factor is used To make the user aware of the activated correctio...

Page 93: ...o place the apex of the angle 2 Confirm this position by clicking the left mouse button 3 Draw the first leg of the angle to be measured using the mouse pointer 4 Confirm this position by clicking the...

Page 94: ...nflammations Decision whether the inflammation is clearing up or getting worse Decision on bone mass build up reduction on implants Scope This measurement tool works only with X ray exposures Activati...

Page 95: ...display works only for density profile measuring sections Opening the display dialog box The dialog box opens via the Attributes function Hotkey Simultaneously press the Alt and Enter keys or Click th...

Page 96: ...Windows clipboard with the Copy button This feature enables the user to perform an evaluation in other programs Allocation between measuring location and diagram The viewfinder in the Display density...

Page 97: ...anges Zooming in which only the detail view changes The display size of the image remains intact here Scope This function can be used for X ray and video images but not for live and still images Activ...

Page 98: ...an pan around the image thus displaying another image detail either in horizontal or vertical direction using the scroll bars The so called Hand mode is a simple and intuitive method for panning aroun...

Page 99: ...hus represents an alternative to positioning using scroll bars keyboard and the Shift visible image portion 98 function Scope This function can be used for X ray and video images but not for live and...

Page 100: ...e g to compare sides 3 7 4 4 Tiling Explanation If several image windows are open simultaneously in the SIDEXIS workspace some image information may be hidden due to mutual overlapping The Tile functi...

Page 101: ...is visible If several windows appear at the same position when arranging the intraoral X rays then these are cascaded with an offset of one frame width You can bring an image window hidden in the back...

Page 102: ...f the Extended image title function is activated Click on the button in the image title see the Options 176 section Terminating the function Double click the image or Hotkey Press the Esc key or Click...

Page 103: ...gnifier function from step 1 onwards as often as desired Moving the magnifier window The magnifier window can be moved to any position within the image by clicking into the title bar and dragging it w...

Page 104: ...I mage R o tate select the menu item Turn to l eft Turning by 180 degrees Click the button or In the menu bar V iew I mage R o tate select the menu item Turn by 180 Example screens 3 7 4 11 Using hotk...

Page 105: ...value of the small image area captured Since the image is now available in the computer as a series of clearly defined numerical values the image information can be processed by selectively changing t...

Page 106: ...below the sliders proceeding from the basic value of 50 Operation 1 Place the mouse pointer on the control button of the desired slider 2 Press and hold down the left mouse button 3 Move the control b...

Page 107: ...s long as the mouse adjuster is active 3 7 5 3 Determining the region of interest for image filters Explanation The image processing functions and commands usually affect the entire image However it i...

Page 108: ...sired position Removing a region of interest 1 Place the mouse pointer in the region of interest 2 Press the right mouse button 3 Click on the Remove function The region of interest is removed from th...

Page 109: ...the chosen brightness and contrast settings in the region of interest Scope X ray and video images not live and still images Activating the function Click the button or In the menu bar A nalysis Brigh...

Page 110: ...tinguish better from one another than the corresponding gray levels Impact of brightness and contrast adjustment The color display can be influenced by adjusting brightness and contrast The image proc...

Page 111: ...stribution does not make full use of the available grayscale value range Scope This filter works only with X ray exposures Activating the filter Click the button or Select O ptimize contrast from the...

Page 112: ...ontrast of adjacent pixels Contrary to the Sharpen filter described later sharp edges are softened here A smoother image impression is created The overall definition of the image is reduced Scope This...

Page 113: ...function helps to accentuate edges or contours The impression of a sharper image is created Scope This filter works only with X ray exposures Activating the filter Click the button or Select S harpen...

Page 114: ...of configuring the Sharpen filter individually Scope This filter works only with X ray exposures Activating the filter Click the button or Select Sharpen Plus v ariable from the pop up menu F ilter o...

Page 115: ...Scope This filter works only with X ray exposures Activating the filter Click the button or Select F ilter black dots from the pop up menu F ilter or In the menu bar A nalysis F ilter select the menu...

Page 116: ...on During this filter operation the borders between high contrast image details are analyzed and displayed lighter or darker Thus edges or contours within the image are clearly accentuated The result...

Page 117: ...ivating the function Click the button or Hotkey Activate the key combination Ctrl Z or Select U ndo filter from the pop up menu or Use the E dit menu bar to select the U ndo filter menu item 3 7 5 16...

Page 118: ...xplanation The configuration is described in Section Contrast optimization 111 Activating the function Click the button or In the menu bar A nalysis Mouse t ools select the menu item O ptimize contras...

Page 119: ...n the gray scale spectrum of the X ray image The gray tones contained in the window are then distributed evenly over the 8 bit gray levels 256 gray tones All values below the window appear black All v...

Page 120: ...ing gray level in the image Linear function The Linear function ensures that the gray tones contained in the window are evenly distributed over the 8 bit gray levels 256 gray tones during windowing of...

Page 121: ...nes brighter or darker This can be achieved with the gamma function 1 Click the Linear field with the left mouse button A pop up menu opens 2 Select the Gamma function An additional slider with a disp...

Page 122: ...anation Vector objects such as drawings notes and hints can also be inserted in images now as known from conventional X rays Different tools are available for that purpose Scope All drawing tools can...

Page 123: ...ing objects from the workspace 35 3 7 6 3 Lines Explanation This function enables you to draw lines with any number of node points in the workspace Scope Can be freely used in the workspace Activating...

Page 124: ...ting the function Click the button or In the menu bar A nalysis D r awing tools select the menu item C ross Functioning The use of this drawing function is explained in the following sections Section...

Page 125: ...g the function Click the button or In the menu bar A nalysis D r awing tools select the menu item E llipse Functioning The use of this drawing function is explained in the following sections Section C...

Page 126: ...3 Relocating the image stock Explanation Because of the large data volumes which result from the generation of digital X ray and video images the patient and image database may increase considerably...

Page 127: ...m Scope This function can be used for all X ray and video images of the image database Functioning During relocation SIDEXIS remembers the external storage medium to which the images are relocated Whe...

Page 128: ...re and to determine its extent Activating the function Click the button or Use the U tilities menu bar to select the R elocate menu item 1 Selecting the time period You can select between quarterly in...

Page 129: ...ox for the required patient This makes sense if patients are currently in treatment 2 Confirming the dialog Relocation is carried out upon confirming the dialog 3 The relocation procedure Relocation o...

Page 130: ...media for relocation If you have too few storage media prepared it may interrupt the relocation procedure In this case relocation can be continued at a later point in time Recommendations for storage...

Page 131: ...se if patients are currently in treatment After you have confirmed the dialog box you are guided through the relocation procedure step by step with a number of messages 2 Confirming the dialog After y...

Page 132: ...er from the selection of those not yet relocated Supplement Exchangeable external data media When using exchangeable external data media then you are requested to insert the respective data media Afte...

Page 133: ...g functions Deleting raw data manually Deleting raw data automatically 4 5 1 Deleting raw data manually Explanation It is possible to delete raw data from the SIDEXIS database manually This is especia...

Page 134: ...3D Data Reduction button You can define for how long the unprocessed data should remain saved as well as the check intervals Starting the function Upon activating the function the Reduce quantity of 3...

Page 135: ...e to be excluded from deletion then deactivate the check box for the required patient This makes sense if patients are currently in treatment Operation Press the Delete data button The raw data will b...

Page 136: ...rking and to the existing system environment Activating the function Click the button or From the menu bar U tilities select the menu item Configure s ystem Example screen 5 1 Exposure settings Activa...

Page 137: ...of the exposure sequence By clicking the different buttons individually or in combination you can determine the image type s for which the selected settings are active Depending on image type Value r...

Page 138: ...ox which is displayed immediately after taking the exposure Depending on image type L R marking This function determines whether a tooth position marker is to be inserted into the image Example screen...

Page 139: ...rformance and therefore plays a less significant role on fast PCs Language output Activates audio output Call image description automatically Determines when the image description dialog box opens aut...

Page 140: ...m The display size is set here For setting Zoom 1 1 the zoom is adjusted to match the selected resolution Yes check box The settings are activated for the corresponding image type by selecting the Yes...

Page 141: ...Open Opens an existing exposure template Save Saves the exposure template Save as Saves the exposure template under a new name Delete Deletes the active exposure template Quit Closes the configuratio...

Page 142: ...or and the position of the sensor cable are displayed as an outline 5 Position the sensor as desired and release the left mouse button The exposure position of the sensor now appears in the exposure t...

Page 143: ...lete unnecessary positions or add new positions as described in Creating a new exposure template 141 5 2 4 Changing the exposure position in the exposure template window Example screen Function Using...

Page 144: ...ing exposures red Posterior Switches to the sensor holder for molar exposures yellow Delete Deletes the exposure position in the exposure template 5 2 5 Changing the tooth registration Explanation Tee...

Page 145: ...ee example screen can be individually adapted Example screen Activating the function 1 From the menu bar U tilities select the menu item Configure s ystem 2 Press the Standard findings button The edit...

Page 146: ...he is omitted You must use this character only once within an entry For optimal work with thehotkeys it is also recommendable to use unique hotkeys within the entire menu Assigning the same hotkey twi...

Page 147: ...nserted into the printed image if L R marking has not yet been selected for this image Clicking the various buttons individually or in combination determines the image type for which the selected sett...

Page 148: ...epending on image type By clicking the different buttons individually or in combination you can determine the image type s for which the selected settings are active Depending on image type L R markin...

Page 149: ...be entered here Aliasname of sender The alias name of the sender may be entered here Type of connection Selection of the e mail service SMTP direct Opens the SIDEXIS E Mail dialog box The server addre...

Page 150: ...image type L R marking This function determines whether a tooth position marker is to be inserted on the printed image if L R marking has not yet been selected for this image see also Section Exposur...

Page 151: ...e views are checked for modifications before the image is closed The program asks whether the changes should be saved Backup When quitting the SIDEXIS software the following message is displayed in th...

Page 152: ...ich the next test has to be performed is entered The date of the last constancy test performed at this station is also provided for your information The next test date is displayed when the SIDEXIS XG...

Page 153: ...If not they are compressed using the configured Compression parameter Depending on image type Compression parameter See Section Exposure settings 136 5 10 Configuring the permanent dentist data Activa...

Page 154: ...a name After each change in the Manage permanent dentist dialog box and subsequent confirmation with OK you will be prompted to restart SIDEXIS in order to apply the new data 5 11 Displaying an error...

Page 155: ...n I check out a patient 46 Register new patient See section How can I create new patient data 43 Changing patient data See also Section How can I modify patient data 44 Deleting patient data See also...

Page 156: ...bination Ctrl N See Section Generating a new exam 25 Opening an existing exam Hotkey Activate the key combination Ctrl O See Section Opening a saved exam 27 Closing the exam See Section Closing an exa...

Page 157: ...ing an exam See Section Importing an exam 32 Exporting an exam See Section Exporting an exam 30 Changing programs See Section Changing programs 23 Exit program See Section Exiting SIDEXIS XG 25 6 2 Im...

Page 158: ...e See Section Scanning images 70 Configuring the scanner See Section Scanning images 70 Select image from the image database for viewing See Section Opening images from the SIDEXIS database 48 Close i...

Page 159: ...See Section Exporting an image view 64 6 3 Edit toolbar Undo last filter operation Hotkey Activate the key combination Ctrl Z See Section Undoing the last filter operation 117 Copies the active image...

Page 160: ...for selecting objects in the workspace See Section Selecting objects in the workspace 87 Panning Hotkey Activate the Ctrl key double click with the left mouse key See Section Moving the image segment...

Page 161: ...ics See Section Special drawing tool for orthodontics 124 Rectangle See section Rectangle 124 Ellipse See section Ellipse 124 Measuring lengths See section Length measurement 89 Adjusting length measu...

Page 162: ...moothing filter See Section Smooth down 112 Sharpen Plus filter See Section Sharpen Plus 113 Sharpen Plus Variable filter See Section Sharpen Plus variable 114 Noise reduction filter See Section Noise...

Page 163: ...n of interest 108 6 5 View toolbar Maximize active image to full screen size See Section Full Frame mode 102 Reducing the active image to standard size Hotkey Press the Esc key See Section Full Frame...

Page 164: ...ing images in the workspace See Section Cascading 101 Turning the active image 90 to the left Hotkey Activate the key combination Ctrl L See Section Rotating 103 Turning the active image 90 to the rig...

Page 165: ...t 16 Customize user interface See Section Customizing the user interface and plugin administration 170 6 6 Utilities toolbar Opening the constancy test See Section Constancy test 132 Relocating the im...

Page 166: ...ts of the Windows wizard to burn the data to CD Possible errors An error alert will appear instead of Windows assistant if no CD burner is available in the SIDEXIS station or if the Windows assistant...

Page 167: ...software Such a copy is generally referred to as a backup Backup The backups must be carried out in two steps Step 1 Database backup 168 Step 2 File based backup 168 Restoration Restoration must be ca...

Page 168: ...des In addition to the database PDATA_SQLEXPRESS the Master database should be backed up as well The database Master contains user and password information Backup SIDEXIS XG provides the NGSQLBackup e...

Page 169: ...he image data folder the database will be backed up as well Prerequisite In order to restore the backed up database the backed up image data folder must be restored first See Section File based backup...

Page 170: ...storations 7 3 Customizing the user interface and plug in administration Explanation Interface customization allows users to adapt the SIDEXIS XG software to their special requirements and wishes Acti...

Page 171: ...can be assigned to the toolbars of the SIDEXISXG XG user interface desktop Activating the function 1 From the menu bar V iew select the menu item C ustomize 2 Select the Commands tab Structure The men...

Page 172: ...w select the menu item C ustomize 2 Select the Toolbars tab Operation Toolbars selection window The existing toolbars on the SIDEXIS XG desktop can be shown and hidden by clicking the check boxes New...

Page 173: ...the toolbars remain unchanged Dialog box 7 3 2 1 Showing and hiding toolbars Explanation In addition to the Toolbars selection list box described above you can also show and hide the toolbars directly...

Page 174: ...is automatically created When the menu command is created a distinction is made between filter plugins and other types of plugins Filter plugins are available in the menu bar via Analysis Filter Filte...

Page 175: ...alled the plugin 3 Select the required plugin file 4 Press the Open button 5 Close the dialog box The new plugin is registered Removing a plugin from the SIDEXIS XG software 1 Mark the plugin to be de...

Page 176: ...Options tab Dialog box Configuration The Options tab is subdivided into the following configuration fields Toolbars configuration group box Large Icons check box The size of the SIDEXIS XG user interf...

Page 177: ...e will be displayed on the title bar of the SIDEXIS_XG program printouts and export files First name check box If the check box is activated the first name will be displayed on the title bar of the SI...

Page 178: ...ving and loading the user interface is displayed in each case for your information 2 Press the OK button Only if the selected option has an impact on other users a query is displayed Press the Yes but...

Page 179: ...ned roles 180 7 3 5 1 Configuration field User Explanation This area is used for managing the users of SIDEXIS XG Structure Left selection field Contains a list of all users of the SIDEXIS XG database...

Page 180: ...gned roles Explanation In this area the roles for the selected user are displayed and managed Structure Add button The Add button opens up the Roles 182 window There you can assign roles to the select...

Page 181: ...XG the Windows login will be used The user does not have to log on a second time The user name must be identical to the login name used for logging on to Windows Request new password at next login che...

Page 182: ...In this window you can create and configure a new role The Remove button deletes the selected role If the role has already been assigned to other users these assignments are deleted as well The Attrib...

Page 183: ...s all actions that are not assigned to the role Granted picklist Shows all actions that are assigned to the role Configuration Moving an action from one picklist to the other 1 Select the desired acti...

Page 184: ...d here Option button International Tooth system FDI Tooth numbering of the FDI World Dental Federation Option button American Dental Association ADA Tooth numbering of the American Dental Association...

Page 185: ...is either contained in the message itself or in this manual Identification These messages are normally identified by the following symbol Questions and warnings Questions and warnings Explanation If t...

Page 186: ...necessary to call a service engineer NOTICE If this information does not lead to the desired result or the error is not included in the list call the hotline for assistance 1500 SIDEXIS can only be s...

Page 187: ...e patient must slightly differ from the existing entry e g by appending a number This error is unlikely to occur as the number of exposures that can be saved is very large 1611 The number of images th...

Page 188: ...mal system state If the patient is not registered at another station on the network check all stations thoroughly he or she can be enabled in SIDEXIS for processing with the command Utilities Multista...

Page 189: ...806 Connect a sensor or check the sensor s cable or connection 1807 The sensor has been successfully replaced or newly installed No further action is necessary 1811 see 1806 1812 It was necessary to i...

Page 190: ...component is displayed 3 Press the Next button The image is retrieved and processed The name of the patient is displayed and the program proposes a storage location for the retrieved image 4 Remember...

Page 191: ...tool creates a file to find errors for the SIRONA customer service center Information pertaining the settings and environment of the SIDEXIS XG system are found in this file Command 1 Follow the path...

Page 192: ...asurements 93 angles 93 Anode current 140 AP 52 apex of the angle 93 area 138 B backup 126 bone density bar length 96 spreading 96 C Cannot be diagnosed 58 carpus exposures 52 Ceph X ray exposure 80 c...

Page 193: ...E email 71 email address 72 email connection 24 71 Error messages 185 exposure quality 132 extraoral video camera 83 F Findings 58 138 findings 50 findings dialog 77 flashing 80 82 foot switch 83 84 f...

Page 194: ...e code 51 52 imported images 93 incorrect assignment 55 instructions 185 international odontogram international odontogram 51 Internet browser 24 Intraoral X ray images 75 J JPEG 139 K kit solution 7...

Page 195: ...original images 60 Ortho template 37 P PA 52 Panorama X ray unit ORTHOPHOS 3 DS 7 ORTHOPHOS Plus DS 7 ORTHOPHOS Plus DS Ceph 7 ORTHOPHOS XG Plus DS 7 ORTHOPHOS XG Plus DS Ceph 7 panoramic X ray expos...

Page 196: ...vice disk 13 service engineer 132 service password 133 Sex 21 Short description 58 short description 49 132 single intraoral image 75 Single selection 53 SIROCAM 7 83 SQL server 168 square pixels 93 s...

Page 197: ...n 7 Video camera 7 video image 84 video images 39 Viewing stations 20 Views Original view 47 views 47 different views 47 saved views 48 W warnings 185 Warranty passport 7 windowing 119 Windows clipboa...

Page 198: ...t K p a p d e OMMV p W m d a PQMTKOMUKMNKNMKMO MTKOMMV KJk KW NNN SPO p a p d e rp W c PN SQSOR _ d K K p a p ii QUPR p a I p NMM I k OUOTP rp l k RV SO NPQ a PQMT...

Reviews: