5-7
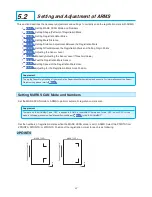
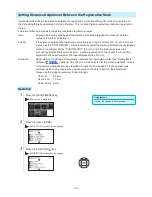
This section describes the necessary adjustment and settings to correctly scan the registration mark with ARMS.
P.5-7
Setting MARK SCAN Mode and Numbers
P.5-11
Setting Shape (Pattern) of Registration Mark
P.5-12
Setting Registration Mark Size
P.5-14
Setting Mark Distance
P.5-16
Setting Distance Adjustment Between the Registration Mark
P.5-18
Setting Offset Between the Registration Mark and Cutting Origin Points
P.5-20
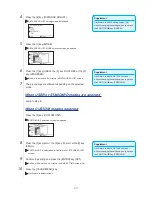
Adjusting the Sensor Level
P.5-22
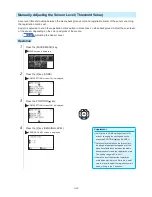
Manually Adjusting the Sensor Level (Threshold Value)
P.5-24
Test the Registration Mark Sensor
P.5-26
Setting Speed of the Registration Mark Scan
P.5-27
Adjusting for the Registration Mark Scan Position
Supplement
Turning the Paper-Weight setting off can result in the Registration Mark not being read correctly. For information about the Paper-
Weight setting, please refer to
P.7-14
.
Setting MARK SCAN Mode and Numbers
Set the MARK SCAN mode to ARMS to perform automatic registration mark scan.
Supplement
There are "AXIS ALIGNMENT" and "OFF" in addition to "ARMS" in the MARK SCAN modes. To turn "OFF", select "OFF" for the
mode in following procedures. See "Manual Position Adjust"
P.6-1
for AXIS ALIGNMENT".
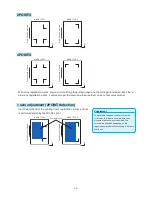
Set the numbers of registration marks when the MARK SCAN mode is set to ARMS. Select the POINTS from
2POINTS, 3POINTS, or 4POINTS. Position of the registration marks for each is as following.
2POINTS
Fe
ed d
ire
ct
io
n o
f m
ed
ia
MARK TYPE 1
Fe
ed d
ire
ct
io
n o
f m
ed
ia
MARK TYPE 2
5.2
Setting and Adjustment of ARMS
Summary of Contents for Vinyl Express Qe6000
Page 1: ...CUTTING PLOTTER USER S MANUAL MANUAL NO VEXQe60 UM 151...
Page 2: ......
Page 24: ......
Page 86: ......
Page 146: ......
Page 152: ......
Page 168: ......
Page 194: ......
Page 208: ......
Page 232: ...A 4 Qe6000 900 1046 593 Unit mm Dimensional accuracy 5mm A 3 External Dimensions...
Page 244: ......
Page 246: ......


