background image

REC

FULL AUTO button

PAUSE

Unlike conventional camcorders, this model frees
you from having to peer into a small viewfinder. You
can watch the subject on the large LCD monitor for
easier, more enjoyable video-shooting.

EASY CAMERA 

WITH FULL AUTO

Before you start recording, perform the operations
described on pages 

10 

through 21 to prepare your

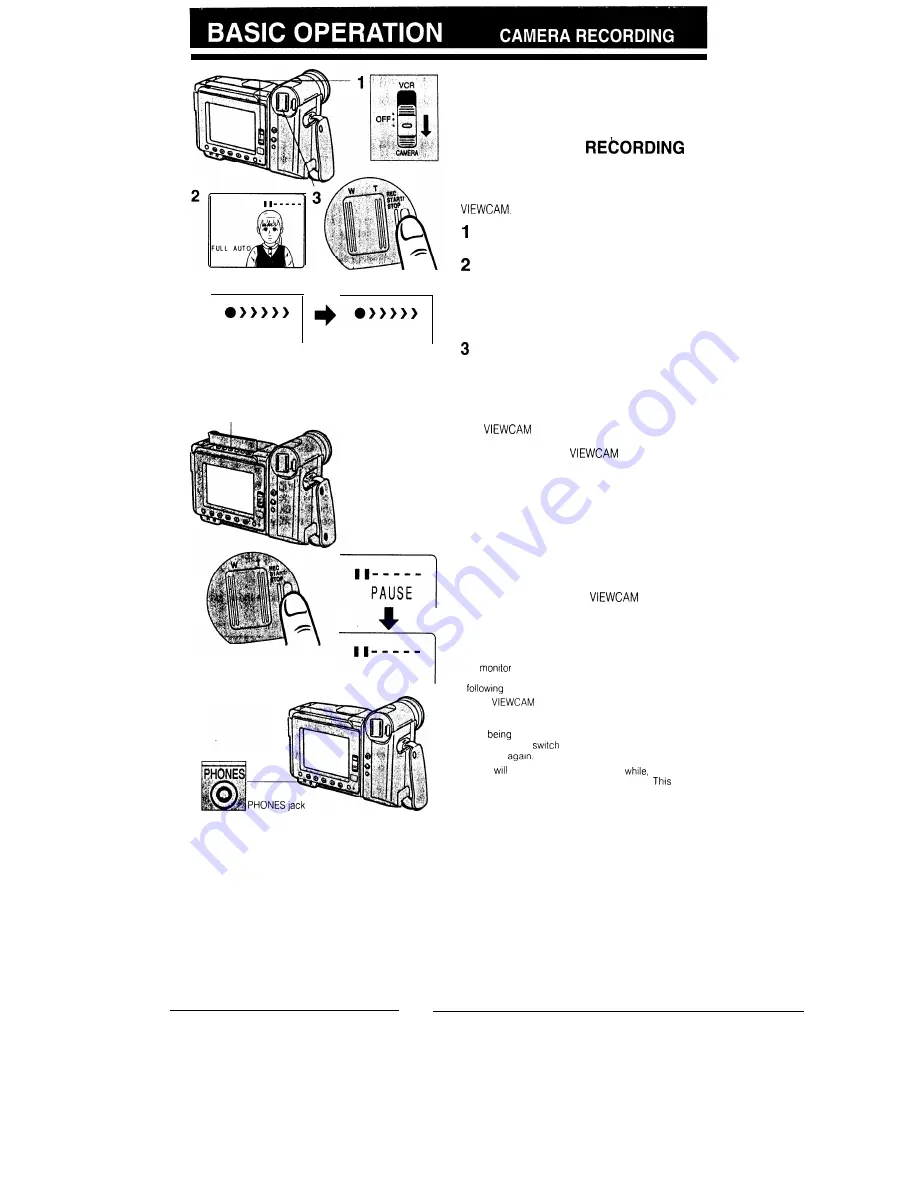
Set the Operate switch to CAMERA.

Make sure that the Full Auto mode indicator

“FULL AUTO” is displayed on the monitor.

Note:

If, at this time, “FULL AUTO” does not appear, press and
hold the FULL AUTO button for more than 1 second.

 Press the REC START/STOP button to start

recording.

AUTO WHITE BALANCE AND
AUTOEXPOSURE

This 

 is equipped with auto white balance

and auto exposure functions. By pressing the FULL
AUTO button to set the 

 to Full Auto mode,

colour and brightness controls are automatically
adjusted to their optimum settings, letting you make

beautiful recordings easily.
In particular, the auto white balance feature uses

fuzzy logic for light source discrimination, which
makes it possible to obtain truer colours.

TO PAUSE RECORDING

Press the REC START/STOP button again.
Recording pauses, and the 

 is in

Recording Standby mode.

Notes:

To leave Camera mode, set the Operate switch to OFF.

The speaker is turned off during recording

To 

 the sound during recording, plug a pair of

earphones into the PHONES jack. Adjust the volume by

 the procedure described on page 20.

If the 

 is kept in Recording Standby mode for

more than 5 minutes, the power will be automatically
turned off to save battery power and to protect the tape
from 

 damaged. To continue recording after this,

set the Operate 

 to OFF, and then back to

CAMERA 

If you 

 not be recording again for a 

 turn off the

power by sliding the Operate switch to OFF. 

 will

make the battery last longer.

22

Summary of Contents for Viewcam VL-H410X

Page 1: ...SHARP LIQUID CRYSTAL VIDEO CAMERA kli H PAL OPERATION MANUAL Before using this VIEWCAM please read this manual carefully especially page 2 S H A R P ...

Page 2: ...dio dubbing cannot be played back on this unit Your VIEWCAM is designed to record in SP mode only It will not perform normal playback for programmes prerecorded in LP mode If you record on a tape on which PCM sound has already been recorded the audio track of the new VIEWCAM recording may not come out when the tape is played back on a PCM capable VCR If this occurs set the VCR s audio monitor sele...

Page 3: ... adaptor charger The AC adaptor incorporates the AUTO VOLT AGE 1 IO 240V AC 50 60 Hz function FEATURES PRECAUTIONS PART NAMES 6 MONITOR DISPLAY 9 DISPLAY LOCATIONS 9 WARNING INDICATOf 9 PREPARATION IO lNSTALLlNG THE MEMORY BACKUP BATTERY 10 lNSTALLlNG THE BATTERY IN THE REMOTE CONTROL 10 USlNG THE AC ADAPTOR BATTERY CHARGER 11 CHARGING ON THE VIEWCAMPORT UNIT 12 POWERING THE VIEWCAM FROM AN AC OUT...

Page 4: ...onitor and the power will autQmatically turn off in approximately 10 seconds If the word DEW flashes on the LCD monitor remove the video cassette leave the cassette compartment open and wait several hours to allow the VIEWCAM to acclimate to the surrounding temperature To use the VIEWCAM again turn on the power after waiting for several hours Be sure that the word DEW has disappeared from the moni...

Page 5: ...he recorded image l Watch the temperature and humidity You can use your VIEWCAM at 0 C to 4O C and at 35 to 80 relative humidity Do not store the unit in an unventilated car in the summer in direct sunlight or near strong heat sources this can result in severe damage to the unit s casing and circuitry Be careful when handling the unit after it has been left in a hot place such as the ones describe...

Page 6: ...indicate the battery s charge condition Slide the switch to indicate the battery charge condition as follows I Position Charge conditions I Temperature during charging Store the battery pack in a dry cool place l Charge the battery pack at temperature of 10 C to 30 C For long battery lifetime Charge the battery pack lithium ion type at least once every six months l Do not leave the battery pack be...

Page 7: ...inding will damage the video cassettes If the video cassette is not properly wound reinsert it In the VIEWCAM and rewind the tape l Store the video cassettes in their cases and stand them on edge Using Your VIEWCAM Abroad Television system signals and electrical system voltages and frequencies vary substantially from country to country When you are abroad please check the sections below before usi...

Page 8: ...button Play button Fast Forward Pause Still 311 Forward Search stop bittoo 131 32 331 1 button 31 2 3 3 1 a 1 by ton 33B 5oj AERA f I directly related to r cording and playback e MENU button PICTUFWVCXUME butt ER button is pressed About the PLUG IN POWER MIC Jack This external microphone jack outputs a DC voltage of 4 0 V It is for use with the VR 1MC stereo microphone optional accessory or the mi...

Page 9: ...ol buttons ____ PAUSE STILL button Fast Forward Forward Search button SLOW button VOLUME up button Notes l To use the infrared remote control make sure that the remote control menu item REMOTE is set to ON The remote control cannot be used to operate the VIEWCAM when this item IS set to OFF See page 36 l The REC START STOP button on the remote control has no effect when the VIEWCAM s Operate switc...

Page 10: ...ight in large characters for the first 3 seconds and then blink in regular size characters DEW INSERT A CASSETTE A S E TF CASSETTE NOT RECORDABL Em E T A THE TAPE ENDS SOON Tj t E ND CHANGE THE CASSETTE TAPE END The video cassette IS defective and should be removed Dew has formed instde the VIEWCAM Wait for a few hours until the dew disappears see page 2 About 10 seconds after this warning appears...

Page 11: ...P THIS BATTERY AWAY FROM CHILDREN IF SWALLOWED CONSULT A PHYSICIAN IMMEDIATELY FOR EMERGENCY TREATMENT B BATTERY MAY EXPLODE IF MISTREATED OR INSTALLED WITH POLARITY REVERSED DO NOT RECHARGE DISASSEMBLE OR DISPOSE OF IN FIRE Cautions l If the Irthtum battery is installed with polanty reversed the VIEWCAM will not turn on Do not short circutt recharge disassemble or heat the battery l Should the ba...

Page 12: ...e of the battery adaptor battery charger disconnect it pack with the A mark on the charger and Insert the AC plug into a wall outlet guide the battery pack into the groove The OPERATE indicator will light up Pressing the battery pack slide it in the direction of the arrow until it locks into place 3 When the battery pack is charged all three CHARGE indicators will light up Remove the battery pack ...

Page 13: ...EWCAM to the ViewCamport unit See above Attach the second battery pack to the AC adaptor battery charger as shown at left Turn off the VIEWCAM s power Removing the VIEWCAM from the ViewCamport Unit Press the VIEWCAM release button and remove the VIEWCAM Note If the VIEWCAM is removed from the ViewCamport unit the battery pack inside will naturally discharge wrth time even after it has been fully c...

Page 14: ...ry pack can be charged using the car battery adaptor battery charger in basically the same manner as the AC adaptor battery charger see page 11 Note If you power the VIEWCAM from the car battery for an extended period of ttme the battery will be drained and restartrng the engine may be difficult An average fully charged car battery has a capacity of 50 ampere hours which will allow 20 hours of VIE...

Page 15: ...mated recording time Recording time will be reduced in cold weather The battery will drain in the Recording Standby mode Turn off the power if you will not be recording again soon Cautions l Do not expose the battery compartment cover to strong force as it may come off l If you remove the battery pack durrng recording or playback the tape will remain wound around the vrdeo head drum and may be dam...

Page 16: ... extend the cassette compartment 3 Take out the cassette 4 The cassette compartment retracts then close the compartment door Cautions l Do not try to close the door while the cassette compartment is being extended or retracted l Be careful not to get your fingers caught in the cassette compartment l Do not apply force to the cassette compartment except when pressing the PUSH mark to close it l Do ...

Page 17: ... and representative city for each zone Press the v or A button to move the F pointer to SETTING and then press the SET button At this time 1 l 1994 12 OO AM is displayed with the 1 flashing l When the memory backup is not operating e g when the VIEWCAM is first received from the factory the pointer automatically points at this item Press the v or A button to select 2 day and press the SET button P...

Page 18: ...ng the area to London 1 2 3 4 5 Set the Operate switch to CAMERA Press the MENU button to display MENU 1 If MENU 2 is displayed press the PAGE button 0 to get MENU 1 on the monitor Press the v or A button to select AREA Press the SET button until 1 LONDON appears The VIEWCAM is now set to the London England time Press the MENU button and the menu will disappear from the monitor The area name time ...

Page 19: ...t To Display Area Date and Time on the Monitor Select DISPLAY on the MENU 1 and set it to ON The area date and time will be displayed on the monitor I Setting Summer Time Daylight Saving Time Select SUMR TIME on the MENU 1 and set it to ON The time automatically changes to summer time daylight saving time and the I mark is displayed on the monitor To reset to standard time set SUMR TIME to OFF 18 ...

Page 20: ...neo Bali Malaysia Philippines Singapore Taiwan 10 TOKYO Japan Korea 11 SYDNEY Australia Sydney 12 SOLOMON New Caledonia 13 WLLNGTN Fiji New Zealand 14 SAMOA Western Samoa 15 HAWAII 16 ANCHRGE 17 L A 18 DENVER 19 CHICAGO 20 NEWYORK Hawaii I Tahiti HST Hawaii Standard Time U S A Alaska AST Alaska Standard Time U S A Los Angeles San Francisco PST Pacific Standard Time U S A Denver MST Mountain Standa...

Page 21: ...tton to adjust the desired function to your preference l The monitor display will disappear automatically if you do not press any button within approximately 4 seconds after the PICTURE VOLUME button is pressed Notes l Picture adjustments have been factory preset to neutral settings and the backlight mode to normal NORMAL l In bright daylight set the backlight to BRIGHT Thus WIII make the picture ...

Page 22: ...ough the end of the strap as shown Pull the strap in the direction of the arrow l and then secure the end of the strap with the short slider 2 ATTACHING THE SHOULDER STRAP USING THE HAND STRAP Fitting the hand strap to your hand Hold the VIEWCAM towards your chest and pull the strap down until the velcro patches open Place your thumb on the REC START STOP button pull the strap tight until it fits ...

Page 23: ...ss controls are automatically adjusted to their optimum settings letting you make beautiful recordings easily In particular the auto white balance feature uses fuzzy logic for light source discrimination which makes it possible to obtain truer colours TO PAUSE RECORDING Press the REC START STOP button again Recording pauses and the VIEWCAM is in Recording Standby mode Notes l To leave Camera mode ...

Page 24: ...ing out when you want to show the surroundings 1 MENU button I MENU 2 v 1 A ISET 1 1 P A G E Setting the zoom range You can select the two zoom ranges 8x zoom and 16x digital zoom The zoom range is factory preset at 16x digital zoom In the 8 16x zoom range the picture quality may become slightly worse 1 2 3 4 Set the Operate switch to CAMERA Press the MENU button to display MENU 2 If MENU 1 is dts...

Page 25: ... MENU 2 If MENU 1 is displayed press the PAGE button 0 to get MENU 2 on the monitor Press the V or A button to move the pointer to DGTL MODE Press the SET button to select EXTEND Press the MENU button to turn off the menu display Notes l When the Digital 2x Quick Zoom function is set Snap recording is not possible To use Snap turn off the Dtgital 2x Quick Zoom Extend Zoom function l Picture qualit...

Page 26: ...o Foculs mode the VIEWCAM automatically focuses on whatever is in the centre of the scene Always keep the subject in the centre of the monitor Notes l If no subject is in the centre of the monitor the focus area will expand and the subject nearest the centre will be focused on l If no subject is displayed on the monitor the VIEWCAM will automatically zoom out until some subject comes Into the fram...

Page 27: ... the video cassette was loaded EDIT SEARCH This VIEWCAM lets you search without switching from Camera Recording mode to VCR mode for the point on the tape where you wish to start recording next In Recording Standby mode make sure that the auto manual indicators or other operation indicators are not displayed on the monitor If they are displayed on the monitor turn them off by pressing the MODE DIS...

Page 28: ...reen without having to hold the VIEWCAM against your eye l The LCD monitor also makes high angle and low angle shots easy l For hand held recording the VIEWCAM should be steadied to prevent image shake l Use a tripod for stable recording Basic Recording Positions Put the fingers of your right hand through the hand strap and place your right thumb close to the REC START STOP and Power Zoom buttons ...

Page 29: ...When AUTO is selected the date time is displayed and recorded for IO seconds at the beginning of the first recording that day When OFF is selected the date time is neither displayed nor recorded Note Select AUTO if continuous date time display annoys you during recording 5 Press the V or A button to move the b pointer to SELECT 6 Press the SET button to select DATE TIME or DATE Both the date and t...

Page 30: ...d in large characters for 3 seconds and then changes to TAPE END in smaller characters l If you want to turn off the indicator press the MODE DISPLAY button Note The tape remaining bar Indicator only shows approximate time left This varies slightly depending on the length of tape used This function is based on the standard P5 90 tape Remaining Battery Power Display When you turn on the VIEWCAM the...

Page 31: ...n the MODE DISPLAY button Two seconds later LCD LAMP OFF starts flashing on the monitor Keep the MODE DISPLAY button down for 3 more seconds and the backlight turns off and the LAMP OFF indicator lights UP To turn on the backlight again press the MODE DISPLAY button or set the Operate switch to OFF and then back to CAMERA or VCR Note If the LAMP OFF tndlcator starts flashing when the backlight is ...

Page 32: ...icators on the monitor e g because they interfere with your view of the picture press the MODE DISPLAY button The buttons WIII still function as indicated even after their indrcators are turned off l A pair of earphones with a 3 5 mm diameter plug can be plugged directly into the VIEWCAM s PHONES tack l When a pair of earphones IS plugged into the PHONES tack the speaker is automatrcally cut off l...

Page 33: ...ginning of the previous recording press the REW button again while the indicators are on Example To rewind the tape to the beginning of five different recordings Monitor display Tape position First recording Last recording Notes l Program Search functrons when the video cassette IS stopped or durtng playback l Returns the tape to the Immediately prevrous recording Skrpprng the immediately previous...

Page 34: ...Forward Search or Reverse Search button to return to Fast Forward or Rewind mode and repeat the operation When you find the desired scene press the STOP button and then the PLAY button to start normal playback Notes l Sound is turned off during these searches l Some picture notse appears during these searches This IS not a malfunction STILL This function freezes the picture Press the STILL button ...

Page 35: ...enes that you want to return to later Counter display in VCR mode f 7 Counter display in CAMERA mode L 1 00 00 No display in VCR mode No display in CAMERA mode s f L Note The counter reading may differ slightly from the actual time This is more noticeable when the tape has been rewound or fast forwarded a number of times in which case there can be a difference of several seconds To Reset the Count...

Page 36: ...g of a scene that you want to return to later Then press the COUNTER button to turn off the counter control button indicators Stop playback or recording If the VIEWCAM is in the Camera mode set the Operate switch to VCR Then press the REW button The tape will automatically stop when the counter reaches O OO OO Press the PLAY button to view the desired scene Notes l The FF Fast Forward button can b...

Page 37: ...ton to turn off the menu In the CAMERA mode In the VCR mode c MENU 2 HiI3 AUTO iEhME EC XA AfO ECT bREMOTE l D G T L y4 TL Z O O M v 1 A ISET 1 IPAGE I MENU iAT OFF REiOTE iTO c v 1 A ISET I I 4 Aim the remote control at the photoreceptor of the VIEWCAM and press the control buttons to operate the VIEWCAM Notes l Be careful not to allow direct sunlight or bright light from interior rllumination to...

Page 38: ... AUTO MENU 2 CORRECT on Clicl AUTO MENU 2 bSELF R E C A AfORRECl Rotate the LCD g monitor j 80 l D G T L CIpE TL Z O O M vertrcally The screen image will be inverted to show a v 1 A SET 1 IPAGE mirror image of the subject When the monitor is turned back to the normal position the image returns to normal Notes l In Self Recording mode it IS not possible to record usrng manual recording modes change...

Page 39: ...ure does not function l Battery consumption is larger in the DIS mode We recommend you not use the DIS mode when using the VIEWCAM on a tripod Caution The DIS function cannot compensate for excessive VIEWCAM shake or for the subjects or situations described below l Subject with vertical or horizontal strtpes l Subject with low contrast l Subject with a plain background l Dark or dimly Itt subject ...

Page 40: ... start Still or Strobe recording To return to normal recording press the STILL STROBE button twice in the Still recording mode once in the Strobe recording mode Notes l You can swatch between Still Recording mode and Strobe Recording mode while the VIEWCAM is recording or in Recording Standby mode l Once the Still or Strobe Recording mode is set unless they are cancelled the VIEWCAM continues to r...

Page 41: ...ittle ambient illumination is displayed on the monitor The gain up function lets you record a brighter picture Press the BLC GAIN UP button The LIGHT indicator changes to K indicator indicating that the gain up function is now working To turn off the gain up function press the BLC GAIN UP button again The w indicator changes to the LIGHT indicator Note Make sure that the LIGHT indicator is display...

Page 42: ...ills the monitor for about 5 seconds or more Press the W B LOCK button l The W B indicator on the monitor changes to W B LOCK indicator Note In step 2 above if the white subject is small the power zoom may zoom out automatrcally and the monitor wtll not be filled with white In this case set the VIEWCAM to manual focus mode To Cancel the White Balance Lock Mode Press the W B LOCK button or hold dow...

Page 43: ...enjoy clear blur free frame by frame still pictures Press and hold down the FULL AUTO button for more than 1 second l The FULL AUTO indicator disappears and the manual operation indicators appear on the monitor Select the shutter speed by pressing the SHUT SPEED button Check that the desired shutter speed is displayed on the monitor You can now start recording by following the same operating proce...

Page 44: ...he widest angle Notes When you are recording a macro shot see that the subject receives sufficient illumination l It is recommended that you use a tripod for recording macro shots to prevent camera shakes FADE IN FADE OUT Press the SLOW FADER button to smoothly fade in or fade out a scene FADE IN 1 Press the SLOW FADER button in the Recording Standby mode l FADER is displayed on the monitor 2 Pres...

Page 45: ... the Recording Standby mode 11 I is displayed Press the MENU button to display the Menu 2 If MENU 1 is displayed press the PAGE button 0 to get MENU 2 on the monitor Move the b pointer to SCREEN by pressing the v or A button Press the SET button to select WIDE Press the MENU button to turn off the menu l The monitor now displays the picture with the top and bottom portions masked out To Return to ...

Page 46: ...heatre 15 35 Cigarette lighter al 30 cm 15 20 Candles on blrthday cake at 20 cm 10 15 Good lighting is difficult to achieve There are many problems waiting to catch the unwary Simply mounting one light or several lights on either side of the VIEWCAM will only make your subject look flat and two dimensional To make a subject more interesting use the lighting to model your subject and to add or crea...

Page 47: ... TV with the supplied audio video cable as shown 3 Set the input select switch on the TV to AV or VIDEO For details consult the operation manual supplied with your TV If your TV has an S video input terminal connect it to the ViewCamport unit s S video termrnal with the supplied S video cable S Video Terminal S video terminals are used to pass the chroma colour and luminance brightness components ...

Page 48: ...hing the AV Pack Pull out the AV pack vertically pressing on the AV PACK EJECT button on the AV pack MONITOR IN JACK The MONITOR IN jack on the ViewCamport unit is used to input video pictures from an external source When you connect the VIEWCAM to other video equipment for example a video printer for prints of screen images etc you can check the video image on the VIEWCAM s LCD monitor There is n...

Page 49: ...rminal on the RF converter and the 75 ohm coaxial antenna terminal on the TV Plug the RF converter cable into the audio and video jacks on the ViewCamport unit or on the AV pack Slide the VIEWCAM s Operate switch to VCR Load a video cassette cassette window facing outward and then press the PLAY button a Cautions l Use only the VRX30RF RF converter optional accessory with this VIEWCAM l The RF con...

Page 50: ...l If your TV set has only one audio input terminal for monaural source connect the white plug to the terminal Do not connect the red plug CUTTING UNWANTED SEQUENCES Play back the tape to be edited and locate the beginning and end of the sequence you wish to cut Write down the tape counter readings at the beginning and end of that sequence Then rewind the tape to the beginning of the portion that y...

Page 51: ...socket with the supplied S video cable l If the source equipment has only one audio output terminal connect the whtte plug to that terminal and leave the red one unplugged While the S video cable is plugged into the ViewCamport s S video socket the VIDEO terminal does not accept recording signals Audio signals can be recorded When you wish to record through the VIDEO terminal be sure to leave the ...

Page 52: ...y forward in the drrection of the arrow and then remove the fluorescent lamp compartment cover Carefully hold the end white knob of the fluorescent lamp unit with tweezers and pull the lamp unit out Insert the replacement fluorescent lamp unit into the compartment See note below Replace the fluorescent lamp compartment cover Notes l Be sure to Insert the replacement fluorescent lamp straight in In...

Page 53: ...properly adjusted during recording p 41 Call for service 1 Call for service Use a new video cassette p 5 Replace the lithium battery with a new one does not function I P 10 The remote control is being used 1 Use the remote control within its operating Cassette cannot be inserted Cassette won t eject beyond its operating range range p 36 Intense daylight is falling on the Avoid letting intense dayl...

Page 54: ...ith macro function 37 mm 10 2 cm 4 full colour LCD screen TFT active matrix DC 3 6 V 8 8 W during camera recording in Full Auto mode with Zoom motor off backlight in normal mode and DIS function Auto white balance with white balance lock 0 C to 4O C 35 to 80 20 C to 6O C 193 W x 139 5 H x 91 8 D mm 985 g without battery pack lithium battery video cassette and the filter for protecting the lens AC ...

Page 55: ...SHARP CORPORATION Osaka Japan Printed in Japan TINSE0176MZi fWO4 A ...

Reviews: