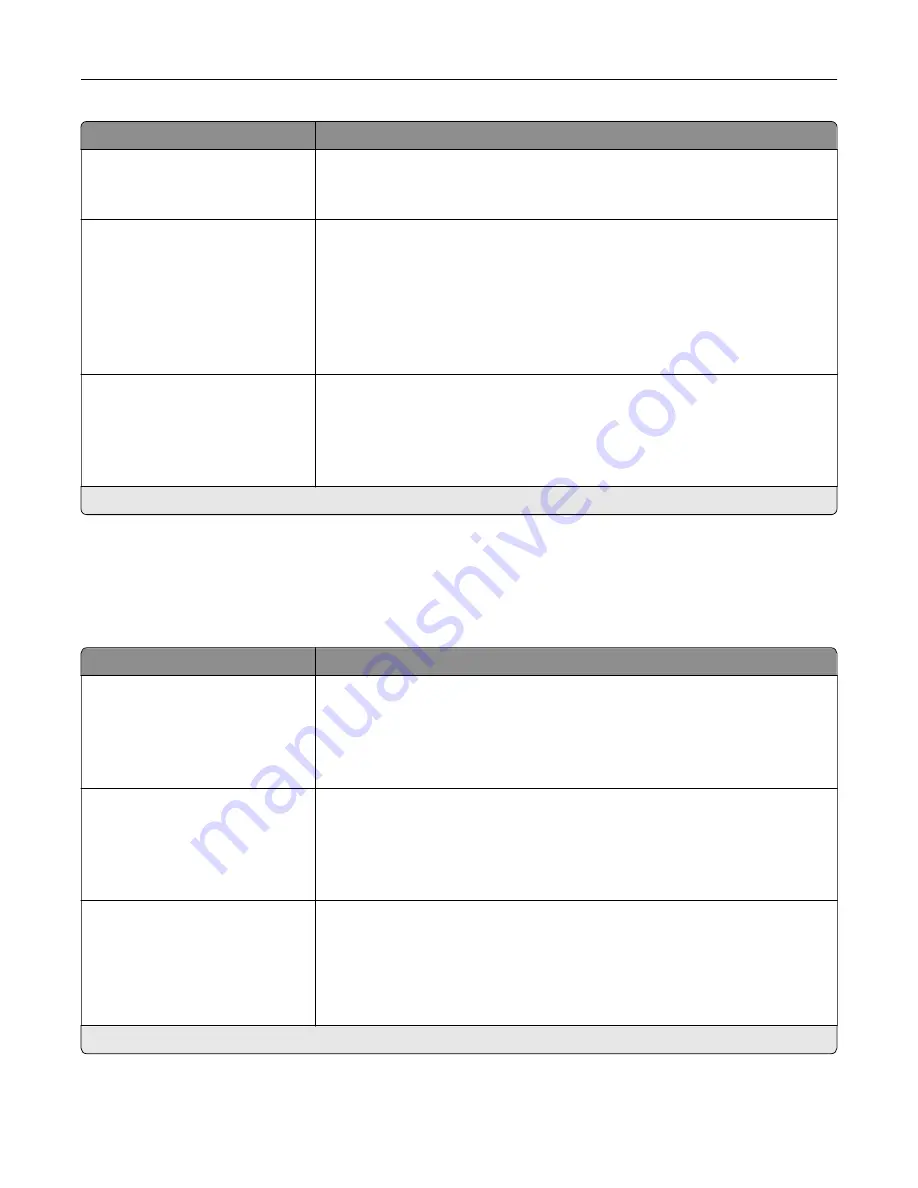
Menu item
Description
Invert
Off*
On
Invert bitonal monochrome images.
Note:
This menu item does not apply to GIF or JPEG image formats.
Scaling
Anchor Top Left
Best Fit*
Anchor Center
Fit Height/Width
Fit Height
Fit Width
Adjust the image to fit the printable area.
Note:
When Auto Fit is set to On, Scaling is automatically set to Best Fit.
Orientation
Portrait*
Landscape
Reverse Portrait
Reverse Landscape
Specify the orientation of text and graphics on the page.
Note:
An asterisk (*) next to a value indicates the factory default setting.
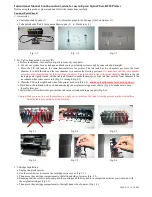
Paper
Tray Configuration
Menu item
Description
Default Source
Tray [x] (1*)
Multipurpose Feeder
Manual Paper
Manual Envelope
Set the paper source for all print jobs.
Paper Size/Type
Tray [x]
Multipurpose Feeder
Manual Paper
Manual Envelope
Specify the paper size or paper type loaded in each paper source.
Substitute Size
Off
Letter/A4
All Listed*
Set the printer to substitute a specified paper size if the requested size is not
loaded in any paper source.
Notes:
•
Off prompts the user to load the required paper size.
•
All Listed allows all available substitutions.
Note:
An asterisk (*) next to a value indicates the factory default setting.
Understanding the printer menus
52
Summary of Contents for MX-C607P
Page 1: ...DIGITAL FULL COLOR PRINTER MX C607P User s Guide October 2021 Machine type 5063 Model 53H ...
Page 86: ...2 Remove the waste toner bottle Maintaining the printer 86 ...
Page 91: ...Replacing a photoconductor unit 1 Open door A Maintaining the printer 91 ...
Page 92: ...2 Remove the waste toner bottle Maintaining the printer 92 ...
Page 95: ...Replacing an imaging unit 1 Open door A Maintaining the printer 95 ...
Page 96: ...2 Remove the waste toner bottle Maintaining the printer 96 ...
Page 101: ...4 Insert the new waste toner bottle 5 Close door A Maintaining the printer 101 ...
Page 102: ...Replacing the transfer belt 1 Turn off the printer 2 Open door A Maintaining the printer 102 ...
Page 103: ...3 Remove the waste toner bottle 4 Open door A1 Maintaining the printer 103 ...
Page 129: ...Staple jam in door G 1 Open door G 2 Pull out the staple cartridge holder Clearing jams 129 ...
Page 131: ...5 Insert the staple cartridge holder 6 Close door G Clearing jams 131 ...


