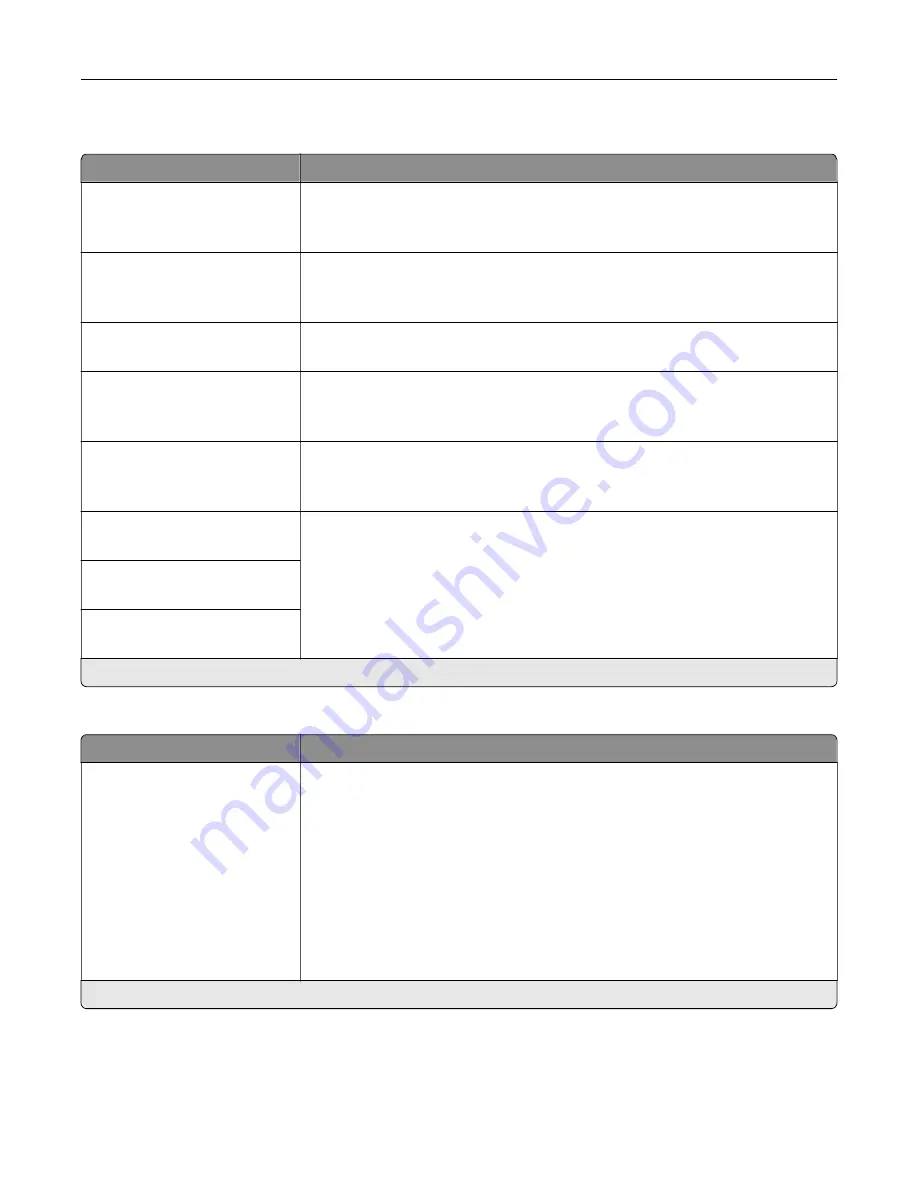
Quality
Menu item
Description
Print Mode
Black and White
Color*
Set how the printer generates color content.
Print Resolution
4800 CQ*
1200 dpi
Set the resolution for the printed output.
Note:
4800 CQ provides high
‑
quality output at maximum speed.
Toner Darkness
1 to 5 (4*)
Determine the lightness or darkness of text images.
Halftone
Normal*
Detail
Enhance the printed output to have smoother lines with sharper edges.
Color Saver
Off*
On
Reduce the amount of toner used to print graphics and images.
Note:
When set to On, this setting overrides the value of the Toner Darkness
setting.
RGB Brightness
‑
6 to 6 (0*)
Adjust the brightness, contrast, and saturation for color output.
Note:
This setting does not affect files where CMYK color specifications are
used.
RGB Contrast
0 to 5 (0*)
RGB Saturation
0 to 5 (0*)
Note:
An asterisk (*) next to a value indicates the factory default setting.
Advanced Imaging
Menu item
Description
Color Balance
Cyan
‑
5 to 5 (0*)
Magenta
‑
5 to 5 (0*)
Yellow
‑
5 to 5 (0*)
Black
‑
5 to 5 (0*)
Reset Defaults
Adjust the amount of toner that is used for each color.
Note:
An asterisk (*) next to a value indicates the factory default setting.
Understanding the printer menus
46
Summary of Contents for MX-C607P
Page 1: ...DIGITAL FULL COLOR PRINTER MX C607P User s Guide October 2021 Machine type 5063 Model 53H ...
Page 86: ...2 Remove the waste toner bottle Maintaining the printer 86 ...
Page 91: ...Replacing a photoconductor unit 1 Open door A Maintaining the printer 91 ...
Page 92: ...2 Remove the waste toner bottle Maintaining the printer 92 ...
Page 95: ...Replacing an imaging unit 1 Open door A Maintaining the printer 95 ...
Page 96: ...2 Remove the waste toner bottle Maintaining the printer 96 ...
Page 101: ...4 Insert the new waste toner bottle 5 Close door A Maintaining the printer 101 ...
Page 102: ...Replacing the transfer belt 1 Turn off the printer 2 Open door A Maintaining the printer 102 ...
Page 103: ...3 Remove the waste toner bottle 4 Open door A1 Maintaining the printer 103 ...
Page 129: ...Staple jam in door G 1 Open door G 2 Pull out the staple cartridge holder Clearing jams 129 ...
Page 131: ...5 Insert the staple cartridge holder 6 Close door G Clearing jams 131 ...


