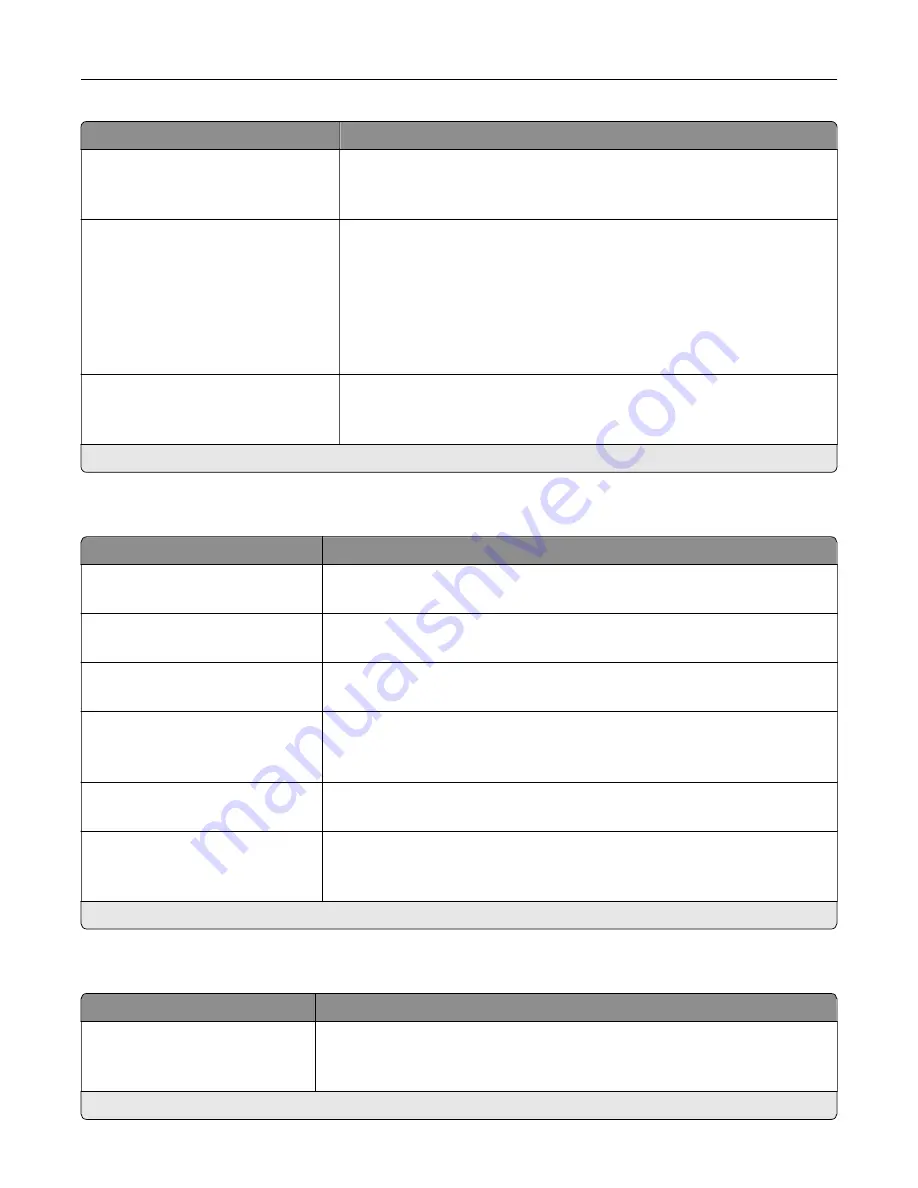
Menu item
Description
Auto LF after CR
Off*
On
Set the printer to perform a line feed after a carriage return control
command.
Tray Renumber
Assign MP Feeder
Assign Tray [x]
Assign Manual Paper
Assign Manual Envelope
View Factory Defaults
Restore Defaults
•
Configure the printer to work with a different print driver or custom
application that uses a different set of source assignments to request a
given paper source.
•
Show the factory default value assigned for each paper source.
•
Restore the tray renumber values to their factory defaults.
Print Timeout
Off
On* (90 seconds)
Set the printer to end a print job after it has been idle for the specified
amount of time.
Note:
An asterisk (*) next to a value indicates the factory default setting.
HTML
Menu item
Description
Font Name
Times*
Set the font to use when printing HTML documents.
Font Size
1–255 (12*)
Set the font size to use when printing HTML documents.
Scale
1–400% (100*)
Scale HTML documents for printing.
Orientation
Portrait*
Landscape
Set the page orientation for HTML documents.
Margin Size
8–255 mm (19*)
Set the page margin for HTML documents.
Backgrounds
Do Not Print
Print*
Print background information or graphics in HTML documents.
Note:
An asterisk (*) next to a value indicates the factory default setting.
Image
Menu item
Description
Auto Fit
On
Off*
Select the best available paper size and orientation setting for an image.
Note:
When set to On, this menu item overrides the scaling and orientation
settings for the image.
Note:
An asterisk (*) next to a value indicates the factory default setting.
Understanding the printer menus
51
Summary of Contents for MX-C607P
Page 1: ...DIGITAL FULL COLOR PRINTER MX C607P User s Guide October 2021 Machine type 5063 Model 53H ...
Page 86: ...2 Remove the waste toner bottle Maintaining the printer 86 ...
Page 91: ...Replacing a photoconductor unit 1 Open door A Maintaining the printer 91 ...
Page 92: ...2 Remove the waste toner bottle Maintaining the printer 92 ...
Page 95: ...Replacing an imaging unit 1 Open door A Maintaining the printer 95 ...
Page 96: ...2 Remove the waste toner bottle Maintaining the printer 96 ...
Page 101: ...4 Insert the new waste toner bottle 5 Close door A Maintaining the printer 101 ...
Page 102: ...Replacing the transfer belt 1 Turn off the printer 2 Open door A Maintaining the printer 102 ...
Page 103: ...3 Remove the waste toner bottle 4 Open door A1 Maintaining the printer 103 ...
Page 129: ...Staple jam in door G 1 Open door G 2 Pull out the staple cartridge holder Clearing jams 129 ...
Page 131: ...5 Insert the staple cartridge holder 6 Close door G Clearing jams 131 ...


