background image

GB


SGM Technology for lighting


Palco Series 

- 35 - 

User’s Manual 1.03


S

TEP 

7


GREEN


/


W

HITE


1.


Use the UP key to pass to the “GREEN=0  %” menu  

2.


Press “Enter” and “GREEN=” will begin to flash  

3.


Use the UP/DOWN keys to choose the required value of the COLOUR-
Green channel for the current scene. 

4.


Press “Enter” to exit the GREEN menu and confirmdal menu GREEN e 
confermare. 


S

TEP 

8


BLUE


/


A

MBER


1.


Use the UP key to pass to the “BLUE=0  %” menu  

2.


Press “Enter” and “BLUE=” will begin to flash  

3.


Use the UP/DOWN keys to choose the required value of the COLOUR-
Blue channel for the current scene. 

4.


Press “Enter” to exit the BLUE menu and confirm. 


S

TEP 

9


MACRO 

 
In the program, it’s possible to use scenes with effects pre-programmed in the Macro channel. Wherever 
Macros are used, all the colour channel settings will be ignored. 


1.


Use the UP key to pass to the “MACRO=0” menu  

2.


Press “Enter” and “MACRO=” will begin to flash  

3.


Use the UP/DOWN keys to choose the required Macro value for the 
current scene. 

4.


Press “Enter” to exit the MACRO menu and confirm. 


S

TEP 

9


-


SCENE


TIME 

 
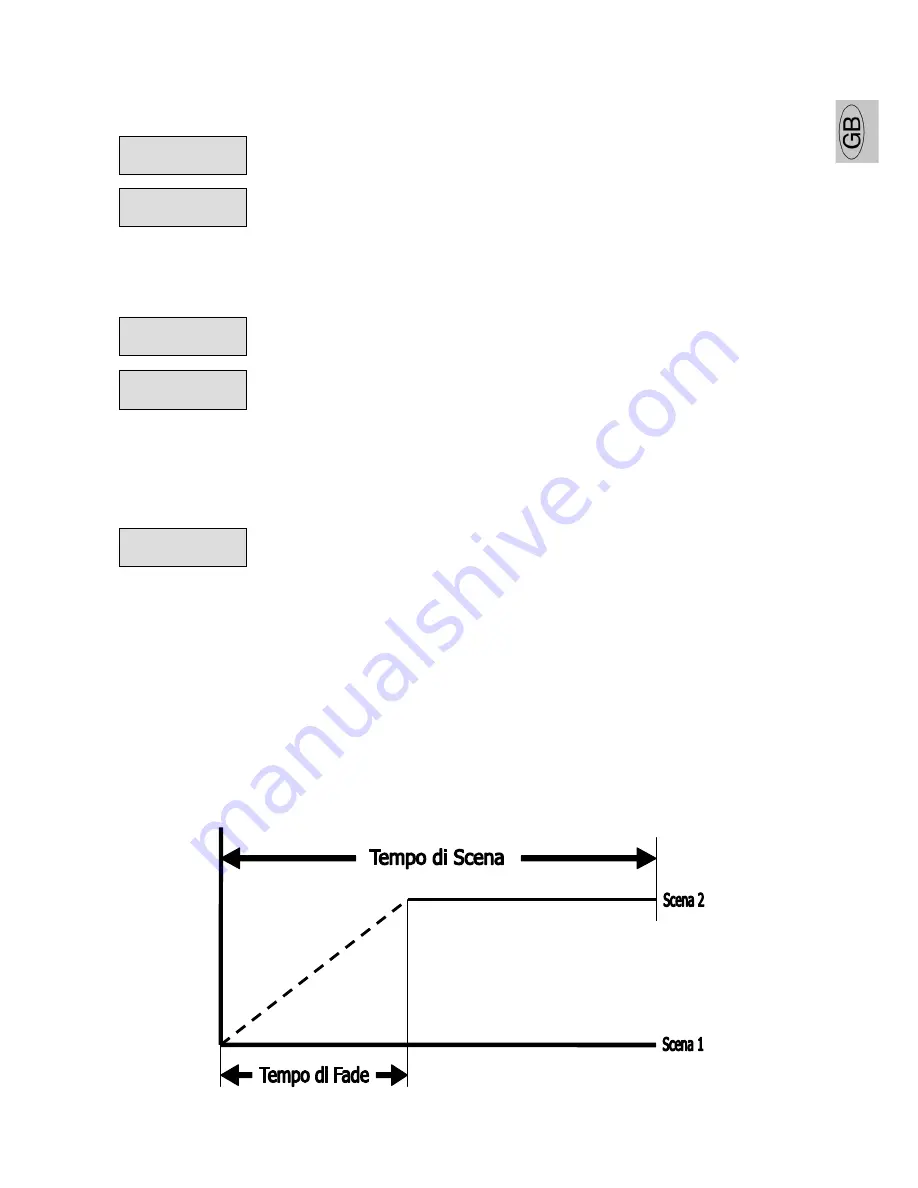
Each scene in a program can be run with the required times. There are two types of scene times: 


Total scene time (STIME), expressed in hours, minutes and seconds 


Scene fade time (FTIME), expressed in hours, minutes and seconds 

 
The scene time is the total time occupied by the scene in the program, whereas fade time is the time 
taken by the scene’s channel status to reach the appropriate level. 


MACRO=4 


BLUE=100% 


GREEN=70 % 


WHIT2=70 % 


AMBER=100% 


Summary of Contents for PALCO 3

Page 1: ...U S E R S M A N U A L R E L 1 0 3 P R O F E S S I O N A L L E D C O L O U R C H A N G E R GB I D F E P PALCO 3 PALCO 5 M 0 0 1 2 6 5 P A L C O 3 P A L C O 5 U S E R S M A N U A L R E L 1 0 1...

Page 2: ...enst SGM beh lt sich das Recht vor Verbesserungen an den Produkten vorzunehmen und deshalb empfehlen wir die Bedienungsanleitung dem Produkt stets beizulegen und die Seriennummer auf der letzten Seite...

Page 3: ...PTIONAL ACCESSORIES 11 2 INSTALLATION 12 2 1 UNPACKING THE FIXTURE 12 2 2 MOUNTING THE FIXTURE 12 WIRING 12 INSTALLATION AND POSITIONING 13 ADDRESSING THE FIXTURE 15 3 OPERATION 18 3 1 CONTROLLING THE...

Page 4: ...PROGRAM NUMBER 33 STEP 2 CHOOSING THE SCENE NUMBER 34 STEP 3 CHOOSING THE FIXTURE NUMBER 34 STEP 4 SHUTTER 34 STEP 5 DIMMER 34 STEP 6 RED WHITE1 34 STEP 7 GREEN WHITE2 35 STEP 8 BLUE AMBER 35 STEP 9...

Page 5: ...this manual SGM has an on going product development policy so the information printed in this manual may not be completely up to date If any doubts arise regarding the topics covered in this manual or...

Page 6: ...S REACH AS THEY ARE POTENTIAL SOURCES OF DANGER THE UNIT MUST ONLY BE USED BY ADULTS DO NOT ALLOW CHILDREN TO TAMPER WITH OR USE THE PRODUCT FIXTURE INSTALLATION WORK MUST BE CARRIED OUT BY EXPERIENCE...

Page 7: ...the unit s owner The validity of the guarantee is effective to all effects only on presentation of the guarantee to the manufacturer or the SGM technical assistance centre Always quote unit serial num...

Page 8: ...ntify the models Palco 3 with LEDs of 3 and 1 Watt Palco 5 with LEDs of 4 5 and 3 Watt Palco 5 Full Color with LEDs of 3 and 1 Watt PALCO WHITE Thanks to two different types of LEDs White Amber formin...

Page 9: ...t through 180 Adjustable display brightness LED power reduction in the event of overheating Elapsed time meter for each colour channel Red Green and Blue General fixture operating time meter CONTROL S...

Page 10: ...n and Blue LEDs make up the matrix that generates Palco s light beam Their layout in the matrix ensures that the emitted light can be controlled as far as Colour Intensity and Temperature are concerne...

Page 11: ...ables to select via DMX different colour temperatures for the white light beam MEMORIES Comprehensive programming can be carried on board the fixture thus enabling playback in a fully stand alone stat...

Page 12: ...ng and can also be floor mounted or on any other flat surface without fixing remaining steady no matter what the angle of the head The head is made up of a radiator in drawn aluminium on which the LED...

Page 13: ...l with three buttons LENSES Lenses mounted on an interchangeable plate all the lenses are in a single block with various beam apertures 8 25 40 10 x 22 horizontal or vertical asymmetrical beam Narrow...

Page 14: ...d with wiring and dedicated cable gland Palco only requires its AC plug to be wired following the indications below Simbolo Pin EU US UK L Live Brown Yellow Copper Red N Neutral Blue Silver Black Grou...

Page 15: ...de It s also possible to fit a display safety cover to avoid any unauthorized use of the front control panel 180 00 204 50 The display cover is fitted as follows Loosen the hex screws fixing the horiz...

Page 16: ...e unit in a ventilated location The Palco can be hung on any support or truss structure using Fast Lock G or Aliscaff clamps In the event of an Aliscaff type clamp being used a Fast Lock Omega support...

Page 17: ...DMX by an external console Stand alone Mode with on board programming and the possible control of a series of other fixtures using a MASTER SLAVE set up We ll now cover the addressing of a Palco for D...

Page 18: ...dress channel Press Enter again to confirm Palco requires 8 DMX channels for the control of all its functions With a DMX 512 control universe up to 64 can therefore be controlled simultaneously and se...

Page 19: ...DRESS DMX PALCO N ADDRESS DMX 1 001 13 097 25 193 37 289 49 385 2 009 14 105 26 201 38 297 50 393 3 017 1 113 27 209 39 305 51 401 4 025 16 121 28 217 40 313 52 409 5 033 17 129 29 225 41 321 53 417 6...

Page 20: ...n control 0 100 White1 Ch 4 Green White2 Continuous Green saturation control 0 100 White2 Ch 5 Blue Amber Continuous Blue saturation control 0 100 Amber Ch 6 CTC CTC Continuous colour temperature cont...

Page 21: ...justment from 1 to 20 Hz 152 159 Pulse open effect low speed 160 167 Pulse open effect medium speed 168 175 Pulse open effect high speed 176 183 Pulse close effect low speed 184 191 Pulse close effect...

Page 22: ...time 32 39 36 MACRO 4 White 5000 K 40 47 44 MACRO 5 Rainbow Medium NO Stand time 40 47 44 MACRO 5 White 5600 K 48 55 52 MACRO 6 Rainbow Fast NO Stand time 48 55 52 MACRO 6 White 6500 K 56 63 60 MACRO...

Page 23: ...a DMX proceed as follows 1 Set the Color_Mode channel at 220 85 2 Use the RED GREEN and BLUE channels to obtain the required white balance 3 Set the Macro channel at 71 28 4 Increase Color_Mode to the...

Page 24: ...ng the correct functionning of the fixture Customization of some of the parameters Stand Alone programming 4 2 Navigating the menu The front control panel made of a display and three keys give an easy...

Page 25: ...F It deactivates the power boost R_h R_h Red LED operating hours menu Reset is possible G_h G_h Green LED operating hours menu Reset is possible B_h B_h Blue LED operating hours menu Reset is possible...

Page 26: ...or Fahrenheit ON Fixture in Master data transmission mode MASTER MASTER OFF Fixture in non Master mode SLAVEID SLAVEID 1 39 It configures the slave number assigned to the fixture ON It enables the pl...

Page 27: ...DOWN keys to adjust the new maximum value required for the Red channel 6 Press Enter to confirm the choice 1 Use the UP key to select Gblnc 100 2 Press Enter again and Gblnc will begin to flash 3 Use...

Page 28: ...t s also possible to reset the elapsed time meter when the LED matrix is replaced The L_h menu gives access to the display of the fixture s total operating time and can t be reset 1 Use the UP DOWN ke...

Page 29: ...ture WIRELESS LOGOFF This function allos to disable all the wireless communication previously activated To enable the LOGOFF proceed as follows 1 Connect Palco 5 to the power supply wait till it has c...

Page 30: ...uired option 4 Press Enter to confirm the changes DMX DELAY It s possible to decide for how many seconds the fixture must hold the last operating status if there is no DMX signal Delay time can be set...

Page 31: ...keys to find the FACT menu 2 Press Enter to confirm the choice The text on the display will begin to flash 3 Use the UP DOWN keys to select FACT SET and press Enter 4 Press Enter to set the default pa...

Page 32: ...temperatures 1 Using the UP DOWN keys select the menu TEMPERATUR 2 Press the Enter key to instantaneously display the actual temperature 3 Using the UP DOWN keys it is possible to display the temperat...

Page 33: ...e displayed text will immediately begin to flash 3 Use the UP DOWN keys to choose the required programs from 1 to 5 or OFF to stop the playback of a current program 4 Press Enter to exit the PRGRUN me...

Page 34: ...an control the start and stop time of a program day by day on a weekly basis The fundamental stages of programming the Scheduler are as follows 1 Entering the Scheduler menu 2 Choosing the event numbe...

Page 35: ...ly be necessary to program the MASTER main fixture and all the fixtures connected to it will ruin the same program if configured as SLAVES During Master programming it s also possible to store various...

Page 36: ...9 if the scene to be created must have each slave fixture with its own channel status chosen individually 3 Press Enter to exit the FIXTURE menu and confirm STEP 4 SHUTTER 1 Use the UP key to pass to...

Page 37: ...e program it s possible to use scenes with effects pre programmed in the Macro channel Wherever Macros are used all the colour channel settings will be ignored 1 Use the UP key to pass to the MACRO 0...

Page 38: ...FTIME menu gives access to the adjustment of the scene fade time The time can be configured in hours minutes and seconds 1 Use the UP key to pass to the FTIME_h 0 menu 2 Press Enter and FTIME_h will...

Page 39: ...the PRGRN menu and confirm 5 2 The Event Scheduler Scheduler is a Palco menu that allows to organize a series of 48 events over a period of a week and which are repeated week after week Each event can...

Page 40: ...repared program will start 1 Use the UP key to pass to the START_h 0 menu 2 Press Enter and STIME_h will begin to flash 3 Use the UP DOWN keys to choose the hour at which the program has to start from...

Page 41: ...N keys to choose the seconds at which the program has to end from 0 to 59 4 Press Enter to exit the END_s menu and confirm STEP 6 ENABLING AN EVENT 1 Use the UP key to pass to the ENABLE OFF menu 2 Pr...

Page 42: ...eriodically clean the front glass particularly if the unit is exposed to the weather Should the fixture remain unused for a lengthy period the clock data may be lost In this case the internal clock mu...

Page 43: ...perture angles The following procedure must be followed in the event of the front lenses having to be changed on the LED matrix REMOVING THE FRONT LENS PANEL Remove the screws on the rear of the Palco...

Page 44: ...he 8 hex screws that fix the lens holder panel to the LED matrix aligned below using a 2 5mm key To install the new set of lenses proceed as follows Carefully avoid touching the single lenses that mak...

Page 45: ...ur clean them with a dry cloth under no circumstances using solvents products for removing grease or abrasive objects Once the new set of lenses is positioned fix it to the matrix with the appropriate...

Page 46: ...44 Palco Series WIRELESS ANTENNA INSTALLATION FOR PALCO5 1 Remove the protection plug A from the wireless socket 2 Screw on the socket the ring B nut of the extension cable 3 Screw the antenna on the...

Page 47: ......

Page 48: ......

Page 49: ...1 0 3 S G M T E C H N O L O G Y F O R L I G H T I N G S P A V I A P I O L A T O R R E 1 _ 6 1 0 1 0 T A V U L L I A P U I T A L Y T E L 3 9 0 7 2 1 4 7 6 4 7 7 _ F A X 3 9 0 7 2 1 4 7 6 1 7 0 w w w s...

Reviews: