SP LINK | Using SP LINK
18
|
Doc #OI0005 Rev26 2020
Saving a new configuration
The configuration settings should now be saved to file before sending them to the SP PRO.
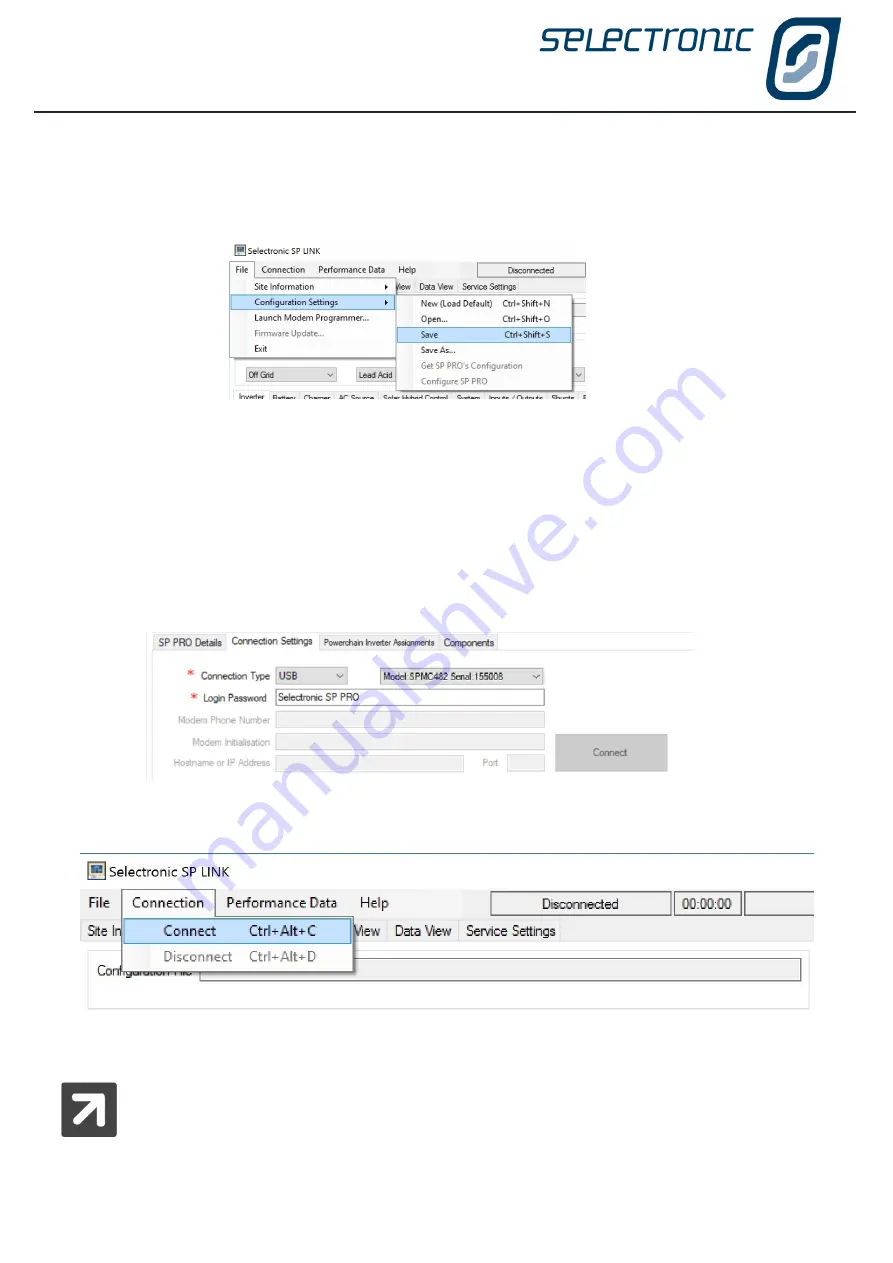
To save the SP PRO configuration settings, click on File - Configuration Settings - Save.
The configuration settings will be saved in the same location as the site information saved in the previous step.
SP LINK will automatically use the default file name Config1 prefixed with the site name.
The configuration settings are now stored on the computer. The SP PRO can be configured with these settings
at any time once the computer is linked and connected to the SP PRO.
Connecting to the SP PRO
Plug the SP PRO into the computer with the supplied USB cable. The SP PRO will be automatically detected
by the computer and SP LINK. When this occurs it will be indicated by SP LINK showing both model and serial
number under Connection Settings.
Now we can connect to the SP PRO. Either clicking the Connect button or in the Connection menu, click
Connect.
SP LINK is now connected through to the SP PRO. SP LINK will notify you if a connection is unable to be
established.
It is important to note that the SP PRO has NOT yet been configured with any of the setting
changes made at this time. This is performed in the next step.
SP LINK will notify you if the connected SP PRO does NOT have the same model number and serial number as
detailed in the SP LINK “SP PRO Details” tab. SP LINK will also prompt you, as required, to update the time
within the SP PRO from the computers time.
Summary of Contents for SP PRO 2i Series
Page 1: ...Instruction Manual for SP LINK Configuration and monitoring for SP PRO series 2i ...
Page 31: ...SP LINK Using SP LINK Doc OI0005 Rev26 2020 31 Blank Page ...
Page 91: ...SP LINK Performance Monitoring Doc OI0005 Rev26 2020 91 BLANK PAGE ...
Page 97: ...SP LINK Service Settings Doc OI0005 Rev26 2020 97 Blank Page ...


