29
Ausgabe
issue
E / 07.03.2013
Dokument
document
OM.MAI.11e
Blatt
sheet
3 (5)
9
Dismantling / Reassembly
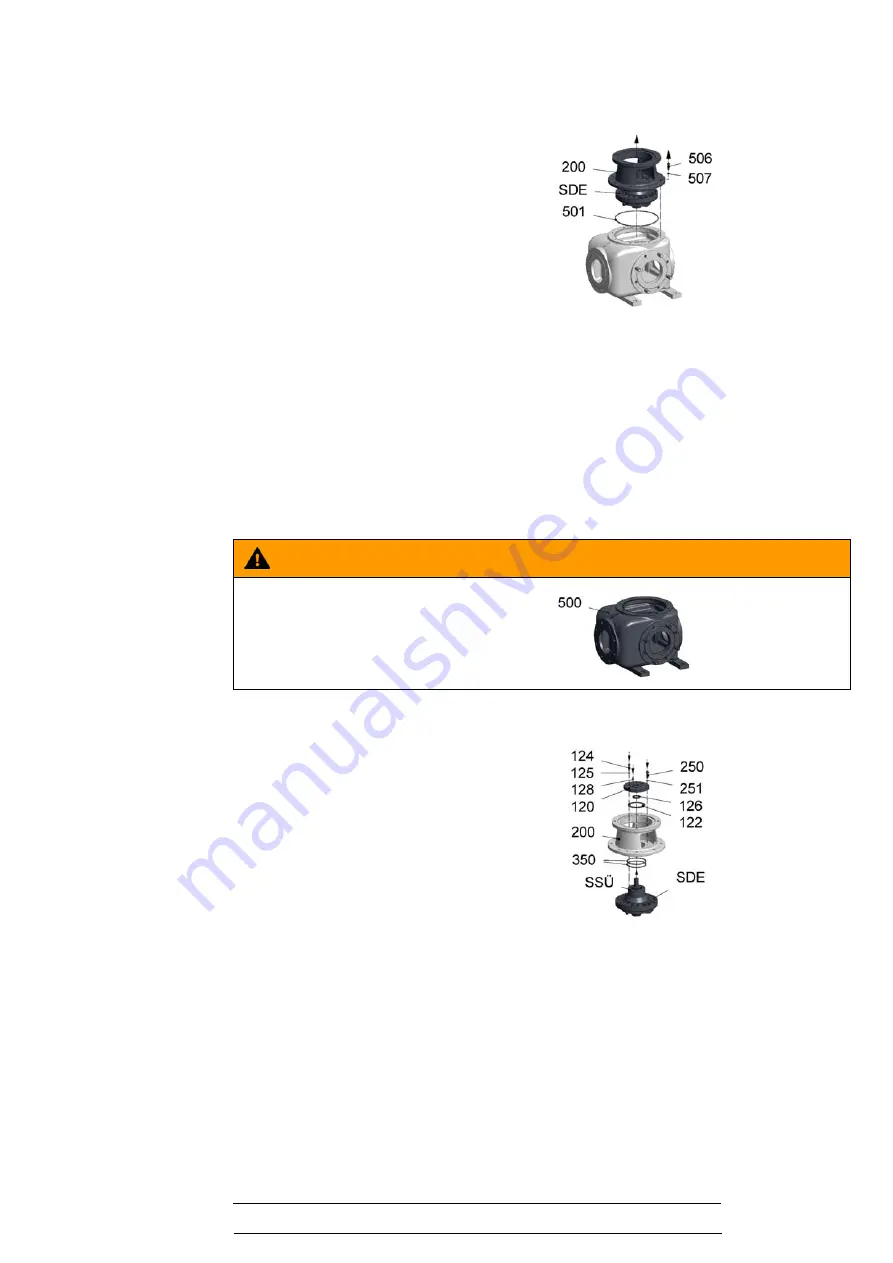
9.1.3.3 Cutterhead assembly (SDE) - dismantling
9.1.4 Reassembly
9.1.4.1 Cutterhead assembly (SDE) - mounting
¾
Remove screw fitting
(506, 507)
.
¾
Remove drive casing
(200)
with cutter-
head assembly
(SDE)
.
¾
Remove O-ring
(501)
.
¾
Remove lubrication nipple
(128)
.
¾
Remove screw fitting
(124, 125, 250, 251)
.
¾
Remove cover plate
(120)
, seal
(122)
and
lip seal
(126)
from drive casing
(200)
.
¾
Remove cutterhead assembly
(SDE)
and
O-rings
(350)
.
¾
Follow cutterhead assembly
(SDE)
dis-
mantling instructions (
→
chapter 9.1.10).
WARNING
Tilting or falling macerator.
Death or serious injury can occur
¾
Attach cutter casing
(500)
to secure the
macerator.
¾
Follow cutterhead assembly
(SDE)
reas-
sembly instructions (
→
chapter 9.1.10).
¾
Check O-ring
(350)
for damage and
replace if necessary.
¾
Insert O-ring
(350)
in drive casing
(200)
.
¾
Insert cutterhead assembly
(SDE)
in drive
casing
(200)
.
¾
Align seal
(122)
, lip seal
(126)
and cover
plate
(120)
with cutterhead assembly
(SDE)
.
–
Observe the lubrication nipple
(128)
installation position on the side open-
ing of the drive casing
(200)
.
–
Note flushing connection
(SSÜ)
posi-
tion.
¾
Mount screw fitting
(124, 125, 250, 251)
.
¾
Mount lubrication nipple
(128)
on connec-
tion plate
(120)
.
Summary of Contents for Macerator 110 Series
Page 3: ......
Page 11: ...6 ...
Page 13: ...8 ...
Page 19: ...14 ...
Page 23: ...18 ...
Page 25: ...20 ...
Page 27: ...22 ...
Page 31: ...26 ...
Page 37: ...32 ...
Page 41: ...36 ...
Page 42: ......
Page 43: ...38 ...
Page 47: ...42 ...
Page 51: ...46 ...
Page 53: ...48 ...
Page 55: ...50 ...
Page 56: ...51 ...
Page 59: ......
Page 67: ...6 ...
Page 69: ...8 ...
Page 75: ...14 ...
Page 79: ...18 ...
Page 81: ...20 ...
Page 83: ...22 ...
Page 93: ...32 ...
Page 96: ......
Page 97: ...36 ...
Page 101: ...40 ...
Page 105: ...44 ...
Page 107: ...46 ...
Page 109: ...48 ...
Page 110: ...49 ...


