


INTRODUCTION
b. Put waxed paper or similar film on the sur-
faces.
– Twist bolt when inserting it to improve thread
conformation.
NOTE:
NOT intended for engine stud repairs.
Repair of Small Holes/Fine Threads
Option 1:
Enlarge damaged hole, then follow
STANDARD THREAD REPAIR procedure.
Option 2:
Apply FORM-A-THREAD on the screw
and insert in damaged hole.
Permanent Stud Installation (light duty)
– Use a stud or thread on desired length.
– DO NOT apply release agent on stud.
– Do a STANDARD THREAD REPAIR.
– Allow to cure for 30 minutes.
– Assemble.
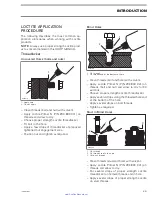
Gasket Compound
A00A3SA
2
1
1
3
1
1. Proper strength Loctite
2. Loctite Primer N (P/N 293 800 041) and Gasket Eliminator 518
(P/N 293 800 038) on both sides of gasket
3. Loctite Primer N only
– Remove old gasket and other contaminants
with Loctite Chisel remover (P/N 413 708 500).
Use a mechanical mean if necessary.
NOTE:
Avoid grinding.
– Clean both mating surfaces with solvent.
– Spray Loctite Primer N on both mating surfaces
and on both sides of gasket. Allow to dry 1 or
2 minutes.
– Apply GASKET ELIMINATOR 518 (P/N 293 800
038) on both sides of gasket, using a clean ap-
plicator.
– Place gasket on mating surfaces and assemble
immediately.
NOTE:
If the cover is bolted to blind holes (above),
apply proper strength Loctite in the hole and on
threads. Tighten.
If holes are sunken, apply proper strength Loctite
on bolt threads.
– Tighten as usual.
Mounting on Shaft
Mounting with a Press
A00A3UA
1
2
3
1. Bearing
2. Proper strength Loctite
3. Shaft
– Clean shaft external part and element internal
part.
– Apply a strip of proper strength Loctite on shaft
circumference at insert or engagement point.
NOTE:
Retaining compound is always forced out
when applied on shaft.
– DO NOT use anti-seize Loctite or any similar
product.
– No curing period is required.
Mounting in Tandem
1. Apply retaining compound on internal element
bore.
2. Continue to assemble as shown above.
smr2005-002
XV
www.SeaDooManuals.net