background image

3.39-1 

005.149.04-EN 

3.39  Troubleshooting/emergency operation 

3.39.1  Control failure 

If a functional failure occurs, first check whether  

-  An EMERGENCY STOP button has been 

actuated. 

-  The grid assembly in the filling hopper is 

raised. 

-  A fuse has been triggered. 

-   * The magnets of the competent control 

valves are supplied with voltage. 


* INFORMATION 

The plugs of the control valve magnets are 
equipped with light-emitting diodes for 
troubleshooting, which must light up when 
voltage is present. 

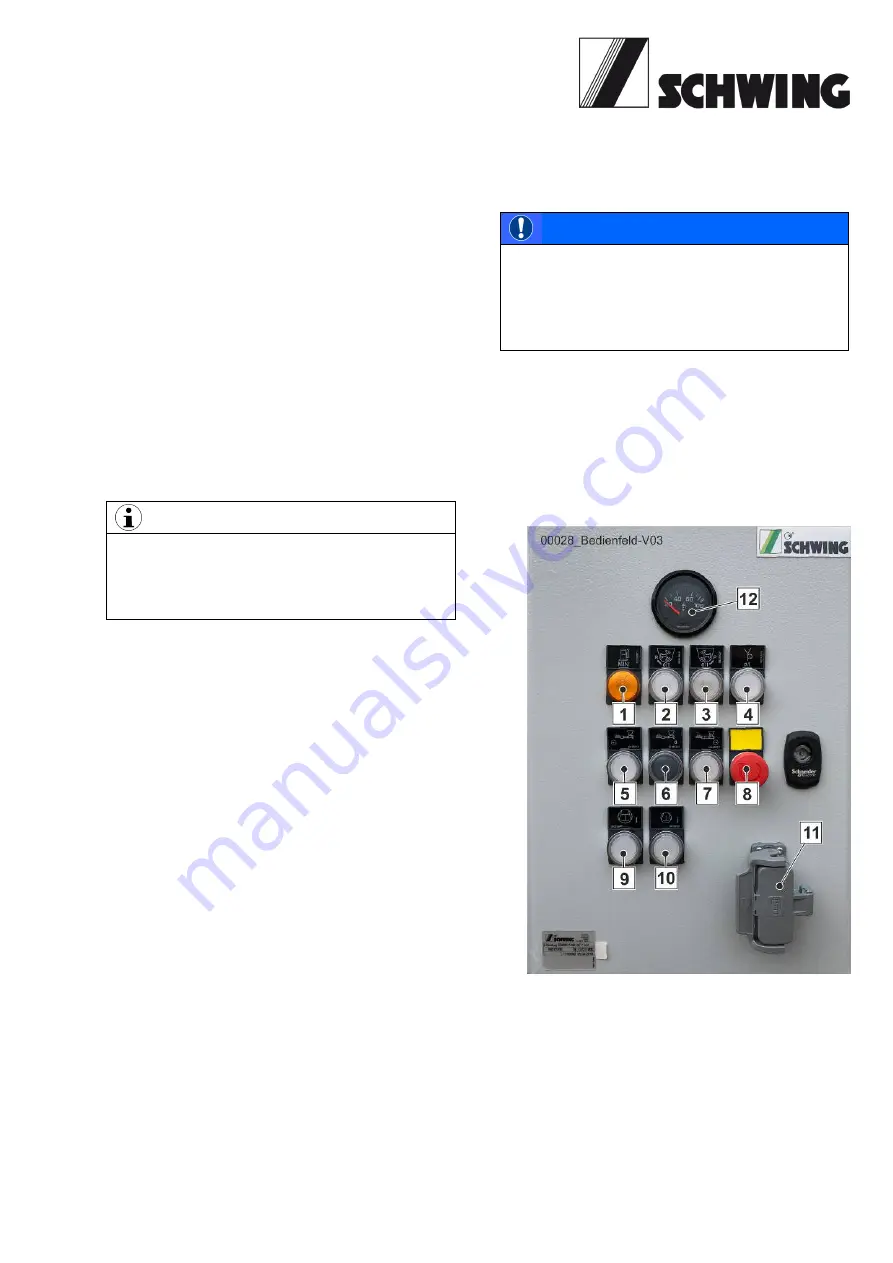
3.39.2  Electrical fuse protection for the 

machine control system  

Depending on the type of machine, the system 
can be secured in several places: 

A main safety fuse located near the starter. 

Safety fuses in the switch cabinet or 
operator station of the concrete pump 
(Fig. 1).  

Also see electric circuit diagram. 

Check fuses: 

Switch off the motor and remove the 
ignition key. 

Open the top cover of the control station 
using the special key. 

 
Commercially available vehicle fuses are used. 

Only insert newly equivalent fuses. 


ATTENTION 

Material damage caused by overrated 
fuses! 

The electrical system is destroyed due to 
overrated and overridden fuses 

Close the cover of the control station and 
begin operating the machine. 

If the error occurs again: 

Stop the machine and 

have an electrician inspect the system. 


Fig. 1 

Summary of Contents for SP 1800-D

Page 1: ...Original operating instructions Stationary concrete pump EN SP 1800 D SP 2800 D...

Page 2: ...operating instructions readily available on to machine so they can be viewed at all times Please ensure prompt replacement of the operating instructions if they should become lost When placing an orde...

Page 3: ...nical data 1 4 Machine description 1 5 Pictographs without text 1 6 Control warning and steering elements diesel drive 1 7 Control system 1 8 Safety 2 Safety manual Operation 3 Driving operation 3 2 S...

Page 4: ...operation Water system 3 33 Working operation Air system 3 34 Control of operations 3 35 Troubleshooting error handling 3 36 Release of blockages Emergency operation 3 37 Emergency oil supply of the...

Page 5: ...ries 4 6 Maintenance plan 4 10 Maintenance report master copies 4 11 Description of the maintenance Hydraulic fluid and filter 4 20 Check pressure settings 4 21 Oil cooler motor cooler 4 22 Drive line...

Page 6: ...Central lubricating system 4 80 Radio controls 5 Special equipment 6 High pressure cleaning system 6 2 End hose shut off valve 6 3 Chamber valve 6 4 External volume flow 6 5 Hydraulic shut off assemb...

Page 7: ...005 007 00 EN Presentation 1 Safety 2 Operation 3 Maintenance 4 Radio remote control 5 Special equipment 6 Appendix 7...

Page 8: ...005 007 00 EN Blank page...

Page 9: ...n Machinery and Equipment Constructors It is applicable without restrictions to our machines and an integral part of these operating instructions The safety manual contains essential safety notices fo...

Page 10: ...re supplemented by the corresponding abbreviation used in the ISO language code Example 005 008 04 EN 005 008 Identification number 04 Amendment index EN ISO language code EN English Please indicate t...

Page 11: ...e hazard classes of the signal words used TYPE OF HAZARD designates the type of hazard or source of the danger CONSEQUENCES describes the consequences of non observance PREVENTION indicates how the ha...

Page 12: ...ur attention to possible risks to your machine Please note if due to damage to the machine components or functions fail this can lead to accidents resulting in personal injury ATTENTION ATTENTION iden...

Page 13: ...ain them for future reference Familiarise yourself with the machine Do not wait until work shifts Please be aware that the figures in these instructions may differ slightly from the actual design of y...

Page 14: ...ng the CE marking to the machine See also chap 1 3 The original of each declaration of conformity is archived at SCHWING The customer receives a copy of this declaration in the national language toget...

Page 15: ...of the applied harmonised standards see Normative references in DIN EN 12001 hoisting spraying And placing machines for concrete and mortar safety requirements 2 Complete list of the applied national...

Page 16: ...list of the applied harmonised standards see Normative references in DIN EN 12001 hoisting spraying And placing machines for concrete and mortar safety requirements 2 Complete list of the applied nat...

Page 17: ...ion of the concrete pump means for example SP 1800 SP SCHWING PUMP 1800 Technical parameters minimum value Additional designations SP 2800 200 120 D 147 kW 200 Pumping cylinder mm 120 Piston of the di...

Page 18: ...es of the European Economic Area EEA must comply with the basic health and safety requirements of the relevant EC regulations The machine manufacturers confirm this by applying a mark Fig 2 to the mac...

Page 19: ...volume of pumped material other operating factors can also significantly reduce the service life of a machine under certain conditions such as Not operating the machine in accordance with its intended...

Page 20: ...o see the Difficult operating conditions chapter 1 3 3 FINAL DECOMMISSIONING AND DISPOSAL OF THE MACHINE The machines contain valuable raw materials that should be reused but also materials and sub st...

Page 21: ...1 004 997 02 EN 1 4 Technical data diesel engine Notice Output data is theoretical max value WARNING The specified concrete pressures require suitable pumping line material see the Pumping line chapt...

Page 22: ...1 4 2 004 997 02 EN WARNING The specified concrete pressures require suitable pumping line material see the Pumping line chapter...

Page 23: ...1 4 3 004 997 02 EN WARNING The specified concrete pressures require suitable pumping line material see the Pumping line chapter...

Page 24: ...1 4 4 004 997 02 EN WARNING The specified concrete pressures require suitable pumping line material see the Pumping line chapter...

Page 25: ...1 4 5 004 997 02 EN WARNING The specified concrete pressures require suitable pumping line material see the Pumping line chapter...

Page 26: ...1 4 6 004 997 02 EN Blank page...

Page 27: ...ctive series plus a safety margin SCHWING guarantees that this value will not be exceeded by newly delivered ex works machines THE HIGHEST SOUND PRESSURE LEVEL LpA The sound pressure level is a measur...

Page 28: ...driving direction 95 dB A 123 dB A SP 2800 E 97 1dB A 5 m from the front on the left in the driving direction 98 5 dB A 107 8 dB A SP2800 D CAT 151 kW 105 dB A 4 m from the front on the right in the...

Page 29: ...g the measurement Operate the machine at maximum hydraulic power INFORMATION The measured sound pressure level LpA is also influenced by the installed drive power and the drive motor used For this rea...

Page 30: ...1 4 1 4 002 410 15 EN Blank page...

Page 31: ...ive motor drives without the intermediate gear the pumps of the hydraulic system directly There are alternative diesel or electric motors available HYDRAULIC SYSTEM The hydraulic system operates in an...

Page 32: ...pushes the previously drawn in concrete into the pumping line During this the rock valve swivels so that the drawing cylinder is connected to the filling hopper and the pushing cylinder connected to...

Page 33: ...ge area than initially planned the signs and labels must be exchanged for a national language version Please ensure good condition and renew signs immediately that have become damaged or rendered ille...

Page 34: ...nt 10144573 10187511 10144566 98362082 Agitator Pump operation P 0 Suction operation R Concrete pump Sucking 0 Pumping Open isolation valve Close isolation valve 98362086 10115873 98362502 98362504 Ch...

Page 35: ...ne Speed adjuster Water pump Compressor CE signs 10086507 10158389 10144568 10148919 Main switch battery on Off Delivery note box No tread surface 98394724 98393988 Stowing box Up 0 Down EASy 200 disp...

Page 36: ...108 034 EN Lifting eye 98363577 10163380 Attention Exemplary values for Horizontal trailer load Vertical trailer load 98381870 983814191 Only use with appropriate machinery 1 For stationary concrete p...

Page 37: ...l Fig 3 1 Fuel level warning light 2 Agitator suction operation on off illuminated button 3 Agitator pumping operation agitator on off illuminated button 4 Concrete vibrator on off illuminated button...

Page 38: ...mergency Off button 3 Illuminated button Concrete pump suction 4 Button Concrete pump off 5 Illuminated button Concrete pump pumping 1 7 3 Control panel arrangement Fig 6 1 CAT control INFORMATION The...

Page 39: ...t display screens and through settings in the settings screen 7 IOPU control station connector Connects the IOPU control station to the motor wiring harness 8 Left arrow button The operator can use th...

Page 40: ...hange and save the motor s rotational speed on the control panel The function is the equivalent of a cruise control in a passenger vehicle As long as the control is active the configured value will re...

Page 41: ...be carried out from a degree of clogging of 30 3 Automatic regeneration of the diesel particle filter DPF is required from a degree of clogging of 80 a control light appears on the display 4 At a degr...

Page 42: ...y b Do not attempt to carry out any machine functions during regeneration c Regeneration must not be interrupted d The process can last up to approx 30 minutes e The motor independently adjusts its sp...

Page 43: ...5 2 Breather screw on the water separator A warning is issued when the water level in the fuel water separator is too high Drain water from the fuel system Connect a suitable hose to the draining devi...

Page 44: ...f Fig 16 3 Output regulation of the concrete pump Description of Fig 17 1 Output regulation of the concrete pump 2 Fuel fine filter 3 Fuel coarse prefilter Descriptions of Fig 18 4 Fuel coarse prefilt...

Page 45: ...tery Only use the interruption of the run on function forced switch off of motor in case of emergency ATTENTION Severe material damage to motor Repeatedly forcing the motor to switch off at short inte...

Page 46: ...1 7 10 005 142 08 EN Fig 21 turn main switch for starter batteries to the right...

Page 47: ...005 016 00 EN Presentation 1 Safety 2 Operation 3 Maintenance 4 Radio remote control 5 Special equipment 6 Appendix 7...

Page 48: ...005 016 00 EN Blank page...

Page 49: ...Safety Manual Concrete delivery and placing machines 01 2018 Rev16 EN...

Page 50: ...528 Frankfurt Telefon 49 69 6603 1262 Fax 49 69 6603 2262 E Mail bub vdma org Internet bub vdma org This safety manual was produced with the co operation of the following com panies Putzmeister Concre...

Page 51: ...ter Sales Service personnel 13 1 1 18 Maintenance 13 1 1 19 Place of work working area danger zone 14 1 2 Designated use 18 1 2 1 Retesting safety inspection 19 1 2 2 Inspection intervals for retestin...

Page 52: ...2 2 3 Clearances 32 2 2 4 Highvoltage warning devices 33 2 2 5 Procedure in the event of a flash over 33 2 2 6 Earthing in the event of electrostatic charging 34 2 2 7 Earthing on construction sites...

Page 53: ...2 7 5 Constant observation of the machine 51 2 7 6 Truck mixer 51 2 8 Cleaning 51 2 8 1 General 51 2 8 2 Cleaning agents 52 2 8 3 Cleaning with compressed air 53 2 8 4 Protection against water 54 2 8...

Page 54: ...3 9 Noise emissions 66 3 10 Exhaust fumes 66 3 11 Functional fluids 67 3 12 Disposal of the machine 68 Index 69 1 2 3 Table of contents Concrete delivery and placing machines 6 01 2018 Rev16 EN...

Page 55: ...s according to the degree of injury or amount of damage to be expected Infringements of the rules laid down in this Safety Manual may lead to accidents and or machine failures even if not expressly de...

Page 56: ...8 01 2018 Rev16 EN...

Page 57: ...1 Terms definitions requirements Safety Manual Concrete delivery and placing machines 01 2018 Rev16 EN 9...

Page 58: ...10 01 2018 Rev16 EN...

Page 59: ...concrete pumps Stationary concrete pumps Stationary placing systems an ensemble of placing boom and base structure 1 1 2 Concrete pump For the purposes of this Safety Manual concrete pumps are defined...

Page 60: ...no couplings spouts dis charge stops or other items fixed to the outlet end of the end hose un less they are approved by the manufacturer 1 1 9 Manufacturer Any natural or legal person that markets a...

Page 61: ...vers must be able to independently eval uate all dangerous situations which may occur when working in the area of the hopper of a concrete pump and react according to the sit uation 1 1 15 Subject exp...

Page 62: ...Place of work working area danger zone 1 1 19 1 Mobile machines 1 Figure 1 Example 1 1 19 2 Stationary machines 1 1 Figure 2 Example Safety Manual Concrete delivery and placing machines 14 01 2018 Re...

Page 63: ...perations when remov ing a blockage and during cleaning pro cedures The diameter of the danger zone is twice the end hose length 9 Danger zone Beneath the placing boom Risk of injury from falling item...

Page 64: ...ter level of caution The hoseman and machine operator must have visual contact Place of work truck mixer driver The truck mixer driver s place of work is in the danger zone of the hopper and at operat...

Page 65: ...es of work may occasionally fall within the danger zone especially the place of work of the hose man and the truck mixer driver If a place of work falls within the dan ger zone increased caution is re...

Page 66: ...risk of becoming caught in the rotating agita tor Delivery line systems In the area around the delivery line systems there is a risk of injury from the delivery line bursting if there is an abrupt ris...

Page 67: ...tion of cracks damage wear corrosion and other changes Retesting of the completeness and effectiveness of the safety equipment Retesting to find out whether any defects which are found during the test...

Page 68: ...the operator can be liable in the event of damage if it is proved that the damage has arisen as a con sequence of regular retesting not being properly carried out If retesting is not carried out the...

Page 69: ...ting equipment for the extension have differing pivot points and modes of control it is not possible to co ordinate their movements 1 3 5 Extending the placing boom and end hose Extension of the placi...

Page 70: ...e outlet end of the end hose unless they are approved by the manufacturer 1 3 7 Impermissible working area During pumping operations the end hose must not be moved back wards beyond the vertical axis...

Page 71: ...livery line elements are marked with the maximum permissible deliv ery pressure The delivery line and end hose are only suitable for concrete pressures of up to 85 bar until the wear threshold is reac...

Page 72: ...ensure that only persons who are qualified or have received the necessary instruction work on or with the machine It is the responsibility of the operator to carry out regular e g annual safety briefi...

Page 73: ...should commission the manufacturer s After Sales Department with the maintenance of your machine 1 5 3 Responsibility of the machine operator The operator must define the responsibility of the machin...

Page 74: ...ntil you are certain you can execute them safely Ask questions if there is something you have not understood Begin oper ating the machine only once you are fully and explicitly familiar with the layou...

Page 75: ...minimum comply with the requirements of the specified standards Symbol Meaning Safety helmet The safety helmet protects your head e g from falling concrete or parts of delivery lines if lines burst D...

Page 76: ...aids and working platforms provided for reasons of safety or wear a safety harness The relevant national regulations must be complied with DIN EN 361 Personal protective equipment against falls from a...

Page 77: ...2 Setting up and working with the machine Safety Manual Concrete delivery and placing machines 01 2018 Rev16 EN 29...

Page 78: ...30 01 2018 Rev16 EN...

Page 79: ...e you change the mode of control control block control console or re mote control Never put the remote control down when the machine is ready for op eration If this is unavoidable in exceptional cases...

Page 80: ...imum clearance is measured in the horizontal when the placing boom is fully extended Rated voltage V Minimum clearance m up to 1 kV 1 0 1 kV up to 110 kV 3 0 110 kV up to 220 kV 4 0 220 kV up to 380 k...

Page 81: ...ery line for instance 2 2 4 Highvoltage warning devices According to the current rules of engineering highvoltage warning de vices do not meet a safety standard which enables minimum clearan ces to hi...

Page 82: ...tri cal charges in the machine Persons who bridge the charged parts to the earth are heavily charged on contact Machines in use in the vicinity of transmitters must be earthed This earthing may be car...

Page 83: ...cture as specified in the manufacturer s information The base frame of the base structure must be fastened in place so that it is level on the base structural ele ments in every direction Check the do...

Page 84: ...supporting ground and any barriers separating the construction site from public roads The setup site must have sufficient lighting to ensure safe operation of the machine Ensure that the setup site is...

Page 85: ...ea must be enlarged as required Support plates and timber blocks may be used to increase the support area The sup ports must be undamaged and free from ice oil grease etc The support blocks and timber...

Page 86: ...r backfilled ground the safe clearance corresponds to dou ble the pit depth but must be at least 2 m 2 4 4 Supports The placing boom must not be raised until the machine has been sup ported in accorda...

Page 87: ...wise the maximum permissible deviation from the horizontal is 3 Greater deviations from the horizontal over load the slewing gear for the placing boom as well as its overall sup port structure jeopard...

Page 88: ...or when passing under overhead cables The same minimum clearances apply when driving under high voltage lines as when working with the placing boom Be aware of the height of the truck Only drive over...

Page 89: ...fting points fitted to the machine are provided for assembly purposes only They are not suitable for lifting the complete machine The lifting points for lifting the entire machine are specially marked...

Page 90: ...adio remote control is long enough for the machine to receive control commands e g from a great distance from inside en closed spaces even without visual contact If there is no visual con tact for exa...

Page 91: ...or obstacles on the construction site with the placing boom Under cer tain circumstances it is even possible to overload or cause damage to the placing boom Uncontrolled movements may result from the...

Page 92: ...b merged below the surface of the concrete being delivered otherwise the concrete may spray upwards The concrete may also spray from the end hose due to the presence of air in the delivery line To pre...

Page 93: ...ith the Beaufort scale are average wind speeds measured over a period of 10 minutes Higher speed gusts of wind may occur briefly during the measuring period Higher wind speeds jeopardise the stability...

Page 94: ...ems 2 6 1 Suitable delivery lines Use only delivery lines end hoses couplings etc which are in per fect condition and suitable for the delivery job and have been ap proved by the machine manufacturer...

Page 95: ...delivery pressure using compressed air etc There is a risk of death from the delivery line bursting or from concrete being ejected from the end of the delivery line Prevent blockages by adjusting the...

Page 96: ...the delivery lines Delivery lines in particular riser lines which are not laid along placing booms must be securely fastened in order to transfer the forces gen erated in them into the structure or ot...

Page 97: ...Pumping operations 2 7 1 Place of work The machine operator s place of work is with the remote control when the pump is in operation If you operate the machine using the remote control all operating a...

Page 98: ...cure it to prevent unintended movements and unauthorised use Switch off the remote control and lock it away 2 7 4 Moving machine components and hot surfaces Keep all access covers maintenance flaps gu...

Page 99: ...xer driv ers who deliver the concrete to you so that they are able to operate the operating elements on the concrete pump provided for their use Only allow the truck mixer drivers to work alone once y...

Page 100: ...d steps to climb in to and out of the machine It is forbidden to stand on the grille Do not jump from the machine Do not reach into the hopper or any other moving machine compo nents This rule must al...

Page 101: ...y be used for cleaning purposes under the supervision of a subject expert All persons participating in the clean ing procedure must be instructed in the safety regulations The manufacturer accepts no...

Page 102: ...of blockage The sponge ball or the plug used to push the concrete out must be sufficiently dense that the air does not pass through it into the con crete In addition the delivery line must be sealed...

Page 103: ...eaning procedure After the machine is cleaned the covers tapes must be completely re moved and the machine must be checked to ensure that it is ready for operation Before working with the machine P 31...

Page 104: ...56 01 2018 Rev16 EN...

Page 105: ...3 Maintenance and special work Safety Manual Concrete delivery and placing machines 01 2018 Rev16 EN 57...

Page 106: ...58 01 2018 Rev16 EN...

Page 107: ...inadvertent ly Lock the main control devices and remove the key If a main switch is fitted attach a warning plate to it Only carry out maintenance work if the machine is parked on level and sufficient...

Page 108: ...hy draulic fluid radiator etc Ensure that all functional fluids consumables and replaced parts are disposed of safely and with minimum environmental impact 3 2 Welding Only carry out welding flame cut...

Page 109: ...ut maintenance and repair work on the placing boom if the placing boom is folded or properly supported the engine is switched off and the support legs are secured Support the placing boom arms before...

Page 110: ...persons authorised by the manufacturer may intervene in the machine s software This also applies to updates Unauthorised interventions in the machine s software may lead to se vere damage and accident...

Page 111: ...system of machines with an internal combustion engine When reconnecting connect the positive terminal first and then the negative terminal Before starting work on highvoltage assemblies and after cutt...

Page 112: ...to the mains power supply Only trained and qualified personnel are permitted to work on electri cal systems with an operating voltage of more than 25 volts alternat ing voltage or 60 volts direct cur...

Page 113: ...n jury caused by functional fluids escaping under pressure If there is a hydraulic accumulator open the accumulator dump valve to prevent any machine movements caused by residual pressure Modification...

Page 114: ...achine operator Take the values for the sound pressure level and sound power level from the machine Operating Instructions Wear suitable personal protective equipment in the vicinity of the ma chine A...

Page 115: ...ous to health and always take note of the manufacturer s information Take care when handling toxic and caustic functional fluids brake flu id battery acid water glass concrete set accelerating admixtu...

Page 116: ...arly hydraulic fluids engine oils fuel brake fluid concrete admixtures any environmentally hazardous functional fluids or functional fluids which are hazard ous in any other way and dispose of these c...

Page 117: ...tant observation of the machine P 51 Continuation delivery lines P 48 Corner bearing loads P 38 D Danger due to high voltage P 31 Danger zone P 17 Definition of terms P 11 Delivery line systems P 12 1...

Page 118: ...elivery lines P 48 Operating Instructions P 25 Operating Instructions operating procedures and other regulations P 25 Operating procedures P 26 Operator P 12 Other regulations P 27 P Personal protecti...

Page 119: ...with the machine P 29 Setup site P 35 36 Signaller and other auxiliary personnel P 13 Software P 62 Stationary machines P 14 35 Stationary placing booms P 35 Subject expert P 13 Suitable delivery line...

Page 120: ...72 01 2018 Rev16 EN...

Page 121: ......

Page 122: ......

Page 123: ...005 017 00 EN Presentation 1 Safety 2 Operation 3 Maintenance 4 Radio remote control 5 Special equipment 6 Appendix 7...

Page 124: ...005 017 00 EN Blank page...

Page 125: ...ON Check the tightness of the reservoirs Empty fuel tank and oil box if necessary Secure the outrigger against independent extension at 80 km h chassis frame AIR PRESSURE TABLE Tyre size Air pressure...

Page 126: ...3 2 1 001 855 06 EN Blank page...

Page 127: ...s with other construction equipment cranes diggers etc are not possible The prescribed safety distance from overhead transmission lines is adhered to under all placing boom positions The prescribed sa...

Page 128: ...down During bad weather the placing boom must be folded together into transport position OBSERVE SAFETY MANUAL Concrete pumps must be earthed when in proximity to transmitters in order to dissipate el...

Page 129: ...3 3 3 001 462 06 EN Fig 1...

Page 130: ...3 3 4 001 462 06 EN Blank page...

Page 131: ...ANDARD EQUIPMENT Protection class IP 54 Operability during mains voltage fluctuations ISO Class B When connecting to the supply line ensure that a right rotating field is present Protection against ra...

Page 132: ...IC SHOCK It is imperative to switch main switch into 0 position and pull mains plug Recheck rotational direction The rotational direction should always be checked After the connection After repairs to...

Page 133: ...t switched off Such special equipment having locked control levers also continues to run Switch off the motor or special equipment if necessary such as described in the corresponding chapters RECOMMIS...

Page 134: ...ion can be ineffective if the corresponding hydraulic control valve jams for example Therefore press the nearest EMERGENCY STOP switch immediately if the machine carries out unwanted movements or does...

Page 135: ...The machine can be severely damaged if the tanks for fuel and hydraulic oil are mixed up Do not mix up the filling neck for hydraulic oil with the fuel filling neck on the opposite side Ensure that al...

Page 136: ...ocking bars 1 Fig 5 are used to secure the grid assembly Insert both locking bars Otherwise the concrete would bent or push up the grid assembly An end limit switch shuts down the agitator and concret...

Page 137: ...ume of approx 38 l This quantity is sufficient for an operating time of approx 45 minutes Top up diesel fuel if necessary For fuel quality see motor operating instructions The fuel tank holds approx 2...

Page 138: ...the AdBlue tank open the left hand maintenance flap Fig 9 Disengage the safety on the slewing arm 2 Fig 10 detailed view 1 Fig 11 Swing the AdBlue tank out of the machine frame Fig 12 Secure the exten...

Page 139: ...3 10 5 005 144 04 EN Fig 10 Fig 11 locked release Fig 12 Fig 13...

Page 140: ...rage fuel consumption of approx 220 g per kW and hour Fig 15 explanation of formula To A Max diesel filling volume in L tank contents To B Viscosity of diesel fuel at 15 C To C Fuel consumption in kg...

Page 141: ...ightly and turn it clockwise to the first locking position The warning lights 1 2 light up during a short automatic check Fig 1 Fig 2 If no faults are detected the lights go out after approx 2 seconds...

Page 142: ...ational speed with the button 11 and make sure the adjustable maximum speed does not exceed the nominal speed revolution counter 1 If the nominal speed Technical data chapter is exceeded lower the rot...

Page 143: ...possible using the pressure reducing valve 4 Fig 6 Switch off the concrete pump and agitator 3 11 3 Forced switch off of motor Fig 9 The motor can be switched off immediately via a forced switch off...

Page 144: ...3 11 4 005 145 03 EN Fig 7 control panel with regeneration Fig 8 control panel with TSC Fig 9 pos 2 Forced switch off of motor button...

Page 145: ...rt surface must be extended using suitable means until the permissible ground pressure is reached Depending on the dwelling time of the machine we recommend the use of our spacers item no 1095646 or t...

Page 146: ...load capacity of lifting eyes due to additional weight of accessories and remnants of pumping medium Determine weight of loads prior to raising ATTENTION Chain lengths that are too short lead to seri...

Page 147: ...ed from the towing vehicle loosen the toggle 1 Fig 1 and lower the protective tube 2 Tighten the toggle 1 Hold bolt 3 Actuate the crank 4 and lower the supporting dish until the trailer coupling is re...

Page 148: ...h bolts and split pins Raise the machine at the front using the crank 4 Fig 1 and ensure it is horizontal Lower front connection piece and secure with bolts and split pins Insert the supporting bracke...

Page 149: ...the front hydraulic supporting stand 1 Fig 2 to both machine sides using the control levers The control levers are spring centred and return to the central position once they have been released Exten...

Page 150: ...3 20 6 004 551 01 EN Blank page...

Page 151: ...re in bar s Wall thickness Fig 2 Delivery tube marking as of approx 2017 Fig 3 Tapered tube marking as of approx 2017 Fig 4 Elbow marking as of approx 2017 Caption Fig 2 Fig 4 Designation Meaning Char...

Page 152: ...pecified on the components and type plates are the maximum permissible operating pressures for components in new condition If the minimum wall thickness is not met then replace tubes and elbows With t...

Page 153: ...rict accordance with the manufacturer s instructions Due to changes to the pumping line other safety relevant adjustments of the machine may be mandatory After significant changes that are not carried...

Page 154: ...ype plate of the concrete pump see Fig 6 These concrete pumps may not pump through end hose and boom pumping line with piston sided pressure Separately installed pumping lines are an exception With pi...

Page 155: ...clip pin 4 out of the wedge 5 Remove the wedge 5 and keep it ready to use as a chock for the hinge 7 Open the foldable outlet 6 At an open angle of approx 100 the wedge 2 can be wedged into the notch...

Page 156: ...ve wedge 2 Open the foldable and rotatable outlet Loosen both the safety screw 4 and the second safety screw offset by 180 by approx half a rotation Rotate the foldable and rotatable outlet into the r...

Page 157: ...he same as for the short outlet The larger outlet 180 180 150 has the advantage of having less concrete resistance Use the larger outlet when you wish to pump concrete that is hard to pump The larger...

Page 158: ...ete pump depending on the Drive power of the concrete pump Installed pump kit Application of the differential cylinder Certain stationary concrete pumps can for example produce a concrete pressure of...

Page 159: ...e up to max 110 bar 2b Thick walled tubes with wall thickness of 7 1 mm are suitable up to max 160 bar These tubes are used when mid to high concrete pressures or very high stoppage times are required...

Page 160: ...he end hose during pumping Do NOT use fixed end pieces reductions or extensions on the end hose Connecting hoses with a double sided fixing are not permitted for use as end hoses Do NOT use longer end...

Page 161: ...not exceed the max permissible concrete pressure of the pumping line parts The concreting personnel at the placement site must be informed about possible dangers and be familiar with all necessary wo...

Page 162: ...s that not only the remaining concrete but also possibly a piece of rubber may be pulled out during the next pumping 3 23 10 OBSERVATION DURING OPERATION Prior to operation it must be ensured that the...

Page 163: ...ance The SCHWING customer service can mention suitable measurement devices depending on the pumping line material used We strongly recommend to build the pumping line exclusively with suitable SCHWING...

Page 164: ...3 22 14 003 336 15 EN Blank page...

Page 165: ...deliver oil In order to prevent the unintentional start up of a function switch all engaged steering elements to the 0 position prior to starting Switch the upstream ball valve to the base position A...

Page 166: ...The concrete pump cannot be operated The plug is included in the tool set of the machine EMERGENCY OPERATION see chap 3 39 CLOSE MAINTENANCE FLAPS CAUTION Hearing can be damaged Personal hearing prote...

Page 167: ...cial equipment as well as various special equipment is not possible CAUTION Unintentional start up After switching on the drive motor the auxiliary pump agitator pump pumps oil immediately However the...

Page 168: ...a hydraulic outrigger a ball valve selects between the outrigger and additional functions In the position Outrigger only it can be driven In the position Agitator the oil flow is conducted to other co...

Page 169: ...solids as they cause a rapid wear of the water pump Connect suitable hoses to the suction socket 5 and delivery connection 3 OPERATION Start the drive motor and regulate the speed of the diesel engine...

Page 170: ...is set at the factory and may only be adjusted by SCHWING s customer service If the water pump is used to clean the pumping line observe chap 3 40 END OF OPERATION Switch off the water pump using the...

Page 171: ...tach a suitable pressure hose to the delivery connection 7 on the compressor Connect the pressure hose for example to the junction 1 Fig 2 of the pumping line cleaning nozzle Open the air drain cock 3...

Page 172: ...te by opening and closing the air drain cock in the pressure line e g 3 Fig 1 END OF OPERATION Open the air drain cock in the pressure line Switch off the compressor using the button 10 Fig 4 WINTER O...

Page 173: ...fficient to bring the compressor up to operating temperature Water can collect in the compressor 1 Fig 5 and cause damage For this reason we recommend Switch on the compressor once a week for at least...

Page 174: ...3 34 4 004 546 02 EN Blank page...

Page 175: ...hing on the shut off assembly and restart after switching off the shut off assembly See hydraulic switching diagram Have a hydraulics technician connect the hydraulic junctions of the shut off assembl...

Page 176: ...ecommend using SCHWING shut off assembly example Fig 1 and pumping line material When using unsuitable materials SCHWING is not liable for any damages We recommend hydraulic hoses DN 12 of up to a 15...

Page 177: ...se the hydraulic system This can be done for example by opening manual relief valves or also by repeated manual switching of the appropriate directional valve in both directions In contrast to a press...

Page 178: ...0 CONCRETE TECHNOLOGY CONDITIONS Release the blockage by reverse pumping the concrete with a concrete pump Then pump again carefully Repeat the process if necessary until the blockage releases If redu...

Page 179: ...en caused by dirt in the hydraulic oil This dirt causes the control piston to jam and thus not execute or execute control commands incorrectly A clogging of the oil is prevented through careful oil ma...

Page 180: ...3 37 4 004 910 01 EN Blank page...

Page 181: ...isk of accidents due to parts or material being ejected Intake air is compressed in the pumping line and escapes abruptly at the end of the line or through the hopper Persons in the danger zone may be...

Page 182: ...the drive motor and release pressure accumulator if available in order to prevent unwanted working movements of the concrete pump After filling up mount cover for water box properly and secure with w...

Page 183: ...ic switching diagram or data sheet The pressure relief valves set in the factory may not be altered Reconnect the concrete pump to rod sided application when higher performance is required See the Wor...

Page 184: ...g in the adjustment spindle 2 Fig 6 can dampen the limit stop further However this is associated with a stroke rate reduction If the rock valve incorrectly connects through e g due to a rigid concrete...

Page 185: ...NG Observe the safety regulations for handling fuel Observe the warning lights on the control station Fig 8 They must not light up while the motor is running For certain failures e g motor oil pressur...

Page 186: ...3 38 6 005 148 02 EN Blank page...

Page 187: ...system Depending on the type of machine the system can be secured in several places A main safety fuse located near the starter Safety fuses in the switch cabinet or operator station of the concrete p...

Page 188: ...e same position for the preheating system provided the motor is equipped with such system 3 39 3 Bypass In the event that the machine has to be operated during an emergency or test operation a bypass...

Page 189: ...the control lever must be disassembled immediately after completion of the test The control lever can switch the concrete pump into the pump or suction direction After releasing the control lever it...

Page 190: ...rete pump to the hydraulic oil box The PRV opens and the concrete pump stops If the concrete pump stops unexpectedly it is possible that the EMERGENCY STOP valve is open Check first if voltage is pres...

Page 191: ...setting 1 CLEANING DEVICES SCHWING delivers as standard suitable equipment for cleaning machine and pumping line suitable as special equipment or accessories For example Compressor Fig 1 Water pump 1...

Page 192: ...mping line the concrete column must be released by pumping backwards Various methods are applied to clean a pumping line 2 1 REVERSE PUMPING OF CONCRETE Reverse pumping of concrete using a sponge rubb...

Page 193: ...e if the machine is not equipped with an automatic adjustment of the agitator rotational direction to pumping or suction operation Do not forget to switch Machines with VECTOR control switch automatic...

Page 194: ...the pumping line Only use the handle of the hammer to tap the pumping line Do not use metal objects Dents cause rapid wear of the delivery tube The inner hardened layer of highly wear resistant tubes...

Page 195: ...e approx 7 strokes to empty the pumping line 850 l 125 l approx 7 strokes Which would cause the filling hopper to overflow We therefore recommend to interrupt the back siphonage process at the latest...

Page 196: ...g is made of soaked double folded tightly rolled up empty cement bags INFORMATION The plug must be completely sealed to prevent the concrete from leaching 2 3 RINSE PUMPING LINE Cement residues are re...

Page 197: ...e concrete can escape freely 7 The cleaning head must be equipped with a functioning pressure gauge 2 and a large dimensioned blow valve 3 Fig 15 8 The length of the plug must be such that it seals th...

Page 198: ...control transmitter Use the local control WARNING If the machine has to be switched on for cleaning the machinist is responsible that no unauthorised persons come near the open gate valve housing 3 2...

Page 199: ...immediately if water no longer comes out Hose out the water box with pressure water Fig 20 Do not remove grid from water box Fill water box with fresh water Check the water box weekly for deposits tha...

Page 200: ...he flap in the wedge shaped constructed guides INFORMATION Do not forget to secure Vibrations can cause the flap to open INFORMATION Let flat gate valve machines run a few more strokes so that the flu...

Page 201: ...th mechanical paint damage because this can cause painted areas to separate even more Damaged painted surfaces should be repaired as soon as possible and in a professional manner During subsequent use...

Page 202: ...box and piston rods of the differential cylinder Application Open the drain cock 1 Fig 22 of the water box at the rear of the machine Start the water pump and route pressurised water to the spraying...

Page 203: ...e Working operation Cleaning Maintenance and repair the required safety at work is ensured DANGER It is forbidden to turn the machine on when the hopper grate is removed or opened or to manipulate the...

Page 204: ...Stop the machine Switch off the drive motor and prevent it from starting up Discharge the pressure accumulator If present To more clearly illustrate the above mentioned risks our machines can be fitt...

Page 205: ...r the supporting dish of the crank support Fig 1 MECHANICAL OUTRIGGER Lift the machine at the front somewhat with the crank support Fig 1 until the front supports 1 Fig 2 are unburdened Retract the fr...

Page 206: ...utrigger position of the ball valve The auxiliary pump may not drive any other aggregates Start the drive motor Retract the front hydraulic supports 1 Fig 2 with the control levers on the machine Shut...

Page 207: ...pply cable of the e machine Drain the operating materials if necessary Close and lock maintenance flaps COUPLING CAUTION Danger of crushing No one may remain between concrete pump and towing vehicle d...

Page 208: ...eed load capacity of lifting eyes due to additional weight of accessories and remnants of pumping medium Determine weight of loads prior to raising ATTENTION Chain lengths that are too short lead to s...

Page 209: ...anger that it may cause brittle fractures to steel components In addition extreme cold can destroy rubber And plastic parts In case of frost danger of frost and in extreme heat special measures are re...

Page 210: ...from the pumping cylinder 1 4 HYDRAULIC SYSTEM SCHWING recommends appropriate hydraulic fluids for different climates and applications See chapter 4 4 The multi purpose hydraulic oil filled in at the...

Page 211: ...3 60 3 002 368 08 EN Viscosity temperature diagram Fig 2 Viscosity temperature diagram Kinematic viscosity mm 2 s Temperature C...

Page 212: ...n the agitator motor The hydraulic oil is then routed to the tank via the pressure relief valve and thereby warms up faster The temperature of the hydraulic oil optimal operating viscosity can be foun...

Page 213: ...to 20 C 1 8 ELECTRICAL SYSTEM The initial capacity of the batteries depends on the battery status and ambient temperature Ensure good battery status Remove batteries when machine is not used Store ba...

Page 214: ...temperatures 1 12 PUMP OPERATION In general heated concrete is used at ambient temperatures below freezing Expect short setting times In order to prevent bleeding the heated concrete must be mixed tho...

Page 215: ...ge the insert of the motor air filter if necessary Do not open the maintenance flaps in order to improve the cooling effect This could interfere with the air circulation and have the opposite effect E...

Page 216: ...ass VG 46 and the viscosity class VG 68 intended for tropical applications See chapter 4 4 If a single grade oil VG 46 is used the oil must be changed to VG 68 When changing the oil also replace the f...

Page 217: ...3 60 9 002 368 08 EN Viscosity temperature diagram Viscosity temperature diagram Kinematic viscosity mm 2 s Temperature C...

Page 218: ...possible to use a multi purpose oil Should such oil not be available please use an oil with a viscosity level thicker than the recommended gear oil see gear type plate thus VG 320 instead of VG 220 i...

Page 219: ...equently prepared in hot areas with cooled aggregates or cooled water The placement of the concrete should take place preferably during cooler periods of the time such as in the morning or evening Rin...

Page 220: ...3 60 12 002 368 08 EN Blank page...

Page 221: ...Relieve pressure accumulators Preserve motor according to the motor operating instructions Drain water from the reservoir water box and water pump Spray water box with a rust protective agent Close a...

Page 222: ...ll to the brim Check batteries and install Check fixing elements Completely lubricate machine Carry out function testing INFORMATION For storage of the machine under difficult conditions special regul...

Page 223: ...per m with a maximum grain size of 32 mm A water cement value of 0 42 0 65 A grain structure according to grading curve A consistency of K 2 to K 3 The following faults could result in the inability o...

Page 224: ...3 80 2 001 156 04 EN Blank page...

Page 225: ...005 018 00 EN Presentation 1 Safety 2 Operation 3 Maintenance 4 Radio remote control 5 Special equipment 6 Appendix 7...

Page 226: ...005 018 00 EN Blank page...

Page 227: ...parts Avoid penetration of dirt especially into the hydraulic system Completely lubricate the machine after high pressure cleaning 1 2 CORROSION PROTECTION Heavy rust weakens the material and may cau...

Page 228: ...l boxes which mixes with the oil This mixture can no longer meet the requirements for a quality oil with increasing water content After several days of standstill of the machine the water separates fr...

Page 229: ...ion material Fig 1 Test run the machine after repair and check the oil level Mind unusual noises temperatures and leaks Carry out maintenance work on repaired or replaced units in the same way as for...

Page 230: ...lectrician disconnect the power supply of such machines prior to carrying out repair work on the machine WARNING Danger caused by electric shock Always switch off and secure main switch Only qualified...

Page 231: ...brication points Drive motor SP 1800 BR02 250 400 1 00 1 00 Rotor oil 8000 F2 2 see motor operating instructions SP 2800 BR02 250 400 SP 3800 BR02 2 x 195 630 SP 8800 BR02 Container 1000 1500 SP 7000...

Page 232: ...4 3 2 002 878 14 EN Blank page...

Page 233: ...pace make sure that no persons can be hit by escaping oil Open the breather screw very carefully until oil emerges By no means open further or remove the junction DANGER Danger caused by oil jet Hydra...

Page 234: ...normal lubricants specified in column BI can be used DIN German National Standard ISO International Organisation for Standardisation MIL L American Military Standard for Lubricants API American Insti...

Page 235: ...s corresponds to about API GL 5 1 2 5 COMPRESSOR OIL VDL Mineral oil for air compressor with agents designed to improve anti corrosion and durability Carbon residue after ageing max 3 according to DIN...

Page 236: ...MX 68 S2 VX 68 SRS Wiolan HS 32 HV 32 HS 46 HV 46 1 HS 68 HV 68 VG 32 Winter operating conditions in Central Europe VG 46 Summer operating conditions in Central Europe VG 68 Rooms with high amounts of...

Page 237: ...iolan IT 220 BI 3 2 VEHICLE GEAR OIL Viscosity according to SAE 90 85w 90 Quality according to MIL L 2105 B ARAL Gear oil HYP CP Energear HYPO 90 Hypogear 90 EP MOBIL Mobilube HD A 85w 90 SHELL Spirax...

Page 238: ...SHELL Tivela WB TEXACO Synlube CLP 220 BI ATTENTION The above synthetic lubricating oils on polyglycol base must not be mixed with oils of another base 3 4 INDUSTRIAL GEAR OIL POLY ALPHA OLEFIN BASE...

Page 239: ...ol HE 100 Motanol HE 150 CP Energol RC 100 Energol RC 150 SHELL Corena oil H 100 D Corena l H 150 D SUNOCO Sunvis 9100 Sunvis 9150 TEXACO Compr Alphasyn EP 100 Compr Oil EP 150 MOBIL Rarus 427 Rarus 4...

Page 240: ...P 2 WINTERSHALL Wiolub LFP 2 BI MPG A 5 3 SPECIAL LUBRICANTS FOR SEVERE OPERATING CONDITIONS Under severe operating conditions we recommend for the SLIDING BEARING OF THE BOOM COLUMN and SLIDING PIECE...

Page 241: ...ASTIC SLIDERS IN THE TELESCOPIC TUBE Designation according to DIN MLE2N 40 SCHWING art no 10194658 10 kg tin 5 6 SPECIAL LUBRICANTS FOR COUPLINGS AND SEALS OF THE PUMPING LINES OPTIMOL OLIT CLS Schwin...

Page 242: ...in contact Remove contaminated clothing and wash skin with water and soap If the skin was penetrated by high pressure consult a doctor immediately After eye contact Immediately rinse thoroughly under...

Page 243: ...urs and particles Hand protection Wear protective gloves made of PVC or nitrile rubber insofar as safety permissible Eye protection Wear protective glasses in case of risk of splashing Body protection...

Page 244: ...4 4 12 000 869 22 EN Blank page...

Page 245: ...cannot resist operating pressures and are therefore ripped out suddenly This can lead to severe injury from parts being blown away and hydraulic liquid leaking out The minor difference between lightwe...

Page 246: ...ey cannot be applied to other types e g expansion bolts It is also not possible to use them when means are used which increase the friction e g liquid screw lock Depending on the coating and lubricati...

Page 247: ...1 64 47 M 8 X 1 25 18 13 27 20 31 23 M 12 X 1 25 67 49 100 74 115 85 M 10 X 1 5 36 27 53 39 62 46 M 12 X 1 5 65 48 95 70 110 81 M 12 X 1 75 62 46 90 66 108 80 M 14 X 1 5 105 77 155 114 180 133 M 14 X...

Page 248: ...89 145 107 M 10 X 1 5 44 32 64 47 75 55 M 12 X 1 5 80 59 115 85 140 103 M 12 X 1 75 76 56 112 83 130 96 M 14 X 1 5 130 96 190 140 230 170 M 14 X 2 120 89 180 133 210 155 M 16 X 1 5 200 148 295 218 35...

Page 249: ...ad diameter Stainless steel screws and nuts Coefficient of friction 0 12 Mounting tightening torque Nm ft lb Strength class 50 e g turned parts Strength class 70 Standard A2 70 A4 70 Strength class 80...

Page 250: ...28 24 29 33 39 3 8 35 42 48 57 45 54 61 73 7 16 54 64 73 87 70 84 95 114 1 2 80 96 109 130 110 132 149 179 9 16 110 132 149 179 160 192 217 260 5 8 150 180 203 244 220 264 298 358 3 4 270 324 366 439...

Page 251: ...Series Min tube wall thickness Mounting torque mm mm Nm 6 6x1 30 8 8x1 45 10 10x1 60 12 12x1 5 85 15 L 15x1 5 125 18 18x1 5 200 22 22x2 200 28 28x2 340 35 35x3 460 42 42x3 600 6 6x2 45 8 8x1 5 60 10 1...

Page 252: ...as described below Insert screw joint connections into through hole Mount lock nut manually Final assembly of the lock nut with suitable torque wrench and mounting torque of the respective screw joint...

Page 253: ...Series Size Md Nm Md ft lb L 6 25 18 8 35 26 10 40 30 12 50 37 15 70 52 18 110 81 22 150 111 28 190 140 35 300 221 42 400 295 Series Size Md Nm Md ft lb S 6 35 26 8 55 41 10 70 52 12 75 55 14 100 74...

Page 254: ...ith soft seal Md ft lb L 6 M 10x1 25 18 18 13 8 M 12x1 5 35 26 25 18 10 M 14x1 5 55 41 50 37 12 M 16x1 5 80 59 70 52 15 M 18x1 5 100 74 90 66 18 M 22x1 5 170 125 130 96 22 M 26x1 5 230 170 180 133 28...

Page 255: ...soft seal Md ft lb L 6 G 1 8 A 25 18 20 15 8 G 1 4 A 55 41 50 37 10 G 1 4 A 55 41 50 37 12 G 3 8 A 95 70 80 59 15 G 1 2 A 185 136 100 74 18 G 1 2 A 100 74 100 74 22 G 3 4 A 250 184 180 133 28 G 1 A 4...

Page 256: ...Form E with soft seal Md ft lb L 6 M 10x1 15 11 15 11 8 M 12x1 5 25 18 25 18 10 M 14x1 5 40 30 40 30 12 M 16x1 5 55 41 55 41 15 M 18x1 5 70 52 70 52 18 M 22x1 5 120 89 120 89 22 M 26x1 5 140 103 140...

Page 257: ...m Form E with soft seal Md ft lb L 6 G 1 8 A 15 11 15 11 8 G 1 4 A 20 15 20 15 10 G 1 4 A 20 15 20 15 12 G 3 8 A 70 52 70 52 15 G 1 2 A 90 66 90 66 18 G 1 2 A 90 66 90 66 22 G 3 4 A 180 133 180 133 28...

Page 258: ...F 2A 28 21 12 9 16 18 UNF 2A 30 22 12 3 4 16 UNF 2A 55 41 12 7 8 14 UNF 2A 60 44 15 9 16 18 UNF 2A 30 22 15 3 4 16 UNF 2A 55 41 15 7 8 14 UNF 2A 60 44 15 1 1 16 12 UN 2A 110 81 15 1 5 16 12 UN 2A 165...

Page 259: ...NF 2A 100 74 12 9 16 18 UNF 2A 75 55 12 3 4 16 UNF 2A 100 74 12 7 8 14 UNF 2A 160 118 14 9 16 18 UNF 2A 75 55 14 3 4 16 UNF 2A 100 74 16 3 4 16 UNF 2A 100 74 16 7 8 14 UNF 2A 160 118 16 1 1 16 12 UN 2...

Page 260: ...5 60 44 8 G 1 4 50 37 8 M 14x1 5 60 44 10 G 3 8 80 59 10 M 16x1 5 85 63 12 G 3 8 80 59 12 M 18x1 5 110 81 14 G 1 2 160 118 14 M 20x1 5 16 G 1 2 160 118 16 M 22x1 5 150 111 20 G 3 4 250 184 20 M 27x2...

Page 261: ...8 22 G 3 4 140 103 25 G 1 270 199 28 G 1 260 192 30 G 1 1 4 420 310 35 G 1 1 4 390 288 38 G 1 1 4 550 406 42 G 1 1 2 550 406 Notice All screw joints are mounted unoiled Mounting the RSWS with sealing...

Page 262: ...Md Nm Md ft lb L 6 25 18 S 6 35 26 8 38 28 8 50 37 10 50 37 10 60 44 12 60 44 12 75 55 15 85 63 14 95 70 18 120 37 16 120 89 22 155 114 20 190 140 28 220 162 25 260 192 35 330 243 30 400 295 42 420 31...

Page 263: ...12 70 Nm DKO 20 S 36 Hose DN 16 100 Nm DKO 25 S 46 Hose DN 19 160 Nm DKO 28 L 41 Hose DN 25 140 Nm DKO 30 S 50 Hose DN 25 210 Nm DKO 38 S 60 Hose DN 31 300 Nm According to Schwing company standard 3...

Page 264: ...4 5 20 000 024 14 EN Blank page...

Page 265: ...er use is met We recommend our customer service for installing our original spare parts and accessories as well as for all maintenance and repair work on your SCHWING machines Please note that SCHWING...

Page 266: ...A strong increase of the water content suggests water ingress from the outside A worn sealing of the differential cylinder can also be assumed here Dirt in the hydraulic oil If external contamination...

Page 267: ...r the first commissioning Time interval in the following maintenance schedule A daily or 10 operating hours B weekly or 50 operating hours C monthly or 200 operating hours D quarter annually or 500 op...

Page 268: ...4 10 2 004 073 01 EN Blank page...

Page 269: ...res 4 21 A8 Grease joints of the operating levers A9 Check that the hydraulic and water systems do not leak check aggregates reservoirs pumping lines etc 4 44 A10 Check the fastening of the constructi...

Page 270: ...on rock valve slewing cylinder agitator and filling hopper 4 40 B6 Check clamping screws of the rock valve swivel head for tightness 4 40 B7 Check screws of the rock valve cover for tightness 4 40 B8...

Page 271: ...ter housing and bracket for damages cracks for each filter maintenance 4 30 D9 Function testing of maintenance indicator 4 30 D10 Empty fuel water separator daily 1 7 4 D11 Check soot level monitor st...

Page 272: ...itions concrete type concrete pump stroke rate etc We therefore recommend testing new components after having pumped a specified amount of concrete Then According to the wear and tear Plan further dat...

Page 273: ...4 11 001 915 00 EN MAINTENANCE REPORT Maintenance A B C D E F G please enter Date Signature Notes...

Page 274: ...4 11 001 915 00 EN Blank page...

Page 275: ...4 11 001 915 00 EN MAINTENANCE REPORT Maintenance A B C D E F G please enter Date Signature Notes...

Page 276: ...4 11 001 915 00 EN Blank page...

Page 277: ...ure that adhesive label is in good condition and replace it if required As the hydraulic oil expands when heated correspondingly different oil levels would be shown otherwise If necessary top up with...

Page 278: ...detected through a visual inspection The classification of solid contamination in lubrication and hydraulic fluids occurs according to ISO 4406 To determine the oil purity classification solid partic...

Page 279: ...samples can thus be taken cleanly quickly and easily and sent 4 20 6 Description of the oil sampling procedure Take the sample During operation or shortly after shut down because dirt and wear partic...

Page 280: ...our FLUSHING AND FILTRATION UNIT Drain residual oil using the drain valve as described above Clean the box and replace the filter inserts whenever you change the oil 4 20 9 Cleaning the reservoir In p...

Page 281: ...side surfaces of the box dry Check the seal and mount the cleaning cover ATTENTION Pumps can be destroyed After removing the suction hoses and prior to commissioning vent the pumps in question while t...

Page 282: ...h Collect the fluid in a suitable receptacle and clean it or dispose of it in an environmentally responsible way Screw pre 2011 models Pull the old filter insert 2 off the filter head Clean the filter...

Page 283: ...4 20 7 004 553 03 EN Document the changes of oil and filters using the appropriate SCHWING tags see Fig 8 Fig 9 Fig 8 item no 98391708 Fig 9 item no 98391709...

Page 284: ...4 20 8 004 553 03 EN Blank page...

Page 285: ...unning of the concrete pump ATTENTION For pressure tests of the concrete pump hydraulic system be sure to set the direction to Pumping In the direction draw the seals of the concrete pump control bloc...

Page 286: ...rete pump and open the shut off valve 7 Fig 2 Switch the concrete pump on The pumping pistons are brought into the final position and remain there The concrete pump pressure gauge 6 display must incre...

Page 287: ...oling efficacy Clean outside of hydraulic oil cooler Soiling on the radiator fins of the oil cooler Fig 1 reduces the cooling capacity Carefully clean the radiator with compressed air To do this bring...

Page 288: ...quipped with a motor oil cooler Please make sure that for applications on dusty construction sites the cooling fins of the motor cooler are cleaned from time to time Otherwise this may result in damag...

Page 289: ...restricted Remove any dust incrustations Renew damaged valve The valve must point down when in installed condition REMOVE FILTER ELEMENT If the machine is equipped with an air filter monitoring system...

Page 290: ...to the compressed air gun It must extend to the bottom of the element fig 1 Blow out element from the inside out by up and down movements until dust no longer escapes fig 2 Do not damage element CAUTI...

Page 291: ...upright in the original packaging protected from dust moisture and damage DISPOSAL The filter element consists of filter paper and polyurethane foam All filter elements are hazardous waste and must be...

Page 292: ...4 30 4 004 491 01 EN Blank page...

Page 293: ...Slewing shaft Slewing cylinder Agitator INFORMATION Depending on the type of rock valve the number of grease nipples can vary Additional grease nipples are located on the lubrication point for the mi...

Page 294: ...ess out the ball socket during repair work CHECKING SCREW TYPE CONNECTIONS Check the tightness of the cover screws 14 Fig 4 regularly and clamping screws of the swivel head 15 only large rock accordin...

Page 295: ...LEWING SHAFT Remove safety screw 3 Fig 7 with disc Set distance B 1 5 to 3 mm with the adjusting nut 1 Align bore in the collar of the adjusting nut with the nearest threaded bore of the locking disc...

Page 296: ...ock into left and right final position and check the condition of the cutting ring and wearing insert according to maintenance schedule Check the overall scope of the cutting ring The cutting ring sho...

Page 297: ...otate the cutting ring by 90 INFORMATION Always rotate the cutting ring into the same direction Make sure that the cutting ring is securely guided by the rock and prevented from falling out or tilting...

Page 298: ...16 against transfer liquid In the event of leaks replace the 0 rings concrete super fine components penetrate through the bearing cpl outward immediately before destroying the bearing cpl The slewing...

Page 299: ...ive motor and empty pressure accumulator to prevent the rock from moving independently Loosen the pipeline outlet and check the inner side of the rock with a torch Bring the rock into the other final...

Page 300: ...4 40 8 001 193 16 EN Blank page...

Page 301: ...location when driving the concrete pump with open water box Do not reach into the water box No other work must be carried out on the concrete pump while working on the pumping piston Make sure that no...

Page 302: ...te control CHECK FASTENER Bring an intermediate piece into the water box Check the fastening screws for tightness Fig 3 While doing so hold distance piece on the continuous hexagon Bring the second in...

Page 303: ...witch on the motor again when the assistant has left the machine REMOVAL Bring piston until just before the rear final position The distance piece Fig 1 must be fully visible in the water box Loosen a...

Page 304: ...box Clean and check all parts INSTALLATION Apply a thick coat of grease to new piston and cylinder wall Mount new pistons to the piston rod flange by means of screw and nuts Drive pumping piston into...

Page 305: ...4 42 5 004 076 01 EN Fill with water Mount top cover Fig 1 and secure with wedge and clip pin Open stopcock 1 Fig 2 on concrete pump control block Fig 1 Fig 2...

Page 306: ...4 42 6 004 076 01 EN Blank page...

Page 307: ...If fluid leaks from the walls of a pipe or formed part there is a great risk of accidents due to pipe breakage Stop operation immediately and release pumping line through back siphonage ATTENTION Knoc...

Page 308: ...minimum wall strength in mm 1 Tube 70x2 9 X Y 0 20 40 60 80 100 120 140 160 180 200 220 0 1 2 3 2 Tube 88 9x3 2 X Y 0 20 40 60 80 100 120 140 160 180 200 220 0 1 2 3 3 Tube 108x4 X Y 0 20 40 60 80 100...

Page 309: ...180 210 240 270 0 1 2 3 4 5 6 7 8 9 8 Tube 159x4 5 X Y 0 20 40 60 80 100 120 140 160 180 200 220 0 1 2 3 4 5 9 Tube 165 1x7 1 X Y 0 20 40 60 80 100 120 140 160 180 200 220 0 1 2 3 4 5 6 7 10 Tube 168...

Page 310: ...crete flow approx 100 mm behind the flange Fig 1 Pipe elbows The main wear zone is located in the direction of concrete flow in the inlet bend Fig 2 Two layer materials Two layer materials must be exc...

Page 311: ...n be mostly avoided if the last boom section assumes a horizontal position during the pumping procedure Fig 5 Position 1 2 limited impact wear Position 3 higher impact wear Measurement points Wear mea...

Page 312: ...allation situation The respective installation situation is specified on the measurement sheet according to the installation present 3 Taking the measurement Depending on the prescribed measurement me...

Page 313: ...4 44 7 002 514 16 EN Blank page in order to be able to read the descriptions and corresponding tables on the following pages...

Page 314: ...suring tip as far on the end of the shoulder as possible in the direction of the groove 1 2 Installation situation 2 Tube after elbow Measuring points P1 Approx 20 30 mm behind the welding seam of the...

Page 315: ...m Quality type Wall thickness mm P1 mm P2 mm 100 700 4 0 2 0 2 0 2 7 10 2 100 700 7 7 4 5 3 2 3 8 10 2 125 700 4 0 2 0 2 0 2 7 8 3 125 700 4 5 2 5 2 0 2 7 8 3 125 700 8 6 5 6 3 0 4 0 8 3 Removal of th...

Page 316: ...rement points P1 Measurement on the shoulder of the installation flange around the entire circumference Set the measuring tip as far on the end of the shoulder as possible in the direction of the groo...

Page 317: ...oklet ES4045 Removal of the pipe component must be done on reaching a measurement point P1 or P2 at the latest Type SUPER 2000 ELBOWS ESSER TWIN PIPE 700 ELBOWS Nominal size DN mm Quality type Wall th...

Page 318: ...nts P1 Measurement in the 50 mm area in front of the outlet flange welding seam P2 Measurement on the shoulder of the outlet flange around the entire circumference Set the measuring tip as far on the...

Page 319: ...et ES4045 Removal of the pipe component must be done on reaching a measurement point P1 or P2 at the latest Type SUPER 2000 TAPERED TUBES ESSER TWIN PIPE 700 TAPERED TUBES DN inlet mm DN outlet mm Qua...

Page 320: ...be installed in the pumping direction For this purpose directional arrows are located on the material The lifetimes of conventional non directional tubes and elbows can be extended if the parts are r...

Page 321: ...e very heavy A 3 m long delivery tube DN 125 of Super 2000 quality weighs for example approx 45 kg Before removing attach tubes and elbows to lifting gear Use new seals and fuses for the couplings Cle...

Page 322: ...r deformations which are suggestive of displaced or destroyed hose armouring steel cord insert Check the outer skin for cuts ruptures or abrasions which entail damage to the hose armouring Hoses with...

Page 323: ...4 44 17 002 514 16 EN INFORMATION Due to the greater load check end hoses equipped with a non return valve Fig 10 especially carefully in the pressure area of the non return valve Fig 10...

Page 324: ...4 44 18 002 514 16 EN Blank page...

Page 325: ...or the change thereof INFORMATION In order to ensure a safe and undisturbed operation please only use the above material SCHWING is not liable for any damages caused by improperly performed maintenanc...

Page 326: ...OIL Drain the oil at operating temperature for it to drain properly Loosen the filler plug 1 first as described above Open the drain cock 2 Close drain cock after complete emptying Fill new oil as des...

Page 327: ...ccording to maintenance schedule page 4 10 4 Mount filter in reverse order CLEAN OIL COOLER Clean the cooling fins of the oil cooler with a compressed air gun Fig 2 A dirty cooler leads to greater hea...

Page 328: ...sing WARNING Do not use flammable cleaning agents No traces of cleaning agent may get into the compressor Mount a new filter to the top cover Mount the top cover with a new sealing ring 4 Fill the com...

Page 329: ...be and lift the separator housing 2 from the oil chamber Remove the connection tube 7 from the separator housing Lever the cover of the housing 8 with the oil separator cartridge 12 carefully from the...

Page 330: ...4 55 6 002 940 02 EN Blank page...

Page 331: ...embly Fig 1 driven by the concrete pump hydraulic must be lubricated at least once a week grease nipple 6 Fig 1 As the lubrication requirement increases with progressive wear the lubricating intervals...

Page 332: ...4 57 2 004 054 00 EN Blank page...

Page 333: ...the batteries be connected the other way round The two batteries of the SP must remain connected electrically an interruption can cause the alternator to be destroyed If the diesel engine of the SP ha...

Page 334: ...of the starter battery 1 Fig 1 to the 0 position Open the top cover of the switch cabinet or control station using the special key The allocation of the fuses can be found in the diagram on the inside...

Page 335: ...4 60 3 005 151 04 EN Fig 3 panel with regeneration If triggered again there is a short circuit Stop the machine and have an electrician check the system...

Page 336: ...measures are required if applicable for the electronics of the vehicle e g for the anti lock braking system ABS Read the operating instructions of the engine manufacturer or vehicle manufacturer to fi...

Page 337: ...vices cables etc to protect them against paint mist and aggressive substances 4 60 13 Steam jet cleaning Cover any electrical and electronic components Never direct a water or steam jet onto these com...

Page 338: ...sitive terminal from the battery Otherwise there is a danger of short circuiting Measure the voltage between the terminals If the measuring device shows at least 12 5 volts then the battery is ok The...

Page 339: ...cid level and refill with distilled water if necessary Clean battery terminals and terminal posts First connect the positive terminal and then the negative terminal Otherwise there is a risk of short...

Page 340: ...4 60 8 005 151 04 EN Blank page...

Page 341: ...competent person is given in the SAFETY MANUAL We recommend having the inspection done only by employees of SCHWING EXPERT An expert must be consulted in case of significant changes and extensive repa...

Page 342: ...guishes between safety components of the first S1 and second order S2 The failure of S1 parts can jeopardise the life and health of users and any person staying in the danger zone and also cause damag...

Page 343: ...WING GmbH Service Postfach 20 03 62 D 44647 Herne Of course you can also fax us this page or reply by email Fax 49 0 2325 74674 E Mail service schwing de Customer no Address Contact person Tel Fax Ema...

Page 344: ...7 EN Was welded yes no If so where Were mechanical procedures carried out drilling sanding other If so where Was the work documented by photos or drawings yes no If so is this document attached to thi...

Page 345: ...by an expert Observe the sign on the machine Fig 1 Before carrying out electric welding disconnect all batteries see chap 4 60 and where appropriate take measures to protect vehicle or engine electro...

Page 346: ...4 70 2 001 918 05 EN Blank page...

Page 347: ...005 019 00 EN Presentation 1 Safety 2 Operation 3 Maintenance 4 Radio remote control 5 Special equipment 6 Appendix 7...

Page 348: ...005 019 00 EN Blank page...

Page 349: ...OPERATING INSTRUCTIONS Receiver Type Version Factory No Frequency Transmitter Type Version Factory No Frequency X X X Planar V4 Compact M Compact V R 18 R CAN Compact M2 R6 R10...

Page 350: ...ion machines and industrial plants Only under these conditions are the safety systems STOP and zero setting fully effective No other form of use is permitted Any non observance of this con dition will...

Page 351: ...es 1 5V The functions of the receiver are released with the ON HORN key The receiver has to be switched off with the STOP key when work is finished A red dot flashes on the Planar display during opera...

Page 352: ...t see image 1 An automati cally controlled charging process keeps batteries from over charging Base unit has to be connected to a power supply optional also with dc charger see image 2 WARNING Never t...

Page 353: ...have not previously been operated by radio control Failing this the receiver electronic circuit will not receive any power supply Ensure that the operating voltage of the receiver complies with the el...

Page 354: ...please follow precisely the following rules for operation The unit to be controlled can only be switched on it is assumed that the transmitter is ready to operate when no command unit is actuated The...

Page 355: ...serves the right to decide on repair or replacement Do not attempt to continue working with a defective NBB radio remote control Even initial ly minor defects might be the start of a more extensive de...

Page 356: ...NiMH batteries Reception frequency range see rating plate Data security Generates a CRC code with a Hamming distance 4 Generates a neutral position Addressing of each transmitter with its own unique...

Page 357: ......

Page 358: ......

Page 359: ...trip Terminal strip no Function Wire No Pin No or plug socket 1 Power supply 24V DC 1 B1 2 Power supply 0V DC 2 C5 IN 1 14 Common 14 B3 OUT 1 SW07 13 ON HORN momentary 13 B4 OUT 2 To activate the rece...

Page 360: ......

Page 361: ...de 1 Auto Off no FM yes Active Passive 2s Transmitter Planar V4 NOTE FREQUENCY BAND F Band DATASHEET TRANSMITTER Formular Nr 154_engl SERIAL No 9999904790 Stand 01 10 10 NAME M Tscholak DATE 16 03 201...

Page 362: ...ATASHEET RECEIVER Formular Nr 154_engl SERIAL No 9999904790 Stand 01 10 10 NAME M Tscholak DATE 16 03 2011 SYSTEM PLUG INSERT CABLE 1 3 400 7011 15 x 0 75mm CABLE LENGTH 2 5m SPECIAL 3 1 3 680 1019 em...

Page 363: ......

Page 364: ...ols Components GmbH Otto Hahn Stra e 3 5 DE 75248 lbronn D rrn Tel 0 72 37 9 99 0 Fax 0 72 37 9 99 1 99 eMail sales nbb de http www nbb de We reserve the right to alter specifications without notice A...

Page 365: ...005 020 00 EN Presentation 1 Safety 2 Operation 3 Maintenance 4 Radio remote control 5 Special equipment 6 Appendix 7...

Page 366: ...005 020 00 EN Blank page...

Page 367: ...6 8 1 002 720 04 EN Hydraulic shut off assembly Editor SCHWING GmbH Dep TDS 1 PO box 20 03 62 D 44647 Herne 20 08 2017 19 19 00...

Page 368: ...6 8 2 002 720 04 EN TABLE OF CONTENTS 1 PREFACE 3 2 AREA OF APPLICATION 3 3 SAFETY 4 4 SETTING UP OF THE SYSTEM 5 5 INSTALLATION 5 6 DRIVE 5 7 MAINTENANCE 5 8 TECHNICAL DATA 5...

Page 369: ...contact our Customer Services or your SCHWING representative 2 AREA OF APPLICATION Hydraulic shut off assemblies are required for high rise or downwards conveying as of approx 30 m high deep During in...

Page 370: ...ated control elements Persons not involved must leave the danger area of the shut off assembly During the cleaning process no one must remain at the end of the line in the area of the concrete output...

Page 371: ...plings and spare parts 6 DRIVE Hydraulic shut off assemblies can be connected to the hydraulic system of the concrete pump and actuated via a separate aggregate or a hand pump WARNING Do NOT operate t...

Page 372: ...6 8 6 002 720 04 EN Blank page...

Page 373: ...005 021 00 EN Presentation 1 Safety 2 Operation 3 Maintenance 4 Radio remote control 5 Special equipment 6 Appendix 7...

Page 374: ...005 021 00 EN Blank page...

Page 375: ...available This service is completely free of charge because we highly value customer support and product monitoring Our offer also expressly applies to having obtained the SCHWING machine second hand...

Page 376: ...7 10 2 005 022 00 EN Please complete in block letters Customer no Address Country Contact person Tel Fax Email Machine type Machine no...

Page 377: ...available This service is completely free of charge because we highly value customer support and product monitoring Our offer also expressly applies to having obtained the SCHWING machine second hand...

Page 378: ...7 10 2 005 022 00 EN Please complete in block letters Customer no Address Country Contact person Tel Fax Email Machine type Machine no...

Page 379: ...Service Niederlassung Gewerbegebiet Neu Boston Kurzer Weg 7 D 15859 Storkow Telefon 04106 72321 Telefax 04106 71810 E Mail Hamburg schwing de Kontakt Herr Hermann Telefon 033678 61308 033678 61230 Tel...

Page 380: ...CHWING Stetter Service Niederlassung In den Weiden 31 D 73776 Altbach Telefon 0911 302875 0911 302875 Telefax 0911 306455 E Mail Nuernberg schwing de Kontakt Herr Wolfram Telefon 07153 610138 Telefax...

Page 381: ...165 4455 489 Perafita Matosinhos 00351 220 912 600 00351 220 912 665 cimertex cimertex pt Rep blica Argentina Repas S A Reconquista 336 piso 12 OF Y 1335 Buenos Aires 0054 1 14393 9243 0054 1 14394 49...

Page 382: ...t Danmark Bekoteknik Vaerkstedsvej 23 4600 Koge 0045 56 636 633 0045 56 636 368 Kongeriget Danmark ABS Pumper A S Gydevang 30 DK 3450 Allerod 0045 48 17 11 10 0045 48 17 19 11 abspumper abspumper dk R...

Page 383: ...2 334 6148 00502 2 360 9677 imocom infovia com gt HongKong Ekpac Equipment Limited 255 Gloucester Road 2803 Sino Plaza Causeway Bay Hongkong 00852 2555 5555 00852 2873 6230 www ekpac com HongKong C Cr...

Page 384: ...67 info mbar co il al Mamlaka al Urduniyya al Ha schimiyya Farradj Co P O Box 974 Jabal El Weibdeh Amman 11118 Jordanien 00962 6 464 3800 o 3801 o 2900 00962 6 464 3901 k abujaber abujaber group com R...

Page 385: ...00 Casablanca 00212 2 248 660 00212 2 245 442 Estados Unidos Mexicanos Imocom de Mexico S A de CV Av Presidente Ju rez No 2032 Col La Loma Tlalnepantla Edo de M xico 54000 M xico 0052 55 9114 3918 005...

Page 386: ...448 3725 gordon sa amauta rcp net pe Rzeczpospolita Polska Rep blica Portuguesa Edificio Vecofabril Divisao Equibet o Estrada da Pai 1679 007 Pontinha 351 21 478 8500 pedro f maia equibetao pt Estado...

Page 387: ...tica Avesco AG Hasenmatt Str 2 CH 4901 Langenthal 0041 62 915 80 80 0041 62 915 81 35 Lukas Schreiber avesco ch Confoederatio Helvetica Ingtec AG Postfach 2 16 Unterfortstra e CH 4313 M hlin 0041 61 8...

Page 388: ...ovskaya Str 04086 Kiev 00380 44 467 2601 o 467 2602 00380 44 467 2607 kiev construction com ua United States of America Schwing America Inc 5900 Centerville Road White Bear Minnesota 55127 001 651 4 2...

Page 389: ...ndustrial Zone Song Jiang Shanghai 201 602 0086 21 5764 5855 0086 21 5764 5577 Yemen Mugahed Trading Company LTD P O Box 837 Sana a Republic of Yemen 00967 1447 961 2 00967 1447 963 malik y net ye Cyp...

Page 390: ...Always Ready 7 30 10 005 023 01 Blank page...

Reviews: