background image


Chapter 1    INSTALLATION 

16 


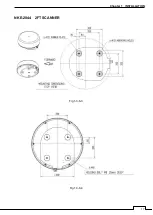
1.3.6    CONFIRM MOUNTING BASE BEFORE INSTALL 


NKE-1066    1.5FT SCANNER 


Fig 1-3-6-2 

Fig 1-3-6-1 

4-

φ

40 RUBBER PLATE 

Summary of Contents for SMR-715 series

Page 1: ...MARINE RADAR EQUIPMENT INSTRUCTION MANUAL...

Page 2: ......

Page 3: ...follows The normal installation cable length is 10m between scanner and display Optional special length cables are prepared by SAMYUNG ENC if request Option cable is provided with a length of 5m 15m 2...

Page 4: ...his indication is neglected and these equipment are not operated correctly CAUTION This indication is shown where any person is supposed to be injured or any property damage is supposed to occur if th...

Page 5: ...7 PZ No184 FZ of Federal Law about Technical Regulation dated December 12 2002 and Resolution of the Russian Federation Goverment dated 19 11 03 No0696 navigation equipment has an appropriate marking...

Page 6: ...p away from a scanner when it is transmitting The high level of microwave is radiated from the front face of the scanner specified below The microwave exposure at close range could result in injuries...

Page 7: ...district When conducting maintenance make sure to turn the main power off Failure to comply may result in electrocution Turn off the main power before cleaning the equipment Especially when a rectifie...

Page 8: ...A Make sure to install the antenna at a place higher than human height Direct exposure to electromagnetic waves at close range will have adverse effects on the human body Direct exposure to electromag...

Page 9: ...oise suppression level Use the radar only as a navigation aid The final navigation decision must always be made by the operator him herself Making the final navigation decision based only on the radar...

Page 10: ...ailure to comply may result in adverse effects on the radar function which may lead to accidents or equipment failure Any adjustments must be made by specialized service personnel Failure to comply ma...

Page 11: ...UNTING POINT WARNING LABEL MOUNTING POINT Warning label is patched on the equipment visible surface Do not try to remove break or modify the label NKE 1066 SCANNER UNIT NKE 2044 SCANNER UNIT SMR 715 S...

Page 12: ...it SMR 715 SMR 720 1 Sun Cover MTV305222 1 Power Cable CFQ 9900 1 Instruction Manual H 7ZPRD0895 1 Mounting Hardware MPTG32528 Screw 5X20 L 5 Washer W5Bs 5 Attached parts MPXP35238 Name plate MPNN4891...

Page 13: ...pment MTZ304691 1 Template MTZ302447 1 Installation Cable CFQ9924 10 1 means revision such as A B and so on NKE 1066 SCANNER UNIT means revision such as A B and so on Parts Name Figure Qty Scanner Uni...

Page 14: ...1 5feet Scanner Unit NKE 1066 Radome diameter 450mm 2feet Scanner Unit NKE 2044 Radome diameter 620mm STANDARD LENGTH 10m OPTION LENGTH 5m 15m 20m 30m SMR 720 RADAR SMR 715 RADAR 7inch WIDE VGA COLOR...

Page 15: ...xiii EQUIPMENT APPEARANCE NKE 1066 SCANNER UNIT NKE 2044 SCANNER UNIT...

Page 16: ...LR PUSH SWITCH ROTARY KNOB WITH PUSH SWITCH FRONT PANEL TOUCH PANEL REAR CASE MOUNTING BRACKET SUN COVER SPEAKER Thumb position Fingertip position Note When you remove the sun cover do the thumb posit...

Page 17: ...F THE SCANNER UNIT 12 1 3 1 SELECTING THE INSTALLATION POSITION 12 1 3 2 LOWEST SCANNER INSTALLATION HEIGHT 12 1 3 3 MOUNTING RACK AND MAST FOR THE SCANNER 13 1 3 4 SCANNER AND THE SURROUNDING STRUCTU...

Page 18: ...TUP THE TRAIL LENGTH 56 5 5 2 SETUP THE RADAR TRAILS REF LEVEL etc 57 5 6 AIS OPERATIONS 59 5 7 TT OPERATIONS 60 5 8 MODE FUNCTION 62 5 9 SWITCHING DAY NIGHT MODE 63 5 10 USER OPTION KEY 64 5 11 MARK...

Page 19: ...SE LEVEL 84 7 7 COMMUNICATION PORT SETUP 85 7 7 1 BAUD RATE 85 7 7 2 RX PORT 86 7 7 3 TX PORT 86 7 7 4 TX DATA FORMAT 87 7 7 5 TARGET INFORMATION TX 87 7 8 I F DEVICE 88 7 8 1 HEADING EQUIPMENT 89 7 8...

Page 20: ...TABLE UPDATE 108 8 5 6 INTERNAL SETTING 109 8 5 7 USB FORMAT 111 8 6 SYSTEM SETTING 112 8 6 1 MASTER SLAVE DEMO 112 8 6 2 OWN SHIP OUTLINE 113 8 6 3 UNIT 113 8 6 4 MOVE OWN SHIP 114 8 6 5 USE RANGE SE...

Page 21: ...EPING PERIOD OF MAINTENANCE PARTS 130 10 2 WHEN YOU REQUEST FOR REPAIR 130 10 3 RECOMMENDED MAINTENANCE 130 10 4 RADAR FAILURE CHECK LIST 131 Chapter 11 DISPOSAL 132 11 1 DISPOSAL OF THE UNIT 132 11 2...

Page 22: ...AL 145 12 7 3 STANDARD CONFIGURATION 145 12 7 4 OPTION CABLE 145 APPENDIX A 1 NKE 1066 1 5FT SCANNER INTERCONNECTION DIAGRAM A 1 NKE 2044 2FT SCANNER INTERCONNECTION DIAGRAM A 2 NCD 2256 DISPLAY UNIT...

Page 23: ...trong breeze 7 High wind 8 fresh gale 9 Strong gale 10 Storm 11 Violent storm 12 Hurricane C C up Course up Own ship s course is pointed to the top center of the radar display CCRP The Consistent Comm...

Page 24: ...value is small the accuracy of position is high HL Heading line A graphic line on a radar presentation drawn from the consistent common reference point to the bearing scale to indicate the heading of...

Page 25: ...elative to own ship s motion RM Relative Motion A display on which the position of own ship remains fixed and all targets move relative to own ship RM R Relative Motion Relative Trails RM T Relative M...

Page 26: ...splacement from north True speed The speed of a target relative to ground or to sea True vector A vector representing the predicted true motion of a target showing course and speed with reference to t...

Page 27: ...Available cable lengths and types for installing the radar SMR 715 720 are as shown in the table below Request an appropriate cable from SAMYUNG ENC beforehand A cable longer than the sufficient lengt...

Page 28: ...ay from the compass Take precautions to prevent water from splashing through the window or door of the bridge onto the display unit Install the display unit by considering convenience of maintenance I...

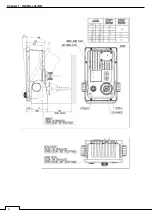
Page 29: ...Chapter 1 INSTALLATION 3 1 2 3 DIMENSIONAL DRAWING OF DISPLAY MOUNTING...

Page 30: ...Chapter 1 INSTALLATION 4...

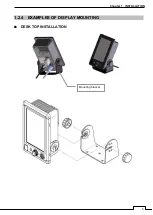
Page 31: ...Chapter 1 INSTALLATION 5 1 2 4 EXAMPLES OF DISPLAY MOUNTING DESK TOP INSTALLATION Mounting bracket...

Page 32: ...Chapter 1 INSTALLATION 6 DESKTOP MOUNTING TEMPLATE Note Please note the paper size 182 257...

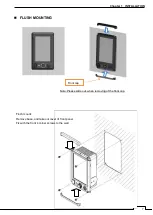
Page 33: ...ter 1 INSTALLATION 7 FLUSH MOUNTING Front cap Note Please slide out when removing of the front cap Flush mount Remove base and take out cover of front panel Fix with the front 4 corner screws to the w...

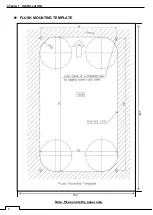
Page 34: ...Chapter 1 INSTALLATION 8 FLUSH MOUNTING TEMPLATE Note Please note the paper size 182 257...

Page 35: ...Chapter 1 INSTALLATION 9 CEILING INSTALLATION Option Overhead Mounted Kit Note Please slide out when removing of the front cap Front cap...

Page 36: ...5A When you connect with the ship power supply without using the optional rectifier you need measure the voltage between the ground and the positive negative side of the ship power supply When the shi...

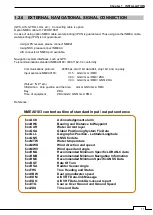
Page 37: ...S ZDA Talker G P etc Information ship position and the time GGA GNS GLL RMC Day ZDA Time of equipment ZDA GGA GNS GLL RMC Reference NMEA0183 content outline of standard input output sentence xxACK Ack...

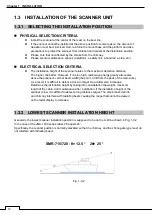
Page 38: ...h radio wave energy greatly attenuates above the scanner s vertical beam width the point 3 dB from the peak of the main lobe As a result it is difficult to detect a close in target Sea clutter also in...

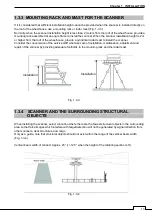
Page 39: ...nner Consider the convenience of the service staff who take care of installation maintenance adjustment and repair of the scanner by providing adequate footholds to the mounting rack and the radar mas...

Page 40: ...ence If there is a concern that structural objects existing within the vertical beam width may generate false images equip the structural objects with a radio wave absorber There are two types of abso...

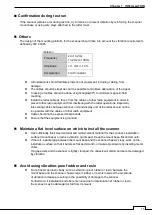
Page 41: ...y unit of the radar should not be run parallel with the cables of other radio equipment Cable should not be exposed sharp bends Ensure that the equipment is grounded Maintain a flat level surface on w...

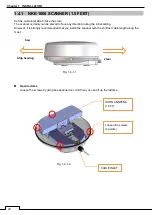
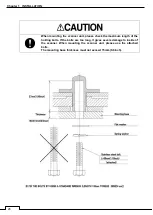
Page 42: ...Chapter 1 INSTALLATION 16 1 3 6 CONFIRM MOUNTING BASE BEFORE INSTALL NKE 1066 1 5FT SCANNER Fig 1 3 6 2 Fig 1 3 6 1 4 40 RUBBER PLATE...

Page 43: ...Chapter 1 INSTALLATION 17 NKE 2044 2FT SCANNER Fig 1 3 6 3 Fig 1 3 6 4...

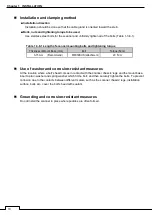
Page 44: ...Base mm Bolt Torque N m 3 15 mm Recommend M8X30SUS attachment 20 N m Use of washer and corrosion resistant measures At the location where a bolt s head comes in contact with the scanner chassis legs...

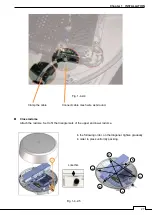
Page 45: ...s not affected by wind The microwave radiator is also protected by the radome even in a poor weather conditions it can be rotated stably at all times Remove the radome then open the metal protection c...

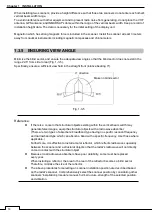
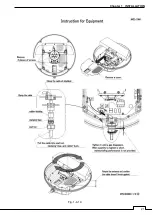
Page 46: ...ny direction during the initial setting However it is strongly recommended that you install the scanner with the shortest cable length along the mast bow Ship heading Fig 1 4 1 1 Open radome Loosen th...

Page 47: ...Chapter 1 INSTALLATION 21 Fig 1 4 1 3...

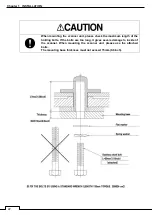
Page 48: ...unit please check the maximum length of the holding bolts If the bolts are too long it gives severe damage to inside of the scanner When mounting the scanner unit please use the attached bolts The mo...

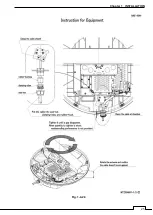
Page 49: ...enter of the cable inlet Fig 1 4 1 5 Coating clip Connect cable mesh wire as Ground Pull and fix the cable toward the outside with coating clip Avoid to touch the cable to electrical parts In the foll...

Page 50: ...to install and possible to initial setup but it is better selection to select the cable length must be minimize along the mast bow stern Fig 1 4 2 1 Open radome Loosen the screws by using box spanner...

Page 51: ...Chapter 1 INSTALLATION 25 Fig 1 4 2 3...

Page 52: ...unit please check the maximum length of the holding bolts If the bolts are too long it gives severe damage to inside of the scanner When mounting the scanner unit please use the attached bolts The mo...

Page 53: ...ttach the radome Set to fit the triangle mark of the upper and lower radome Fig 1 4 2 5 Clamp the cable Connect cable mesh wire as Ground Like this In the following order on the diagonal tighten gradu...

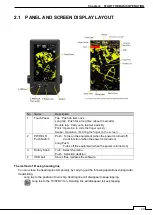
Page 54: ...mean when we mention tap flick and swipe when you re using a touch screen take a look at this table The operation with touch panel TAP Push an item once Swipe Sliding the finger while it is touching...

Page 55: ...the equipment when the power is turned off Clear function when the power is turned on Long Push Turns off the equipment when the power is turned on 3 Rotary Knob Turn Select the menu Push Selection de...

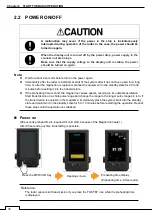
Page 56: ...ate for 20 to 30 minutes before setting it into the transmit state If the preheating time is short the magnetron causes sparks resulting in its unstable oscillation Start transmission on a short pulse...

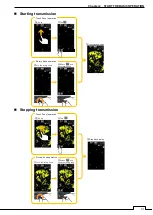
Page 57: ...g transmission Touch Panel operation Turn the rotary knob Select and push rotary knob Flick up Tap Rotary Knob operation Transmitting display Touch Panel operation Turn the rotary konb Select and push...

Page 58: ...wer off 2 3 SCREEN LAYOUT 2 3 1 STANDBY SCREEN Startup screen Startup screen can be selected from three choices below Press the PWR CLR key 3 seconds or more Swipe Graphical screen Normal screen Numer...

Page 59: ...Chapter 2 START THE BASIC OPERATION 33 Tap on the screen to select graphical display screen Temperature and Depth Wind speed and direction Vessel speed and Course...

Page 60: ...TION 34 Various STBY screens and Icon menu Normal screen Graphical screen Numerical screen Flick up Flick up Flick down Flick down Flick up Flick up Flick down Flick down Flick up Flick up Flick down...

Page 61: ...knob or flick the screen then the resident icons will be displayed Tap the TX STBY icon About 10 seconds the icons fade out Flick up Turn the rotary knob to select the TX icon Set focus on TX icon Pus...

Page 62: ...the icons No operation about 10 seconds the icons fade out TX Tap icon or push rotary knob Radar echo Tap icon or push rotary knob Turn the rotary knob to select a function icon Selected icon is focus...

Page 63: ...cally Tap Auto of Gain setting mode Tap MANUAL of Gain setting mode Monitor the green bar while turning the rotary knob Flick the green bar Tap or The case of TX Adjustment Bar is shown You should be...

Page 64: ...reen bar Tap or Adjustment Bar is shown You should be adjust the sea level while monitoring the radar echo in TX mode Tap return icon Push rotary knob Push the rotary knob or tap the return icon to fi...

Page 65: ...ap or Adjustment Bar is shown You should be adjust the rain snow clutter suppression level while monitoring the radar echo in TX mode Tap return icon Push rotary knob Push the rotary knob or tap the r...

Page 66: ...n the crew fall into over the boat by accident Carry out a tap MOB icon immediately The radar memorizes the place latitude and longitude information and continues displaying the MOB place on a screen...

Page 67: ...NM Also 1NM 2NM 4NM 8NM 16NM are possible by system menu setting NKE 2044 scanner 0 0625NM 0 125NM 0 25NM 0 5NM 075NM 1 5NM 3NM 6NM 12NM 24NM 48NM Also 1NM 2NM 4NM 8NM 16NM 32NM are possible by system...

Page 68: ...to set the optimum state by situation settings complex radar signal processing function try the function that can be easily set by calling a content set in advance settings the following icon In addit...

Page 69: ...pecified icons can be copied to the favorite icon area All of the icons are displayed You can line up your favorite function icons in this area 4 or less Fixed icons TX STBY Gain Tap and hold the icon...

Page 70: ...0 0625NM 0 125NM 0 25NM 0 5NM 0 75NM 1NM 1 5NM 2NM 3NM 4NM 6NM 8NM 12NM 16NM 24NM 32NM 48NM 1 5NM Adjusted by the range icon Range is easily changed by tap increase decrease icon as shown in the figur...

Page 71: ...an optimal level The gain level is displayed in the bottom portion of the icon It is possible to judge the gain level by the length of a green bar roughly How to change the Gain level Please refer to...

Page 72: ...ll become inhibited When using the sea clutter suppression function make sure to choose the most appropriate image noise suppression level The sea clutter suppression level is displayed in the bottom...

Page 73: ...etection of not only echoes from the rain or snow but also targets such as other ships or dangerous objects will become inhibited When using the rain snow clutter suppression function make sure to cho...

Page 74: ...s adjustment icon but it will appear when you double tap on the screen too In addition by turning while pressing the rotary knob also appeared Double tap Brilliance Menu appears Turn while pressing th...

Page 75: ...snow clutter suppression function the sea clutter suppression function is switched to the manual mode The sea clutter suppression function AUTO and the rain snow suppression function AUTO cannot be se...

Page 76: ...ring is displayed on the screen Of course the same operation can be realized by the rotary knob Erase EBL Double tap the EBL icon or double push the rotary knob when the EBL icon is selected Note If t...

Page 77: ...m GYRO or GPS compasses In case of no external bearing signal display only RELATIVE BEARING mode Target tracking function TT and display AIS symbol is necessary the GYRO or GPS compass signal When GYR...

Page 78: ...SMR 715 720 radar provides a single press Man Overboard MOB operation Instantly a dedicated symbol arises on the screen including a range detailed info such as position bearing range ant time till arr...

Page 79: ...OFF CENTER FUNCTION It is possible to shift the center of own ship in order to observe a particular target in a wider range Be to tap once on the icon center of own ship will be shifted as the follow...

Page 80: ...nt are also can be displayed Tap anywhere on the screen BEARING BRG 20 0 RANGE RNG 0 3464NM TTG TTG 2 1MIN In case of GPS signal coming in Latitude LAT 35 04 2292 N Longitude LON 136 46 3008 E Do not...

Page 81: ...hat you set OFF Function OFF These zones act as suppression zones avoiding unnecessary overloading to the processor and clutter by disabling automatic acquisition and tracking outside them FOR REFEREN...

Page 82: ...onitored from the lengths and direction of their trails serving for collision avoidance In this section choose from the Short Middle Long or Super long The selected group of trails is displayed in the...

Page 83: ...CTION ICONS N 5 5 2 SETUP THE RADAR TRAILS REF LEVEL etc You can be selected in the range of trail length set by 5 5 1 Tap Tap Radar trail Tap the desired menu Trails REF Level or Time All Combine Tra...

Page 84: ...nd and other fixed targets True bearing signal input and speed signal input are required to display radar trails in true trail mode Relative motion trails The system plots the trails of a target at a...

Page 85: ...AIS symbol then the details are displayed on the screen Activated AIS target This symbol shows the position of an AIS target on the PPI Plan Position Indicator The shape is an isosceles triangle and i...

Page 86: ...TIME to CPA BRG Target BEARING from own ship direction RNG Target RANGE from own ship position COG The ship s course of ground SOG The ship s speed of ground MMSI The ship s MMSI NAME The ship s name...

Page 87: ...s or until another target is designated The displayed target data can be closed by press the CLR button Tracking target This symbol is displayed for the target which becomes the tracking target after...

Page 88: ...deo Noise Rejection Level1 Level2 Level3 Level1 Level2 Trails interval Off Off 3min 3min Off Trails mode Relative True True True True Trails REF Level Level1 Level4 Level4 Level4 Level4 Time All combi...

Page 89: ...The display color setting can be changed easily Note The switching day night the brightness of the rotary knob does not change The brightness of rotary knob works in unison with the screen brightness...

Page 90: ...e operation You can set a function listed in the bar menu to an option key as following However the functions performed by an icon cannot assign to the option key Example Flick on the touch panel Resi...

Page 91: ...nd redo the memos You can delete all the memos by tapping the clear bar You can select a marker to display by tapping the view menu bar Numerical of the upper right menu shows the screen points the am...

Page 92: ...on the touch panel again All icons appear Tap icon Set Line in this example setting Mark menus appear Tap Setting bar Mark Setting menus appear Tap Mark1 bar Set Mark1 in this example setting Maker1...

Page 93: ...an undo and redo the lines You can delete all the lines by tapping the clear bar You can select a marker to display by tapping the view menu bar Numerical of the upper right menu shows the screen poin...

Page 94: ...symbol Flick on the touch panel Resident icons appear Flick on the touch panel again All icons appear Tap icon Mark menus appear Tap SETTING bar Mark Setting menus appear Tap MARK1 bar Tap the bar to...

Page 95: ...used when you want to adjust the settings of your favorite radar image Tap Tap Radar Echo Radar Echo menus appear Tap each key to adjust the radar echo Pulse Length IR Interference Rejection Target En...

Page 96: ...ommended conditions are following In bays harbors and narrow waterway where targets are densely crowed Rough sea state due to torrential rain or stormy weather MP Middle Pulse The normal transmission...

Page 97: ...When viewing a radar beacon SART signal or fast moving target on the radar display do not use this function This function is suitable for using in TM mode The bearing data input is required for video...

Page 98: ...displayed It will remove the signal that can be regarded as unnecessary wave of more than level 1 Level3 Select if Level1 and Level2 cannot reject the signals enough 5 12 7 TIMED TX This function repe...

Page 99: ...n the range is changed or pulse length is changed When MANUAL is selected adjust the video to be the largest by observing the tune indicator bar Because the tune indicator bar is the guide during manu...

Page 100: ...are displayed in their direction relative to the ship s heading line the operator can view the video in the same field of view as in operating the ship at sea This mode is suitable for watching over o...

Page 101: ...elation with own ship This means that a target with its relative vector directed to own ship will be a dangerous target The vector length of a target is proportional to its speed and the vector time c...

Page 102: ...n you want to set about function of target tracking function TT and AIS Tap icon Tap Target bar Tap anything to adjust the target Function ON OFF CPA Limit TCPA Limit CPA Ring Display Target Number Di...

Page 103: ...17 5 TARGET NUMBER DISPLAY A target ID number is a value displayed beside the TT symbol or AIS symbol These numbers are assigned to targets in acquisition order TT is automatically assigned to the 1...

Page 104: ...be changed by tapping upper right are It is possible to display the 6 combinations as following Depth and Latitude Longitude Temperature and Latitude Longitude Depth and Wind True Temperature and Win...

Page 105: ...447 is provided for SMR 715 720 RADAR Through the additional interface you can lead out the video signal to an external monitor Additional external port is using a D sub 15 pin connector External moni...

Page 106: ...GGA GLL RMC ZDA V2 3 GGA GLL RMC GNS ZDA Talker G P etc Information classification about a ship the time entry GGA GNS GLL RMC Day and time entry ZDA Time entry of equipment ZDA GGA GNS GLL RMC IEC61...

Page 107: ...se you want to configure it with your favorite please set it by referring to this chapter It is recommended that you save to USB memory see 8 5 6 1 or you keep a note of the setting by the user for re...

Page 108: ...ticular set The tuning function control fine tunes the receiver circuits to match their maximum sensitivity to that transmitted signal Tuning adjustment is necessary for maintaining a high performance...

Page 109: ...rrectly This set up makes the target RANGE coincident with the VRM readout data Read out the target range by the VRM function The target has the same height with the radar scanner should be better Ran...

Page 110: ...sea clutter level is proportion to the height of the scanner So an optimum sea clutter rejection constant must be selected according with the height of antenna 7 6 NOISE LEVEL The noise level had bee...

Page 111: ...of communication Auto Switching automatically between 4800bps and 38400bps Tap Input code 0 and tap ENT Tap COM Port Setting Baud Rate Tap the desired menu TX Port Target info TX RX Port TX Data Form...

Page 112: ...NGS 7 7 2 RX PORT Choose the receive port of each signal It sets to automatic when there is no particular problem Auto Switching automatically between NMEA1 NMEA2 and NMEA3 7 7 3 TX PORT Choose the tr...

Page 113: ...mat of the transmission data to be transmitted from the transmission port 7 7 5 TARGET INFORMATION TX Set this menu when you want to send from the NMEA port sending the information of the ship and tar...

Page 114: ...uipment when inputting true bearing signals true bearing data and speed data Settings and parameters are different for each type of equipment Make settings for the type of equipment to be connected Ta...

Page 115: ...the manual setting value set will be operational but please do never forget that it is running in head up always 7 8 3 SPEED EQUIPMENT Selects the input of the speed data of own ship GPS Input the spe...

Page 116: ...atus of the GPS receivers GPS DGPS and WAAS receivers currently connected This setting is available only for JRC GPS DGPS WAAS receiver directly connected to the connector for which GPS is engraved at...

Page 117: ...e GPS Does not perform fixing with beacon Beacon Fix a position with beacon or single GPS Does not perform fixing with SBAS AUTO The optimum setting is selected from single GPS SBAS and beacon 7 9 2 3...

Page 118: ...w a great number of changes will occur but there will be little time lag As such it is important to choose the optimal value for your own usage situation 7 9 2 9 SMOOTHING This setting is correspondin...

Page 119: ...r the accuracy level is the wider the judgment range is When off is selected RAIM accuracy level function is stopped and the judgment cannot be performed For single GPS set to 30m or more 7 9 2 12 EXC...

Page 120: ...ata to the GPS receiver 7 9 2 14 GPS ADJUST Input the approximate latitude and longitude of the own ship to acquire initial Set the antenna height Enter the current time in UTC Enter the current date...

Page 121: ...is set to Manual 7 9 4 SBAS SETTING AUTO Automatically selects the SBAS satellite number Manual Manually enter the SBAS satellite number Note This setting is enabled when Station Select is set to Manu...

Page 122: ...s setting are items that greatly affects the radar image When you want to change please change while observing the radar image carefully Tap the desired menu Next to section 8 1 1 Next to section 8 1...

Page 123: ...hancement Target enhance level can be set from level1 to level4 If the level is set too high the range resolution may be declined So it is necessary to set a value properly 8 1 3 GAIN PRESET Adjust th...

Page 124: ...en using the sea clutter suppression function make sure to choose the most appropriate image noise suppression level 8 1 5 FTC Sets the FTC Curve User selects the river or sea of the curve selection P...

Page 125: ...d longitude Radar alarm level means alarm detection level in the guard zone When ships enter or depart from the guard zone alarm will sound Detection levels can be set from level1 to level4 When setti...

Page 126: ...quick Gate Size Set up the region size which can search the movement target automatically When region is wide possible to track fast moving target but many clutters are include Sometime do miss tracki...

Page 127: ...frequency of the transmitter in the range 90 to 100 This setting cannot be performed simultaneously with the setting of STAGGER TRIGGER 8 3 2 STAGGER TRIGGER Turn on off the interference reduction fun...

Page 128: ...ed Economy Sensitivity slightly lowers but the service life of magnetron is prolonged when short pulses are used High Power Sensitivity improves when long pulses are used but the service life of magne...

Page 129: ...8 3 7 TUNE INDICATOR LEVEL If the tuning level is too low then you need to adjust the tune indicator level Set the range to 24NM SMR 715 or 48NM SMR 720 Note Do not let the tune indicator bar reach 1...

Page 130: ...enu Next to section 8 4 1 Next to section 8 4 2 Tap Touch Panel Calibration Long Tap cross mark Long Tap cross mark Long Tap cross mark Calibration complete message appears Press the CLR button to fin...

Page 131: ...ternal Setting USB Format Next to section 8 5 2 Next to section 8 5 3 Next to section 8 5 4 Next to section 8 5 5 Next to section 8 5 6 Next to section 8 5 7 or Tap Buzzer Tap the desired menu Operati...

Page 132: ...itialize the Basic adjustment settings and the Function Settings Main Menu Initialize the settings of the Main Menu and radar screen settings except RADAR Echo and Function Setting 8 5 2 ALL RESET If...

Page 133: ...e Initialize the Transmit time Save the following scanner time data stored in the scanner into the display unit Scanner Transmit Time Motor Rotating Time When replacing the scanner internal control ci...

Page 134: ...Curve Insert Language It is recommended that when you installed the radar and the radar adjustment has been completed run the table update by selecting of the all menu in initial value of this item It...

Page 135: ...109 Chapter 8 DETAIL PERFORMANCE SETTINGS 8 5 6 INTERNAL SETTING You can store in the internal settings to the USB memory by using the USB port or read out the internal settings from USB memory...

Page 136: ...ormat the USB flash memory in FAT32 format 2 Open the properties of the USB flash memory formatted You can copy the system settings which were saved in the internal memory such as various item setting...

Page 137: ...ot use a USB flash memory built the following functions Encrypting contents Checking virus infection It may take long time to access USB flash memory during transmission We recommend that you use USB...

Page 138: ...Master Set to this item when connecting to scanner Slave Set to this item when input video signal of external source to display echo without scanner Demo Set to this item when no video signal is input...

Page 139: ...n set the outline of the own ship in meters In order to reduce the distance measurement error due to radar please also set the installation position of the scanner 8 6 3 UNIT Set the unit that you hav...

Page 140: ...ed signal to a reference of how to move the ship LL latitude and longitude is initial value There is no need to change it if you have a stable operation of the radar 8 6 5 USE RANGE SELECT Turn on off...

Page 141: ...N VECTOR DISPLAY Select the Own Vector display ON or OFF Own vector will appear with dotted line The color is same as the heading line To view the Own vector must be set to True in the vector mode men...

Page 142: ...PLAY COLOR There is that you cannot select the color combination For example PPI color is black and Character color is black If you want to select PPI color white don t forget change the Cursor color...

Page 143: ...If 50 or more targets exist in the filter range they are displayed according to the priority explained in AIS Symbols 8 8 ERROR ALARM MASK It is possible that even if an error is detected the error ma...

Page 144: ...not change the set value carelessly If alarm detection is turned off or detection time is changed be careful because the alarm may not occur or may be delayed 8 8 3 RX DATA Set the error alarm of RX d...

Page 145: ...uipment in the good conditions it is necessary to make the maintenance work as described below If maintenance is made properly troubles will reduce It is recommended to make regular maintenance work C...

Page 146: ...y attenuate or reflect on it resulting in deterioration of radar performance Never use solvents of gasoline benzine trichloroethylene and ketone for cleaning Otherwise the radiation plane may deterior...

Page 147: ...Unit Tuning Can be adjusted tuning at the manual tune Observe a weak echo as far possible 24NM or 48NM range during transmitting Magnetron Current 9 3 1 TEST MENU Scanner information The bar is 50 mor...

Page 148: ...FORMATION Displays the current system information software version information Indicator Software Scanner Software System Number Boot DSP MC DSP V Test Bench 9 3 3 SYSTEM TIME Displays the following s...

Page 149: ...llowing hardware information Serial Number 9 3 6 ERROR LOG The error log displays previously occurred system alarms with the dates and times when they occurred 9 3 7 LINE MONITOR Serial communication...

Page 150: ...en after the power switch is turned off and conducting maintenance work without unplugging the power connector may result in electrocution equipment failure or accidents Make sure to shut off the main...

Page 151: ...importance The following table shows alarms and other indications the system displays Alarm Code Alarm Name Class Description S001 Alarm Error Alarm Cannot send the alarm because of insufficient mess...

Page 152: ...sition data which had been received properly D015 GPS Datum Alarm Cannot receive valid geodetic data which had been received properly D016 GPS Speed Alarm For Speed equipment GPS cannot receive valid...

Page 153: ...received ALR D043 AIS Alarm035 Alarm For AIS function ON an error from the AIS receiver is received ALR D044 Set Gyro Status Requires setting of true bearing D045 DSP Video Alarm DSP detects VIDEO er...

Page 154: ...he number of the file has reached to the maximum File Erase Error Caution Failed to delete the file TT Max Target Status Manually acquired when the number of acquisition reached maximum Detected when...

Page 155: ...de Manufacture NKE 1066 V101 Magnetron M1624 5VMAA00120 New JRC NKE 2044 V101 Magnetron MSF1421B 5VMAA00092 New JRC NKE 2044 A101 Circulator FCX68R 5AJIX00027 Orient Microwave NKE 2044 A102 Diode Limi...

Page 156: ...ny failure is caused due to misuse faulty operation negligence or force major such as natural disaster and fire the product will be repaired with charges Repair after the Warranty Period If any defect...

Page 157: ...131 Chapter 10 AFTER SALE SERVICE 10 4 RADAR FAILURE CHECK LIST SMR...

Page 158: ...laws and regulations for the place of disposal 11 2 DISPOSAL OF USED MAGNETRON A magnetron is used for the scanner NKE 1066 and NKE 2044 When the magnetron is replaced with a new one return the used...

Page 159: ...133 Chapter 12 SPECIFICATIONS Chapter 12 SPECIFICATIONS...

Page 160: ...134 Chapter 12 SPECIFICATIONS 12 1 SCANNER DIMENSION 12 1 1 NKE 1066 4 40 RUBBER PLATE...

Page 161: ...135 Chapter 12 SPECIFICATIONS 12 1 2 NKE 2044...

Page 162: ...136 Chapter 12 SPECIFICATIONS 12 2 DISPLAY DIMENSION 12 2 1 SMR 715 720...

Page 163: ...137 Chapter 12 SPECIFICATIONS...

Page 164: ...nsor resistance film type The operation can be realized intuitive and simple 12 3 1 CONFIGULATION 1 Display unit SMR 715 720 Integrated the 7 inch wide VGA color LCD Monitor unit Keyboard unit and Pro...

Page 165: ...Accuracy Less than 1 10 Bearing Indication RM Head up North up Course up TM North up Course up 11 Ambient Condition Standards IEC60945 Ed 4 0 Temperature Scanner Operation 25 to 55 C Storage 25 to 70...

Page 166: ...be Magnetron M1624 9 Pulse width Repetition Frequency Bandwidth SP1 0 08 s 4000 Hz Wide 20MHz SP2 0 08 s 2250 Hz Wide 20MHz SP3 0 13 s 1700 Hz Wide 20MHz MP1 0 25 s 1700 Hz Middle 6MHz MP2 0 5 s 1200...

Page 167: ...ron MSF1421B 9 Pulse width Repetition Frequency Bandwidth SP1 0 08 s 4000 Hz Wide 20MHz SP2 0 08 s 2250 Hz Wide 20MHz SP3 0 13 s 1700 Hz Wide 20MHz MP1 0 25 s 1700 Hz Middle 6MHz MP2 0 5 s 1200 Hz Nar...

Page 168: ...side 64dots left side 92dots front side 92dots right side 92dots from the default center position Transition of the radar trails is possible during Off Center mode 11 True Motion Unit Built in Not ava...

Page 169: ...er Alarm Zone 5 colors White Green Orange Black Red 18 Simulator Built in 19 Multiple languages English Spanish Turkish Indonesian Thai Malay Vietnamese Chinese Russian Korean Japanese Other one optio...

Page 170: ...aximum tracking range 20NM This varies depending on the range Target information Displays items are true bearing distance true course and true speed Display of Vectors True Relative 4 Operation Built...

Page 171: ...al kit NQA 2447 is necessary In this case water and dust proofing IP55 of rear side of display unit is not guaranteed 4 Slave display output no function 5 LAN no function 12 7 3 STANDARD CONFIGURATION...

Page 172: ...APPENDIX A 1 APPENDIX NKE 1066 1 5FT SCANNER INTERCONNECTION DIAGRAM FIG A1...

Page 173: ...APPENDIX A 2 NKE 2044 2FT SCANNER INTERCONNECTION DIAGRAM FIG A2...

Page 174: ...APPENDIX A 3 SMR 715 720 DISPLAY UNIT INTER CONNECTION DIAGRAM FIG A3...

Page 175: ...APPENDIX A 4 SMR 715 720 PRIMARY POWER SUPPLY DIAGRAM FIG A4...

Page 176: ...APPENDIX A 5 SMR 715 720 INTERCONNECTION DIAGRAM FIG A5...

Page 177: ...APPENDIX A 6 MEMO...

Page 178: ...DAR D EBL OFF CENTER MODE COAST MODE OFF MODE FLOAT TT ST BY DAY MODE RIVER TT ACTIV AIS SLEEP NIGHT SEA MARK MENU TX STBY USER2 At first please display icon menu 1 line icon menu flick up onto the di...

Page 179: ...Trails Interval Short OFF 15sec 30sec 1min 2min 3min 4min 5min 6min 10min 15min CONT Middle OFF 30sec 1min 2min 3min 4min 5min 6min 10min 15min 30min CONT Long OFF 1min 2min 3min 4min 5min 6min 10min...

Page 180: ...vel1 Level2 Level3 Level4 2 RADAR Alarm2 Level Level1 Level2 Level3 Level4 3 RADAR Trails 1 MAX Interval Short Middle Long Super Long 2 Suppression Distance 0 1000 4 TT 1 Vector Constant 1 8 2 Gate Di...

Page 181: ...MEA2 NMEA3 13 RSD OFF NMEA1 NMEA2 NMEA3 4 TX Data Format 1 TX Interval 1 9sec 2 NMEA Version V1 5 V2 0 V2 3 3 NMEA Talker Normal GP 5 Target Info TX 1 TX Target TT AIS TT AIS 2 TTM Range Accuracy 1 2...

Page 182: ...eset 1 All Menu 2 RADAR Echo 3 Initial Setting Menu 4 Main Menu 2 All Reset 3 System Time Clear 4 Scanner Time Clear 1 TX Time Clear 2 Motor Time Clear 3 ANT to DISP Unit 4 DISP to ANT Unit 5 Table Up...

Page 183: ...6 16km OFF ON 7 32km OFF ON 3 sm 1 0 0625sm OFF ON 2 0 125sm OFF ON 3 0 25sm OFF ON 4 1sm OFF ON 5 2sm OFF ON 6 4sm OFF ON 7 8sm OFF ON 8 16sm OFF ON 9 24sm OFF ON 10 32sm NKE 2044 NL only OFF ON 11...

Page 184: ...canner 1 Scanner Time Out 1 Alarm Sensitivity OFF ON 2 Sensitivity Time 0 999sec 2 Scanner Data 1 Alarm Sensitivity OFF ON 2 Sensitivity Time 0 999sec 3 Scanner Video 1 Alarm Sensitivity OFF ON 2 Sens...

Page 185: ...ty Time 0 999sec 8 Wind 1 Alarm Sensitivity OFF ON 2 Sensitivity Time 0 999sec 9 Rate of Turn 1 Alarm Sensitivity OFF ON 2 Sensitivity Time 0 999sec 10 Rudder 1 Alarm Sensitivity OFF ON 2 Sensitivity...

Page 186: ...7 Self Test 1 Key Test 2 Touch Panel Test 3 Buzzer Test 4 Key Light Test 5 Monitor Display Test 1 Pattern1 2 Pattern2 3 Pattern3 4 Pattern4 5 Pattern5 6 Pattern6 7 Pattern7 8 RGB Setting 1 Red 2 Green...

Page 187: ...APPENDIX A 16 DECLARATION OF CONFORMITY...

Page 188: ...APPENDIX A 17...

Page 189: ...APPENDIX...

Page 190: ...ore information contact Official Web site http www samyungenc com hompage eng main main jsp Marine Service Department 69 Sangni Ro Youngdo Gu Busan Korea 49089 e mail overseas samyungenc com ISO 9001...

Page 191: ...Chapter 3 ADJUST THE RADAR ECHO A 2...

Page 192: ...Chapter 3 ADJUST THE RADAR ECHO...

Reviews: