File No.
:
VersionA1
7
Internal
4. Installation of Equipment
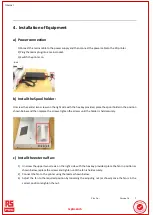
a) Power connection
1)Connect the mains cable to the power supply and then connect the power cable to the 3D printer.
2) Plug the mains plug into a mains socket.
3) Switch the printer on.
b) Install the Spool holder:
Unscrew the central two screws on the right side with the hex key provided, place the spool holder in the position
shown below and then replace the screws, tighten the screws until the holder is held securely.
c) Install the external fan:
1) Unscrew the upper two screws on the right side with the hex key provided, place the fan in position as
shown below, replace the screws and tighten until the fan is held securely.
2) Connect the fan to the printer using the lead as shown below.
3) Adjust the fan to the required position by loosening the adjusting nut (as shown) once the fan is in the
correct position retighten the nut.
rrsp
sprro.c
o.com
om

