background image

98

DPOF PRINT SETTINGS

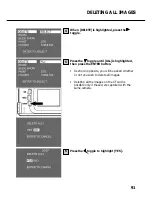
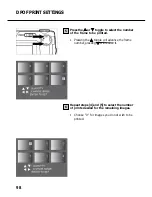
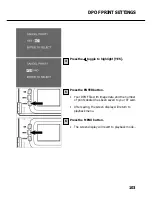
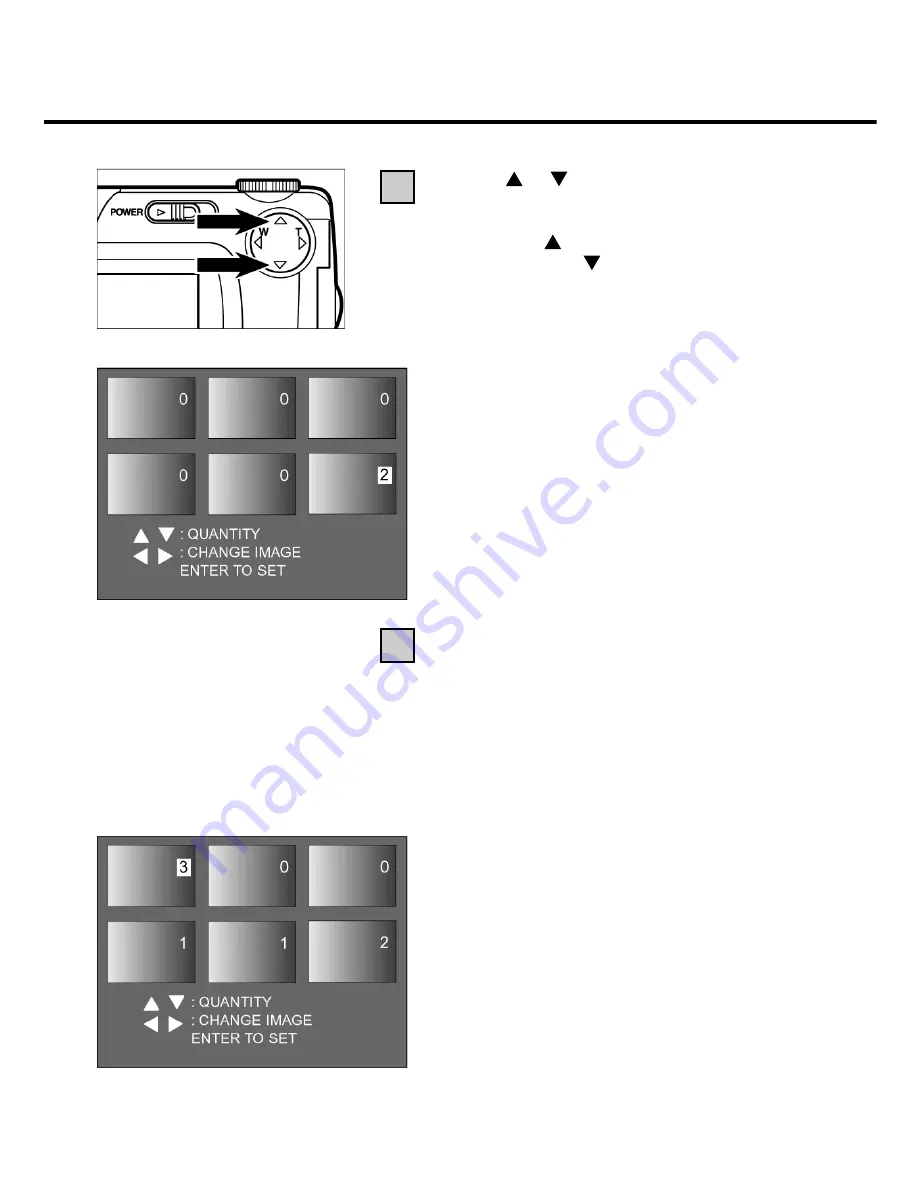
Press the   or   toggle to select the number
of the frame to be printed.

• Pressing the   toggle will advance the frame

number, pressing   will reduce it.

Repeat steps [4] and [5] to select the number
of prints desired for the remaining images.

• Choose “0” for images you do not wish to be

printed.

5

6

Summary of Contents for d23 com

Page 1: ...1 Rollei d23 com Instructions for use ...

Page 2: ...2 ...

Page 3: ...ad these instructions carefully to fully understand the different features of your camera This symbol confirms conformity of the camera with European Union regulations governing electrical equipment CE stands for Conformité Européenne European Conformity ...

Page 4: ...ergesehenen Unfällen kommen kann Be very careful when using the camera near small children to avoid unexpected accidents Keep batteries and other objects that might be swallowed away from small children Immediately call a doctor should such an object be swallowed Immediately remove the batteries and turn off the camera if the camera has been dropped or subject to impact so that its interior compon...

Page 5: ...amera Size AA alkaline batteries 4x Video cable Wrist strap Camera case USB cable Software on CD ROM USB drivers for Windows 98 Windows 98 Second Edition Windows 2000 Prof Me USB drivers for Mac OS 8 6 9 9 0 2 9 0 4 Windows Macintosh PDF Manual Adobe PhotoDeluxe 4 0 Family Edition CD ROM for Windows Adobe PhotoDeluxe 2 0 CD ROM for Macintosh Documentation hard copy Warranty Card ...

Page 6: ...rist strap 23 Loading the batteries 24 Checking battery power 26 Automatic cutoff 27 Using the optional AC adapter 27 Inserting and removing the CF memory card 28 Inserting the CompactFlash card 28 Removing the CompactFlash card 29 Taking pictures Basic modes Display of LCD screen in Record mode 34 Camera settings 35 Focusing 36 Focus lamp 36 Focusing range in autofocus mode shortest focusing dist...

Page 7: ...mode display LCD screen 58 Record mode settings 58 Choosing image quality 60 Choosing image size 63 White balance settings 65 Sharpness settings 68 Playback mode Single frame playback 71 Screen display in playback mode 72 Image data display on screen 73 Index playback 74 Zoom playback 77 Slide show 79 Starting the slide show 79 Stopping the slide show 81 Settings in slide show menu 82 Deleting ima...

Page 8: ...Camera File System 106 Setup Setup menu Setup menu display on LCD screen 108 Setup menu settings 108 Adjusting the brightness of the LCD screen 110 Automatic cutoff 112 Formatting a CompactFlash card 114 Setting date and hour 116 Activating the beeper 120 Video out Switching video out 122 Choosing the screen language 124 Resetting to factory defaults 126 Connecting your camera to a computer Connec...

Page 9: ...9 CONTENTS Annex Watching your images on a TV screen 142 Troubleshooting 143 Hints on working with the camera 147 Care and storage 151 Specifications 152 System requirements 155 ...

Page 10: ...10 KAMERAGEHÄUSE Do not touch DESCRIPTION OF PARTS Shutter release Control dial Data monitor Viewfinder window Self timer lamp Flash sensor Flash Lens Terminal cover ...

Page 11: ...11 DESCRIPTION OF PARTS Flash ready lamp orange Focus lamp green MENU button Viewfinder eyepiece ON OFF switch Strap eyelet ENTER DISPLAY button LCD screen Card slot Four way toggle ...

Page 12: ...12 DESCRIPTION OF PARTS TERMINALS BOTTOM PLATE Power supply Video out USB connector Battery compartment cover Tripod socket 1 4 DESCRIPTION OF PARTS ...

Page 13: ...card Self timer The number of images remaining can only be approximate because it varies with JPEG compression which is a function of subject characteristics DATA MONITOR The diagram below shows all the data that can be displayed on the data monitor DESCRIPTION OF PARTS ...

Page 14: ...rks If you sight a subject closer than 1 m through the optical viewfinder you will have to make allowance for parallax In this case only the portion below the parallax marks will be captured It is therefore advisable to use the LCD screen for close up shots which is parallax free DESCRIPTION OF PARTS ...

Page 15: ...ritten to CompactFlash card or loaded from CompactFlash card Focusing area Flash ready lamp orange Lit Flash ready to fire DESCRIPTION OF PARTS In autofocus mode the camera will focus on the shaded area Blinking rapidly approx 8 times per second when shutter release is pressed fully Flash recharging shutter remains locked Blinking slowly approx twice per second with flash OFF Slow shutter speed wi...

Page 16: ...F INSTRUCTIONS 1 2 3 4 SETTING UP THE CAMERA Load batteries see page 24 Insert CompactFlash card see page 28 TAKING PICTURES For details see page 32 Turn control dial to Switch camera on pushing ON OFF switch ...

Page 17: ...zoom in telephoto Press to zoom out wide angle 7 Press the shutter release halfway The green focus lamp lights when the camera has completed focusing Press the shutter release down fully to take your picture Your picture appears on the LCD screen The green focus lamp blinks slowly while the picture is being saved on your CompactFlash card approx twice per second ...

Page 18: ...rn the control dial to Switch the camera on pushing the ON OFF switch The last picture captured appears on the LCD screen Pressing the or toggle lets you display the preceding or the following image PLAYBACK For details see page 71 ...

Page 19: ...86 Display the image to be deleted proceeding as described under 1 to 3 under PLAYBACK on the preceding page Press the MENU button The playback menu appears on the LCD screen Once DELETE is highlighted press the toggle Once SELECT is highlighted press the ENTER button ...

Page 20: ...oose whether or not you wish to delete the image Press the toggle so that YES is highlighted then press the ENTER button The image displayed under 1 is deleted To cancel deletion select NO and press the ENTER button The LCD screen returns to playback mode Press the MENU button The LCD screen resets to playback menu ...

Page 21: ...21 ...

Page 22: ...22 SETTING UP THE CAMERA ...

Page 23: ...23 ATTACHING THE WRIST STRAP 1 2 Thread the loop of the wrist strap through the strap eyelet Thread the other end of the wrist strap through the loop and tighten ...

Page 24: ...been fully loaded with the aid of a suitable charger Always switch the camera off before changing batteries You may skip this step when you load batteries for the first time after buying your camera Open the battery compartment pushing its cover as illustrated 1 then flip the cover open 2 Load the batteries with correct polarity following the marks ...

Page 25: ...ows the right date and time see page 116 If the camera is neither loaded with batteries nor connected to AC the clock may be slow or reset entirely Should this be the case reset the date and time as described on page 116 Never put the camera down with its battery compartment open to avoid damage to the compartment cover Be careful when changing batteries The spent cells may be hot ...

Page 26: ... power but camera remains fully operative The display goes dead followed by five second blinking of whereupon it goes dead again Battery power insufficient for operation of camera Replace all batteries by fresh ones Remove all batteries and use the optional AC adapter see page 27 If the data monitor remains blank replace the batteries or check whether they have been loaded with correct polarity ...

Page 27: ...ically cut off 30 minutes after its last use This interval cannot be varied USING THE OPTIONAL AC ADAPTER Using the optional AC adapter the camera can be connected to a wall outlet This is advisable for prolonged shooting sessions above all when the camera is linked up to a PC Make sure the camera is turned off before changing from battery to AC power or vice versa NEVER change the power supply wi...

Page 28: ...card after loading down your pictures to your computer Inserting the CompactFlash card Open the card slot as shown Insert the CF card into the card slot Insert the card with its flat side facing the camera lens and the signal end facing down pushing it as far as it will go Take care not to jam the card insert it straight Should the card jam make sure you are inserting it the right way round Never ...

Page 29: ...he ejector lever down as shown Make sure the lever is swung down or the card slot cannot be closed Close the card slot to that it clicks shut Switch the camera off Open the card slot as shown Swing the ejector lever up as shown REMOVING THE CF CARD 3 4 1 2 ...

Page 30: ...F CARD Press the ejector lever straight in The card will be ejected part of the way so that it can easily be gripped and removed Proceed with care The card might be hot Keep the card in its case Close the card slot so that it clicks shut 4 5 ...

Page 31: ...31 TAKING PICTURES ...

Page 32: ... Compose your shot using either the optical viewfinder or the LCD screen Be sure not to obstruct the lens with your fingers hair etc Should automatic focusing be impossible with your particular subject use focus lock see page 38 Zoom in or out with the toggles if necessary Use the toggle to zoom in telephoto Use the toggle to zoom out wide angle 1 2 3 4 ...

Page 33: ...mera shake It is therefore advisable to mount the camera on a tripod Press the shutter release down fully to take your picture Should the orange flash ready lamp blink as you press the shutter release down fully the flash is still recharging In this case keep the release down until the flash has recycled You picture will appear on the LCD screen and it will be saved to your CF card During saving t...

Page 34: ...era settings LCD screen switched off Live image LCD screen switched off The display of the LCD screen will change with every depression of the display button DISPLAY OF LCD SCREEN IN RECORD MODE Live image Live image no camera settings ...

Page 35: ... page 63 Image quality see page 60 White balance see page 65 Flash mode see page 41 Continuous shooting see page 45 Frame counter Focusing mode see page 68 Focusing mode see page 39 Exposure compensation see page 55 Camera settings ...

Page 36: ...focusing distance or farther away than 40 cm in the macro mode Focus lamp lit Focus set and locked in Focus lamp blinks rapidly approx 8 times per second Focus detection impossible but shutter can be released Standard mode 0 4 m infinity Macro mode see page 53 4 cm 40 cm FOCUSING RANGE IN AUTOFOCUS MODE shortest focusing distance The minimum focusing distance in autofocus mode is listed below If y...

Page 37: ...es of subject that are unsuitable for autofocusing In such a case use focus lock see page 38 Sight a subject detail at the same distance as your main subject and lock focus Alternatively you may switch to manual focusing see page 39 Subject too dark Subject contrast too low e g blue sky or white wall Autofocus area captures detail at different distances Subject too bright e g highly reflecting car...

Page 38: ...s area over your main subject in the center of the viewfinder or center your subject on the LCD screen and press the shutter release halfway The camera focuses automatically and locks in the focus setting for as long as you keep the shutter release depressed halfway The green focus lamp lights Recompose without letting go of the shutter release then press the release fully down to take your pictur...

Page 39: ...ss the MENU button The record menu is displayed on the LCD screen Press the or toggle until FOCUS is highlighted then press the toggle Press the or toggle until MANUAL is highlighted then press the toggle Press the MENU button MANUAL appears in the upper right hand corner of the LCD screen confirming that you are in the manual focusing mode ...

Page 40: ...ply defined on the screen Pressing the toggle will shift focus towards the background Pressing the toggle will shift focus towards the foreground Press the shutter release down fully to take your picture Manual focus will be maintained for as long as the camera remains switched on If you switch it off and on again the camera will reset to autofocus ...

Page 41: ...is out of flash range or flash is not allowed AUTOFLASH WITH RED EYE REDUCTION FILL FLASH WITH RED EYE REDUCTION Use these modes to avoid red eye in flash shots of people or animals In these modes the main flash is preceded by a number of weak preflashes It is advisable to mount the camera on a tripod There are five flash modes to accommodate different lighting conditions and subjects Flash range ...

Page 42: ...the record menu Once FLASH is highlighted press the toggle Press the or toggle until the desired flash mode is highlighted The flash modes change in the following order AUTOFLASH FILL FLASH FLASH OFF AUTOFLASH WITH RED EYE REDUCTION FILL FLASH WITH RED EYE REDUCTION CHOOSING A FLASH MODE 1 2 3 ...

Page 43: ...DUCTION When it is switched on the camera is always in the default mode AUTOFLASH WITH RED EYE REDUCTION FLASH READY LAMP 4 The orange flash ready lamp indicates the flash status Lit Flash charged and ready to fire Blinks rapidly when shutter release is depressed fully approx 8 times per second Flash being charged shutter stays locked Blinks slowly with Flash OFF approx twice per second Camera wil...

Page 44: ...44 ADDITIONAL FEATURES ...

Page 45: ...ber of images may vary as a function of subject and surroundings Maximum number of continuous shots approximate Image quality FINE STD Standard ECON Economy FULL size full resolution approx 2 images approx 4 images approx 8 imagesv HALF size half resolution approx 6 images approx 12 images approx 12 images Turn the control dial to and press the MENU button The record menu is displayed on the LCD s...

Page 46: ...he MENU button The icon is displayed in the upper right hand corner of the LCD screen see page 35 Flash is automatically switched to FLASH OFF and disabled If you select single frame shooting or self timer the flash will automatically be reset to AUTOFLASH WITH RED EYE REDUCTION 3 4 5 Single frame shooting Continuous shooting Self timer ...

Page 47: ...ocus and exposure settings for the picture series will be locked in if you keep the shutter release briefly half pressed before continuous shooting Press the shutter release down fully and keep it in this position The camera will keep shooting until you let go of the shutter release or the maximum number of shots has been exposed The camera will remain in the continuous shooting mode until you sel...

Page 48: ...on a tripod turn the control dial to and press the MENU button The LCD screen displays the Record menu Press the or toggle until DRIVE MODE is highlighted then press the toggle Press the or toggle until the icon is highlighted Settings in this mode change as follows Single frame shooting Continuous shooting Self timer ...

Page 49: ... right hand corner of the LCD screen Compose your subject either through the optical viewfinder or on the LCD screen and vary your coverage if necessary using the and toggles Press the toggle to zoom in telephoto Press the toggle to zoom out wide angle Press the shutter release halfway 4 5 6 7 ...

Page 50: ...ely before exposure the lamp stays lit At the same time beeps will be heard that can be disabled via the SETUP menu If your main subject is off center use focus lock see page 38 After the exposure the camera resets to single frame shooting Do not press the shutter release from in front of the camera You would block the camera s view and make focusing impossible To deactivate the self timer turn th...

Page 51: ... toggle in the Record mode until maximum magnification has been reached Hold the toggle down for over two seconds The digital zoom mode has been set A frame on the screen marks the area of the scene that will be captured with digital zoom As soon as the frame appears you may let go of the toggle The digital zoom mode can not be activated with the LCD screen switched off ...

Page 52: ...page 38 The digital zoom remains active after your shot To deactivate it hold the toggle down until the frame disappears from the screen Then turn the camera off and on again to complete deactivation Images captured with digital zoom have a resolution of 640 x 480 pixel This is why these shots appear smaller on your computer screen or when you print them out with appropriate resolution ...

Page 53: ...lays the Record menu Press the or toggle until FOCUS is highlighted then press the toggle Press the or toggle until CLOSE UP is highlighted then press the toggle Press the MENU button CLOSE UP appears in the upper right hand corner of the LCD screen confirming that you are in macro mode In the macro mode the flash is automatically set to FLASH CANCEL to prevent it from firing 1 2 3 4 ...

Page 54: ...screen cannot be switched off in the macro mode Press the shutter release halfway Should the green focus lamp blink check your shooting distance which in macro mode should be between 4 cm and 40 cm Press the shutter release down fully to take your picture The camera will stay in macro mode until you switch it off and on again It will then default to autofocus Once the camera is reset to autofocus ...

Page 55: ...ture will be Conversely the smaller the compensation the darker the image Turn the control dial to and press the MENU button The LCD screen displays the Record menu Press the or toggle until is highlighted then press the toggle Press the or toggle until the desired compensation value is highlighted Compensation values from 2 0 to 2 0 can be set in half f stops ...

Page 56: ...release down fully to take your picture To deactivate exposure compensation follow the steps previously described and reset compensation to zero Alternatively you might turn the camera off and on again For a bright subject you should introduce a plus compensation so that bright areas will be properly rendered For a dark subject enter a minus compensation to ensure proper rendering of the dark area...

Page 57: ...57 RECORDING OPTIONS ...

Page 58: ...l flash Flash OFF Autoflash with Red Eye Reduction Fill flash with Red Eye Reduction 2 0 1 5 1 0 0 5 0 0 5 1 0 1 5 2 0 AF autofocus CLOSE UP macro mode MANUAL manual focusing RECORD MODE SETTINGS FLASH for flash modes see page 41 FOCUSING for focusing modes see page 36 ...

Page 59: ...see page 53 For RECORDING MODE continuous shooting see page 45 For RECORDING MODE self timer see page 48 The settings for IMAGE QUALITY IMAGE SIZE WHITE BALANCE and SHARPNESS will be described on the following pages CONTINUOUS SHOOTING see page 45 IMAGE QUALITY see page 60 IMAGE SIZE siehe Seite 63 WEISSLICHT ABGLEICH see page 65 SHARPNESS see page 68 Single frame shooting Continuous shooting Self...

Page 60: ...The following table lists the compression rates capture format file sizes and the number of images that can be stored on an 8MB CF card in FINE STD and ECON mode respectively Compression rate FINE STD Standard ECON Economy approx 1 6STD approx 1 12 approx 1 25 Capture format Exif2 1 JPEG DCF standard File size approx 910 kB approx 560 kB approx 230 kB Max number of approx 8 approx 13 approx 33 ima...

Page 61: ...n the control dial to and press the MENU button The LCD screen displays the Record menu Press the or toggle until QUALITY is highlighted then press the toggle Press the or toggle until the desired image quality is highlighted Image quality settings change in the following order ...

Page 62: ... 35 You are free to save images of different quality on one and the same CF card Image quality settings are retained even when the camera is switched off Changing the image quality setting affects the number of pictures remaining per CF card This is reduced above all by FINE mode We therefore suggest that you watch the number of remaining images very closely 4 5 ...

Page 63: ... of pictures remaining per CF card You may choose between FULL and HALF Image size Number of pixels w x h FULL 1792 x 1200 HALF 896 x 600 Turn the control dial to and press the MENU button The LCD screen displays the Record menu Press the or toggle until IMAGE SIZE is highlighted then press the toggle ...

Page 64: ... The image size selected is displayed in the upper right hand corner of the LCD screen see page 35 Image size settings are retained even if the camera is switched off Changing the image size affects the number of images remaining per CF card This is reduced above all by the FINE mode We therefore suggest that you watch the number of remaining images very closely FULL HALF ...

Page 65: ...s Fluorescent light This setting is intended for subjects illuminated by the light of fluorescent tubes Tungsten light This is intended for subjects illuminated by ordinary light bulbs Turn the control dial to and press the MENU button The LCD screen displays the Record menu Press the or toggle until WB is highlighted then press the toggle The camera has four white balance settings ...

Page 66: ... white balance settings change in the following order Press the toggle Press the MENU button The white balance selected is displayed in the upper left hand corner of the LCD screen see page 35 In AUTO no icon will appear on the screen Automatic white balance Daylight Fluorescent light Tungsten light 4 5 3 ...

Page 67: ...67 WHITE BALANCE SETTINGS Switching the camera off will automatically reset it to AUTO ...

Page 68: ... Does not affect the sharpness of the image SOFT Softens up the image Turn the control dial to and press the MENU button The LCD screen displays the Record menu Press the or toggle until SHARPNESS is highlighted then press the toggle Enhances the apparent sharpness of the image ...

Page 69: ...esired sharpness setting is highlighted The sharpness settings change in the following order Press the toggle Press the MENU button The sharpness setting selected is displayed in the upper right corner of the LCD screen see page 35 In NORMAL there will be no icon on the screen ...

Page 70: ...70 PLAYBACK MODE ...

Page 71: ...ill return to its normal position Shortly thereafter your last picture will appear on the LCD screen Press the or toggle to display the desired image Pressing the toggle will display the next following image Pressing the toggle will display the preceding image When you have reached the last image on the card and press the toggle the first of your images will be displayed If you press the toggle wh...

Page 72: ...ODE IMAGE DATA DISPLAY ON SCREEN Every depression of the DISPLAY button will change the screen display in the following order Index playback 9 thumbnails Single frame playback without image data Single frame playback with image data ...

Page 73: ...g date and time IMAGE DATA DISPLAY ON SCREEN Frame No Total number of frames that can be stored on CF card If you change to index playback the number of the last image displayed in playback mode will appear highlighted No 9 in the example shown ...

Page 74: ... search With single frame playback selected press the DISPLAY button once or twice see page 72 If image data are displayed in playback mode press the DISPLAY button twice If no image data are displayed press it once The number of the last image displayed in playback mode appears highlighted the remaining numbers in white ...

Page 75: ... number highlighted Pressing the toggle will select the preceding image with its frame number highlighted With image 9 selected and 9 highlighted the following nine images will be displayed if you press the toggle With image 10 selected and 10 highlighted the preceding nine images will be displayed if you press the toggle toggle toggle 2 ...

Page 76: ...3 Press the DISPLAY button once see page 72 The screen display changes from index playback to single frame playback with image data The selected index image with its number highlighted is displayed in image playback mode ...

Page 77: ... until ZOOM is highlighted ENTER TO SET is displayed at the bottom of the screen Press the ENTER button In the playback or index playback mode the center of the image is enlarged 2 5x Press the or toggle to scroll through the enlarged image The image will shift in the direction of the toggle pressed The image will keep shifting for as long as you keep one of the toggles depressed 1 2 3 4 ...

Page 78: ...yback You may also cancel zoom playback by pressing the MENU button This will take you to the playback menu Pressing the button again will take you to single frame playback In zoom playback the image in the center of the screen is displayed with a resolution of 640 x 400 pixels Images captured with digital zoom see page 51 cannot be played back in the zoom mode Should you try to display such an im...

Page 79: ...s the or toggle until SLIDE SHOW is highlighted ENTER TO SET is displayed at the bottom of the screen Press the ENTER button The slide show menu is to be seen on the LCD screen STARTING THE SLIDE SHOW The images can be displayed on the screen in succession similar to a slide show 1 2 3 ...

Page 80: ...ss the or toggle until START is highlighted ENTER TO START is displayed at the bottom of the screen Press the ENTER button The slide show starts with the settings chosen in the slide show menu INTERVAL and DIRECTION 4 5 ...

Page 81: ...s one of the following buttons Shutter release One of the toggles or DISPLAY button MENU button ENTER button To continue the slide show press the ENTER button If you press the MENU button during the show the screen will display the playback menu ...

Page 82: ...plays the playback menu Press the or toggle until SLIDE SHOW is highlighted ENTER TO SET will be displayed at the bottom of the screen Press the ENTER button The screen displays the slide show menu as shown Press the or toggle until INTERVAL is highlighted then press the toggle 1 2 3 4 ...

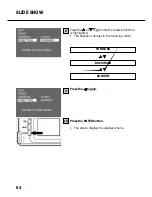
Page 83: ...oggle will set a longer interval Pressing the toggle will set a shorter interval The interval can be varied in increments of one second from 3 to 60 seconds The interval governs the screen time of each image Press the toggle Press the or toggle until DIRECTION is highlighted then press the toggle ...

Page 84: ...8 9 10 Press the or toggle until the desired direction is highlighted The direction changes in the following order FORWARD BACKWARD RANDOM Press the toggle Press the ENTER button The screen displays the playback menu ...

Page 85: ...85 DELETING IMAGES ...

Page 86: ...may also turn the dial with the camera switched on If the camera is still turned off switch it on The ON OFF switch is spring loaded and will return to its normal position Shortly thereafter your last picture will appear on the LCD screen Press the or toggle to display the desired image Pressing the toggle will display the next following image Pressing the toggle will display the preceding image 1...

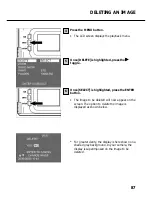
Page 87: ...e toggle Once SELECT is highlighted press the ENTER button The image to be deleted will now appear on the screen The option to delete the image is displayed as shown below For greater clarity the display is here shown on a shaded gray background In your camera the display is superimposed on the image to be deleted 4 5 6 ...

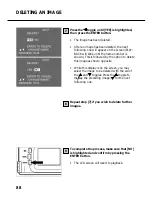
Page 88: ...own This is followed by the option to delete this image as shown opposite While this display is on the screen you may select the image to be deleted with the aid of the and toggles Press the toggle to display the preceding image for the next following one Repeat step 7 if you wish to delete further images To complete the process make sure that NO is highlighted and confirm by pressing the ENTER bu...

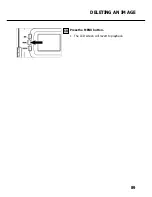
Page 89: ...89 DELETING AN IMAGE Press the MENU button The LCD screen will revert to playback 10 ...

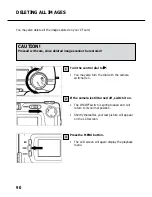
Page 90: ...F card Turn the control dial to You may also turn the dial with the camera switched on If the camera is still turned off switch it on The ON OFF switch is spring loaded and will return to its normal position Shortly thereafter your last picture will appear on the LCD screen Press the MENU button The LCD screen will again display the playback menu ...

Page 91: ...oggle until ALL is highlighted then press the ENTER button As shown opposite you will be asked whether or not you wish to delete all images Deleting all the images on the CF card is possible only if these were captured with the same camera Press the toggle to highlight YES 4 5 6 ...

Page 92: ...ll the images saved on your CF card are deleted While the images are being deleted the green focus lamp will blink slowly approx twice per second Once all the images on the card have been deleted NO IMAGE and ENTER TO MAIN MENU appear on the screen ...

Page 93: ...93 PLAYBACK SETTINGS ...

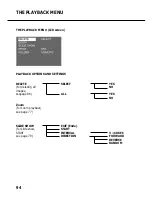
Page 94: ...reen SELECT ALL DELETE for deleting all images seepage 86 YES NO YES NO Zoom for zoom playback see page 77 EXIT Ende START INTERVAL DIRECTION SLIDE SHOW for slide show START see page 79 3 60 SEC FORWARD REVERSE RANDOM PLAYBACK OPTIONS AND SETTINGS ...

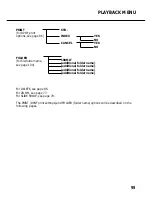
Page 95: ...ngs and FOLDER folder name options will be described on the following pages PLAYBACK MENU STD INDEX CANCEL PRINT for DPOF print options see page 96 YES NO YES NO FOLDER for file folder name see page 104 100MLT additional folder name additional folder name additional folder name additional folder name ...

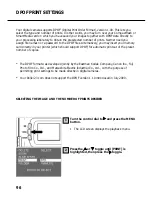
Page 96: ...sert your memory card directly in your printer which should support DPOF for automatic printout of the preset number of copies The DPOF format was developed jointly by the Eastman Kodak Company Canon Inc Fuji Photo Film Co Ltd and Matsushita Electric Industrial Co Ltd with the purpose of permitting print settings to be made directly in digital cameras Your Rollei 23 com does not support the DPOF v...

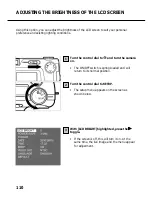
Page 97: ... toggle to select the image to be printed Selected images are marked by their highlighted frame number If frame 6 has been selected frame number 6 highlighted and you press the toggle the following six images will be displayed If frame 7 has been selected frame number 7 highlighted and you press the toggle the preceding six images will be displayed ...

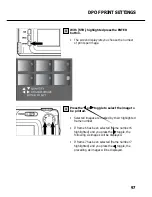
Page 98: ...t the number of the frame to be printed Pressing the toggle will advance the frame number pressing will reduce it Repeat steps 4 and 5 to select the number of prints desired for the remaining images Choose 0 for images you do not wish to be printed 5 6 ...

Page 99: ...the ENTER button to confirm The DPOF file with image data and number of prints is saved to your CF card After saving the screen display will return to playback menu Press the MENU button The screen display will revert to playback mode ...

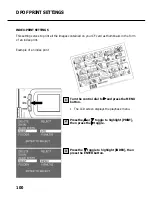
Page 100: ...our CF card as thumbnails in the form of an index print Example of an index print Turn the control dial to and press the MENU button The LCD screen displays the playback menu Press the or toggle to highlight PRINT then press the toggle Press the toggle to highlight INDEX then press the ENTER button 1 2 3 ...

Page 101: ...ighlight YES Press the ENTER button Your DPOF file with image data and the number of prints desired has been saved to your CF card After saving the LCD screen will revert to playback menu Press the MENU button The screen display will revert to playback ...

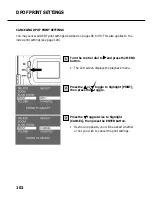
Page 102: ...ex print settings see page 100 Turn the control dial to and press the MENU button The LCD screen displays the playback menu Press the or toggle to highlight PRINT then press the toggle Press the toggle twice to highlight CANCEL then press the ENTER button As shown opposite you will be asked whether or not you wish to cancel the print settings 1 2 3 ...

Page 103: ...ES Press the ENTER button Your DPOF file with image data and the number of prints desired has been saved to your CF card After saving the screen display will return to playback menu Press the MENU button The screen display will revert to playback mode 4 5 6 ...

Page 104: ...d in the playback menu The file name of the image to be saved consists of Pict a four digit number and jpg Up to 9999 files are saved in the folder 100mlt02 last file name Pict9999 jpg Starting with frame number 10 000 a new file 01mlt02 is created in the Dcim file Consequently frame No 10 000 will be saved in folder 101mlt02 under the name pict0001 jpg If you take over 10 000 pictures there will ...

Page 105: ...layback menu Turn the control dial to and press the MENU button The playback menu is displayed on the LCD screen Press the or toggle until FOLDER is highlighted then press the toggle Press the toggle until the desired file name is highlighted then press the ENTER button If there is only one folder namely 100mlt02 nothing will change as you press the or toggle ...

Page 106: ...quipment conforming to DCF The following options are available with equipment conforming to DCF Images can be played back on the LCD screen of another digital camera The image files recorded with certain other digital cameras can be printed out Recording media such as CF or SmartMedia cards are interchangeable between digital cameras When using a DCF compatible computer even the image data of some...

Page 107: ...107 SETUP ...

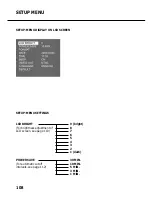
Page 108: ...NU SETTINGS LCD BRIGHT for brightness adjustment of LCD screen see page 110 9 bright 8 7 6 5 4 3 2 1 dark SETUP MENU DISPLAY ON LCD SCREEN POWER SAVE for automatic cutoff intervals see page 112 30 MIN 10 MIN 5 MIN 3 MIN 1 MIN ...

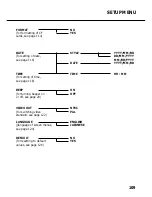
Page 109: ...YYYY MM DD DD MM YYYY MM DD YYYY YYYY MM DD HH MM BEEP for turning beeper on or off see page 20 ON OFF VIDEO OUT for switching video standard see page 122 NTSC PAL LANGUAGE language of screen menus see page 124 ENGLISH JAPANESE DEFAULT for resetting to default values see page 126 NO YES TIME for setting of time see page 116 ...

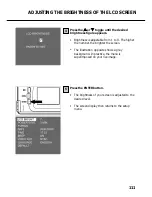
Page 110: ...ditions Turn the control dial to and turn the camera on The ON OFF switch is spring loaded and will return to its normal position Turn the control dial to SETUP The setup menu appears on the screen as shown below With LCD BRIGHT highlighted press the toggle If the screen is off this will turn it on At the same time the live image and the menu appear for adjustment 1 2 3 ...

Page 111: ...ss is adjustable from 1 to 9 The higher the number the brighter the screen The illustration opposite shows a gray background In practice the menu is superimposed on your live image Press the ENTER button The brightness of your screen is adjusted to the desired level The screen display then returns to the setup menu 4 5 ...

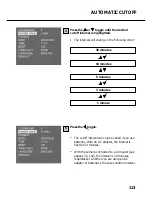
Page 112: ...rval can be varied Turn the control dial to and switch the camera on The ON OFF switch is spring loaded and will automatically return to its normal position Turn the control dial to SETUP The setup menu appears on the screen as shown below Press the or toggle until POWER SAVE is highlighted then press the toggle 1 2 3 ...

Page 113: ... the interval is fixed at 30 minutes With the camera connected to a computer see pages 132 142 the interval is 30 minutes regardless of whether you are using an AC adapter or batteries or have set another interval Press the or toggle until the desired cutoff interval is highlighted The intervals will change in the following order Press the toggle 4 5 ...

Page 114: ...he ON OFF switch is spring loaded and will automatically return to its normal position Turn the control dial to SETUP The setup menu is displayed on the LCD screen as shown below CAUTION Formatting will delete all data from your CF card Decide very carefully whether you really wish to delete all these data 1 2 ...

Page 115: ...hted then press the ENTER button You will be asked whether or not you want to format your CF card Press the toggle to highlight YES then press the ENTER button Formatting of your CF card starts After the card has been formatted the screen display will return to the setup menu 3 4 ...

Page 116: ...every shot provided you have properly set its clock Turn the control dial to and switch the camera on The ON OFF switch is spring loaded and will automatically return to its normal position Turn the control dial to SETUP The setup menu will appear on the LCD screen as shown below 1 2 ...

Page 117: ...isplayed as shown opposite If you wish to set only the hour press the or toggle until TIME is highlighted then press the ENTER button Thereafter start with step 7 If you wish to change the order of year month and day press the toggle once to highlight YYYY MM DD If you do not wish to change the date format start with step 7 3 4 ...

Page 118: ...ws If you change this sequence the new format will also be reflected in the date hour display on the LCD screen If you do not wish to change this sequence proceed with step 7 Press the toggle once The last two year digits are highlighted Every time you press the toggle the highlighted portion will shift in the following order year Æ month Æ day Æ hour Æ minute If you press the toggle the sequence ...

Page 119: ...r 3 the display lets you set the date and hour To set the hour repeat steps 6 and 7 Once you have set the date and hour press the ENTER button The built in clock starts running and the LCD screen displays the setup menu After changing batteries check whether date and hour are still correct If you don t use an AC adapter and leave the cover of the battery compartment open longer than five minutes t...

Page 120: ... the control dial If you wish these beeps can be turned off Turn the control dial to and switch the camera on The ON OFF switch is spring loaded and will automatically return to its normal position Turn the control dial to SETUP The LCD screen will display the setup menu as shown below 1 2 ...

Page 121: ...l BEEP is highlighted then press the toggle Select either ON or OFF using the or toggle The beeper settings will change as follows Press the toggle With OFF selected no beep will be heard regardless of which button you press The volume of the beep cannot be varied ...

Page 122: ...nada Mexico the Philippines Korea etc The PAL standard is primarily used in Western Europe except France in Australia Singapore Thailand China etc The two systems are NOT compatible Your Rollei d 23 com however allows the video output to be switched to either NTSC or PAL so that you can easily view your pictures on a TV set wherever you are Turn the control dial to and switch the camera on The ON ...

Page 123: ... NTSC PAL Press the or toggle to highlight VIDEO OUT then press the toggle Press the or toggle to select either NTSC or PAL The setting will change as follows Press the toggle The standard selected will be activated ...

Page 124: ... the control dial to and switch the camera on The ON OFF switch is spring loaded and will automatically return to its normal position Turn the control dial to SETUP The setup menu is displayed on the LCD screen as shown below Press the or toggle until LANGUAGE is highlighted then press the toggle 1 2 3 ...

Page 125: ...uage setting changes as follows Press the toggle The language selected will appear on the LCD screen ENGLISH JAPANESE To return to English 1 Repeat steps 1 2 on the preceding page 2 Press the or toggle until LANGUAGE is highlighted then press the toggle 3 Press the or toggle to select 4 Press the toggle ...

Page 126: ... AF autofocus Recording see page 45 Single frame White balance see page 65 AUTO Image quality see page 60 STD Standard Image size see page 63 FULL Sharpness see page 68 NORMAL Slide show interval see pages 82 83 3 seconds Slide show sequence see pages 82 83 FORWARD LCD screen brightness see page 110 5 Auto cutoff interval see 112 3 minutes Beeper see page 120 ON RESETTING TO FACTORY DEFAULTS ...

Page 127: ...n the control dial to SETUP The LCD screen will display the setup menu as shown below Press the or toggle to highlight DEFAULT then press the ENTER button You will be asked whether or not you wish to reset the camera Press the toggle until YES is highlighted then press the ENTER button The camera is reset to its factory defaults The LCD screen displays the setup menu 1 2 3 4 ...

Page 128: ...128 CONNECTING YOUR CAMERA TO A COMPUTER ...

Page 129: ...ng the driver software To install the drivers for Windows 98 Windows 98 SE Windows 2000 Prof Windows proceed as follows 3 2 1 Insert the installation CD ROM into your CD ROM drive Double click on the Setup icon The Setup dialog box appears Please wait ...

Page 130: ...OUR CAMERA TO A COMPUTER 4 5 When the Welcome dialog appears click Next When the Software License Agreement box appears read it carefully and decide what to do Back to preceding box Yes to accept No to reject and exit ...

Page 131: ...131 CONNECTING YOUR CAMERA TO A COMPUTER 6 When the Start Copying Files box appears select Next to start installation Back to go back to the previous dialog box Cancel to exit ...

Page 132: ...132 CONNECTING YOUR CAMERA TO A COMPUTER 4 When the Setup Complete box appears click Finish to complete installation ...

Page 133: ...133 CONNECTING YOUR CAMERA TO A COMPUTER The following steps apply equally to OS 8 6 and OS 9 Choose the appropriate driver for your system Start the installation 2 1 ...

Page 134: ...134 CONNECTING YOUR CAMERA TO A COMPUTER When the Welcome box appears click Continue 3 ...

Page 135: ...135 CONNECTING YOUR CAMERA TO A COMPUTER To start installation click Install Read the warnings then click on Continue If necessary you may quit the program by clicking Cancel 2 1 ...

Page 136: ...NNECTING YOUR CAMERA TO A COMPUTER Installation has been completed successfully To initial the newly installed software restart your computer suggested or click Continue if you wish to continue installing 7 6 ...

Page 137: ...tion and the data on your CF card may be damaged or erased In the case of Windows 2000 Professional writing takes longer than is signaled on the computer In other words even after the copying message has disappeared from the computer screen data transfer will continue During this period DO NOT switch the camera off pull the USB plug or turn the control dial to avoid malfunctions When the camera is...

Page 138: ... discharged batteries the camera may turn off during data transfer An error message will be generated in this case and both the camera and the computer may malfunction or the data on your CF card may be damaged or even erased To avoid power problems it is recommended that an AC adapter not supplied with the camera be used whenever the camera is connected to a computer ...

Page 139: ...ws 95 Windows 98 Windows 2000 Windows NT 4 0 Service Pack 5 Working memory 16 MB or more at least 32 MB for Windows NT Hard disk memory 110 MB or more available Monitor Color monitor with 800x600 video signal resolution CD ROM drive Required for installation and use of software For Apple Macintosh Processor 68040 or higher or Power Macintosh Operating system Mac OS 8 6 OS 9 Working memory 32 MB or...

Page 140: ...y select Start Run and input D ENGLISH INSTALL SETUP EXE in the box Open when your CD Rom drive is the D drive and click OK Installation auf Macintosh Computer 1 Switch computer on and start the operating system 2 Insert CD ROM with Adobe PhotoDeluxe 2 0 software into your CD ROM drive 3 Double click on the CD ROM icon with Adobe PhotoDeluxe 2 0 software 4 Open the English directory with a double ...

Page 141: ...141 APPENDIX ...
Page 142: ...cable into the video output of your camera The LCD screen is disabled Plug the other end of the video cable into the video input of your TV set Switch your TV set on Turn the control dial of your camera to Switch your camera on Set your TV set for the proper AV channel The TV screen will show the same display as the LCD screen of your camera during playback You may play back your images in any of ...

Page 143: ...lease is depressed halfway Are you trying to shoot Step back to maintain a 36 a subject that is less distance of at least 40 cm than 40 cm away or Use macro mode for in macro mode subjects that are between over 40 cm away 4 cm and 40 cm away Shutter does not Is camera switched off Turn control dial 32 release to and switch camera on Is camera set to Record Does green focus lamp Your image is being...

Page 144: ...s full Shutter does not release Is camera switched on Turn control dial to and switch camera on 86 90 32 Are batteries spent Replace all four batteries or use the AC adapter sold separately 24 27 Have batteries been inserted with wrong polarity Reload them with proper polarity 24 Is LCD screen switched off Press DISPLAY button to switch it on 34 Camera has turned off automatically to save power Tu...

Page 145: ... is no CF card loaded Insert a card Green focus lamp blinks slowly about twice per second and PLAYBACK blinks on screen Camera is reading data from CF card Wait until it has finished and the focus lamp as well as PLAY BACK stop blinking Flash picture comes out underexposed Was your subject within flash range Make sure your subject is within range of the built in flash unit 0 4 3 m ...

Page 146: ...l go dead after five seconds while the lens moves out Replace the batteries Image file damaged Did you remove your CF card while it was accessed by the camera Never remove your CF card while the green focus lamp is blinking slowly after exposure about twice per second 33 Camera does not work properly Remove the batteries and replace them If the camera malfunctioned while it was powered by AC pull ...

Page 147: ...l performance even after a drop due to low temperature Remove the batteries if you do not plan to use the camera for a prolonged period Leaking battery acid might damage your camera When using alkaline batteries low power may occasionally be displayed although the batteries still have sufficient power Keep using the camera the display will disappear Caution Batteries may heat up considerably in us...

Page 148: ...u are near electrostatic discharges or fields You remove the card or cut off power while it is being accessed by the camera reading writing etc You do not use your card over a prolonged period The data stored on the card will deteriorate with time It may become impossible to restore the data from a card that has not been used in a long time Normal wear is likewise a risk factor Normal wear is like...

Page 149: ...a soft dry and clean cloth Should the screen flicker permanently or fail have it replaced Copyright TV programs movies videos etc are copyrighted material Unauthorized recording of such material my violate their authors copyright At some events or exhibitions etc photography may not be allowed Copyrighted images may be used only within the scope of the copyright DPOF DPOF data recorded on your CF ...

Page 150: ...Inserting and removing batteries or memory cards with wet hands may damage your camera Improper use of your camera at the beach or near water may give rise to damage and malfunctions Do not expose the camera to direct sunlight for any extended period Never point the lens directly at the sun to avoid damage to the CCD sensor NOTES ON WORKING WITH THE CAMERA ...

Page 151: ... from dust or chemicals such as moth balls If you will not use the camera for any prolonged period preferably keep it in an air tight container with a desiccant such as silica gel Remove the batteries if you are planning not the use the camera for an extended period Leaking battery acid might damage the camera and its components Do not leave the camera in a closet together with moth balls Check th...

Page 152: ...three aspheric surfaces Focusing range 40 cm to infinity macro mode 4 cm to 40 cm Digital zoom Telephoto zoom 2 5x Image storage Storage medium CompactFlash card type I File format Exif 2 1 JPEG DU standard DPOF 1 0 Number of pixels w x h 1 792 x 1 200 full size 896 x 600 half size Storage capacity with 8MB CF card Full size Half size FINE approx 8 images approx 28 images STD Standard approx 13 im...

Page 153: ...Shutter Electrical CCD shutter and one mechanical shutter Shutter speeds 1 500 s to 1 s Exposure compensation 2 EV in 0 5EV increments White balance Automatic manual for daylight tungsten light fluorescent light LCD screen Type 46mm 1 8 inch TFT LCD module Pixels approx 60 000 Brightness steps 9 Screen language English or Japanese DisplaySingle frames index 9 frames slide show magnification 2 5x z...

Page 154: ...ion no flash in macro mode Output control Balanced for available light Interface Video out Composite video signal NTSC or PAL PC interface USB terminal Universal Serial Bus Power source Batteries Four size AA alkaline batteries or size AA Nicad or NiMH batteries External power supply AC adapter DC input on camera Operating temperature 0 C to 40 C max 85 relative humidity noncondensing Dimensions a...

Page 155: ...10 MB free disk space VGA color monitor CD ROM drive 3 5 diskette drive USB and Video out terminals System requirements for iMac iBook G3 blue white series G4 series Mac OS 8 6 9 9 0 2 preferably 9 0 4 32MB RAM or more 110 MB free disk space VGA color monitor CD ROM drive USB and Video out terminals ...

Reviews: