background image


37


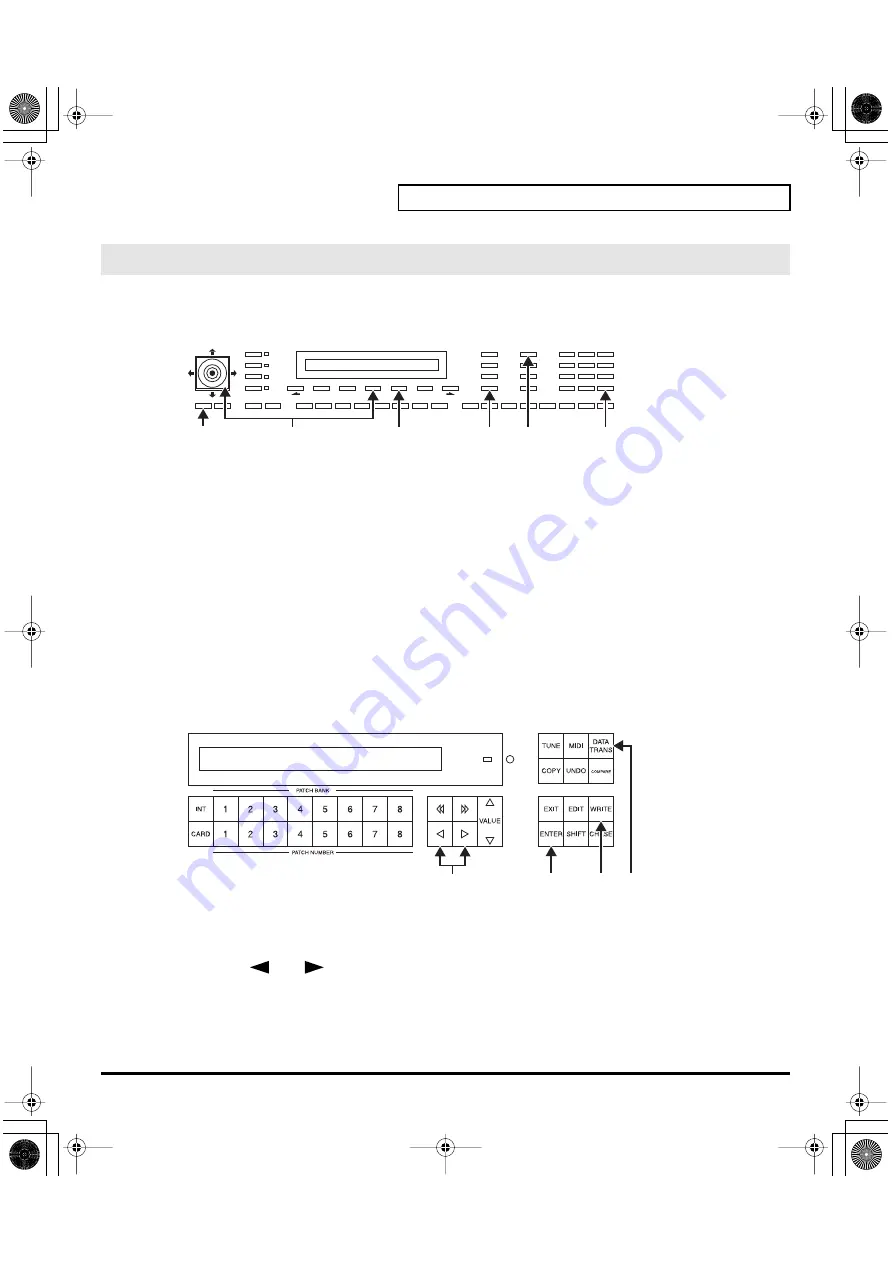
Transferring Patches To and From the D-50/550


All the 64 Patches data stored on the Memory Card can be loaded to the D-50/550’s internal memory. 


Using the D-50


1.


Insert the Memory Card (M-256D) into the D-50 Card Slot.


2.


Turn the 


Memory Protect


 of the D-50 to 


OFF


.


2-1.


Press the 


[TUNE/FUNCTION]


 button.


2-2.


Select “


Protect


” with the 


Selector button


 and turn it 


OFF


 with the joystick.


3.


Press the 


[DATA TRANSFER]


 button.


4.


Select “


(Card -> Int)


” with the corresponding 


Selector button


.


5.


Press 


[ENTER]


 button. When the data transfer is completed, the display shows “


Complete


.”


6.


Return the Memory Protect of the D-50 to 


On


.


6-1.


Press the 


[TUNE/FUNCTION]


 button.


6-2.


Select “


Protect


” with the 


Selector button


 and turn it 


ON


 with the joystick.


Using the D-550


1.


Insert the Memory Card (M-256D) into the D-550 Card Slot.


2.


Press the 


[DATA TRANS]


 button.


3.


Using the 


[

]


 or 


[

]


 buttons, select “


(Card -> Int)


.”


4.


Press the 


[ENTER]


 button.


5.


Press the 


[WRITE]


 button to turn the Memory Protect 


OFF


 temporarily. 


6.


Press the 


[ENTER]


 button again. When the data transfer is completed, the display shows “


Complete


.”


Transfer the patch from the memory card to the D-50/550

2-1
6-1

4

[EXIT]

3

5

2-2
6-2

4, 6

5

3

3

vc1_e.book 37 ページ 2004年4月2日 金曜日 午後3時21分

Summary of Contents for V-Card VC-1

Page 1: ...unt Avenue Dublin 12 Republic of IRELAND TEL 01 4294444 ITALY Roland Italy S p A Viale delle Industrie 8 20020 Arese Milano ITALY TEL 02 937 78300 NORWAY Roland Scandinavia Avd Kontor Norge Lilleakerv...

Page 2: ...conven tional audio CD player The resulting sound may be of a level that could cause permanent hearing loss Damage to speakers or other system components may result 106 Never climb on top of nor place...

Page 3: ...emper ature extremes Excessive heat can deform or discolor the unit Before Using Cards Using PC Cards 704 Carefully insert the PC card all the way in until it is firmly in place 705 Never touch the te...

Page 4: ...t to Default Factory Settings 35 Transferring Patches To and From the D 50 550 36 Transferring Patches from the D 50 to the VC 1 36 Transferring Patches from the VC 1 to the D 50 550 40 Copying a Reve...

Page 5: ...08 Structure of Tone Parameters 111 Creating Patches 113 Naming a Patch 113 Saving Patches 114 Initializing Patch Settings 115 Reset to Default Factory Settings 115 Copying a Patch Bank 116 Settings f...

Page 6: ...e included license agreement before you open the CD ROM case License Agreement This license agreement permits you to use specific software whose copyright is owned by Roland Corporation You must read...

Page 7: ...e original D 50 would have been technologically incapable of containing them fig 01 02 V Synth All sound generator parameters are assignable to the V Synth s full complement of editing controls Parame...

Page 8: ...ation for digital synthesizers is proud to have created The D 550 also released in 1987 shrank the D 50 s powerful synthesizer engine into a mere two rack spaces Now more than fifteen years after it c...

Page 9: ...emory Structure 44 The Basic Concept of a Tone 45 Structure of Tone Parameters 48 Creating a Patch 50 How to Make the Patch Settings 50 Useful Functions for Editing 51 Editing a Value 51 Undoing an ed...

Page 10: ...hown on the panel are indicated with a mark fig 02 01 FrontPanel1 9 VOLUME slider Adjusts the overall volume that is output from the rear panel MAIN OUT jacks and PHONES jack p 15 INPUT Not used with...

Page 11: ...l light when you touch the Time Trip Pad TIME TRIP This switches the Time Trip Pad on and off The effect being controlled switches according to the buttons pressed p 19 ASSIGNABLE HOLD Switches hold o...

Page 12: ...button and pressing NUMBER 1 8 PATCH ASSIGN Not used with the VC 1 Display Function VALUE Dial This is used to modify values If you hold down SHIFT as you turn the VALUE dial the value will change in...

Page 13: ...me p 23 COSM1 COSM2 These can be assigned a variety of the D 50 s different functions allowing you to change the tone in real time p 23 TVA These can be assigned a variety of the D 50 s different func...

Page 14: ...N OUT THRU These connectors can be connected to original D 50 or other MIDI devices to receive and transmit MIDI messages p 83 CTRL 1 2 PEDAL Jacks You can connect optional expression pedals EV 5 BOSS...

Page 15: ...val a few seconds after power up is required before the unit will operate normally Always make sure to have the volume level turned down before switching on power Even with the volume all the way down...

Page 16: ...Pre1 D 50 No Original D 50 preset patches Pre2 VC 1 No Newly added patches Pre3 PN D50 01 No D 50 D 550 sound library Pre4 PN D50 02 No D 50 D 550 sound library Pre5 PN D50 03 No D 50 D 550 sound lib...

Page 17: ...appears 2 Touch List in the upper left area of the display The PATCH List window appears fig 03 05 PatchList 3 Select a patch from the list Either turn the VALUE dial or use INC DEC to select a patch...

Page 18: ...an specify whether or not a beep tone will be heard when you touch a valid point on the touch screen At the factory setting the beep tone will be sounded fig 03 07 1 In the upper right of the screen t...

Page 19: ...TIME TRIP PAD button for that function 3 While you play the keyboard to produce sound place your fingertip on the Time Trip pad and move your finger in the following way If TIME TRIP is on Using the...

Page 20: ...l from the D Beam controller and press the D BEAM button for that function to turn on the D Beam controller 3 While playing the keyboard to produce sound place your hand over the D Beam and slowly mov...

Page 21: ...SetupList 4 When editing a parameter that requires you to specify a value move the cursor to the value box of that parameter Then modify the value by either turning the VALUE dial or pressing INC or D...

Page 22: ...ASSIGNABLE L table 1 p 22 ASSIGNABLE R table 1 p 22 Sens L 0 20 Sens R 0 20 fig 05 08 LCD_CtrlSetupC1C2 C2 C2 table 1 p 22 table 1 You can control the following parameters Display Parameters Assignabl...

Page 23: ...25 OSC2 LFO DP1 table 2 p 25 OSC2 LFO DP2 table 2 p 25 OSC2 LFO DP3 table 2 p 25 OSC2 LFO RATE table 2 p 25 OSC2 LEVEL table 2 p 25 fig 05 11 LCD_CtrlSetupCosm COSM1 COSM2 COSM1 WIDTH table 2 p 25 CO...

Page 24: ...A are applied are specified with the Tone Select button or the Partial Select button Tone Parameters The Tones UPPER or LOWER to be applied are specified with the Tone Select button Partial Parameters...

Page 25: ...orus Balance TONE PARTIAL FORM p 64 Waveform WG Waveform PCM No WG PCM Wave No PW WG Pulse Width PW Velo WG PW Velocity Range PW Aftr WG PW Aftertouch Range PW LFO WG PW LFO Select PW LFOD WG PW LFO D...

Page 26: ...E dial or pressing INC or DEC 5 Repeat steps 3 4 to set patch factors 6 If you wish to save the changes you ve made perform the Save operation p 34 If you do not wish to save changes press EXIT to ret...

Page 27: ...er Tones are played by each key in 8 voices polyphony SPLIT The Split mode divides the keyboard into upper and lower sections where two different Tones can be played in 8 voices polyphony That is the...

Page 28: ...his selects the Tone that on the Pedal Hold effect When the Key mode is Whole Pedal Hold always works whichever of the above three modes may be selected Value U L UL Time Portamento Time This sets the...

Page 29: ...ects many times in the environment fig 05 16e LCD_PatchEditControl Output Mode Output Mode Selects one of the following four output modes Value 1 4 OUTPUT Output Mode Display Function Stereo reverb wo...

Page 30: ...0 Display Description Display Description 1 Small Hall 17 Bright Hall 2 Medium Hall 18 Large Cave 3 Large Hall 19 Steel Pan 4 Chapel 20 Delay 248 ms 5 Box 21 Delay 338 ms 6 Small Metal Room 22 Cross D...

Page 31: ...the number of repeats of the delayed sound differ Value UL ULL ULU When the Key Mode is Dual When the Key Mode is Whole Level Chase Level Sets the volume of the chase sound Value 0 100 Time Chase Tim...

Page 32: ...50 50 approx 2 cents You can change the setting of the MIDI Functions included Patch Factor as follows fig 05 19 LCD_PatchEditControl Midi TxCH Transmit Channel The transmit channel of each Patch can...

Page 33: ...A pulldown menu appears 3 In the pulldown menu touch PATCH NAME or TONE NAME The window for naming appears fig 06 02 LCD_PatchName ToneName 4 Touch the on screen alphabetic or numeric keys to enter t...

Page 34: ...menu appears 3 In the pulldown menu touch PATCH WRITE The PATCH WRITE window appears 4 Turn the VALUE dial to specify the save destination patch When you touch ReName the PATCH NAME window will appea...

Page 35: ...ata save it as describe below Transmit it to an original D 50 or an external MIDI device and save it p 40 Transmit it to a PC using V Synth USB function and save it p 83 1 Press MODE The MODE MENU win...

Page 36: ...ches are restored when you turn the power off then on again The transferred patch data 64 patches will be lost if you turn off the power Be sure to save the data Saving Transferred Patches with the VC...

Page 37: ...s ENTER button When the data transfer is completed the display shows Complete 6 Return the Memory Protect of the D 50 to On 6 1 Press the TUNE FUNCTION button 6 2 Select Protect with the Selector butt...

Page 38: ...ANSFER button specify B Dump with the Selector button 5 Press the D 50 s ENTER button to begin the bulk dump When the data transfer is completed the D 50 s display shows Complete 6 Press the EXIT butt...

Page 39: ...ch Bank Copy in the left of the screen The Bank Copy screen appears 4 When editing a parameter that requires you to specify a value move the cursor to the value box of that parameter Then modify the v...

Page 40: ...of the V Synth to On 5 1 Press MODE 5 2 Touch SYSTEM 5 3 Select Exclusive Sw then turn the V Synth s VALUE dial to specify On 6 Press MODE on the V Synth The MODE MENU window appears 7 Touch DATA TRA...

Page 41: ...lding the DATA TRANS button 4 3 Press the ENTER button again fig 04 05a 5 Turn the Exclusive Sw of the V Synth to On 5 1 Press MODE 5 2 Touch SYSTEM 5 3 Select Exclusive Sw then turn the V Synth s VAL...

Page 42: ...ternal banks any from 1 through 32 can be copied to a reverb type in the internal banks any from 17 through 32 This is convenient when for example you want to use Reverb Type 25 Gate Reverb from the P...

Page 43: ...he source Patch Bank of Reverb Type Value P1 P6 I1 I8 No Selects the source Reverb Type Value 1 32 Destination Bank Selects the destination Patch Bank of Reverb Type Value I1 I8 No Selects the destina...

Page 44: ...from an original D 50 or other MIDI device are also stored temporarily in the Work Area Bulk dumped data is cleared if the power is simply turned off so be sure to save the data to the VC 1 p 34 Temp...

Page 45: ...alog synthesizer or a PCM sampled synthesizer Consequently They are referred to as Partials since they are far more than just a pure synthesizer These Partials are combined in pairs to form a TONE A T...

Page 46: ...can be obtained This is effective for making strings or organ type sounds fig 07 06 RingModulatorBlock Partial 1 can be mixed with the ring modulated sound of Partials 1 and 2 Ring Modulator p 47 Tone...

Page 47: ...08e Patch Ring Modulator The Ring Modulator multiplies two sounds creating an unusual and metallic sound that contains complicated harmonics For instance two waveforms and are multiplied and waveform...

Page 48: ...or can be set here The pitch is a Common parameter and is therefore controlled by P ENV and LFO 1 Waveform PCM Wave Number This selects the waveform of the sound source When a synthesizer sound genera...

Page 49: ...velope Generator This generators a control signal envelope curve which controls the pitch timbre and volume of each Partial sound generator P ENV This is the ENV which controls pitch It can be set for...

Page 50: ...ready been prepared carry out the Initialize operation p 56 2 The parameters are organized into several editing groups Touch one of the buttons at the bottom of the screen to select the edit group con...

Page 51: ...own SHIFT as you move the VALUE dial to increase value increments to make large value changes more quickly INC and DEC Press INC to increase the selected value and DEC to decrease it Keep the button p...

Page 52: ...ANEL_Strycture1Button The Partial select setting will be written into the VC 1 by taking the saving procedure p 34 While editing a Partial parameter any Partial sound can be muted Partial Mute Partial...

Page 53: ...appears fig 08 06 LCD_ToneCopyWindow 4 Touch some buttons checkbox in the left side of the screen to select the object you want to copy 5 Touch a button valuebox in the right side of the screen to se...

Page 54: ...UPPER LOWER PARTIAL Source Partial Select the Partial parameter to be copied Value ALL COMMON PART 1 PART 2 BLOCK Source Block If either PART 1 or PART 2 is selected in any of the following Blocks can...

Page 55: ...iginal sound before it was edited The Compare function allows you to call the original Patch without erasing the edited sound 1 In the upper right of the screen touch A pulldown menu appears 2 In the...

Page 56: ...the patch that you wish to initialize p 16 2 Touch in the upper right of the screen A pulldown menu appears 3 In the pulldown menu touch INITIALIZE The INITIALIZE window appears fig 08 10 LCD_Initial...

Page 57: ...ce of the Upper and Lower Tone Value 0 99 Common Parameters Structure Number Partial 1 Partial 2 Combination of two Partials 1 S S Mixture of Partial 1 and partial 2 2 S S Mixture of Partial 1 and rin...

Page 58: ...ater effect on the envelope Value 0 2 fig 09 10 TimeKeyFollow TKF Keyfollow Time Sets the time of the P ENV depending on the key played Higher values change the time more drastically Value 0 4 P ENV T...

Page 59: ...ased to point 4 Value 0 50 P ENV Level Edit fig 09 13 LCD_P ENV Level L0 Level 0 Sets the pitch created the moment a key is pressed Value 50 50 L1 Level 1 Sets the pitch of the point 1 Value 50 50 L2...

Page 60: ...pen the effect Value 0 100 After Pitch Aftertouch Modulation This sets the sensitivity of the vibrato depth controlled by aftertouch Higher values deepen the vibrato effect Value 0 100 The parameters...

Page 61: ...parameters fig 09 17e EQ_Lg LowFreq Low Frequency Sets the frequency where the gain is altered in the low to middle range Value 63 75 88 105 125 150 175 210 250 300 350 r420 500 600 700 840 Hz LowGain...

Page 62: ...e EQ_Hg HiGain High Gain Sets the gain of the Hf frequency settings raise the gain and settings lower it Value 12 12 dB fig 09 20 LCD_ChorusEdit Chorus Edit Type Chorus Type Selects one of the 8 basic...

Page 63: ...heard Restriction of the available parameters caused by Structure Depending on what Structure p 57 is used the available parameters may be different 1 Some parameters included in a Partial that uses...

Page 64: ...aves of the PCM sound generator p 138 Value 1 127 WG PW WG Pulse Width fig 09 22 LCD_WgPw fig 09 23 PulseWidth PW Pulse Width A square waveform has exactly the same width up and down but a Pulse wavef...

Page 65: ...lse width With values the pulse width becomes smaller with stronger aftertouch and with values the pulse width becomes wider with stronger aftertouch Value 7 7 LFO LFO Select Pulse Width Modulation PW...

Page 66: ...pitch Usually the keyboard to a synthesizer assigns a semi tone to each key This parameter can change the pitch ratio as show below The value represents how many octaves are changed over 12 keys Value...

Page 67: ...Value OFF KEY NOM Display Description OFF No vibrato is obtained Vibrato is on Vibrato is on but inverted A L Vibrato can be obtained only by Aftertouch and Bender Lever Display Description OFF No alt...

Page 68: ...will finally fade out Value 0 100 TVF Time Variant Filter Bender Mode Example If the Bender range is set to 12 1 octave and the Keyfollow Pitch of WG is set to 2 the maximum pitch change caused by mo...

Page 69: ...he Keyfollow curve and set the range bias direction where the bias level is valid The bias range is where the bias level is valid on the keyboard It can be set with the bias point where the bias range...

Page 70: ...g harder Value 0 100 DKF Keyfollow Depth This can change the TVF ENV depth depending on the key played Higher values change the depth more drastically Value 0 4 TKF Keyfollow Time fig 09 36 TimeKeyFol...

Page 71: ...100 T2 Time 2 Sets the time needed to reach point 2 from point 1 Value 0 100 T3 Time 3 Sets the time needed to reach point 3 from point 2 Value 0 100 T4 Time 4 Sets the time needed to reach point 4 fr...

Page 72: ...Level This sets the level of point 4 Value 0 100 EndL End Level To lower the level after releasing the key set this to 0 and to raise the level set it to 100 Value 0 100 The End Level is retained unt...

Page 73: ...change the overall volume of the keyboard bias level from the set level and set the range bias direction where the bias level is valid This bias range is where the bias level is valid on the keyboard...

Page 74: ...ey played 0 to 4 are valid Higher values change the time more drastically Value 0 4 TVA ENV Time An envelope curve is determined by times and levels fig 09 37e TvaEnv fig 09 43 LCD_TvaEnvTime T1 Time...

Page 75: ...3 Value 0 100 SusL Sustain Level Sets the level of point 4 Value 0 100 EndL End Level To lower the level after releasing the key set this to 0 and to raise the level set it to 100 Value 0 100 The End...

Page 76: ...LFO Depth Sets the depth of a growl effect Higher values deepen the effect Value 0 100 After Aftertouch Range Sets the sensitivity of the aftertouch that controls the cutoff point values lower the cu...

Page 77: ...Sets the depth of the tremolo effect Higher values deepen the effect Value 0 100 After Aftertouch Range Sets the sensitivity of the aftertouch that controls the volume values lower the volume by stro...

Page 78: ...either turning the VALUE dial or pressing INC or DEC 4 Repeat steps 3 to make the settings for the System function 5 After you have edited the settings of the System function touch Write located in th...

Page 79: ...e digital output Value 44 1 48 96 kHz fig 10 03a LCD_SystemKeyboard Keyboard Octave Octave Shift Transposes the pitch of the keyboard in 1 octave units Value 3 3 Transpose Modifies the pitch range of...

Page 80: ...TANDARD REVERSE fig 10 04 LCD_SystemMidi MIDI MIDI CH MIDI Channel Sets the Basic Channel MIDI channel on which the VC 1 receives and transmits messages Value 1 16 The transmit change can be set to a...

Page 81: ...th s panel buttons or when the Program Change number to be transmitted is altered also on the V Synth s panel IN other words Program Change messages are not transmitted by patch selection with the Pro...

Page 82: ...ttings or to the factory settings System Initialize fig 10 04a 1 Access the System Edit screen 2 Touch Init located in the lower right of the screen 3 If you want the factory settings to be in effect...

Page 83: ...ecovering the System p 86 Canceling the USB Connection p 86 fig 11 01 ModeMenuSystem 1 Turn off the power of VC 1 V Synth once then pull out the VC 1 from the PC CARD slot 2 Turn on the power of V Syn...

Page 84: ...nding on your system Please proceed to one of the following sections depending on the system you use Windows XP 2000 Me 98 p 84 Macintosh p 85 Windows XP 2000 Me 98 fig 11 05 ModeMenuUsb 1 Make sure t...

Page 85: ...r computer p 86 Macintosh fig 11 05 ModeMenuUsb 1 Make sure that the power of the V Synth is turned off 2 Start up your computer 3 Connect the V Synth and your computer using a USB cable 4 Turn on the...

Page 86: ...fig 11 10 AccessLamp 1 In the V Synth s USB Storage screen make sure that Access the access indicator is not blinking 2 Perform the Eject operation on your computer 2 1 Windows 98 Me 2000 XP In My Com...

Page 87: ...ese files to the computer e g the hard disk Do not perform operations on your computer to erase format or rename these folders or files If the VC 1 fails to operate correctly use the CD ROM included w...

Page 88: ...downloaded from the Roland Website http www roland com products en VC 1 This URL may change without notice Exchanging MIDI Messages with Your Computer OS Folder Windows XP 2000 Midi Usb_xp2k Readme_e...

Page 89: ...om the D 50 to the VC 1 101 Transferring Patches from the VC 1 to the D 50 550 104 Overview of the VC 1 107 Memory Structure 107 The Basic Concept of a Tone 108 Structure of Tone Parameters 111 Creati...

Page 90: ...rform The explanations in this manual include illustrations that depict what should typically be shown by the display Note however that your unit may incorporate a newer enhanced version of the system...

Page 91: ...e will change in larger steps VOLUME Knob Adjusts the overall volume that is output from the MAIN OUT jacks and the PHONES jack By pressing the VOLUME knob you can audition preview the current sample...

Page 92: ...result in shock or electrocution Gas pipes may result in fire or explosion Telephone line ground or lightning rod may be dangerous in the event of lightning USB Connector Use a USB cable to connect th...

Page 93: ...Setting 2 1 MIDI CH p 117 2 2 Control p 117 2 3 Separate CH p 118 2 4 ProgramChange Sw p 118 2 5 Exclusive Sw p 118 2 6 BankSelect Sw p 118 Menu3 Utility 3 1 Patch Name p 113 3 2 Patch Initialize p 1...

Page 94: ...ith a protection circuit A brief interval a few seconds after power up is required before the unit will operate normally Always make sure to have the volume level turned down before switching on power...

Page 95: ...rks Pre1 D 50 No Original D 50 preset patches Pre2 VC 1 No Newly added patches Pre3 PN D50 01 No D 50 D 550 sound library Pre4 PN D50 02 No D 50 D 550 sound library Pre5 PN D50 03 No D 50 D 550 sound...

Page 96: ...the rear panel of the VariOS will function as a USB MIDI interface Roland VariOS External MIDI When USB is not connected and when your computer is not powered up the MIDI connectors on the rear panel...

Page 97: ...MIDI CH and press the VALUE knob 4 Turn the VALUE knob to specify the receive channel 1 16 fig 12 13 MIDI CH Sets the Basic Channel MIDI channel on which the VC 1 receives and transmits messages Value...

Page 98: ...tion actually affects the sound differs depending on the individual patch Some Patches may not be affected at all Applying Effects by Turning Knobs Display Description C1 PITCH The volume balance of t...

Page 99: ...indicate reminding you that the patch settings have been modified If you turn off the power or select a different patch while the display indicates your edited patch will be lost fig 12 18 Chase Swit...

Page 100: ...Tones can be played in 8 voices polyphony That is the VC 1 works like two 8 voice synthesizers The Split Point where the keyboard is divided into two sections is shown next to the Key Mode indication...

Page 101: ...hes are restored when you turn the power off then on again The transferred patch data 64 patches will be lost if you turn off the power Be sure to save the data Saving Transferred Patches with the VC...

Page 102: ...eted the display shows Complete 6 Return the Memory Protect of the D 50 to On 6 1 Press the TUNE FUNCTION button 6 2 Select Protect with the Selector button and turn it ON with the joystick Using the...

Page 103: ...NSFER button specify B Dump with Selector button 6 Press the D 50 s ENTER button to begin the bulk dump When the data transfer is completed the D 50 s display shows Complete 7 Press the EXIT button on...

Page 104: ...the same MIDI channel the basic channel p 117 3 Turn the MIDI Mode of the VariOS to Internal p 119 4 Turn the Memory Protect of the D 50 to OFF 4 1 Press the TUNE FUNCTION button 4 2 Select Protect wi...

Page 105: ...Patch Bank fig 12 29 Select Bank Selects the Patch Bank in the VC 1 with the patch data to transfer to the D 50 Value I1 I8 P1 P6 fig 12 29a 11 Press the VALUE knob and the display will ask Are You S...

Page 106: ...3 Turn the VariOS s VALUE knob to select Exclusive Sw and press the VALUE knob 6 4 Turn the VariOS s VALUE knob to select On fig 12 24 7 Press the VariOS s MENU button so it s lighted and access the M...

Page 107: ...iginal D 50 or other MIDI device are also stored temporarily in the Work Area Bulk dumped data is cleared if the power is simply turned off so be sure to save the data to the VC 1 p 114 Temporary Area...

Page 108: ...alog synthesizer or a PCM sampled synthesizer Consequently They are referred to as Partials since they are far more than just a pure synthesizer These Partials are combined in pairs to form a TONE A T...

Page 109: ...an be obtained This is effective for making strings or organ type sounds fig 07 06 RingModulatorBlock Partial 1 can be mixed with the ring modulated sound of Partials 1 and 2 Ring Modulator p 110 Tone...

Page 110: ...08e Patch Ring Modulator The Ring Modulator multiplies two sounds creating an unusual and metallic sound that contains complicated harmonics For instance two waveforms and are multiplied and waveform...

Page 111: ...or can be set here The pitch is a Common parameter and is therefore controlled by P ENV and LFO 1 Waveform PCM Wave Number This selects the waveform of the sound source When a synthesizer sound genera...

Page 112: ...velope Generator This generators a control signal envelope curve which controls the pitch timbre and volume of each Partial sound generator P ENV This is the ENV which controls pitch It can be set for...

Page 113: ...access the MENU screen 3 Turn the VALUE knob to select Utility and press the VALUE knob fig 12 30 4 Turn the VALUE knob to select Patch Name and press the VALUE knob fig 12 32e 5 Use the or buttons to...

Page 114: ...Default Factory Settings p 115 Never insert or remove the VC 1 while the VariOS is turned on Patches cannot be saved to PC cards other than the VC 1 1 Make sure that the patch that you want to save i...

Page 115: ...VALUE knob once again to carry out the Patch initialize operation This restores all data in the VC 1 to the factory set condition Factory Reset If there is important data you ve created that s stored...

Page 116: ...he VariOS s VALUE knob to specify the copy source Patch Bank and press the VALUE knob fig 12 26 Source Bank Specify the copy source Patch Bank Value I1 I8 P1 P6 5 Turn the VALUE knob to specify the co...

Page 117: ...ALUE knob 4 Turn the VALUE knob to specify the value 5 Repeat steps 2 4 to set system settings 6 After you have edited the settings of the System function perform the Save operation p 120 Changes you...

Page 118: ...N P Dump Tx Edit When set to P Dump the Patch you select is transmitted to an external device However it cannot be transmitted by Patch Shift with the pedal switch or by patch selection with the Progr...

Page 119: ...I mode to PC Value PC Internal fig 12 46a C1 C2 C3 Knob Knob Switch Enables or disables control of the C1 C2 C3 knobs System Display Description PC When using a USB connection the MIDI connectors on t...

Page 120: ...s VALUE knob once again to carry out the system save operation The current settings of the system functions can be restored to a set of standard settings or to the factory settings System Initialize f...

Page 121: ...computer included the VariOS package 1 Make sure that the power of the VC 1 is turned off 2 Connect the VariOS and your computer using a USB cable then start up your computer fig 12 63 3 Hold down th...

Page 122: ...Then click the item that indicates the PC card drive this will differ depending on your version of Windows see below to unmount the drive 1 2 Windows 98 In My Computer right click the Removable Disk...

Page 123: ...ese files to the computer e g the hard disk Do not perform operations on your computer to erase format or rename these folders or files If the VC 1 fails to operate correctly use the CD ROM included w...

Page 124: ...n of the USB MIDI driver can be downloaded from the Roland Website http www roland com products en VC 1 This URL may change without notice Exchanging MIDI Messages with Your Computer What is the USB M...

Page 125: ...ation 126 Sound List 130 Preset Patches 130 Patch Factors 133 Tone Parameters 134 Common Parameters 134 Partial Parameters 135 System Parameters 137 Waveform 138 MIDI Implementation 140 Specifications...

Page 126: ...are played and how the control messages run as shown in the following pictures Mono Mode Poly Mode Name Functions Poly Mode Allows the control of more than one Key message on one channel at a a time T...

Page 127: ...e Message Off Mono Mode Lower Upper Receive Channel Keyboard Lower Receive Channel Group Upper Keyboard Lower Upper Receive Channel Keyboard Lower Upper Receive Channel Keyboard Lower Receive Channel...

Page 128: ...oly Mode Mode Message Off Mono Mode Whole Whole S Whole Solo Dual Dual S Dual Solo Split Split US Split Upper Solo Split LS Split Lower Solo Upper Receive Channel Upper Receive Channel Group Upper Rec...

Page 129: ...sic Channel Global Channel Receive Channel in Separate Mode Separate Separate S Separate Solo Key Mode Poly Mode Mode Message Off Mono Mode Lower Upper Receive Channel Lower Upper Receive Channel Grou...

Page 130: ...orale Pianissimo D D S D W D D D 8 Intruder FX Steel Pick Synth Bass Afterthought Bones Bottle Blower Future Pad PCM E Piano D D D D D D D D No 1 2 3 4 5 6 7 8 BANK 1 Brass Tacks A Bright Day Soft EPi...

Page 131: ...W D S W D 8 Star Peace Chorus Spacy Voice Thinful Vox Harmonium Android Nuns Pressure Pad Digital Sound D D D D D D D D No 1 2 3 4 5 6 7 8 BANK 1 Synthetic Piano 1 Upright Pianer Loud Piano Tack Piano...

Page 132: ...D D D D 8 Whispy Vox Alpha Omega Ensemble Vox n Sawz 4th Synth Vox Husky Voices Stereo Panorama Voyageur Glass Voice 2 D D D D D D D D No 1 2 3 4 5 6 7 8 BANK1 Perc E Piano Ballad Piano Choir New Age...

Page 133: ...Mode U L UL Time Portamento Time 0 100 Mode Portamento Mode U L UL OUTPUT p 29 Mode Output Mode 1 4 RevType Reverb Type 1 32 Revbal Reverb Balance 0 100 Vol Total Volume 0 100 CHASE p 31 Mode Chase M...

Page 134: ...L0 Level0 50 50 L1 Level1 50 50 L2 Level2 50 50 SusL Sustain Level 50 50 EndL End Level 50 50 Pitch Mod LFOD LFO Depth 0 100 Lever Pitch Lever Modulation 0 100 Aftr Pitch Aftertouch Modulation 0 100...

Page 135: ...rs Parameter Value Comment FORM p 64 WG Form Wave Waveform SQU SAW PCM PCM Wave No 1 127 WG PW PW Pulse Width 0 100 Velo Velocity Range 7 7 After Aftertouch Range 7 7 LFO LFO Select 1 1 2 2 3 3 LFOD L...

Page 136: ...ocity Range 50 50 BP Bias Point Bias Direction A1 C7 A1 C7 BLevel Bias Level 12 12 TVA ENV Velo Velocity Follow 0 4 TKF Time Keyfollow 0 4 TVA ENV Time T1 Time1 0 100 T2 Time2 0 100 T3 Time3 0 100 T4...

Page 137: ...Polarity p 80 Hold Hold Pedal STANDARD REVERSE Pedal1 Control Pedal 1 STANDARD REVERSE Pedal2 Control Pedal 2 STANDARD REVERSE MIDI p 80 MIDICH Basic CH 1 16 Control Control B CH G CH MdeOff Separate...

Page 138: ...8 Harmo Flute Harmonics 39 Lips1 Lips 1 40 Lips2 Lips 2 41 Trumpt Trumpet 42 Bones Trombones 43 Contra Contrabass 44 Cello Cello 45 VioBow Violin bow 46 Violns Violins 47 Pizz Pizzicart Number Display...

Page 139: ...Wurly Wurly 103 FM EP FM Electric Piano 104 M_Box Music Box 105 Kalmb2 Kalimba 2 106 StlGtr Steel Guitar 107 Sitar Sitar 108 FM Bs FM Bass 109 MtlVox Metal Voice 110 Hit Hit 111 Sync Sync 112 FMMod1 F...

Page 140: ...ber 0H FH ch 1 16 vv Volume 00H 7FH 0 127 Hold 1 Controller number 64 for V Synth only Status 2nd byte 3rd byte BnH 40H vvH n MIDI channel number 0H FH ch 1 16 vv Control value 00H 7FH 0 127 0 63 OFF...

Page 141: ...nH kkH vvH 9nH kkH 00H n MIDI channel number 0H FH ch 1 16 kk note number 00H 7FH 0 127 vv note off velocity 00H 7FH 0 127 Note on Status 2nd byte 3rd byte 9nH kkH vvH n MIDI channel number 0H FH ch 1...

Page 142: ...MSB LSB MSB LSB Notes 00H 00H mmH llH Pitch Bender Range mm 00H 0CH 0 12 semitones ll ignored processed as 00H Up to 1 octave can be specified in semitone steps 00H 01H mmH llH Fine Tuning mm ll 00 00...

Page 143: ...lowing structure Roland Exclusive Format Type IV Byte Description a F0H Exclusive status b 41H Roland ID c dev Device ID MIDI basic channel 1 d 14H Model ID D 50 e xxH Command ID f aaH Address MSB dep...

Page 144: ...VF ENV Time T2 0 100 0 100 18H 0vvv vvvv TVF ENV Time T3 0 100 0 100 19H 0vvv vvvv TVF ENV Time T4 0 100 0 100 1AH 0vvv vvvv TVF ENV Time T5 0 100 0 100 1BH 0vvv vvvv TVF ENV Level L1 0 100 0 100 1CH...

Page 145: ...v vvvv LFO 2 Sync 0 1 Off On 21H 0vvv vvvv LFO 3 Waveform 0 3 Triangle Sawtooth Square Random 22H 0vvv vvvv LFO 3 Rate 0 100 0 100 23H 0vvv vvvv LFO 3 Delay Time 0 100 0 100 24H 0vvv vvvv LFO 3 Sync 0...

Page 146: ...0vvv vvvv Chase Time 0 100 0 100 25H 0vvv vvvv MIDI Transmit CH 0 16 Basic 1 16 26H 0vvv vvvv MIDI Separate Mode Receive CH 0 16 Off 1 16 27H 0vvv vvvv MIDI Transmit Program Change 0 100 Off 1 100 28...

Page 147: ...Off 11B 3 Upper On Lower On BIN DEC Description 0000B 0 Upper Partial2 Off Upper Partial1 Off Lower Partial2 Off Lower Partial1 Off 0001B 1 Upper Partial2 Off Upper Partial1 Off Lower Partial2 Off Low...

Page 148: ...Poly Omni Off Mode 1 Mode 3 Mode 2 Mode 4 O X 0 127 12 108 X O O O 0 127 O X X O O X X O X 1 Only V Synth can be transmitted 2 Can be set to O or X manually and memorized 3 RPN Registered parameter co...

Page 149: ...Waveforms Synthesizer 2 PCM 128 Internal User Memory Banks 8 Patches 512 Preset Memory Banks 6 Patches 384 Accessories CD ROM Card Recovery Data Editor UniQuest VC 1 Card Case ROLAND SOFTWARE LICENSE...

Page 150: ...th 62 Chorus Edit 62 Chorus Rate 62 Chorus Type 62 Coars 66 Common 46 109 Compare 55 CONTROL 28 Control 80 117 Control change 97 Control Pedal 1 80 Control Pedal 2 80 Control Setup 21 COSM1 13 COSM2 1...

Page 151: ...59 72 75 L2 59 72 75 L3 72 75 LCD CONTRAST 14 Level 31 73 Level 0 59 Level 1 59 72 75 Level 2 59 72 75 Level 3 72 75 Lever 60 LFO 49 60 65 67 76 77 112 LFO Depth 60 65 76 77 LFO Mode 67 LFO Rate 60 L...

Page 152: ...Receive Channel in Separate Mode 32 Reso 69 Resonance 69 Revbal 30 reverb 29 Reverb Balance 30 Reverb Type 30 reverb types 42 RevType 30 Ring Modulator 47 110 S Select Bank 105 106 SEP 27 Separate 27...

Page 153: ...S 32 TxCH 32 TxPC 32 Type 62 U UKey 32 UNDO 51 Undo 51 UPPER 26 USB 83 121 USB Connector 14 92 USB MIDI 81 USB MISI Switch 81 UTune 32 V VALUE Dial 91 VALUE dial 51 Velo 58 65 70 73 74 Velocity Follow...

Page 154: ...154 Index vc1_e book 154...

Page 155: ...conven tional audio CD player The resulting sound may be of a level that could cause permanent hearing loss Damage to speakers or other system components may result 106 Never climb on top of nor place...

Page 156: ...unt Avenue Dublin 12 Republic of IRELAND TEL 01 4294444 ITALY Roland Italy S p A Viale delle Industrie 8 20020 Arese Milano ITALY TEL 02 937 78300 NORWAY Roland Scandinavia Avd Kontor Norge Lilleakerv...

Reviews: