background image

Output (Printing)

22

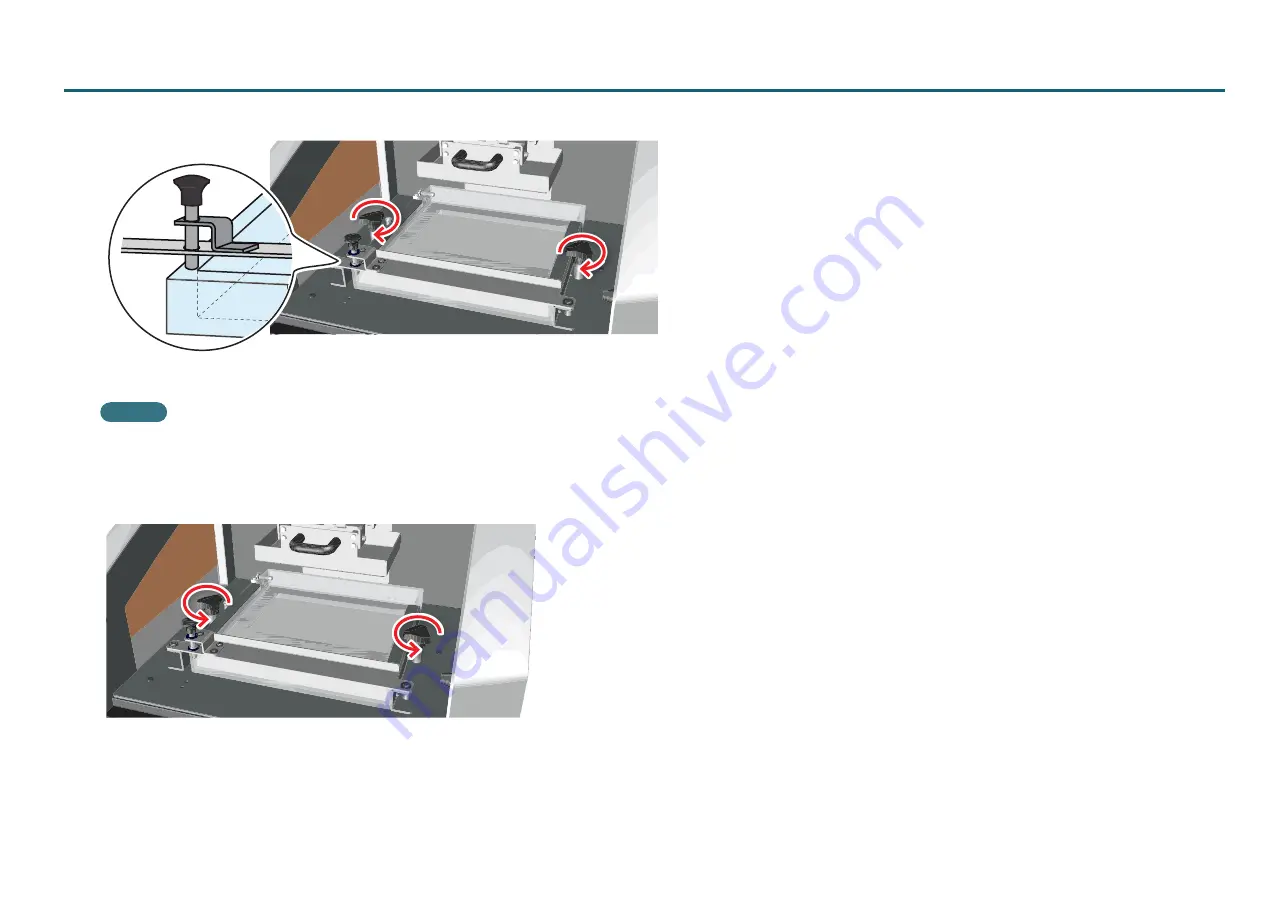
4. 

Tighten the liquid material vat retaining screws.

When doing so, check that the liquid material vat stopper is resting on the edge of the liquid material vat.

MEMO

In the next procedure (step 5), the liquid material vat retaining screws are only loosened by a fixed amount. For this reason, the liquid material vat retaining screws 

are tightened securely at this stage.

5. 

Loosen the liquid material vat retaining screws one turn.

Summary of Contents for monoFabARM-10

Page 1: ...User s Manual...

Page 2: ...ct have been prepared and tested as much as possible If you find any misprint or error please inform us Roland DG Corp assumes no responsibility for any direct or indirect loss or damage which may occ...

Page 3: ...t Down the Machine 11 Output Printing 12 Operation Flow 12 Create 3D Data and Convert it to STL Format 13 Import STL data using monoFab Player AM 14 Prepare for Printing 20 Output data and start print...

Page 4: ...rinting method whereby print data is sliced into layers at regular intervals each of which is exposed irradiated with light by a projector one layer at a time is referred to as the layer exposure meth...

Page 5: ...cation exposed to direct sunlight Install in a location having the specified temperature and relative humidity Installation Environment Operating Temperature of 20 to 30 C 68 to 86 F 35 to 80 relative...

Page 6: ...orage The expiration date for photo curable resin is one year from the date of manufacture shown on the photo curable resin container Store photo curable resin away from direct sunlight or strong ligh...

Page 7: ...at does not meet the ratings displayed on the AC adapter Doing so may lead to fire electrical shock or electrocution WARNING Never use any AC adapter or power cord other than those included with the m...

Page 8: ...uid material vat stopper Secures the liquid material vat in place When the stopper is disengaged the liquid material vat moves toward you 6 Printing platform retaining screw The screw that secures the...

Page 9: ...The ARM 10 turns on and initialization starts The Power button will start flashing slowly When the ARM 10 finishes initialization the Power button stops flashing and remains steadily lit 3 Start mono...

Page 10: ...the Start screen 2 Click the All apps icon 3 Under monoFab Player AM click the monoFab Player AM icon Windows 7 WindowsVista users 1 Click the Start button 2 Click All programs or Programs 3 Under mo...

Page 11: ...monoFab Player AM closes down MEMO If you have not saved the changes to the file you are currently editing a window prompting you to save the changes appears It is also possible to exit monoFab Player...

Page 12: ...on Objects p 16 Print Multiple Objects Simultaneously p 17 Attach Supports to Objects p 18 Adjust the Finish of the Job p 19 Prepare for Printing p 20 Install the liquid material vat in the ARM 10 p 2...

Page 13: ...ilar program create 3D data for printing 1 Create or prepare 3D data 2 Save the 3D data in STL format MEMO For information on how to use 3D CAD software refer to the instruction manual for the softwar...

Page 14: ...e monoFab Player AM For information how to use monoFab Player AM refer to monoFab Player AM Help Import STL Data Import STL data into monoFab Player AM Imported data is displayed in the main view as a...

Page 15: ...it cannot be used for printing If you find errors in data imported into monoFab Player AM it can be corrected using the Healing function Errors are shown in red Healing button MEMO The Healing functi...

Page 16: ...Output Printing 16 Position Objects It is possible to alter the position of move or rotate an object and change its size Move Adjust Size Rotate...

Page 17: ...e objects are positioned in the work area supports are generated as though for a single object As a result when multiple objects have been positioned in the work area and supports have been generated...

Page 18: ...are attached to the object MEMO Supports are required when making objects like those described below Objects where the center of gravity is heavily skewed Objects where the size of the job is large r...

Page 19: ...ill not be necessary to change these settings in order to print Advanced Print Conditions button MEMO By setting the distance and speed at which the Printing platform p 8 moves and the time it is irra...

Page 20: ...children may pose a health hazard WARNING Never place a photo curable resin container in fire Resin may flow out catch fire and spread fire to other nearby objects WARNING Never drink or sniff photo c...

Page 21: ...vat p 8 that is filled with job material resin in the Liquid material vat holder p 8 1 Open the front cover 2 Loosen the liquid material vat retaining screws 3 Insert the liquid material vat Liquid m...

Page 22: ...topper is resting on the edge of the liquid material vat MEMO In the next procedure step 5 the liquid material vat retaining screws are only loosened by a fixed amount For this reason the liquid mater...

Page 23: ...tween the liquid material vat holder and the liquid material vat Pressing the liquid material vat lowers the shutter lever Check that the liquid material vat stopper is down and is touching the outsid...

Page 24: ...hich the job starts to be made in the liquid material vat 1 Using the included hexagonal wrench loosen the Z0 adjustment screws 4 locations Loosen each screw so that around 2 mm of the shaft is visibl...

Page 25: ...hough gently pressing it against the liquid material vat Before fully tightening the screws temporarily tighten opposite corners first to ensure that the screws are tightened evenly This determines th...

Page 26: ...aterial vat gets low For details refer to the Roland DG Start up page http startup rolanddg com 2 Open the lid of the resin bottle and pour resin into the liquid material vat Do not fill with resin be...

Page 27: ...ON When handling resin wear rubber gloves and protective eyewear Do not allow resin to come into contact with the skin or eyes Check print data Preview Slice positioned objects in the height direction...

Page 28: ...the liquid material vat and the surrounding environment Therefore the shape displayed in the print preview is not necessarily the exact shape that will be printed Check cross section Drag the edge of...

Page 29: ...tton This starts the printing operation Wait a few minutes until printing is complete NOTE Do not open the front cover during printing Doing so may result in reduced print quality MEMO The estimated f...

Page 30: ...ng Printing has finished appears click OK The printing platform moves to the highest position 2 When the printing platform has stopped moving open the front cover 3 Loosen the printing platform retain...

Page 31: ...Output Printing 31 5 Set the printing platform in the work tray and remove the job Printing platform Work tray Job Metallic spatula...

Page 32: ...removed job is entirely submerged MEMO Use ethanol with a concentration of at least 70 3 Wash the job by gently swishing it around in the ethanol using the tweezers MEMO If the ethanol changes color...

Page 33: ...until it is entirely submerged 3 Put water into the ultrasonic cleaner container and partially submerge the beaker in it 4 Wash in the ultrasonic cleaner 1 to 2 minutes MEMO For information on how to...

Page 34: ...s also possible to use a commercially available post cure device Remove the supports after completing the post cure procedure Finishing the job involves removing supports and additionally curing the r...

Page 35: ...other nearby objects WARNING Never use gasoline thinner or such material Doing so may cause fire CAUTION When handling resin wear rubber gloves Do not allow resin to come into contact with the skin Pe...

Page 36: ...nce 36 Wash printing platform 1 Loosen the printing platform retaining screw 2 Hold the print platform handle and pull out 3 Soak a rag in ethanol and wipe any resin from the surface of the printing p...

Page 37: ...it may not be possible to print MEMO The printing platform is a consumable part After several print jobs resin may work its way into the fine corrugations on the printing platform surface making it i...

Page 38: ...Maintenance 38 6 Tighten the printing platform retaining screw...

Page 39: ...the liquid material vat 1 Loosen the liquid material vat retaining screws 2 Pull up the liquid material vat stopper When the liquid material vat stopper is pulled up the liquid material vat pops out...

Page 40: ...esin from the liquid material vat to a beaker or similar container let it cure and then dispose of it according to local waste sorting criteria 4 Soak a rag in ethanol and wipe any resin from the liqu...

Page 41: ...t gets too cloudy printing becomes impossible the resin stops solidifying and the job sticks to the liquid material vat Printing range MEMO The part of the printing range that is not cloudy can still...

Page 42: ...orm If the surface of the printing platform is scratched or the job remains in the liquid material vat it is recommended to replace the printing platform with a new one Contact Roland DG Corp or the a...

Page 43: ...into the liquid material vat Does the weight of the job exceed the maximum printable resin volume Reduce the size of the object monoFab Player AM Help Make the object lighter by reducing the thicknes...

Page 44: ...d material vat is dirty wash it Set the non cloudy part of the bottom of the liquid material vat toward the back of the machine Alternately replace the liquid material vat with a new one p 39 p 41 p 4...

Page 45: ...Continue The Device Manager appears 4 Click Device Manager If a User Account Control window appears click Continue The Device Manager appears 5 From the View menu click Show hidden devices 6 In the l...

Page 46: ...king it and then click Uninstall 7 If a message prompting you to confirm deletion appears click Yes 8 If a User Account Control window appears click Continue 8 If a User Account Control window appears...

Page 47: ...window prompting you to restart the computer appears click Yes When the computer has restarted the uninstall process is complete 16 After the computer has restarted open the Control Panel again and c...

Page 48: ...e machine may be damaged 1 Place the large retainer on top of the UV irradiation outlet shutter Fix the shutter in place so that it does not open Insert the large retainer into the center of the reces...

Page 49: ...Appendix 49 3 Tape the retainers in place 4 Close the front cover and tape it down...

Page 50: ...B A or less During standby 49 dB A or less Dimensions 430 W x 365 D x 450 H mm 17 0 W x 14 4 D x 17 8 H inches Weight 17 kg 37 5 lbs Interface USB Installation environment During operation Temperature...

Page 51: ...Appendix 51 Dimensional Drawing 89 250 430 25 425 725 365 59 250 5 40 40 Unit mm...

Page 52: ...rial Number Labels Back side Serial Number This number is required when you seek maintenance servicing or support Never remove the label Power Rating Use an electrical outlet that meets the requiremen...

Page 53: ...R1 140829 DOC 1213...

Reviews: