112
Editing a Sample
Here’s how to assign samples as the rhythm tones of a rhythm set.
For example, you can create an original rhythm set by replacing
certain tones of a preset rhythm set with different samples.
*
From the SAMPLE LIST screen you can also press [F4 (ASSIGN)]->
[F5 (To PAD)] to execute Assign to Pad.
*
You cannot execute this with more than one sample selected.
1.
With the SAMPLE LIST screen shown, select a sample.
2.
Press [SAMPLE EDIT <-> LIST] to access the SAMPLE EDIT
screen.
3.
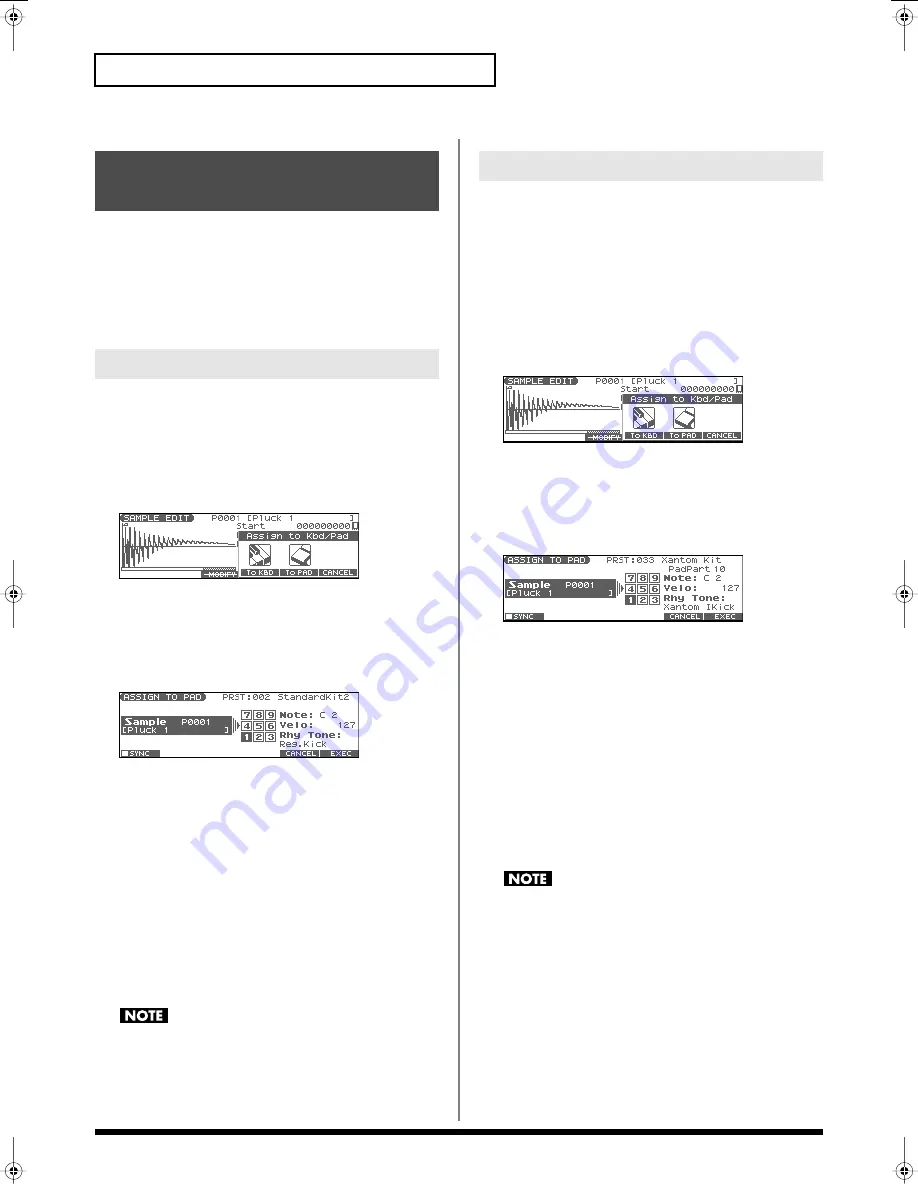
Press [F4 (ASSIGN)].
The Assign to Kbd/Pad window will appear.
fig.AsgnToKbdPad
4.
Press [F5 (To PAD)].
The ASSIGN TO PAD screen will appear.
If a rhythm set is not assigned to the pad, a message will ask
“Change into Rhythm and Initialize?”, asking if you want to
assign an initialized rhythm set to the pad. Press [F6 (EXEC)].
fig.AsgnToPad
5.
Select the desired pad by pressing it directly.
*
If you press [F1 (SYNC)] to add a check mark (
✔
), the Wave Tempo
Sync parameter (p. 59) will be turned ON for the rhythm tone that is
assigned.
6.
Press [F6 (EXEC)].
A message will ask your confirmation.
7.
Press [F6 (EXEC)] to execute Assign to Pad.
The sample will be assigned (as a rhythm tone) to the specified
pad.
*
To cancel, press [F5 (CANCEL)].
8.
Press [EXIT] to return to the previous screen.
If you select another rhythm set, the rhythm set you assigned
will be replaced by that rhythm set. If you want to keep the
rhythm set you created, press [WRITE] and save it (p. 57).
Before you continue with the procedure below, make sure you’re in
Performance mode, and select the rhythm set to which you want to
assign the sample.
1.
With the SAMPLE LIST screen shown, select a sample.
2.
Press [SAMPLE EDIT <-> LIST] to access the SAMPLE EDIT
screen.
3.
Press [F4 (ASSIGN)].
The Assign to Kbd/Pad window will appear.
fig.AsgnToKbdPad
4.
Press [F5 (To PAD)].
The ASSIGN TO PAD screen will appear.
If a rhythm set is not assigned to the pad (part 10), a message
will ask “Change into Rhythm and Initialize?”, asking if you
want to assign an initialized rhythm set to the selected part.
fig.AsgnToPadPfm
5.
Select the desired pad by pressing it directly.
*
If you press [F1 (SYNC)] to add a check mark (
✔
), the Wave Tempo
Sync parameter (p. 59) will be turned ON for the rhythm tone that is
assigned.
6.
Press [F6 (EXEC)].
A message will ask your confirmation.
7.
Press [F6 (EXEC)] to execute Assign to Pad.
The sample will be assigned (as a rhythm tone) to the specified
pad.
*
To cancel, press [F5 (CANCEL)].
8.
Press [EXIT] to return to the previous screen.
If you select another rhythm set, the rhythm set you assigned
will be replaced by that rhythm set. If you want to keep the
rhythm set you created, press [WRITE] and save it (p. 57).
Assigning Samples to a Pad
(Assign to Pad)
From Patch Mode
From Performance Mode
Fantom-Xa_e.book 112 ページ 2004年10月22日 金曜日 午後2時3分


![ADS AKX-FO(RS)-FO1A-[AKX-FO1]-EN Install Manual preview](http://thumbs.mh-extra.com/thumbs/ads/akx-fo-rs-fo1a-akx-fo1-en/akx-fo-rs-fo1a-akx-fo1-en_install-manual_2853544-01.webp)

