background image


    RIELLO  S.p.A.    
    37045  Legnago  (VR)    
    Tel.  0442630111  -  Fax  044222378  -  www.riello.it    


          As part of the company’s ongoing commitment to perfecting its range of products, the appearance, dimensions, technical data, 
equipment and accessories may be subject to variation.    


Summary of Contents for TAU 35 UNIT

Page 1: ...cod 20103677 rev 1 05 16 TAU 35 UNIT EN INSTALLATION AND MAINTENANCE MANUAL ...

Page 2: ... 2014 30 UE Low Voltage Directive 2014 35 UE EN 677 Standard Gas fired central heating boilers specific requirements for condensing boilers with a no minal heat input not exceeding 70 kW SVGW Gas principles G1 Gas installation EKAS Form 1942 Liquid gas directive Part 2 Cantonal instances regulations e g fire safety regulators Ecodesign Directive 2009 125 CE for energy related products Energy Label...

Page 3: ...and to provide comfort in the home for many years to come This manual pro vides information that is essential to the installation of the appliance Used in conjunction with your own knowledge and expertise it will enable you to install the appliance quickly easily and correctly Once again please accept our thanks and our congratulations on your choice of product Riello S p A ...

Page 4: ...der systems and systems requiring modernisation 27 Water in heating circuits 28 Water connections 30 Draining the condensate 32 Condensate neutralisation unit 33 Gas connection 35 Ch frost protection 35 Flue gas vent and comburent air intake 36 Electrical connections 37 Sensor connections 38 Outdoor sensor connections 39 Filling and draining the system 40 TECHNICAL ASSISTANCE SERVICE 41 Preparing ...

Page 5: ...eezing 9 9The boiler must be serviced at least once a year 9 9This instruction manual is an integral part of the boiler It must be kept safe and must ALWAYS ac company the boiler even if it is sold to another owner or transferred to another user or to another installation If you damage or lose this manual or der a replacement immediately from your local R Technical Assistance Centre 0 0Do not allo...

Page 6: ...de the body and optimising performance 1 4 Safety devices This TAU UNIT condensing boiler is equipped with the following safety devices An automatic safety thermostat that trips at 100 and shuts down the burner An electronic safety system that monitors flow rate through the central heating system using two sensors one on the flow pipe and the other on the return pipe This safety system forces the ...

Page 7: ...D T067697GE CALDAIA REGOLATA PER CHAUDIERE REGLEE POUR VERWARMINGSKETEL INGESTELD OP KESSEL GEREGELT FÜR KJEL INNSTILT FOR European Directive 92 42 EEC η η η η N 230 V 50Hz W Pms bar T C Qn min Pn min NOx IP P min G20 mbar Qn max Pn max Cod kW kW kW kW kW kW kW kW RIELLO S p A Via Ing Pilade Riello 737045 Legnago VR ITALY Categoria Categorie Kategorie Kategori Combustibile Combustible Brandstof Br...

Page 8: ... circuit drain cock 7 Condensate drain siphon 8 Condensate drain pipe 9 Flue gas exhaust fitting 10 Comburent air intake fitting 11 Cover panel 12 Pressure switch for combustion chamber 13 Automatic vent valve 14 Safety valve 3 bar 15 Sensor sockets 16 Gas valve 17 Gas fitting 18 Burner 19 Central heating flow 20 Central heating return 1 7 Layout ...

Page 9: ...0 1 Losses from stack with burner on 1 9 Heat loss in standby mode Pstby 34 W Annual energy consumption QHE 107 GJ Noise level sound power LWA Max 51 dB A LWA Min 43 dB A Emissions NOx NOx referred to HCV 29 mg kWh Emissions at max min heat input G20 CO2 9 15 CO 5 10 ppm Flue gas T 71 55 C Emissions at max min heat input G25 CO2 referred to HCV 9 2 9 15 CO 4 10 ppm Flue gas T 59 55 C Pressure in c...

Page 10: ...CH pump 9 Non return valve 10 CH expansion vessel 11 CH circuit drain cock MI1 First direct zone flow MI2 Second direct zone flow accessory MB Storage cylinder delivery accessory RI1 First direct zone return RI2 Second direct zone return accessory RB Storage cylinder return accessory GAS Gas supply 12 Condensate drain siphon 13 Flue gas exhaust pipe 14 Air intake pipe 1 9 Water circuit ...

Page 11: ... Safety thermostat temperature sensor 3 Control temperature sensor 4 Flue gas temperature sensor 5 Flue gas thermostat 3 4 5 1 2 9 9IMPORTANT LEAVE THE SENSORS IN THEIR ORIGINAL POSITIONS EVEN IF THE BOILER IS CONFIGURED FOR USE IN A CASCADED SYSTEM 1 10 Positioning the temperature sensors ...

Page 12: ...rate Curves are referred to a water density of 983 2 Kg m3 a temperature of 20 C and a kinematic viscosity of 0 474 mm2 s 0 474 cSt PUMP CURVE TECHNICAL SPECIFICATIONS DESCRIPTION ERP ready 2015 Electrical consumption 53 W EEI Part 3 0 20 P L Avg 24 W Minimum pressure at pump suction inlet 0 5 bar Energy efficiency index according to ERP 2015 Commission regulations 641 2009 and 622 2012 Average an...

Page 13: ...1 green and LED 2 yellow both lit Low load 0 25 LED 1 green and LEDs 2 3 yellow all lit Low medium load 25 50 LED 1 green LEDs 2 3 4 yellow all lit Medium high load 50 75 LED 1 green LEDs 2 3 4 5 yellow all lit High load 75 100 PUMP LOAD CURVE 100 75 50 25 Functioning mode A Performance display When the pump is functioning LED 1 is green The four yellow LEDs indicate the instantaneous power draw a...

Page 14: ...ontrol while LEDs 4 and 5 show the currently selected curve 1 2 3 or 4 All these LEDs are yellow in colour LED 1 LED 2 LED 3 LED 4 LED 5 Curve 1 4 m Curve 2 5m ON Curve 3 6m ON ON Curve 4 7m ON B Button lock function The button lock function serves to prevent improper use or accidental changes to pump settings When the button lock is active pressing the button has no effect This prevents users fro...

Page 15: ...L 2 N1 3 N 4 PE 5 FILTRO 6 3A C1 L3 C1 N C1 PE C1 L1 C1 L2 M9 M8 M7 M6 M5 M4 M20 M21 M10 M11 M 1 TAC 2 PE 3 DCV PVM 4 5 L1 N PE M1 M2 M3 FI FU Electrical connections to be made by the heating engineer IG PI PB Sb TF Pcaldaia Sm SE SCH2 SCH1 VE1 H2 TS Treg A B C D E F G TR1 ER EA Sr Sf L1 L2 PE N L3 L1 L2 PE N L3 PE N L3 TA 230 Vac VG1 230V 50Hz Pa Pa Fan PWM TA Room thermostat low voltage 24V FU F...

Page 16: ... N N N N PE PE PE PE PE PE PE PE M M M M M M M M CL CL CL CL CL CL CL CL G G SCH3 SCH4 DB LPB MB LPB LMU Clip in communication card L 230V N 230V L P1 N P1 C val C comun A val NTC 10K NTC 10K SCH5 PI1 VM1 SI1 B1 M SCH3 RVS control card SCH4 Room unit control card SCH5 Mixed zone interface card clip in Pl1 Additional mixed zone pump VM1 Mixer valve for additional zone SI1 CH flow temperature sensor...

Page 17: ...ld keys 3 and 4 for between 3 and 6 seconds to enter chimney sweep mode 7 Parameter selection keys 8 Parameter selection keys 9 Value decrement increment keys 10 Value decrement increment keys 11 Info key 12 Display 13 Functioning mode selection button A line appears under the symbols s Automatic the boiler functions according to the set program o Daytime the boiler operates at daytime comfort set...

Page 18: ...setpoint or CH mode active c Outdoor temperature o Daytime CH mode l Night time CH mode f Flame detected n Error E Small numeric display Displays time parameters and error codes F Central heating modes s Automatic the boiler functions according to the set program o Daytime the boiler operates at daytime comfort setpoint l Night time the boiler operates at night time reduced setpoint b Stand by G D...

Page 19: ...on function is only active if an outdoor temperature sensor is connected If outside temperature drops below 5 C the pumps are switched on If outside temperature is between 4 and 1 5 C the pumps are switched on for 10 minutes at intervals of 6 hours If outside temperature is above 1 5 C the pumps are switched off Overtemperature dispersal function If the tem perature threshold thermostat trips 86 C...

Page 20: ...ls Key Explanation 1 D U Press one of these keys to access the END USER programming level 2 D U Press one of these keys until you reach the parameter you require the example here shows the parameter Pxx 3 Press these keys to change the current value To memorise the new value you need to move on to another parameter 4 MV Press one of these keys to exit the end user programming level Any new setting...

Page 21: ...vel Any new settings are not stored in memory 6 I Press this key to exit the end user programming level Any new settings are stored in memory Note 1 If no key is pressed for about 8 minutes the display automatically returns to the main screen Any new settings made will not be saved Note 2 any changes are saved if you switch to another programming level MANUFACTURER LEVEL Parameters in this level m...

Page 22: ... key to exit the manufacturer programming level Any new settings are stored in memory Note 1 If no key is pressed for about 8 minutes the display automatically returns to the main screen Any new settings made will not be saved 1 15 Information levels BASIC INFORMATION LEVEL Press the Ikey to enter the basic information level Press the Ikey again to scroll through the values listed below Key Explan...

Page 23: ...ntilation at pre ventilation level 22 Home run 99 Burner lockout error code displayed Home run Boiler status after reset EXTENDED INFORMATION LEVEL 1 temperatures Press the I key Press and hold both D Ukeys for at least 3 seconds Press one of the keys until you reach the required parameter Temperature Nr Description b 0 Control board error code b 1 Boiler return temperature b 2 Not used b 3 Flue g...

Page 24: ...C 6 Differential control C 7 Reserved C 8 Reserved C 9 Reserved EXTENDED INFORMATION LEVEL 3 assistance Press the Ikey Press and hold both D Ukeys for at least 3 seconds Press the Ukey twice Press one of the keys until you reach the parameter you require Assistance Nr Description d 0 Reserved d 1 Two stage or modulating control setpoint PID d 2 Current boiler setpoint d 3 Room temperature setpoint...

Page 25: ...LER 2 1 Unpacking the product 2 2 Opening Remove the wooden crate 1 Remove the polystyrene edge protectors 2 Pull off the protective bag 3 Material supplied in the bag inside the boiler Outdoor temperature sensor Torx key for calibrating combustion parameters Gas change diaphragm Plug for control panel 9 9Keep all the packaging material safe Do not throw it away or abandon it as it represents a po...

Page 26: ...e boiler room Pull the front panel towards you then lift it up to remove it Unscrew the screws 1 securing the boiler to the pallet 2 Insert two pipes 3 of suitable length through the lifting holes so that they protrude equally on both sides Use the protruding lengths of pipe as lifting handles ROTATE LIFT 1 1 2 3 2 3 Dimensions and weight ...

Page 27: ...quiring modernisation 0 8 m 0 8 m 1 m 1 m L H P NOTE See the table on the previous page for boiler di mensions When installing these boilers in older systems or systems requiring modernisation always perform the following checks Make sure that the flue is able to withstand the temperature of the combustion gases and that it has been designed and made in compliance with applicable standards The flu...

Page 28: ...r 8 weeks of functioning General note on water used to top up systems If softened water is used to top up a system 8 weeks of functioning after topping up verify that the water in the system respects the above limits in particular for electrical conductivity This check is not necessary if demineralised water is used to top up the system 2 7 Water in heating circuits INTRODUCTION Water used in cent...

Page 29: ...in the tube heads and in the joins of tube bundles These parts of the boiler can therefore be affected by micro corrosion caused by the electrochemical poten tial difference created between the metal parts in con tactwith impurities and othermetal parts around them 3 2 Stray current corrosion Stray current corrosion is caused by the different electri cal potentials of the water in the boiler and t...

Page 30: ...Central heating flow 2 Central heating return 1 3 Condensate drain siphon Ø 20 4 Flue gas exhaust Ø 80 5 Air intake Ø 80 2 8 Water connections TAU UNIT boilers are designed and made for installation in combined central heating and domestic hot water produc tion systems The water fittings have the following specifications ...

Page 31: ...MIXED CIRCUIT 1 1 1 2 1 1 6 1 Isolating valve 2 High temperature heating system user points 3 Softener filter 4 Pressure reducer 5 Drain 6 Low temperature heating system user points TYPICAL WATER SYSTEM SCHEMATICS TAU UNIT basic configuration TAU UNIT configuration with accessory kit installed ...

Page 32: ...the boiler to prevent products of combustion escaping into the room during the first few minutes of boiler functioning 9 9Condensate from the boiler and from the flue should be channelled to the same drain point 9 9The surface on which the boiler stands must be perfectly horizontal and flat over the entire area of the boiler frame in order to avoid condensate drai nage problems 9 9Any condensate n...

Page 33: ...utralisation unit If it ever proves necessary to neutralise the condensate that forms in the flue gas stack connect the condensate drain fittings of the boiler and flue gas stack together using a T union and connect the leg of the T to the inlet of the N2 or neutralisation unit 9 9Make sure that you tighten the hose clamps suffi ciently B C A N2 9 9All connecting hoses must be kept as straight and...

Page 34: ...ondensate discharge Hoses should also be fixed to the floor and suitably protected whenever possible MAINTENANCE The neutralisation unit should be serviced at regular in tervals at least once a year or as needs require The frequency of servicing depends on the characteristics of the system When servicing the unit always check the level of the granulate The minimum granulate level is 15 cm below th...

Page 35: ...d by the burner The gas feed system must also be equipped with all the necessary safety and control devices required by applicable legislation and standards 9 9On completion of the installation check that all joints are sealed TAU 35 UNIT A 1290 B 43 Gas fitting Ø 1 2 M B A TAU UNIT condensing boilers are equipped with an elec tronic frost protection system This system starts up the boiler if temp...

Page 36: ...iances co okers other boilers etc Larger disused flues can nevertheless be used as ducts for routing the boi ler s intake and vent flues 9 9If the vertical section of vent flue is over 4 metres in height a condensate drain must be provided at its bottom This drain point must be connected to the boiler s own condensate collection tank described in the Draining the condensate section 9 9The horizont...

Page 37: ... pole magnetic thermal trip switch and disconnector conforming to IEC EN standards with a contact gap of at least 3 mm 2 Respect the L1 Phase N Neutral and PE ground connections Keep the ground wire about 2 cm longer than the power wires 3 Use cables with a cross section of 1 5 mm2 or more complete with end terminals 4 Always refer to the electrical wiring diagrams in this manual when performing a...

Page 38: ...0 21 STORAGE CYLINDER TEMPERATURE SENSOR accessory Terminals 18 19 1 2 3 4 5 6 7 8 9 10 11 PE N L1 PE N L1 N L1 PE N L1 T reg PB PI1 ALARM The control panel terminal strip 9 9If a storage cylinder is present the storage cylinder temperature sensor must be located according to the instruc tions provided with the storage cylinder 9 9For information on how to connect up additional kits refer to the i...

Page 39: ...25 holes for the expansion plugs Fix the sensor casing to the wall using the two expansion plugs provided Unscrew the nut on the cable guide and insert a two core cable with cross section between 0 5 and 1mm2 not supplied to connect the sensor to terminals 20 and 21 in the boiler see diagram on previous page Connect the two wires of the cable to the sensor terminals Polarity is irrelevant Tighten ...

Page 40: ...ting circuit shut off cocks Close the non return valve 2 See the figure to ascertain the correct position for the dot on the screw NOTE The system is de aerated automatically through the vent valves providedv 2 17 Filling and draining the system 1 DRAINING Switch the electricity supply OFF at the system s main switch and at the control panel before starting to empty the boiler Close the shut off c...

Page 41: ...s correctly pre charged Check that the electrical connections have been made correctly Check that the vent and air intake pipes have been correctly installed and connected 9 9If you need to convert the boiler from METHANE to LPG contact r s Technical Assistance Service Switch the electricity supply ON at the system s main switch and at the control panel The boiler switches on and the display shows...

Page 42: ... Manufacturer level section Press the Rkey Press the keys to adjust the setpoint Pressanyofthekeystoexit R T M V The new setting is stored in memory If the remote storage cylinder has its own thermostat leave the manufacturer level parameter 558b2 1 see the Manufacturer level section If an outdoor temperature sensor is installed set installer parameter 532 Heating curve slope he ating circuit 1 as...

Page 43: ... timer setting is changed Make sure that all the pumps in the system are free and rotate in the right direction Turn the main power switch OFF and make sure that the boiler shuts down completely Provided all the above conditions are satisfied start the boiler up again then analyse the combustion fumes To do so insert the combustion analysis probe into the socket in the flue gas vent fitting 1 3 3 ...

Page 44: ...onnected If outside tem perature drops below 5 C the pumps are switched on If outside temperature is between 4 and 1 5 C the pumps are switched on for 10 minutes at intervals of 6 hours If outside temperature is above 1 5 C the pumps are switched off If the boiler is not going to be used for an extended pe riod of time proceed as follows to prepare it for shut down Turn the control panel power swi...

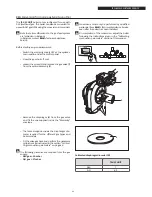
Page 45: ...e display reads out the current boiler temperature To set combustion parameters for maximum and minimum power press and hold the T and Rkeys simultaneously for over 6 seconds The boiler enters fan speed control mode Press the Ukey The fan switches to maximum speed Insert the combustion analysis probe into the socket 1 in the flue gas vent fitting Set the CO2 level by turning the adjuster screw 2 o...

Page 46: ...Once the adjustments are complete the combustion parameters should be as specified in the tables below 4 CO2 values for functioning at MINIMUM POWER TAU 35 UNIT G20 9 15 G31 9 90 Press Vor Mto return to normal functioning mode Once all adjustments have been made Carefully screw the plug back on the combustion analysis socket Fit the top panel back on 9 9Adjustments must only be performed by the R ...

Page 47: ...ve the higher the flow temperature setpoint at low outdoor temperatures see Manufacturer parameter 532 20 30 40 50 60 70 80 90 S 2 S 10 S 20 Tm Tec 20 15 10 5 0 5 10 15 20 Heating curves with room temperature setpoint 20 C Tm CH flow temperature Tec Compound outdoor temperature S Slope If the room setpoint is reduced these curves shift downwards Sa 10 C Sa 20 C 20 30 40 50 60 70 80 90 20 15 10 5 0...

Page 48: ...nd outdoor temperature for light duty buildings Compound outdoor temperature is calculated from effective outdoor temperature and attenuated outdoor tempe rature It is calculated at 10 minute intervals on the basis of effective outdoor temperature and directly determines Summer Winter mode switching par 516 13 14 15 16 17 0 0 8 1 0 0 6 0 0 0 6 0 0 0 8 1 18 00 t Te Tea C Attenuated outdoor temperat...

Page 49: ...r setpoint Parameter 555 b2 lets you specify whether a room thermostat or a timer thermostat is connected to the TA terminals In the first case room thermostat the boiler switches off when the contacts open In the second case timer thermostat the reference curve will be that determined by the reduced room temperature setpoint that has just been set SETTING CENTRAL HEATING PARAMETERS If a remote st...

Page 50: ...rna tes between displaying the time display and the error code Press the Ikey to display the error code on the main display Press and hold the U and Dkeys simulta neously for 3 seconds The internal error code is displayed Press the Ikey to access the information le vel Press the V or Mkey to return to the main screen ...

Page 51: ...tdown Example E154 Press the Ikey to display the error code on the main display Press and hold the U and Dkeys simulta neously for 3 seconds The internal error code is displayed Example 435 Press the Ikey to access the information le vel Press the V or Mkey to return to the main screen Note Once you have eliminated the cause of the error press Sto reset the boiler ...

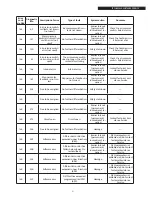
Page 52: ...rentiation Burner lockout permanent Lockout reset re quired Check replace tempera ture sensor 28 152 Flue gas sensor error Short circuit in tempera ture sensor Message Check replace flue gas temperature sensor 28 153 Flue gas sensor error Temperature sensor faulty Message Check replace flue gas temperature sensor 28 507 Flue gas sensor error Temperature reading not plausible Safety shutdown Check ...

Page 53: ...k replace tempera ture sensor 52 148 DHW 2 sensor error Short circuit in DHW tem perature sensor B3 Message Check replace tempera ture sensor 52 149 DHW 2 sensor error DHW temperature sensor B3 faulty Message Check replace tempera ture sensor 61 126 Room unit 1 error No further differentiation Message Check replace room unit room temperature sensor 61 382 Room unit 1 error No further differentiati...

Page 54: ...ressure switch 78 510 Water pressure sensor error not used Water pressure too high or too low or reading not plausible Burner lockout permanent Lockout reset re quired Check replace water pressure switch 78 511 Water pressure sensor error not used Reading not plausible Safety shutdown Check replace water pressure switch 81 518 LPB communication error LPB circuit short circuited or not powered Mess...

Page 55: ...ulty Message Contact Technical Assi stance Service 92 490 Electronic device errors CH flow switch input faulty Message Contact Technical Assi stance Service 92 491 Electronic device errors Dynamic ignition output faulty Message Contact Technical Assi stance Service 95 538 Invalid date Internal LMU clock invalid Message Contact Technical Assi stance Service 100 520 Two master clocks found Two maste...

Page 56: ...down Check the water pres sure check the system check replace the tem perature sensor 117 537 Water pressure too high inactive dpH2OmaxPuOn parame ter maximum permissible pressure differential after pump start up exceeded Safety shutdown Check the water pres sure check the system check the pressure switch 118 513 Water pressure too low inactive Water pressure is below the value set in the PH2O Abs...

Page 57: ... incor rectly toggles repeatedly between open and closed position or fan speed is too high Safety shutdown Check the air pressure switch check the air in take pipe check the fan 129 80 Comburent air system error The air pressure switch has been closed incor rectly toggles repeatedly between open and closed position or fan speed is too low Safety shutdown Check the air pressure switch check the air...

Page 58: ...k the system pres sure 132 94 Water pressure switch tripped The pressure switch has been configured as a switch that prevents start up FaEinstellFlags2 and the switch is open during safety time Start up pre vented for two hours Safety shutdown Check the system pres sure 132 285 Water pressure switch tripped Shutdown at wrong time The error masking time has been interrupted Safety shutdown Check th...

Page 59: ...QAA Generic error Check the system Return temperature too high 154 401 Generic error The boiler return tempe rature is above or equal to the boiler temperature Sd_RL_groesser_VL 2K Safety shutdown OEM parameter not edi table via QAA Generic error Check the system Return temperature too high 154 402 Generic error No further differentiation Safety shutdown Undefined software error 154 404 Generic er...

Page 60: ...or HMI flow temperature is TkSnorm Message Installer parameter 505 Check system boiler setpoint 154 478 Generic error HMI room temperature setpoint is TrSim Message Installer parameter 501 Check system zone setpoint 154 479 Generic error HMI room temperature setpoint is TrSim Message Installer parameter 501 Check system zone setpoint 154 498 Generic error Water schematic with CH circuit 2 and room...

Page 61: ...nical Assi stance Service 169 362 Free to be assigned No further differentiation Safety shutdown 169 Free to be assigned No further differentiation Safety shutdown 169 373 Free to be assigned No further differentiation Burner lockout permanent Lockout reset re quired 169 375 Circuit open Circuit open Burner lockout permanent Lockout reset re quired Contact Technical Assi stance Service 169 586 Fre...

Page 62: ...de switched to pro gramming mode PC tool Safety shutdown Check programming mode parameter tran sfers 183 105 Control board in pa rameter setting mode Unit in programming mode PC tool Burner lockout permanent Lockout reset re quired program ming mode Check programming mode parameter tran sfers 183 279 Control board in pa rameter setting mode Request for programming via OT bus Safety shutdown Check ...

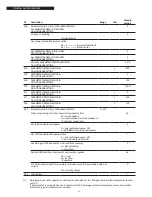
Page 63: ...inder 31 Time program DHW 1st phase on 00 00 24 00 hh mm 06 00 32 Time program DHW 1st phase off 00 00 24 00 hh mm 22 00 33 Time program DHW 2nd phase on 00 00 24 00 hh mm 24 00 34 Time program DHW 2nd phase off 00 00 24 00 hh mm 24 00 35 Time program DHW 3rd phase on 00 00 24 00 hh mm 24 00 36 Time program DHW 3rd phase off 00 00 24 00 hh mm 24 00 45 Standard time programs for HC and DHW No Yes N...

Page 64: ...tic Summer Winter switching temperature THG 30 C switching disabled 8 30 C 20 520 PARAMETER FIXED IN THIS MODEL DO NOT CHANGE SETTING 10 532 Slope for heating circuit 1 1 40 20 533 PARAMETER FIXED IN THIS MODEL DO NOT CHANGE SETTING 10 534 Change room temperature setpoint for CH circuit 1 31 31 K 0 535 PARAMETER FIXED IN THIS MODEL DO NOT CHANGE SETTING 0 629 Maintenance alarm display 0 1 disabled...

Page 65: ...etpoint boiler temperature par 517 the minimum pause time after burner shutdown is interrupted 0 90 K 30 519 External design temperature 50 20 C 5 520 PARAMETER FIXED IN THIS MODEL DO NOT CHANGE SETTING 10 532 Slope for heating curve 1 1 40 20 533 PARAMETER FIXED IN THIS MODEL DO NOT CHANGE SETTING 10 534 Room temperature setpoint adjustment for CH circuit 1 31 31 K 0 535 PARAMETER FIXED IN THIS M...

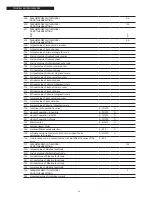
Page 66: ...O NOT CHANGE SETTING s 300 596 PARAMETER FIXED IN THIS MODEL DO NOT CHANGE SETTING s 120 604 Parameter with 8 bits b7b6b5b4b3b2b1b0 0 255 b1b0 Functioning of control board or local system time 00 00 Independent 01 Slave without remote adjustment 10 System master time b2 LPB bus distributed power 0 0 bus distributed power OFF 1 AUTOMATIC bus distributed power b3 LPB bus distributed power status 1 0...

Page 67: ...9 PARAMETER FIXED IN THIS MODEL DO NOT CHANGE SETTING 0 1 no acknowl acknowl 0 630 PARAMETER FIXED IN THIS MODEL DO NOT CHANGE SETTING b0 b1 b7 0 255 0 633 Maintenance alarm repeat period after initial display 0 255 days 0 634 Hours of functioning since last service 0 10000 h 0 635 Number of burner ignitions since last service 10000 0 636 Number of months since last service 0 255 months 0 647 Ioni...

Page 68: ... of lockout phase 714 5th past value of internal diagnostic code 715 Current value of lockout code counter 716 Current value of lockout phase 717 Current value of internal diagnostic code 718 Total hours of operation burner 0 131070 h 719 Hours of operation in heating 0 131070 h 720 Hours of operation in DHW 0 131070 h 721 Hours of operation of zone 0 131070 h 722 Start counter 0 327675 h 723 Aver...

Page 69: ...ly 2 Remove the diaphragm 4 from the gas valve and fit the one supplied inside the Warranty envelope The table alongside shows the diaphragm dia meter required for the different gas types and boiler models Fit the valve gas back and perform the necessary calibrations as instructed in the section Calibra ting combustion parameters on page 46 9 9The following pressures are required from the gas supp...

Page 70: ...SISTANCE SERVICE Apply the adhesive label 6 for G31 gas supplied with the conversion kit inside the boiler casing and remove the old G20 gas label 6 9 9Oncompletionofkitinstallation checkthetightnessofallthejointsmade ...

Page 71: ...mpletion of maintenance the original settings must be restored and combustion fumes analysed to verify correct functioning Proceed as follows to remove the burner Remove the front panel and the top panel from the boiler Unscrew the nut 1 securing the gas feed pipe to the gas valve 2 Loosen the hose clamp 3 and remove the air in take pipe 4 Pull the hose 5 off the pressure measurement union on gas ...

Page 72: ...lame de tection sensor according to the figure below Replace if damaged or worn 9 9It is essential to respect the dimensions in the fi gure 8 2 4 0 1 6 3 Remove the front panel from the boiler and loca te the condensate drain siphon 1 Remove the spring clip 2 detach the corrugated condensate drain hose and remove the siphon Unscrew the two caps 3 to disassemble the siphon Remove the float 4 and cl...

Page 73: ... Assistance Air intake obstructed Check for blockage The burner shuts down after pre ventilation because the flame fails to ignite Gas valve feeds too little gas Check gas supply pressure Gas valve faulty Call Technical Assistance Weak or no ignition arc Call Technical Assistance Air in gas line Bleed the gas feed circuit The burner does not start when it receives the control signal No electrical ...

Page 74: ...boiler reaches the set tem perature but the radiators are still cold Air in the circuit Bleed the circuit Pump malfunctioning Unseize the pump Change the pump The boiler does not reach its tem perature setpoint Burner dirty Clean the combustion chamber Insufficient air fuel flow to burner Check and adjust the burner Incorrect boiler temperature setpoint Check the temperature setting Burner locks o...

Page 75: ...ago VR Tel 0442630111 Fax 044222378 www riello it As part of the company s ongoing commitment to perfecting its range of products the appearance dimensions technical data equipment and accessories may be subject to variation ...

Reviews: