Digital Video Recorder
23
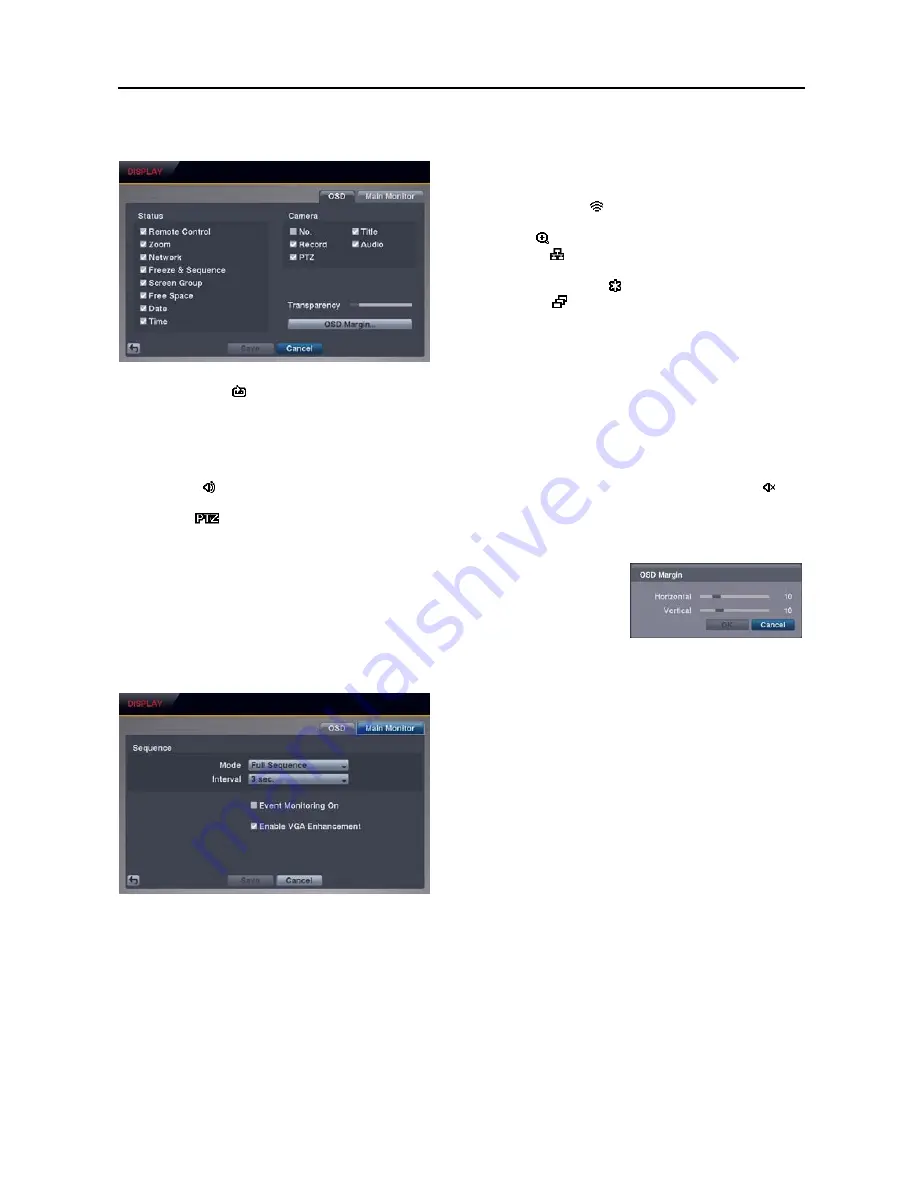
OSD Settings (DISPLAY
OSD Tab)
Status/Camera
: Check each OSD item box to turn it On
or Off.
Remote Control
– The icon displays when the DVR can be
controlled using the infrared remote control.
Zoom
– The icon displays on the enlarged video.
Network
– The icon displays when the unit is connected to
a network via Ethernet.
Freeze & Sequence
– The icon displays while in the Freeze
mode, and the icon displays while in the Sequence mode.
Screen Group
– The screen group number displays when the
DVR is in other than the 4x4 display mode for the 16-channel
DVR, 3x3 mode for the 8-channel DVR, and 2x2 mode for
the 4-channel DVR.
Free Space
– The icon displays when the DVR is in the Recycle mode. The percentage of available storage space displays
when the DVR is not in the Recycle mode.
Date/Time
– The current date and time information displays.
Camera No.
– The camera number displays in the top-left corner of each camera screen.
Camera Title
– The camera title displays in the top-left corner of each camera screen.
Record
– The record related icons display on each camera screen.
Audio
– The icon displays on the camera screen for which the DVR can play live audio on the local system, and the icon
displays on the camera screen for which the DVR is sending audio to a PC running Netcon or WebGuard.
PTZ
– The
icon displays on each PTZ camera screen with PTZ capabilities.
Transparency
: Adjust the transparency of the setup screens by using the slide bar.
OSD Margin…
: Set the Horizontal and Vertical margins so that text and icons will
display within the edges of the monitor.
Main Monitor Settings (DISPLAY
Main Monitor Tab)
Sequence – Mode
: Select the sequence mode between
Full Sequence and Cameo Sequence. (8- and 16-channel
Model Only) Selecting the
Sequence
menu icon at the top
of the screen or pressing the
SEQUENCE
button on the
remote control causes the DVR to sequence cameras. The
DVR can sequence cameras in two modes: “Full” and
“Cameo.” In the Full mode, the DVR sequences through
the cameras with predefined screen layouts. In the Cameo
mode, the bottom right window of a multi-screen format
sequences through the cameras. See
Chapter 3 – Operation,
Live Monitoring
for details.
NOTE: You can define the screen layout in a variety of formats and set the DVR to sequence through the
different screen layouts (pages) so that all the cameras will be displayed. You also can set up the DVR to
display one camera or a group of cameras all the time while cycling through the remaining cameras in a “cameo”
window. This can be done with one camera displayed full screen while displaying the cameo window as a
PIP (picture-in-picture), or displaying the cameras in a grid pattern with the bottom right window as the cameo.
NOTE: Sequence cannot be used in the 4x4 display mode of the 16-channel DVR, 3x3 mode of the 8-channel
DVR, or 2x2 mode of the 4-channel DVR.
Sequence – Interval
: Select the display dwell time of sequence monitoring.
Event Monitoring On
: Selecting the box turns the Event Monitoring On. When it is On, the DVR will display the
camera associated with the event when an event occurs. See
Chapter 3 – Operation, Live Monitoring
for details.
Summary of Contents for R4-8-16DVR2
Page 1: ......
Page 2: ......
Page 3: ......
Page 4: ......
Page 8: ...User s Manual iv...
Page 53: ......
Page 54: ......
Page 56: ...User s Manual ii...
Page 58: ...User s Manual 2...
Page 63: ...Netcon Remote Administration System 7 14 Click Finish to complete the MSXML installation...
Page 64: ...User s Manual 8...
Page 86: ...User s Manual 30...
Page 96: ...User s Manual 40...


