background image

 Important information

v

• Ensure that someone is present at the helm AT ALL TIMES, to take manual 

control in an emergency.

• Make sure that all members of crew know how to disengage the autopilot.

• Regularly check for other boats and any obstacles to navigation – no matter 

how clear the sea may appear, a dangerous situation can develop rapidly.

• Maintain an accurate record of the boat’s position by using either a naviga

tion aid or visual bearings.

• Maintain a continuous plot of your boat’s position on a current chart. Ensure 

that the locked autopilot heading will steer the boat clear of all obstacles. 

Make proper allowance for tidal set – the autopilot cannot.

• Even when your autopilot is locked onto the desired track using a navigation 

aid, always maintain a log and make regular positional plots. Navigation sig

nals can produce significant errors under some circumstances and the autopi

lot will not be able to detect these errors.

EMC installation guidelines

Raymarine equipment and accessories are designed to the best industry 

standards for use in the recreational marine environment.
Their design and manufacture conforms to the appropriate Electromagnetic 

Compatibility (EMC) regulations, but correct installation is required to ensure that 

performance is not compromised. 
The guidelines given here describe the conditions for optimum EMC performance, 

but it is recognized that it may not be possible to meet all of these conditions in all 

situations. To ensure the best possible conditions for EMC performance within the 

constraints imposed by any location, always ensure the maximum separation 

possible between different items of electrical equipment.
For 

optimum

 EMC performance, it is recommended that 

wherever 

possible

:

• Raymarine equipment and the cables connected to it are:

• At least 3 ft (1 m) from any equipment transmitting or cables carrying 

radio signals e.g. VHF radios, cables and antennas. In the case of SSB 

radios, the distance should be increased to 7 ft (2 m).

• More than 7 ft (2 m) from the path of a radar beam. A radar beam can nor

mally be assumed to spread 20 degrees above and below the radiating 

element.

• The product is supplied from a separate battery from that used for engine 

start. Power supply voltages below the minimum specified for a product, and 

starter motor transients, can cause the product to reset. This will not damage 

81282_1.book  Page v  Monday, October 2, 2006  1:58 PM

Summary of Contents for SmartPilot S1 Tiller Pilot

Page 1: ...SmartPilot Series S1WheelPilot S1 TillerPilot CommissioningGuide Documentreference 81282 1 Date Sept2006 81282_1 book Page 1 Monday October 2 2006 1 58 PM ...

Page 2: ...rtPilot are registered trademarks of Raymarine Ltd Raymarine SmartPilot AST Advanced Steering Technology AutoAdapt AutoLearn AutoRelease AutoSeastate AutoTack AutoTrim FastTrim GyroPlus RayGyro RayPilot and WindTrim are trademarks of Raymarine Ltd 81282_1 book Page 2 Monday October 2 2006 1 58 PM ...

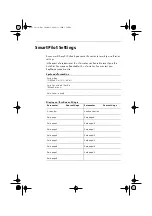
Page 3: ...________________ Date Commissioned _______________________________________ Parameter Yoursettings Parameter Yoursettings DisplayBar _______________ HeadingSelection _______________ Datapage 1 _______________ Data page9 _______________ Datapage 2 _______________ Data page10 _______________ Datapage 3 _______________ Data page11 _______________ Datapage 4 _______________ Data page12 _______________ ...

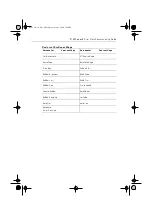
Page 4: ...___________ GybeInhibit _______________ Rudder Alignment _______________ WindType _______________ Rudder Limit _______________ WindTrim _______________ Rudder Gain _______________ Cruise Speed _______________ CounterRudder _______________ AutoAdapt _______________ Rudder Damping _______________ Latitude _______________ AutoTrim _______________ Variation _______________ Response Gyro Non Gyro _____...

Page 5: ...informationaboutyourautopilot Note Thishandbookcontainsimportantinformationabouttheinstallationandcommis sioningofyournewRaymarineproduct Atthebackthereisanindexandglossaryofterms Togetthe best fromtheproductplease readthishandbook thoroughly SmartPilotcontrollercompatibility TheSmartPilotS1WheelandTillersystems are suppliedwiththe ST6002 controllerasstandard The systemsarealsocompatible withthefo...

Page 6: ...lsafety Makesurethepowersupplyisswitchedoffbeforeyoumakeany electricalconnections WARNING Potentialignitionsource Containsapossiblesourceofignition NOTprotectedforusein enginecompartments WARNING Calibrationrequirement Wesupplythisproductcalibratedtodefaultsettingsthatshould provideinitialstableperformanceformostboats Toensure optimumperformanceonyourboat youmustcomplete Chapter 2 WARNING Navigati...

Page 7: ...eirdesignandmanufactureconformstothe appropriate Electromagnetic Compatibility EMC regulations butcorrectinstallationisrequiredtoensurethat performanceisnotcompromised TheguidelinesgivenheredescribetheconditionsforoptimumEMCperformance butitisrecognizedthatitmaynotbepossibletomeetalloftheseconditionsinall situations ToensurethebestpossibleconditionsforEMCperformancewithinthe constraintsimposedbyan...

Page 8: ...rine unit WastefromElectricalandElectronicEquipment WEEE Directive TheWastefromElectricalandElectronicEquipment WEEE Directiverequiresthe recyclingofwasteelectricalandelectronicequipment WhilsttheWEEEDirective doesnotapplytosomeofRaymarine sproducts wesupportitspolicyandaskyou tobe awareofhow todisposeofthisproduct Thecrossedoutwheeliebinsymbol illustratedabove andfoundonourproducts signifiesthatt...

Page 9: ...thePowerandtheDriveunit 5 Grounding the SmartPilot 7 1 5 FuseProtection 8 1 6 How toconnectSmartPilotsystemelements 8 Securing the Cables 9 1 7 How toconnectSeaTalkequipment 9 Single control unit single power supply 9 Isolated control unit single power supply S2 and S3 computers only 10 Separate SmartPilot computer and instrument power 10 WARNING Use correct fuse 10 Connecting SeaTalk or NMEA comp...

Page 10: ...tep3 Check the autopilotoperatingsense 21 Check the rudder position sensor 21 Check the autopilot steering sense 22 Step4 AdjustkeySmartPilotsettings 22 Enter Dealer Calibration mode 23 Set the vessel type 23 Set the drive type 25 Align the rudder position sensor 26 Set the rudder limits 26 Save the new settings 26 2 2 SeatrialCalibration 27 Seatrialsafety 27 Calibratingthecompass 28 Initial proce...

Page 11: ...n 45 Dealer Calibrationscreensandsettings 47 SeaTrial Calibration lock 47 Vessel type 47 Drive type 48 Align rudder 48 Rudder limit 49 Rudder gain 49 Counter rudder 49 Rudder damping 50 AutoTrim 50 Response level 51 Turn rate limit 51 Off course warning angle 52 Joystick mode PWR STEER 52 AutoRelease I O drives only 53 AutoTack angle 53 Gybe inhibit 53 Wind selection 54 WindTrim wind response 54 C...

Page 12: ... 59 SmartPilotalarmmessages 60 4 2 Maintenance 62 EMC servicingandsafetyguidelines 62 Productsupport 63 World wide web 63 Telephone help line 63 Help us to help you 63 SmartPilot Specifications 65 WARNING Potential ignition source 66 Glossary 67 Index 69 81282_1 book Page x Monday October 2 2006 1 58 PM ...

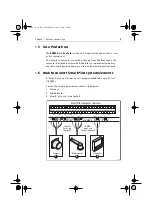
Page 13: ... 1 Beforeyoustart Ensurethe followingcoreelementsofthesystemhave beenfittedinaccordance withthesuppliedinstallationguides Compass Rudderreference S1WheelPilotonly SmartPilotcomputer SmartPilotcontroller ST6002 suppliedasstandard WheelorTillerdriveunit Theremainderof thischaptercoverstheconnectionoftheseunits 81282_1 book Page 1 Monday October 2 2006 1 58 PM ...

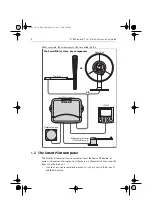
Page 14: ...t system Itprocessesinformationfromthesensorsinthesystemsoitcansteerthe boatusingthe drive unit itcontainsamicroprocessorandelectroniccircuitrytocontrolthedriveunit andthedrivemotor OR OR Tiller drive SmartPilot computer ST6002 Fluxgate compass Rudder position sensor S1 WheelPilot only Wheel drive D9319 1 The SmartPilot system key components 81282_1 book Page 2 Monday October 2 2006 1 58 PM ...

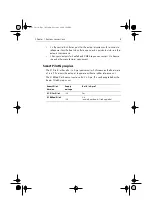
Page 15: ...eandothermanufacturer sequipment SmartPilotGyroplus TheS1TillerPilothas abuiltinGyro yawsensor whichmeasuresthe boat srate of turn This allowstheautopilottooperatewithoutarudderreferenceunit TheS1WheelPilotdoesnotcontainabuilt inGyro Thiscanbeupgradedwitha dealer fittedGyroplusunit SmartPilot Version Supply voltage Built inGyro S1TillerPilot 12 V Yes S1 WheelPilot 12 V No available as dealer fitte...

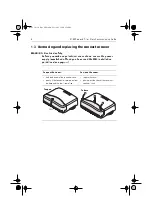
Page 16: ... supplyisswitchedoffandyouhavereadtheEMCinstallation guidelines see page v To open the cover To close the cover holdthebottomoftheconnectorcover gentlylift theconnectorcoverawayfrom thebaseandthelidwillcomefree replacethecover gentlypressthesidesofthecoveruntil youhearitclick PULL D6385 1 To open 1 2 2 To close D6386 1 81282_1 book Page 4 Monday October 2 2006 1 58 PM ...

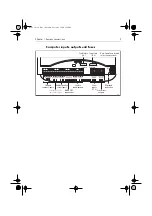
Page 17: ...s Rudder position sensor inputs External GyroPlus yaw sensor inputs SeaTalk inputs outputs Power inputs 12 V RF ground connection NMEA 0183 input ouput Drive motor outputs D9321 1 SeaTalk fuse 2 A Power fuse 10 A Note Spare fuses located in the connector cover 81282_1 book Page 5 Monday October 2 2006 1 58 PM ...

Page 18: ...causeyourSmartPilotto malfunctionandwillreducethepowersuppliedtothedriveunit Ensurethecorrectsizeisusedandifindoubt useaheaviergauge cable OR OR Tiller drive SmartPilot computer Power Power Wheel drive D9322 1 Connecting the power and the Drive Unit Boat s electrical distribution panel 81282_1 book Page 6 Monday October 2 2006 1 58 PM ...

Page 19: ...d 3 Ensureyouuseanappropriate circuit breakerorfuse 4 Routethecablefromthedistributionpanelbacktothe SmartPilotcomputer 5 Connectthecables tothe POWERinputs Cable length Cable gauge Copper area upto6m 23ft 14AWG 2 5mm2 Fuse 15 A Circuitbreaker 10A To connect the power cables Strip8 10mm ofinsulationfromtheendofeachcable Useasmallscrewdriver toloosenthescrewsontheterminalblock Insert thestrippedcab...

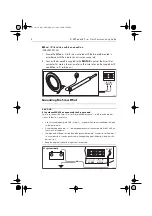
Page 20: ...dtoshipsground Failure toconnect the SmartPilottoshipsgroundmaycauseit orotheron boardelec tronicstofunctionincorrectly Useflattinnedcopper braid 30Arating orgreater Equivalentstrandedwirediame ter4mmorgreater Usingthesuppliedyellow femalespadeconnector connect thebraidtoRF GNDon theSmartPilotcomputer Theother endoftheearthstrapshouldbeconnectedtometalincontactwiththewater If thisisnotpossible itc...

Page 21: ...onnectSmartPilotsystemelements AllSmartPilotcomputerterminals willacceptstrandedcableupto2 5 mm2 14 AWG Connectthefollowingelementsasshowninthediagram 1 Compass 2 RudderSensor 3 SmartPilotController viaSeaTalk SmartPilot computer terminals D9323 1 Screen Blue Red Yellow Green Screen Blue Red Green Red Yellow Screen Red Yellow Screen Red Yellow Screen SeaTalk SeaTalk NMEA RUDDER RATE GYRO FLUXGATE ...

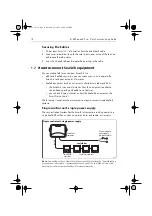
Page 22: ...andprovideadditionalfeatures youcanalsodisplayinformationfromthe SeaTalk equipmentonthe SmartPilotcontroller ThefollowingillustrationsshowsometypicalwaystoconnectsimpleSeaTalk systems Singlecontrolunit singlepowersupply Thesimplesttype of systemhas theSmartPilotcomputerprovidingpowertoa singleSeaTalk busthatincludesasingle controllerandseveralinstruments Note Dependingonthe numberofSeaTalkunitsand...

Page 23: ...ollerandinstrumentsdonotpowerup OnlyinstrumentpowersupplyON ThecontrollershowsaNOPILOT message ConnectingSeaTalkorNMEAcompasses YoucanconnectSeaTalkorNMEAcompassestothe SmartPilotcomputer either toreplace thefluxgatecompassor providesupplementarycompasssignals Whenyouconnectmorethanonecompasstotheautopilotsystem thecomputer processestheirsignalsinthis orderofpriority D6302 2 SmartPilot controller ...

Page 24: ...othe SmartPilot NMEAequipment canbeconnectedinanycombinationof these ways usingtheSmartPilotcomputerNMEAinput output usingtheNMEAinputonthebackof the SmartPilotcontroller Refertothe ControllerhandbookforNMEAdatadetails usingtheSeaTalk NMEAinterface partnumber E85001 toconvertthe NMEAdatatoSeaTalkdata WARNING Connectionstootherequipment IfyouareconnectingRaymarineequipmenttootherequipment usinganon...

Page 25: ...de longitude time HDG HDM HDT heading MWV apparentwindangle apparent windspeed RMA courseoverground COG speedoverground SOG latitude lon gitude variation RMB crosstrack error bearingto waypoint distance towaypoint way point number RMC courseoverground COG speedoverground SOG latitude lon gitude time variation VHW speedthroughwater heading VTG course over ground COG speedoverground SOG VWR relative...

Page 26: ...s the compactS100Controller systemgivesyoufullcoursecontrolawayfrom the mainsteeringposition Externalalarm TheSmartPilot soundsallcriticalalarmsfromallcontrollers Onlargeornoisy boatsyoucanfita Raymarineexternalalarm partnumber Z035 connected throughE85001interfacebox asahighvolume audiblerepeater Windvane TheSmartPilot computercanusewindangleinformationfromawindvaneor instrumenttomaintainacourser...

Page 27: ...tem connections 15 1 10 Secure the cables Topreventstrainontheconnectorblocks securethe cablestothe SmartPilot computerwithcabletiesasshownbelow D6321 1 SmartPilot 81282_1 book Page 15 Monday October 2 2006 1 58 PM ...

Page 28: ...16 S1 Wheel and Tiller Pilots Commissioning Guide 81282_1 book Page 16 Monday October 2 2006 1 58 PM ...

Page 29: ...esafecontrol Forsafecontrolofyourboat youMUSTcompletethedockside checksbeforestartingtheinitialseatrial Withthe boatsafelytiedup completethefollowingdockside checks ST6002SmartPilotController Suppliedas standard AdditionalSmartPilotControllers Thiscommissioningguide containsinstruc tionsforthe ST6002controllersuppliedas standardwithyoursystem The systemisalsocompatiblewiththefol lowingSmartPilotCo...

Page 30: ...rud der angle Troubleshooting If the SmartPilotcontrollerdoesnotbeeporthedisplayisblank checkthe fuse circuitbreakerandtheSeaTalkfuseinthe SmartPilotcomputer If the displayshows the SEATALKFAILorNODATAalarmmessage checktheSeaTalkconnections IftheSTANDBYscreendoesnotdisplayalivecompassheadingorarudder angle check thesensorconnections Step2 ChecktheSeaTalkandNMEAconnections SeaTalkconnections If you...

Page 31: ...oint acablingerror Checkforopencircuit shortcircuitorreversedwires thenavigatorisnotconfiguredtotransmittherequireddataformat Windinstrumentconnections IfyouhaveconnectedtheSmartPilottoaNMEAorSeaTalkwindinstrument checkthelinks bypressingstandbyand autotogether theSmartPilotshoulddisplaythe WindVanemodescreen withthelocked windangleandlockedheading ifthecontrollerdoesnotdisplayWINDmode theSmartPil...

Page 32: ...standbytopreventfur ther ruddermovement 4 If the rudder movestoportortherudderdriveshardover i press standby ii turnoffthepower iii reversethemotorwiresconnectedtotheSmartPilotcomputer iv switchonthe powerandre check Note Iftherudderovershootsandhastodrive backorstartstohuntbackandforth you willneedtoincreasetherudderdampinglevelmanually See page 45 Step4 AdjustkeySmartPilotsettings Thenextstepint...

Page 33: ...omeofthesesettingswillbecheckedlaterinthisprocedureandtheremaineder shouldnot requireanyadjustment Thedefaultvaluesforeachvesseltypeare listedonpage 52 Toset thevesseltype 1 Usethe disp keytoscrollthroughtheDealerCalibrationpagesuntilthe dis playshowseither VESSELoroneofthevesseltypes e g DISPLACE 2 Usethe 1 or 1 keystoselectSAILBOAT ToenterDEALERCAL pressandholdthestandby keyfortwosecondstoentert...

Page 34: ...youreachthe DRIVE TYPpage 2 Usethe 1 or 1 keys toselecttheappropriatedrivetype 3 Press disp toselectthe drivetypeandmovetothe nextcalibrationoption Options Notes DISPLACE NOT APPLICABLEFOR S1WHEEL TILLER PILOTS SEMI DISPLACE PLANING STERNDRV WORK BOAT SAILBOAT TypicalsettingforbothS1Wheeland Tillerpilots Sailingboat Drive Drive Type Setting Drive Type 3 S1 WheelPilot S1 Tiller Pilot Note Drivetype...

Page 35: ... manually steeringastraight course thenaccessingthe ALIGN RUDscreen in Seatrial Calibrationtoadjustthe offset Settherudderlimits 1 Withthe SmartPilotstillinDealerCalibrationpressthe disp keytoscroll throughthe calibrationpagesuntilyoureachthe RUD LIMITpage 2 Turnthewheeltomovetherudder totheportendstopandnotetheangleonthe rudder bar tothestarboardendstopandnotetheangleontherudderbar 3 Usethe 1 1 1...

Page 36: ...hecktheinstallationbeforegoingtoseatomakesure thatitisnotaffectedbyradiotransmissions enginestartingetc IMPORTANT Youcanreturntomanualsteeringatanytimeduringtheseatrial bypressingthestandby key Youshouldonlyperformtheinitialseatrial whenyouhave successfullycompletedthedocksidecalibration inconditionsoflightwindandcalmwater soyoucanassessSmartPilotper formance without theinfluenceofstrongwinds orla...

Page 37: ...oatinslowcirclessotheSmartPilotcandeterminethe deviationandcalculateanycorrectionrequired Youmustcarryoutthisprocedure incalmconditionsandpreferablyonflatwater Initial procedure Automaticcompassdeviationcorrection 1 Withthe pilotinStandbymode enterSeatrialCalibrationas follows seethe followingillustration pressandholdstandbyfortwoseconds toenterCalibrationmode whenyousee the DISPLAY CALscreen pres...

Page 38: ...uthenwanttorepeatthedeviationcorrection returntothe SWING COMPASS screen 6 Continueslowlyturningthe boatuntilthecontrollerbeepsanddisplays the DEVIATIONscreen ThisindicatesthattheSmartPilothas completedthe deviationcorrection Note Thisscreen showsthe maximumdeviationencounteredover360 notasaneast westvalue If thedeviationfigureexceeds15 orthedisplayshowsnodeviationvalue the compassisbeingaffectedb...

Page 39: ...knowntran sit bearing 4 Use 1 1 10and 10keystoadjustthedisplayedheadinguntilitmatches boat ssteeringcompassor aknowntransitbearing 5 Pressandholdstandbyfor2secondstoexit SeatrialCalibrationandsave thenewcompasssettings 2 sec D9329 1 Align the autopilot heading a b Save changes To save deviation correction save heading alignment return to STANDBY mode Autopilot heading Steering compass Known headin...

Page 40: ...stageofthe seatrialistosetkeyparametersthataffecttheSmartPilot s steeringcharacteristics usingAutoLearn TillerPilot andgyroupgradedWheelPilot systemscanmakeuseof AutoLearn Thisisaself learningcalibrationfeaturethatautomatically adjustsruddergain counterrudderandAutoTrimtosuityourboat manualset up WheelPilot withoutthegyroupgrade systemswillrequire manualadjustment see page 31 forinstructions AutoL...

Page 41: ...ypicalcruisingspeed if conditions are notcalm headintothewindandwaves A t l e a s t 0 2 5 n m 5 0 0 m o f c l e a r s e a s p a c e A t l e a s t 0 0 4 n m 1 0 0 m o f c l e a r s e a s p a c e D5495 2 1 minute approximately W i n d 2 sec x2 steer straight ahead at cruising speed planing boats just on the plane head into wind and waves x4 D9330 1 AutoLearn in progress Prepare for AutoLearn Start A...

Page 42: ...L LRNPASS AutoLearncompletedsuccessfully LRNFAIL AutoLearnwasnotsuccessful soshouldberepeated Afail ure codewillalsobedisplayed 1 AutoLearnhasnotbeencarriedout 2 AutoLearnfailed duetomanual interruption 4 AutoLearnfailed probablyduetodrive orcompassfailure 6 Pressandholdthe standbykeyfortwosecondstostorethenewsettings YourSmartPilotisnowfullycalibratedandreadyforuse Theonlyadditionalsettingyoumayn...

Page 43: ...Responselevel Theprincipalmethodof adjustingtheperformanceofSmartPilotsystemsisby changingtheresponselevel Thisistheonlyuseradjustmentyoushouldneedto maketotheSmartPilotonaregularbasis Thiscontrolsthe relationshipbetween theSmartPilot scoursekeepingaccuracyandtheamountof helm driveactivity Whilstitisnotnecessarytosettheresponselevelatthisstage thetestingofother parameters requiresthe temporaryadju...

Page 44: ...el2 seeabove 2 Sailyourboatatcruisingspeedinclearwater youwillfinditeasiertorecognizethesteeringresponseincalmseacondi tionswherewaveactiondoesnotmasksteeringperformance 3 Press autotoenterAutomode thenaltercourseby40 iftheruddergainisadjustedcorrectly the 40 coursechangeshould resultinacrispturnfollowedbyanovershootofnomorethan5 iftheruddergainsettingistoohigh the40 coursechangewillresultina dist...

Page 45: ...ingsresultinmorerudder beingapplied Tocheckthe counter rudder setting 1 Set RESPONSEtolevel3 see page 32 2 Motoryourboatatcruisingspeedinclearwater 3 Press autotoswitchthe SmartPilottoAutomode thenmake a90 course change whengainandcounterrudder are bothsetcorrectly the boatperformsa smoothcontinuousturnwithminimalovershoot if the counterrudderistoolow theboatwillstillovershoot if counterrudderis t...

Page 46: ...dloadonthe sailsorsuperstructure oran imbalanceofengines GainexperiencewithyourSmartPilotbefore attemptingtoadjusttheAutoTrim setting Onsailboatsyoucanonlyevaluate theeffectof AutoTrimwhileunder sail Increasingthe AutoTrimlevelreduces thetimetheSmartPilottakestogetback ontothe correctcourse butmakesthe boatlessstable ifthe SmartPilotgivesunstablecoursekeepingandtheboat snakes around the desiredcou...

Page 47: ...libration USERCAL TheitemsinUserCalibrationvaryaccordingtotheVesselTypeyouhaveselected inDealerCalibration YouwillprobablyneedtoaccessUserCalibrationonafairlyregularbasistoadjust SmartPilotsettingsinresponsetochangingconditions DetailsonUser Calibrationcanbefoundinthe SmartPilotControllerOperationManual Seatrial Calibration SEATRIALCAL TheSeatrialCalibrationgroupisspecificallydesignedforuseduringt...

Page 48: ...libration SEATRIALCAL DealerCalibration DEALERCAL Note You can go backwards through the groups by pressing and holding the dispkey for one second 3 WhenyoureachtheCalibrationgroupyouwanttoaccess press auto to enter thatgroup Topreventaccidentalaccess wehavemadeentrytoDealerCalibrationmore Accessing Calibration Modes 2 seconds 2 seconds saves changes Calibration Modes to enter seatrial calibration ...

Page 49: ...ethe 1 1 10 and 10 keys asappropriate tochange thevalue 6 If youthenwanttoadjustsettingsinanotherCalibrationgroup press standby andthenrepeatsteps2to5asnecessary 7 Whenyouhavemadeallthechangesyouwanttomake press andhold standby fortwoseconds toexitCalibrationmodeandsave changes 3 2 Display Calibration DisplayCalibrationallowsyoutoselectthetypeofbargraphandheadingshown ontheSmartPilotdisplay andset...

Page 50: ...se definewhichSeaTalk NMEAdatapageswillbe availableduringnormaloperation see SmartPilot OperatingGuide Eachdatapage setupscreeninitiallyshowsthe titleDATA PAGEandthepagenumber After1second thetext changestothetitle of the datasetforthatpage Thedefaultsettings are Options RUDD BAR Default Rudderposition bar Itusesthe bargraphto show thetrue rudderangle Requiresrudderpositionsensorfor accurate rudde...

Page 51: ...ange orpress andhold standby for2secondstosavechanges 4 RESPONSE Remainingpages NOTUSED Thesepagesarenotdisplayedwhenyouscroll throughthe data pagesduringnormaloperation AvailableDataPages Displayedas Speed Knots SPEEDKTS Log LOGXXXX X Trip TRIPXXX X Average Speed AV SPD WindDirection e g WINDPORT WindSpeed WINDKTS DepthMetres DEPTHM see Notebelow DepthFeet DEPTHFT see Notebelow DepthFathoms DEPTH...

Page 52: ...tionoptions AUTO TACK GYBESTOP WINDTYPE WINDTRIM RESPONSEandVARIATION arealso availableviaDealerCalibration see page 41 TheSmartPilotOperatingGuide containsspecificUserCalibrationinstructions CrossTrack Error XTE Distance toWaypoint DTW BearingtoWaypoint BTW Rudder Gain RUDDGAIN Response RESPONSE Watch WATCH usedtocontroltheWatchtimer UniversalTime Coordinated UTC NOTUSED Page notdisplayed Anydata...

Page 53: ...impacton SmartPilotoperationandcanaffectyourboat ssafety Onceyouhave commissionedtheSmartPilot youshouldnotnormallyneedtoaltertheDealer Calibrationvalues AccessingDealerCalibration Topreventaccidental access we have madeentrytoDealer Calibrationmore difficultthanthe othercalibrationgroups To access dealer calibration pressandholdthestandby keyfortwosecondstoentertheCalibrationmode whenthescreensho...

Page 54: ...Tiller Pilots Commissioning Guide Accessing Dealer Calibration Dealer Calibration D9334 1 To exit save changes 2 seconds 2 seconds saves changes or or To adjust values 81282_1 book Page 42 Monday October 2 2006 1 58 PM ...

Page 55: ...orseveralothercalibrationsettings Refertothe table onpage 52 fordefaultvalues 2 Thevesseltypeoptionswillnormallygiveoptimumperformancefortypical vesselsofeachtype However youmayfindyou canimprove the performanceof yourvesselbyselectinganoptionfor adifferentvessel type Options CALLOCK OFF Calibrationlock off Seatrial calibration canbeaccessed default CALLOCK ON Calibrationlock on Seatrialcalibratio...

Page 56: ...nder unnecessaryload Youshouldadjustthissettingwhencommissioningthe SmartPilot see page 23 Ruddergain Ruddergainisameasure of howmuchhelmtheSmartPilotwill applytocorrect courseerrors Thehigherthesettingthemorerudderwillbeapplied TillerPilot andGyroupgradedWheelPilot systemswilladjusttheruddergain automaticallyduringAutoLearn see page 28 WheelPilotsystems without theGyroupgrade willrequiremanualadj...

Page 57: ...rudderdampingvalueiftheSmartPilot hunts whentryingtoposition therudder Increasingtherudderdampingvaluereduces hunting Increase the dampingonelevelatatimeuntiltheautopilotstopshunting andalwaysusethe lowestacceptablevalue AutoTrim TheAutoTrimsettingdeterminestherateatwhichtheSmartPilotapplies standinghelm tocorrectfortrimchanges causedbyvaryingwindloadsonthe sailsorsuperstructure ThedefaultAutoTrim...

Page 58: ...Pilotresponselevelsetting Theresponselevelcontrols therelationshipbetweencoursekeepingaccuracyandtheamountof helm drive activity Youcanmaketemporarychanges toresponseduringnormaloperation seeyour Operating Guide fordetails TillerPilot andgyroupgradedWheelPilot systems Setting Effect AUTO TRIM OFF No trimcorrection AUTO TRIM 1to6 Auto trimapplied 1 Slowest 6 Fastest Screen Text Options RESPONSE Ran...

Page 59: ...utomatic deadband The SmartPilot willgraduallyignorerepetitive boatmove mentsandonlyreact totruevariationsincourse Thispro videsthe bestcompromise between power consumption andcourse keepingaccuracy RESPONSE2 AutoSeastate off minimumdeadband Thissettingprovidestightercoursekeepingbutwillleadto increasedpowerconsumptionand drive unit activity RESPONSE3 AutoSeastate off counterrudderyaw damping This...

Page 60: ...nse WindTrimcontrols howquicklythe SmartPilotrespondstochangesinthewind direction Higherwindtrimsettingswillresultinasystemthatismoreresponsive towindchanges Screen Text Options AUTO TACK 40 to 125 in1 steps Screen Text Options GYBESTOP On Default OFF Options WINDAPP Default SmartPilot steerstoapparentwindangle WINDTRUE SmartPilot steerstotrue wind angle Screen Text Options WINDTRIM Range 1to9 Low...

Page 61: ...eincreasingdipoftheearth smagneticfield athigherlatitudes This increaseddiphastheeffectof amplifyingrudderresponse onnortherlyheadings inthenorthernhemisphere andonsoutherlyheadingsinthe southern hemisphere Screen Text Options PWRSTEER ThisoptionmustbesettoOFF Screen Text Range CRUISESP 4 to60knots Options AUTOADAPTOFF AutoAdaptoff AUTOADAPTnth default AutoAdaptcompensationon Northernhemisphere AU...

Page 62: ...loseALLSmartPilot calibrationsettings YouwillthenneedtorepeattheSmartPilot commissioningprocess SelectingSystemresetwillresetallofthe calibrationvalues allofthesettingsinUserCalibration SeatrialCalibrationandDealer Calibra tionwillreturntothe factorydefaultvalues thesettingsinDisplayCalibrationwillnotchange asthesearestoredineach individualcontroller Toresetthesystem 1 SelecttheSystemreset RESET s...

Page 63: ...ive Type 3 4 RudderAlignment 9to 9 RudderLimit 10to40 RudderGain 1to9 CounterRudder 1to9 DoNOT setto0 RudderDamping 1to9 AutoTrim 0to6 Response Gyro Non Gyro 1to9 1to3 TurnRateLimit 1to30 OffCourse Angle 15to40 AutoRelease OFF ON AutoTack Angle 40to125 Gybe Inhibit OFF ON WindType APPARENT TRUE Power Steer OFF WindTrim 1to9 CruiseSpeed 4to60 AutoAdapt OFF nth Sth Latitude 0to80 Variation 30 to 30 ...

Page 64: ... 0 0 0 0 0 0 0 RudderLimit 30 30 30 20 20 30 30 RudderGain 4 5 4 4 4 5 2 CounterRudder 4 3 5 5 5 2 2 RudderDamping 2 2 2 2 2 3 2 AutoTrim 2 2 3 3 3 2 1 Response Gyro Non Gyro 5 2 5 2 5 2 5 2 5 2 5 2 5 2 TurnRateLimit 7 7 7 7 5 7 OffCourse Angle 20 20 20 20 20 20 20 Power Steer Joystick OFF AutoRelease OFF OFF AutoTackAngle 100 100 Gybe Inhibit ON ON WindType APP APP WindTrim 5 5 Power Steer 1 1 1 ...

Page 65: ...cabling Displayshowsrotatingdashes Compasscalibrationinprogress Displayedcompassheadingdoesnot agreewiththeboat scompass Youhavenotcalibratedthecompass Carryoutthe compassswing andalignmentprocedures Nodisplay baronthedisplay Rudderbarswitchedoff in DisplayCalibration selectRUDDBAR Rudderbardisplaymovesinopposite directiontorudder Reverse the redandgreenrudder positionsensor connectionsattheSmartP...

Page 66: ...struments Cablingproblem make sure allthe cablesare con nectedproperly Positioninformationnot received Navigatornottransmittingthe correct positiondata Check navigator andcablingto the SmartPilot When holdinga constantcourse in STANDBYmode theheading contin uouslychanges TheAutopilotisconnectedtoaRaymarinePathfinder unitwiththe BridgeNMEAHeading option switchedon Disablethisfeature on the Pathfind...

Page 67: ...indVanemode andithasnotreceivedwind angledatafor30 seconds theautopilot isin Track modeand theautopilot isnotreceivingSeaTalk navigationdata or thepositionsensorisreceivingalowstrengthsignal thiswill clearwhenthesignalimproves Check the connectionstothe compassand or wind instrument and ornavigator Note Theautopilotstopsadjustingthe headingassoonasitloses data NOPILOT The controller isnotreceiving...

Page 68: ...nttointeractwithone another withaconsequentadverseeffectonoperation Inordertominimize these effectsandenable youtogetthebestpossible performancefromyour Raymarineequipment guidelinesaregivenintheinstallationinstructions to enableyoutoensureminimuminteractionbetweendifferentitems of equip ment i e ensureoptimumElectromagneticCompatibility EMC AlwaysreportEMC relatedproblemstoyournearestRaymarinedea...

Page 69: ...eTechnical SupportDepartmentandadetailsofthelocationsofRaymarineagents worldwide Telephone help line If youdonothave accesstotheworldwideweb please callourhelpline IntheUSA call 18005395539 extension2444or 16038815200extension2444 IntheUK EuropetheMiddleEastortheFarEast call 44 0 2392714713 voice 44 0 2392661228 fax Help us to help you Whenrequestingservice pleasequotethefollowingproductinformatio...

Page 70: ...58 S1 Wheel and Tiller Pilots Commissioning Guide 81282_1 book Page 58 Monday October 2 2006 1 58 PM ...

Page 71: ...o55 C 14 Fto131 F 20 Cto70 C 4 Fto158 F 80 dripresistantwhen mountedvertically Storage conditionswhen packed temperature range relative humiditylimit 5 C to50 C 23 Fto122 F 75 Dimensions width height depth 237mm 95 16 170mm 6 11 16 55mm 9 5 16 Weight 535g 1lb2 8oz Inputs fluxgate compass externalGyroPlusyaw sensor rudder position sensor NMEA 0183 v2 3 SeaTalk x2 power Outputs NMEA0183v2 3 SeaTalk ...

Page 72: ...yrosystemsonly HDM 5Hz0 1 resolution Fuses Power Terminals SeaTalk Terminals Standard automotive blade fusestoprotect 10A 2A CEapprovals conformsto 89 336 EC EMC EN60945 1997 S1 WheelPilot S1TillerPilot Computerspecifications 81282_1 book Page 60 Monday October 2 2006 1 58 PM ...

Page 73: ...ffectsby ensuringoptimum ElectromagneticCompatibility EMC betweenequipment Fluxgate Standard Raymarine compasssuppliedwithcore pack GPS Global PositioningSystem GyroPlus Raymarine sGyroPlusyawsensorthat measuresthe boat srate ofturn Fittedasstandard tothe TillerPilot Optionalupgrade forthe WheelPilot Hz Hertz cyclespersecond I Odrive Inboard Outboardorsterndrive MARPA MiniAutomaticRadarPlotting Ai...

Page 74: ...62 S1 Wheel and Tiller Pilots Commissioning Guide 81282_1 book Page 62 Monday October 2 2006 1 58 PM ...

Page 75: ...alibration 41 Accessing 41 Alignrudder 44 AutoAdapt 49 AutoTack angle 47 AutoTrim 45 Counterrudder 45 Cruise speed 49 Defaults ii 52 Drive type 44 Gybeinhibit 48 Latitude 50 Off course warningangle 47 PowerSteer 49 Response level 46 Rudderdamping 45 Ruddergain 44 Rudderlimit 44 Seatrial calibration lock 43 Systemreset 50 Vessel type 43 Windtype 48 WindTrim 48 Display calibration 37 Drivestoppedala...

Page 76: ...ibrationmodes 36 Advanced 41 Align rudder 44 AutoAdapt 49 AutoTackangle 47 AutoTrim 45 Counter rudder 45 Cruise speed 49 Datapages 38 Displaycalibration 37 Drive type 44 Gybeinhibit 48 Headingselection 38 Latitude 50 Off coursewarningangle 47 PowerSteer 49 Response level 46 RudderBar 38 Rudderdamping 45 Ruddergain 44 Rudderlimit 44 Seatrial calibrationlock 43 Vessel type 43 Windtype 48 WindTrim 48...

Reviews: