background image

RLX-IH 

 802.11b 

Start Here 

Industrial Hotspot  


Page 12 of 99  

ProSoft Technology, Inc. 

April 10, 2007 


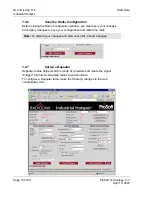
1.6.1 Start 

IH-Browser 

¾


To start IH Browser 

Click the Start button, and then choose Programs. 

In the Program menu, navigate to ProSoft Technology. 

In the ProSoft Technology menu, navigate to RadioLinx. 

Click RadioLinx IH Browser. 


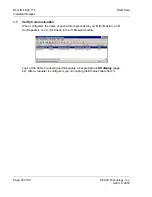
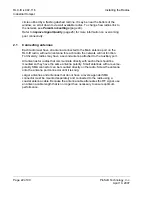
The window lists all the radios your computer can access. The MAC ID number is 
essentially the serial number of the radio; this number is also printed on the side 
of the radio. If a radio listing does not appear in the window, select Scan from the 
File menu. If you still do not see a radio listing, see 

Troubleshooting

 (page 23). 

1.6.2 

Plug In the Cables 

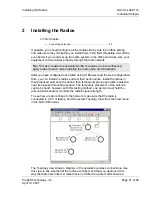
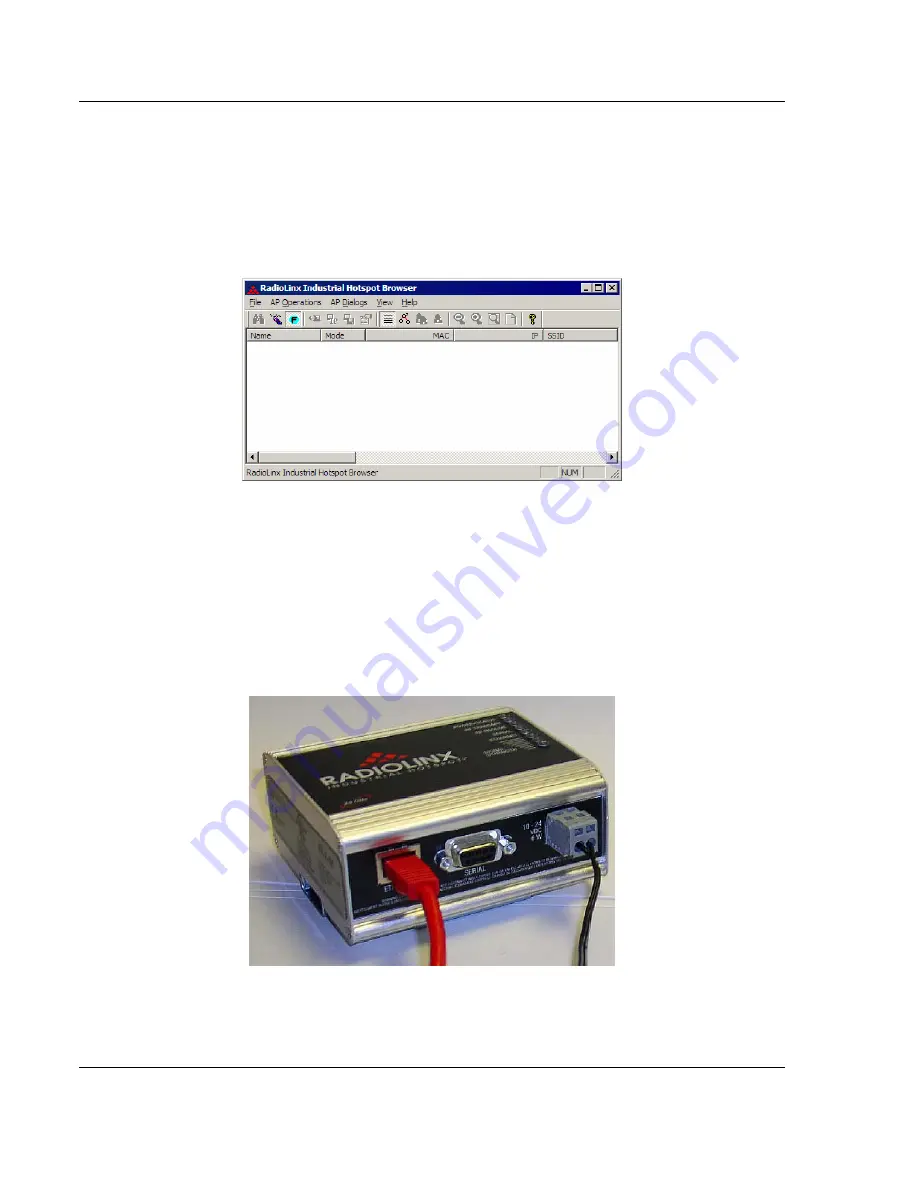
You can configure the RLX-IH using the Ethernet port on the radio. On the 
underside are three ports; Ethernet, Serial and Power (10 to 24 VDC 6 W). 


From left to right: Ethernet port, serial port and power connector. 

ƒ

  If you are connecting to the radio through an Ethernet hub or switch, use the 

gray (straight-through) cable. 

Summary of Contents for RLX-IH

Page 1: ...RLX IH Industrial Hotspot 802 11b User Guide April 10 2007 ...

Page 2: ...the use or application of the product Reproduction of the contents of this manual in whole or in part without written permission from ProSoft Technology is prohibited Information in this manual is subject to change without notice and does not represent a commitment on the part of ProSoft Technology Improvements and or changes in this manual or the product may be made at any time These changes will...

Page 3: ...ion 18 1 6 7 Set Up a Repeater 18 1 6 8 Set Up a Client 19 1 7 Verify Communication 20 2 INSTALLING THE RADIOS 21 2 1 Connecting antennas 22 3 DIAGNOSTICS AND TROUBLESHOOTING 23 3 1 Check the Ethernet cable 24 3 2 LED display 24 3 3 Retrieve the default password 24 3 4 Troubleshoot RLX IH Browser error messages 25 3 5 Troubleshoot missing radios 25 3 6 Improve signal quality 26 4 RADIO CONFIGURATI...

Page 4: ...n 58 5 3 3 Clear 58 5 3 4 Import 58 5 3 5 Export 58 5 3 6 Freeze 59 5 3 7 Print 59 5 3 8 Print Preview 59 5 3 9 Print Setup 59 5 3 10 Exit 59 5 4 AP Operations Menu 59 5 4 1 Connect 60 5 4 2 Assign IP 60 5 4 3 Update Firmware 61 5 5 AP Dialogs Menu 62 5 5 1 Wireless Clients 62 5 5 2 Ethernet Nodes 63 5 5 3 Scan List 64 5 5 4 Properties 65 5 6 View Menu 66 5 6 1 Tool Bar 67 5 6 2 Status Bar 67 5 6 ...

Page 5: ...6 6 5 5 European CE certification 87 6 6 Glossary 87 7 PROSOFT TECHNOLOGY INC SUPPORT SERVICE WARRANTY 90 7 1 How to Contact Us Sales and Support 91 7 2 RMA Policies and Conditions 91 7 2 1 All Product Returns 91 7 3 LIMITED WARRANTY 93 7 3 1 What Is Covered By This Warranty 94 7 3 2 What Is Not Covered By This Warranty 94 7 3 3 DISCLAIMER REGARDING HIGH RISK ACTIVITIES 95 7 3 4 DISCLAIMER OF WARR...

Page 6: ...mercial grade radios and allows better coverage of the factory floor with fewer radios and provides outdoor links of up to 20 miles Features include Single unit repeater functionality Powerful transmitter with amplifier option for long range outdoor applications Redundant master radios WPA encryption 802 1x and MAC ID authentication Built in web server for browser based configuration and remote di...

Page 7: ...radio includes the following components 1 3 System Requirements The RadioLinx IH Browser configuration tool is designed for Microsoft Windows XP 2000 and 2003 Minimum hardware requirements are Pentium II 450 MHz minimum Pentium III 733 MHz or better recommended Supported operating systems o Microsoft Windows XP Professional with Service Pack 1 or 2 o Microsoft Windows 2000 Professional with Servic...

Page 8: ... Ethernet network with a Static or Dynamic IP address for your computer Static IP address Subnet Mask and Gateway address for each RadioLinx device you plan to install Obtain this information from your system administrator 1 4 Installing the IH Browser Configuration Tool To install the IH Browser application 1 Insert the ProSoft Solutions CD in your CD ROM drive On most computers a menu screen wil...

Page 9: ...etermine where you need radios and then choose locations for them accordingly For example you might decide to install your master radio near a PC in a central plant location You can use the PC to configure the radios through the Radio Configuration Diagnostic Utility If the plant is an oil refinery for example you might decide to install radios near the oil tanks The next important issue is how to...

Page 10: ... page 76 Important Radios and antennas must be located at least 8 inches 20 cm away from personnel 1 5 1 Installation Questions Answer the following questions to make your installation easier and to familiarize yourself with your system and what you want to do How many radios in your network Master ID Repeater ID Client ID Locations Is there a Line of Sight between them Selected the appropriate an...

Page 11: ...ity window list NOTE The text shown in yellow at the bottom of the window indicates the status of changes you have made to the configuration If the text shows Changes not saved click Apply Changes to save your settings If the text shows Changes not saved Will disrupt X s you can click Apply Changes however the network will be disrupted temporarily while the changes are applied The value of X indic...

Page 12: ...ID number is essentially the serial number of the radio this number is also printed on the side of the radio If a radio listing does not appear in the window select Scan from the File menu If you still do not see a radio listing see Troubleshooting page 23 1 6 2 Plug In the Cables You can configure the RLX IH using the Ethernet port on the radio On the underside are three ports Ethernet Serial and...

Page 13: ...ion is working The RF Transmit and RF Receive LEDs should blink For information on making connections see Radio power requirements page 76 and Cable specifications page 76 1 6 3 Detecting the Radio After the radio has completed its startup procedure the radio will appear in the IH Browser window Tip If a radio listing does not appear in the window open the File menu and choose Scan If you still do...

Page 14: ...manent IP address To assign a temporary IP Address 1 In IH Browser click to select the radio Tip If a radio listing does not appear in the window open the File menu and choose Scan If you still do not see a radio listing refer to Diagnostics and troubleshooting page 23 2 Open the AP Operations menu and choose Assign IP This action opens the Assign Temporary IP Address dialog box 3 Accept the dynam...

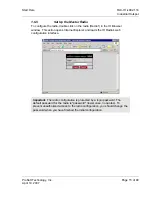
Page 15: ...n the IH Browser window This action opens Internet Explorer and loads the IH Radio s web configuration interface Important The radio configuration is protected by a login password The default password for the radio is password lower case no quotes To prevent unauthorized access to the radio configuration you should change the password when you have finished the initial configuration ...

Page 16: ... radio make the following changes to the web configuration form Radio Network Settings Radio Name Enter a unique name for the radio Select Master as the radio mode Network SSID Assign a network name SSID of up to 32 characters The radio uses this name in all network references All radios in a network must have the same SSID Channel Select a channel for the network or accept the default value Netwo...

Page 17: ...e lower case no quotes For more information on encryption see Security settings page 45 Because you must assign the same Network SSID and WPA phrase to the repeater radios later in this procedure you should write down the settings Note Network SSID and WPA phrase are both case sensitive Network SSID _________________ WPA phrase __________________ Radio Access Settings If a DHCP Dynamic Host Contro...

Page 18: ...apply your changes Click Apply Changes to save your configuration and restart the radio Note To discard your changes and start over click Cancel Changes 1 6 7 Set Up a Repeater Repeater radios help extend the range of a network and create the signal bridges that allow networked radios to communicate To configure a Repeater radio make the following changes to the web configuration form ...

Page 19: ...adio that allows a user to connect an Ethernet device to a wireless network through any 802 11b access point Any Ethernet device that has an RJ45 Ethernet port can in effect be transformed into an 802 11b wireless client by attaching the radio Only a single device can be connected to the radio in client mode Do not connect to more than one Ethernet device using a switch or hub You only use client ...

Page 20: ...rify Communication When configured the name of each radio is preceded by an M for Master an R for Repeater or a C for Client in the IH Browser window Look at the LEDs to ensure good link quality as explained in LED display page 24 After a repeater is configured you can unplug the Ethernet cable from it ...

Page 21: ... configured each radio using IH Browser and the web configuration form you can install the radios and test their performance Install the radios in their proposed permanent locations then temporarily place each radio s antenna near its proposed mounting location The temporary placement of the antenna can be by hand however with this testing method one person must hold the antenna while another moni...

Page 22: ...out an antenna for each radio the network will not function For diversity radios may have a second antenna attached to the Auxiliary port All antennas for radios that communicate directly with each other should be mounted so they have the same antenna polarity Small antennas with a reverse polarity SMA connector can be mounted directly on the radio Screw the antenna onto the antenna port connector...

Page 23: ... the word Scanning if the radio is scanning to find another radio to which to connect If the radio is not connected to a network and not currently scanning the graph will show the words Not connected Update every If you want to update the diagnostic readings according to a particular time interval specify the interval in seconds in this field After entering the new value press Enter only if you wa...

Page 24: ... the Ethernet cable is connected If this LED is flashing an Ethernet packet is being transmitted or received Signal Strength If only one of these three LEDs is lit then the radio is linked If two LEDs are lit the radio s signal strength is fair If all three LEDs are lit the signal strength is good If a radio is configured as a master the middle light of the three Signal Strength LEDs will always b...

Page 25: ... RLX IH Browser attempts to scan for radios and no valid network connection exists on the PC wired or wireless To correct this error Confirm that your PC has at least one active network LAN connection it could be a wired Ethernet connection or a wireless 802 11 connection One way to determine if your network connections are active is to look in the system tray in the lower right corner of your des...

Page 26: ...help the PC running the RLX IH Browser and the radios are probably not connected to the same local network Verify your connections If you are in topological view any unlinked radios may be at the bottom of the window Be sure to scroll down to see all radios If you still cannot see radios with the RLX IH Browser call technical support 3 6 Improve signal quality If you need to improve a radio s sign...

Page 27: ...ant PDA to monitor and change the settings within the RadioLinx Industrial Hotspot radio To open the Radio Configuration Diagnostic Utility 1 In the RadioLinx Industrial Hotspot Browser select the radio to configure from the list view or topography view and then click the right mouse button to open a shortcut menu 2 On the shortcut menu choose Connect The Radio Configuration Diagnostic Utility wil...

Page 28: ...ed some fields and buttons may be unavailable because they do not affect the configuration you have selected Review the topics in this section for more information on when and how to use each configuration option Configuration Help Help is available for each item in the Radio Configuration Diagnostic Utility To view a brief help message about any field on the screen move your mouse pointer over th...

Page 29: ...cription Radio Name The name of the selected radio Radio MAC The MAC address of the selected radio The MAC ID is also printed on the side of the radio Firmware The version of firmware currently installed All radios on the network must have the same firmware versions installed For more information on firmware versions refer to Update firmware page 61 Update every This value in seconds controls how ...

Page 30: ...button is only available when the radio type is Repeater Address Table Click this button to view a list of MAC addresses for devices entered in the radio s address table Port Status Click this button to view spanning tree status of each switch port for RF ports and the RJ45 Ethernet port 4 1 1 Available Parents This page opens when you click the Available Parents button on the Radio Configuration ...

Page 31: ...e length of time in seconds since the radio last saw a packet from this MAC address Hops The number of hops to the Master A value of 0 zero is shown for non ProSoft devices This list contains both 802 11 devices that are part of the same SSID as the IH itself for example Minerals as well as devices that belong to different SSIDs for example Network1 and ProSoftInternal This list is updated continu...

Page 32: ...Above the table you can see information about the current Spanning Tree page 37 including the MAC address of the root device and the timing parameters that are set for the current Spanning Tree Each radio can have up to 34 active ports one Ethernet cable one parent RF link and up to 32 child RF links The primary for creating a Spanning Tree is that it allows you to create fully redundant paths If ...

Page 33: ...radio or a child radio State The current Spanning Tree state of the port Possible states are Blocking Learning Listening and Forwarding Forwarding packets can be transferred Designation The Spanning Tree designation for the branch off the port Possible designations are Root ports going to the root Designated ports going to a branch or Normal Path Cost The cumulative cost of all wired and wireless ...

Page 34: ...n a per radio basis select the single parent button and then click on the radio to view its available redundancies 4 2 Radio Network settings The following fields appear in the Radio Network Settings area at the left side of the Radio Configuration window Use the settings in the Radio Network Settings panel to configure the radios in your network For more information on using these settings see Co...

Page 35: ...special setting to establish the network channel and define the root of the network tree Repeater radios help extend the range of a network and help create the signal bridges that allow networked radios to communicate All RLX IH radios are capable of repeating Parent Link settings Click this button to specify how a repeater radio connects to the network For information see Parent Link settings pag...

Page 36: ... 1 A port for its parent connection 2 A port for each of its two child connections 11 and 12 BPDUs are sent out the port at a rate called the Hello Time The accepted standard value for this is 2 seconds If a radio or any other RSTP device does not get a BPDU for 2 Hello Times it assumes the RSTP device that had been there is no longer available It can then open an alternate path if one is availabl...

Page 37: ...each other Redundant connections are blocked only if spanning tree is enabled Additionally spanning tree is used to flush the Ethernet switch table when the network topology changes as described in the section on Automatic Parent Selection Firmware versions 2 5xx and above also support Rapid Spanning Tree RSTP and will default to this mode when enabled The recommended setting for spanning tree is ...

Page 38: ...meout value for this timer is the maximum age parameter of the switches Forward Delay Monitors the time spent by a port in the learning and listening states The timeout value is the forward delay parameter of the switches Path Costs The RSTP and STP algorithms use a cost to determine which connections should be used The spanning tree is formed by determining the least cost paths from any RSTP devi...

Page 39: ...RLX IH radios is to have IGMP functionality enabled although the user can disable IGMP entirely Additionally the user can specify settings associated with IGMP filtering and snooping Unknown multicast addresses can be sent to all ports flood or to none filtered by changing the IGMP Multicast Filtering option The user can specify whether or not the radio will generate IGMP queries and configure the...

Page 40: ...is received Save Saves your changes and updates the radio configuration Cancel Discards your changes without updating the radio configuration 4 2 4 Parent Link settings This configuration page opens when you click the Parent Link button on the Radio Configuration form Field Description Parent MAC The MAC Address of the radio s Parent node Parent Selection Method Automatically Choose Best The Autom...

Page 41: ...be chosen as its parent Follow List Priority When Follow List Priority is chosen the IH will select its parent from the list giving preference to the 1st entry followed by the 2nd entry and so on Parent Selection Parameters Signal Strength Threshold When the signal from a parent reaches a high enough value a stronger signal will not improve the quality of the link any further For signals that are ...

Page 42: ...m Once per second the IH radio evaluates the link it has to its parent to determine if this link is the best parent to use A cost is calculated for each entry and can be seen in the column labeled Cost in the preceding table The cost calculation is based not only on the strongest signal but on several other factors to provide optimum network communication Prioritized Parent Selection If you need m...

Page 43: ...adio and so on Prioritized Parent by Preferred Parent List With Preferred Parent the IH radio will select its parent from a list of possible parents that you specify You can list up to eight radios to choose from Best in List The IH will select its parent using the Automatic Parent Selection algorithm described above but it will limit the selection to the radios in the list The radio in the list w...

Page 44: ...Directly Linked Radios Clients Devices beyond Direct RF Links When the table is filtered to show only Directly linked radios clients an additional RSSI column is listed showing the Received Signal Strength from each radio or client linked to the radio Index Position in the list Each page shows up to 10 devices Use the Next and Previous buttons to move up and down through the table MAC Address The ...

Page 45: ... WPA pass phrase of between eight and 63 normal keyboard characters WEP key page 46 Enter five normal text characters in the WEP key field Get Keys from Radius Server page 47 Connect to RADIUS remote access dial in server to manage encryption keys Server IP The IP address for the RADIUS server Secret The password for the RADIUS server MAC Filter page 47 Check select this field to restrict connecti...

Page 46: ...ng keys frequently and it performs message integrity checks to prevent forgery and replay You can also select WEP 128 WEP 64 or None no encryption as the encryption type but none of these settings are recommended NOTE If an RLX IH is set to use WPA WEP it will connect to other radios set to WPA only or WPA WEP but it will not communicate with radios set to WEP only Likewise an RLX IH in client mod...

Page 47: ...ield the previously programmed key will not be changed when changes are applied 4 3 4 RADIUS server The 802 11i standard allows the use of a RADIUS remote access dial in server to manage encryption keys and control which radios are allowed to access the network To use this server instead of manually entering WPA phrases or WEP keys click the Get Keys from RADIUS Server button The radio first assoc...

Page 48: ...then click Upload File to upload the list of MAC addresses Browse Click Browse to navigate to a prepared text file of MAC addresses on the appropriate drive and folder and click the Upload File button Save Saves your changes and updates the radio configuration Cancel Discards your changes without updating the radio configuration 4 3 6 Hide Network SSID If you want your radio network to be hidden f...

Page 49: ...his button to change the Login Password for the radio The default password is password You should change this password and keep a record of it in a safe place to protect the radio from being reconfigured by unauthorized users DHCP Dynamic Host Control Protocol is a service provided by a server typically a router or a firewall on a local area network Devices on a network that supports DHCP can requ...

Page 50: ...llow IP Select this setting to restrict access to an SNMP manager with a particular IP address then enter the IP address in the Allow IP field Community String Enter a community string essentially a password that a manager must use to access the radio s SNMP agent Permission Select the permission level to assign to this radio Read only An SNMP Agent can view but cannot modify radio settings Read W...

Page 51: ...wise the change will be rejected New Enter the new password in this field Passwords are case sensitive Repeat Confirm the new password in this field This entry must exactly match the password you entered in the New field otherwise the change will be rejected Save Saves your changes and updates the radio configuration Cancel Discards your changes without updating the radio configuration You can ent...

Page 52: ...io restarts 4 6 Cancel Changes Click Cancel Changes to discard any settings you made during this session Note This button only applies to changes made in the Radio Configuration Diagnostic window Changes made to individual configuration forms for example Spanning Tree Parent Link and SNMP Agent settings take effect when you click the Save button on each of those forms 4 7 Factory Defaults Click th...

Page 53: ...age For more information see Primary radio functions page 54 When you run the program the List view shown in the illustration appears with a list of any radios on the same network as the computer running the RLX IH Browser If you do not see a radio you expect to see click the Scan page 58 button in the tool bar or select Scan from the File menu The preceding illustration shows the List View Refer ...

Page 54: ...dors Properties page 65 View the selected radio s properties In addition there are more options in the File menu You can print either a list of the radios properties or a topology view Change how the RLX IH Browser scans for radios 5 2 Review of Windows mouse and keyboard controls The Microsoft Windows operating system and most Windows compatible applications including the RLX IH use the computer ...

Page 55: ...dows Control Panel to reverse the operation of the mouse buttons for instance if you prefer to use your left hand to operate the mouse rather than your right hand In this training manual however we will refer to the left mouse button and right mouse button as if you are using your right hand on the mouse The left and right mouse buttons have different functions in the RadioLinx IH Browser Use the ...

Page 56: ... option ENTER Equivalent to clicking the selected button the button with the outline ESC Equivalent to clicking the Cancel button ALT underlined letter in dialog box item Move to the corresponding item Windows Program Key Combinations Key Action CTRL C Copy CTRL X Cut CTRL V Paste CTRL Z Undo General Keyboard Only Commands Key Action F1 Starts Windows Help F10 Activates menu bar options SHIFT F10 ...

Page 57: ...age 58 Import page 58 Export page 58 Freeze page 59 Print page 59 Print Preview page 59 Print Setup page 59 Exit page 59 5 3 1 Scan Setup The Scan Setup command allows you to change some settings that govern how the RLX IH Browser scans for radios In the top field of the Scan Setup dialog box you can adjust how often the program automatically scans for radios Enter a value in seconds to have the R...

Page 58: ... added to the scan list At each interval determined by the scan rate each IP address is individually queried 5 3 2 Scan The RLX IH Browser automatically scans for all active radios on the network at a regular interval but you can use the Scan command in the File menu to look for active radios at any time 5 3 3 Clear This command clears deletes all entries from the IH Browser window 5 3 4 Import Th...

Page 59: ... the contents of the RadioLinx IH Browser window Depending on the view you selected you can print either a list of the radios properties or a topology view 5 3 8 Print Preview Displays a preview of the contents of the RadioLinx IH Browser window You can use this to adjust the placement of elements so that they do not span page boundaries 5 3 9 Print Setup Displays the standard Window Print Setup d...

Page 60: ...erations menu Enter your password to log in to the radio 5 4 2 Assign IP If the radio is connected to a network with a DHCP server the radio may already have an IP address assigned to it If no address appears double click the radio listing in the RLX IH Browser or select Assign IP in the AP Operations menu In the next window click OK to accept the temporary IP address subnet mask and default gatew...

Page 61: ...th the radio from the serial port on the radio to the serial port on your computer 2 Start RadioLinx Industrial Hotspot Browser 3 Open the AP Operations menu and then choose Update Firmware 4 Enter the password for the radio This is the same password you use to log into the radio from the Radio Configuration Diagnostic Utility page 27 5 Click the Browse button to locate the Image File firmware ver...

Page 62: ...gs Menu The API Dialogs menu contains the following commands Wireless Clients page 62 Ethernet Nodes page 63 Scan List page 64 Properties page 65 5 5 1 Wireless Clients This dialog box opens when you open the AP Dialogs menu and choose Wireless Clients Use this dialog box to see information about wireless clients attached to the radio ...

Page 63: ...logs menu and choose Ethernet Nodes Use this dialog box to see information about Ethernet devices attached to the radios The following illustration shows a list of Ethernet devices by IP address and MAC ID attached to the Ethernet port of Tourmaline_14 In addition to the IP and MAC ID it gives an age for each entry which is the amount of time since a packet has been heard from that device ...

Page 64: ...ternate path which can also be seen if the parents button is selected in the menu bar blue lines will link the radio to its alternate parents 802 11 Access Point Detector The IH radio can be used as an installation tool to analyze the 802 11 environment and provide the user with information on choosing antenna location and channel selection By using the table in the radio you can mount an IH radio...

Page 65: ...ield Description Radio Name The name of the selected radio MAC The physical media access control address for the network interface IP Mask and Gateway The radio s IP address subnet mask and default gateway For information see Radio Access settings page 48 IP State Indicates whether a radio s IP address has been set Uninit ialized or OK SSID A name that identifies a wireless network You assign this...

Page 66: ...a wireless connection Tx and Rx The transmission throughput rate and the received throughput rate Both rates are measured in kilobytes per second KB s Software Version and Boot Version The versions of the radio s firmware and its boot code Image The image type can be Primary or Secondary Compression Indicates whether the radio s firmware images are compressed or not Ethernet The Ethernet connectio...

Page 67: ...atus of the Caps Lock and Num Lock keys on your computer keyboard Use the corner of the status bar to drag and resize the RLX IH Browser window 5 6 3 List View List View shows a list of all the connected radios in a grid arranged similarly to data in a spreadsheet Resize the window or scroll across to see all of the available columns Click between column headers and drag to the left or right to re...

Page 68: ... page 40 In the topology view you can double click a radio to log in to the Radio Configuration Diagnostic Utility and change the radio s settings To view a radio s properties right click on a radio representation in the topology view and then select Properties from the resulting menu Refer to Topology View key page 68 for an explanation of the symbols that appear in this view Topology View key Fo...

Page 69: ...the radio does not indicate the number of devices on the connection Wireless clients PCMCIA cards are linked to this radio the number of clients linked is indicated by the number of boxes Signal strength the width of the line is not calibrated Alternate parents 5 6 5 Zoom In Use the Zoom In command in Topology View to enlarge the size of the items in the RadioLinx IH Browser window ...

Page 70: ...0 2007 5 6 6 Zoom Out Use the Zoom Out command in Topology View to Topology View to reduce the size of the items in the RadioLinx IH Browser window 5 6 7 Zoom to Fit Use the Zoom to Fit command in Topology View to change the size of the items so that the entire network fits within the the RadioLinx IH Browser window ...

Page 71: ...the border around the area of the IH Browser window that you can print using the Print command on the File menu 5 6 9 Reset Columns Use the Reset Columns command to restore the column size and order to their default values You will be prompted to confirm this action 5 7 Help Menu The Help menu contains the following commands Help Topics page 72 About RLX IH Browser page 72 ...

Page 72: ... that lead you to more information if you need it Links are always underlined Use your mouse to click the underlined text to follow a link and open a help page with more information You can use the Search tab to search for words or phrases inside a help file The help system shows you a list of help topics that contain the words you typed in the Search field Click a topic from the list to view the ...

Page 73: ...significant antenna cable loss is present The radio can operate at 11MB s even over long distances You can develop a highly reliable wireless network by creating redundant page 37 wireless paths Multiple master page 34 radios can be installed without any special programming or control Repeater page 34 radios can connect to any master at any time if one master goes down the repeater connects to ano...

Page 74: ...asy to use Use the Radio Configuration Diagnostic Utility which runs in Microsoft Internet Explorer to configure the radio optionally you can use an SNMP manager for configuration The radio comes with a Windows based utility called RLX IH Browser that finds all the radios on the network and lists information about them A topology view in the RLX IH Browser shows how the wireless network is linked ...

Page 75: ...formation that had been previously entered Version 1 Revert to Existing Features If you prefer to avoid adding these features to your network you may also continue to use your existing system as is and configure new radios to be compatible with the existing network All new radios shipped from ProSoft Technology contain Version 2 firmware To revert to Version 1 download Version 1 into any new radio...

Page 76: ...nals are labeled positive DC connection and DC ground connection You can order an optional AC to DC power supply adapter that is pre wired with a power connector The DC power wires must be less than 3 m to meet regulatory requirements Label Connect to 10 to 24 VDC DC Ground 6 3 2 Cable specifications The recommended cable is category 5 or better A category 5 cable has four twisted pairs of wire th...

Page 77: ...ion and cable type agree Refer to Ethernet cable configuration page 77 for a diagram of how to configure Ethernet cable 6 3 3 Ethernet cable configuration NOTE The standard connector view shown is color coded for a straight through cable Crossover cable Straight through cable RJ 45 PIN RJ 45 PIN RJ 45 PIN RJ 45 PIN 1 Rx 3 Tx 1 Rx 1 Tx 2 Rx 6 Tx 2 Rx 2 Tx 3 Tx 1 Rx 3 Tx 3 Rx 6 Tx 2 Rx 6 Tx 6 Rx 6 4...

Page 78: ...nto 2D slices just like the antenna pattern The beam width of an omnidirectional pattern is 360 because the power is equal in all directions 6 4 2 Antenna gain Antenna gain is a measure of how strongly an antenna radiates in its direction of maximum radiation intensity compared to how strong the radiation would be if the same power were applied to an antenna that radiated all of its power equally ...

Page 79: ...80 for more information The bi directional amplifier is designed to operate with a coaxial cable loss between the radio and amplifier of 6 5 dB to 20 dB The output is always 1 2W regardless of the input level With less than 6 5 dB loss the amplifier maximum input rating will be exceeded With more than 20 dB cable loss the amplifier will not turn on Refer to Amplifier chart page 79 to view the mini...

Page 80: ...81 Yagi array page 81 Parabolic reflector page 82 Antenna selection is dependent on whether the bi directional amplifier is being used or not For each approved antenna there is a specified minimum distance the antennas must be separated from users for safe exposure limits according to FCC part 2 1091 Approved antennas in Europe and other countries accepting CE page 83 Approved antennas in Mexico p...

Page 81: ...m width depends on the number of elements length where more elements equal narrower beam width The antenna gain also depends on the number of elements length where more elements produce higher gain Typical gain is 5 to 10 dBi The antenna polarity is linear or parallel to the length of the antenna Yagi array antennas A yagi antenna is composed of an array of linear elements each parallel to one ano...

Page 82: ...oduces higher gain Typical values are 6 to 15 dBi The antenna polarity is linear parallel to the elements perpendicular to the boom Parabolic reflector antennas A parabolic reflector antenna consists of a parabolic shaped dish and a feed antenna located in front of the dish Power is radiated from the feed antenna toward the reflector Due to the parabolic shape the reflector concentrates the radiat...

Page 83: ... Patch Directional 13 dB N RP 22H x 22 28 cm Patch Directional 19 dB N RP 15 5 x 15 5 57 cm Yagi Directional 14 dB N RP 81L x 9 0 28 cm Parabolic Directional 15 dB N RP 40H x 51W x 25D 36 cm Parabolic Directional 19 dB N RP 58H x 66W x 26D 57 cm Parabolic Directional 24 dB N RP 78H x 96W x 29D 100 cm Only allowed in a point to point network Approved antennas in Europe CE The gain of the antenna co...

Page 84: ...h Directional 13 dB N RP 22H x 22 28 cm Yagi Directional 14 dB N RP 81L x 9 0 28 cm Only allowed in a point to point network 6 4 6 Antenna location spacing and mounting Consider the following points regarding antenna location spacing and mounting When placing antennas ensure a clear line of sight between the master radio s antenna and all of the other radio antennas if at all possible If the site ...

Page 85: ...user or 20 cm whichever is greater If a specific application requires proximity of less than 20 cm the application must be approved through the FCC for compliance to part 2 1093 The installer of this radio equipment must ensure that the antenna is located or pointed such that it does not emit RF fields in excess of Health Canada limits for the general population refer to Safety Code 6 obtainable f...

Page 86: ...OCATIONS ONLY IF INSTALLED IN AN APPROVED ENCLOSURE AND POWERED BY A CLASS 2 POWER SUPPLY WARNING EXPLOSION HAZARD SUBSTITUTION OF COMPONENTS MAY IMPAIR SUITABILITY FOR CLASS I DIVISION 2 AVERRTISSEMENT RISQUE D EXPLOSION LA SUBSTITUTION DE COMPOSANTS PEUT RENDRE CE MATERIEL INACCEPTABLE POUR LES EMPLACEMENTS DE CLASSE I DIVISION 2 WARNING EXPLOSION HAZARD DO NOT DISCONNECT EQUIPMENT UNLESS POWER ...

Page 87: ... E S UK NOTE Member states in the EU with restrictive use for this device are crossed out This device is also authorized for use in all EFTA member states CH ICE LI and NOR IMPORTANT This device is a 2 4 GHz low power RF device intended for office and home use in all EU and EFTA member states except in France where restrictive use applies 6 6 Glossary Term Definition access point AP A generic term...

Page 88: ...ess written as four numbers separated by periods Each number can be zero to 255 For example 1 160 10 240 could be an IP address key A set of information from 40 bits to as much as 256 bits that is used as a seed by an encryption algorithm to encrypt data MAC ID A unique hexadecimal number that identifies any Ethernet device master radio The root radio in a network You must have at least one master...

Page 89: ...otection than WEP against attacks for several reasons TKIP distances the encryption key from the actual data by performing several algorithms to the key before generating the encrypted data it performs dynamic key management by changing the temporal keys frequently and it performs message integrity checks to prevent forgery and replay wired equivalency protocol WEP The original security protocol u...

Page 90: ...1 716 5100 1 661 716 5101 Fax ProSoft Technology 1675 Chester Avenue Fourth Floor Bakersfield CA 93301 USA Brazil 1 281 298 9109 1 281 298 9336 Fax Rua Vergueiro 2949 sala 182 Edifício Vergueiro Work Center Vila Mariana São Paulo SP Cep 04101 300 Europe Middle East Africa 33 0 5 34 36 87 20 33 0 5 61 78 40 52 Fax Zone d activité de Font Grasse 17 rue des Briquetiers F 31700 Blagnac Asia Pacific 60...

Page 91: ... EMEA prosoft technology com Languages spoken include French English North America 1 661 716 5100 support prosoft technology com Languages spoken include English Spanish Latin America Sales only 1 281 298 9109 latinam prosoft technology com Languages spoken include Spanish English Brasil 55 11 5084 5178 eduardo prosoft technology com Languages spoken include Portuguese English 7 2 RMA Policies and...

Page 92: ...redit Returns Customer has an application change ordered too many does not need etc 10 Restocking Fee if Factory Seal is not broken 20 Restocking Fee if Factory Seal is broken ProSoft retains the right in its absolute and sole discretion to reject any non warranty credit returns if the return is not requested within three 3 months after shipment of the Product to Customer if the Customer fails to ...

Page 93: ... Customer may choose to send unit in for evaluation to determine if repair can be made Customer will pay for shipping If unit cannot be repaired the Customer may purchase a new unit Unrepairable Units 3150 All 3750 3600 All 3700 3170 All 3250 1560 Can be repaired if defect is in the power supply 1550 Can be repaired if defect is in the power supply 3350 3300 1500 All 30 is an estimated repair cost...

Page 94: ...ion ProSoft will correct any failure of the Product to conform to specifications or any defect in material or workmanship of the Product with either new or used replacement parts Such repair including both parts and labor will be performed at ProSoft s expense All warranty service will be performed at service centers designated by ProSoft If ProSoft is unable to repair the Product to conform to th...

Page 95: ...l not be liable for technical or editorial errors or omissions made herein nor for incidental or consequential damages resulting from the furnishing performance or use of this material The user guides included with your original product purchased by you from ProSoft contain information protected by copyright No part of the guide may be photocopied or reproduced in any form without prior written co...

Page 96: ...amages so the above limitations may not apply to you This Warranty gives you specific legal rights and you may also have other rights which vary from state to state 7 3 7 Time Limit For Bringing Suit Any action for breach of warranty must be commenced within 15 months or in the case of RadioLinx modules 39 months following delivery of the Product 7 3 8 No Other Warranties Unless modified in a writ...

Page 97: ...l Restrictions Relating To Software And Other Intellectual Property In addition to complying with the Terms of this Warranty Customers purchasing software or other intellectual property shall comply with any license agreement accompanying such software or other intellectual property Failure to do so may void this Warranty with respect to such software and or other intellectual property 7 3 11 Allo...

Page 98: ...Parents 31 65 C Cable specifications 10 13 77 78 Cancel Changes 53 Change password 11 52 Check the Ethernet cable 24 25 Clear 58 59 Collinear array antennas 82 83 Configuring the Radios 10 35 Connect 55 60 61 Connecting antennas 23 77 79 Controlling Law and Severability 99 CSA C22 2 213 M1987 UL Std 1604 listing 88 D Detecting the Radio 14 Diagnostics and Troubleshooting 12 14 24 52 Dialog Box Com...

Page 99: ... of Units out of Warranty 94 Return of Units Under Warranty 94 Review of Windows mouse and keyboard controls 55 RLX IH Backward Compatibility 62 76 RMA Policies and Conditions 93 S Save the Radio Configuration 11 18 Scan 54 58 59 Scan List 55 63 65 Scan Setup 58 Security settings 17 46 67 Set Up a Client 9 20 36 76 Set Up a Repeater 11 18 Set Up the Master Radio 11 15 SNMP Agent settings 51 Spanni...

Reviews: