background image


Technical Manual

HDFS-550/551/552 Frame Synchronizer Cards


Publication 81-9059-0606-0, Rev. A


iv 


List of Figures 

 
Figure 1: HDFS-550/551/552 High Definition Frame Synchronizer Cards.............................................. 1-2


Figure 2: HDFS-552 High Definition Frame Synchronizer Card.............................................................. 1-3


Figure 3: FRM-504 (4RU) High Density System Frame .......................................................................... 1-4


Figure 4: RCP-502 Compact Remote Control Panel................................................................................. 1-4


Figure 5: RCP-503 Remote Control Panel ................................................................................................ 1-4


Figure 6: FRM-504 Integrity System Frame ............................................................................................. 2-1


Figure 7: FRM-501 Integrity System Frame ............................................................................................. 2-2


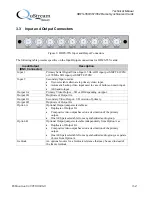
Figure 8: HDFS-55X Input and Output Connectors.................................................................................. 3-2


Figure 9: RCP-502 Compact Remote Control Panel................................................................................. 4-1


Figure 10: RCP-503 Express Remote Control Panel............................................................................... 4-11


Figure 11: RCP-502 Compact Remote Control Panel............................................................................... 5-1


Figure 12: RCP-503 Express Remote Control Panel................................................................................. 5-6


Figure 13: Integrity System Flow Diagram ............................................................................................... 6-1


Figure 14: Jumpers on a Typical HDFS-55X Card ...................................................................................B-1


Figure 15: User-Selected Jumper Settings.................................................................................................B-1


Summary of Contents for HDFS-550

Page 1: ...TECHNICAL MANUAL HDFS 550 551 552 High Definition Frame Synchronizers Publication 81 9059 0606 0 Rev A April 2007 ...

Page 2: ...cts are covered by U S and foreign patents issued and pending Information in this publication supersedes that in all previously published materials Specification and price change privileges reserved Fortel DTV Inc Fortel DTV and the Fortel DTV logo are registered trademarks Integrity DTM Dynamic Threshold Modification and Dual Band Processing are trademarks of Fortel DTV Inc The content of this ma...

Page 3: ...t Remote Control Panel Video 4 1 Status Alarms 4 3 Input Input Configuration 4 4 Output Output Configuration 4 5 Proc Controls 4 7 Color Corrector 4 8 Vid Processing 4 9 User Reset 4 9 Change Mode 4 9 Card Info 4 10 4 3 RCP 503 Remote Control Panel Video 4 11 Status Alarms 4 12 Input Cfg Input Configuration 4 13 Card Info 4 13 Reset Procs Reset the Proc Amp 4 14 VidProcess Video Processing 4 15 Ou...

Page 4: ... iii Chapter 6 Troubleshooting 6 1 6 1 Network Communication Errors 6 1 6 2 Recommended Network Configuration 6 1 6 3 When Things Do Not Work 6 2 No frames or cards found 6 2 Selecting Ethernet cables 6 3 Appendix A SNMP Error Reporting A 1 Appendix B Installing Jumpers on HDFS 55X Cards B 1 ...

Page 5: ...ol Panel 1 4 Figure 5 RCP 503 Remote Control Panel 1 4 Figure 6 FRM 504 Integrity System Frame 2 1 Figure 7 FRM 501 Integrity System Frame 2 2 Figure 8 HDFS 55X Input and Output Connectors 3 2 Figure 9 RCP 502 Compact Remote Control Panel 4 1 Figure 10 RCP 503 Express Remote Control Panel 4 11 Figure 11 RCP 502 Compact Remote Control Panel 5 1 Figure 12 RCP 503 Express Remote Control Panel 5 6 Fig...

Page 6: ...warnings in the unit and in the operating instructions Do not use this equipment in or near water Disconnect AC power before installing any options unless explicitly told to do so in this manual This equipment is grounded through the grounding conductor of the power cord To avoid electric shock connect the power cord to the equipment and plug it into a properly grounded receptacle before connectin...

Page 7: ...manual for proper input voltage range Circuit boards in this equipment are populated with surface mount and FPGA components Special tools and techniques are required to safely and effectively troubleshoot and repair modules that use SMT or FPGA components For this reason service and repair of Fortel DTV products incorporating surface mount technology are supported only on a module exchange basis C...

Page 8: ...rrors and unwanted comb artifacts Its Perfect Palette Legalizer fixes gamma errors better by first analyzing what color it was supposed to be and then correctly adapting each pixel to a legal value without causing a hue shift while minimizing clipping effects There are independent settings for RGB Luminance and Composite thresholds The following are key features of HDFS 55X cards Any input standar...

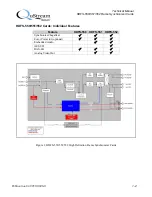
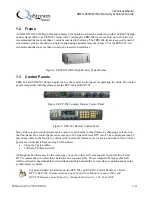
Page 9: ... 0606 0 1 2 HDFS 550 551 552 Cards Individual Features Feature HDFS 550 HDFS 551 HDFS 552 Synchronizer Legalizer 9 9 9 Color Corrector optional 9 9 9 Embedded Audio 9 9 AES I O 9 DAS 441 9 9 9 Analog Video Out 9 9 Figure 1 HDFS 550 551 552 High Definition Frame Synchronizer Cards ...

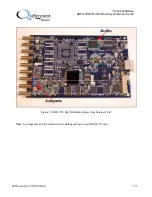
Page 10: ...nual HDFS 550 551 552 Frame Synchronizer Cards Publication 81 9059 0606 0 1 3 Figure 2 HDFS 552 High Definition Frame Synchronizer Card Note See Appendix B for information on installing jumpers on an HDFS 55X card ...

Page 11: ...Remote Control Panel Figure 5 RCP 503 Remote Control Panel One of these remote control panels can be used to control cards in other frames by changing a selection on the front panel One control panel can access up to 299 separate Fortel DTV cards The control panel can be placed anywhere in the facility to control cards in multiple frames over a local area network LAN Control panels are connected t...

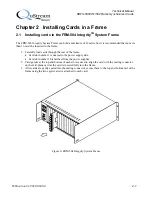
Page 12: ... Carefully load cards through the rear of the frame Card slot number 1 is nearest to the power supply side Card slot number 18 is farthest from the power supplies 2 Card guides at the top and bottom of each slot are used to align the card with the mating connector on the mid plane card as the card is inserted fully into the frame 3 After cards are gently seated into the mating connector secure the...

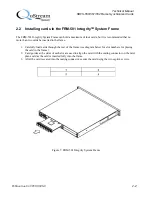
Page 13: ...an two cards be inserted in the frame 1 Carefully load cards through the rear of the frame see diagram below for slot numbers for placing the card in the frame 2 Card guides at the sides of each slot are used to align the card with the mating connector on the mid plane card as the card is inserted fully into the frame 3 After the card is seated into the mating connector secure the card using the t...

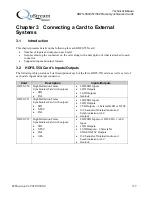
Page 14: ...of each of the three HDFS 55X cards as well as a list of each card s input and output connectors Card Description Inputs Outputs HDFS 550 High Definition Frame Synchronizer Card with outputs SDI PAL 2 HD SDI Inputs 2 HD Outputs 3 SDI Outputs Genlock HDFS 551 High Definition Frame Synchronizer Card with outputs SDI NTSC PAL 2 HD SDI Inputs 2 HD Outputs 2 SD Outputs 2 Selectable SD or NTSC 16 Channe...

Page 15: ...n main input AES audio input Output 1A Primary Video Output SD or HD depending on input Output 1B Duplicate of Output 1A Output 2A Secondary Video Output SD version of primary Output 2B Duplicate of Output 2A Option A Optional Output jumper selectable as Duplicate of Output 2A Composite video output based on a decimation of the primary output One AES pair selectable from any embedded audio group O...

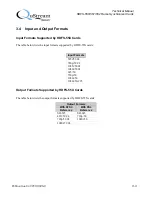
Page 16: ...lists the input formats supported by HDFS 55X cards Input Formats 525i 59 94 720p 59 94 1035i 59 94 1080i 59 94 625 50 720p 50 1080i 50 1080i 50 295 Output Formats Supported by HDFS 55X Cards The table below lists the output formats supported by HDFS 55X cards Output Formats With NTSC Reference With PAL Reference SD 525 SD 625 487i 59 94 720p 50 720p 59 94 1080i 50 1080i 59 94 ...

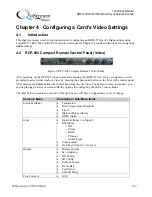
Page 17: ...lect either Audio or Video by pressing the appropriate button on the front of the control panel After pressing the Video button the control panel displays the Video Config menu screen From here you can step through a series of screens offering options for configuring the card s Video settings The table below presents an overview of the options you will have an opportunity to set or change Screen s...

Page 18: ...lack Balance Gamma Balance Black CC Memory Save CC Memory Recall Vid Processing Min FRM Delay User Reset Reset User Controls Change Mode Not allowed with HDFS Card Info Card Type For more detailed information on the RCP 502 and RCP 503 Control Panels see Fortel DTV s RCP 502 Compact Remote Control Panel User Manual January 2005 and RCP 503 Remote Control Panel User Manual Revision No 1 01 June 200...

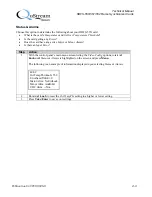
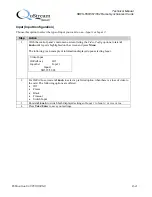
Page 19: ...r or Minor Alarms Is there an Input Error Step Action 1 With the control panel s main menu screen listing the Video Config options rotate A1 knob until Status Alarms is highlighted on the screen and press Menu The following is an example of information displayed upon selecting Status Alarms 40 0C OvrTempThr knob 55 0 ErrorSecs TAKE 0 Major Alrm NoVidLock Minor Alrm AudInErr UDC Alrm NA 2 Rotate A1...

Page 20: ...nob until Input is highlighted on the screen and press Menu The following is an example of information displayed upon selecting Input Video Input OnVidLoss Off Input Sel Input 1 Input 1 SD525 59 94 2 For OnVidLoss rotate A1 knob to select a preferred option when there is a loss of video to the card The following options are offered Off Freeze Black Timeout Switch Input 3 Rotate A2 knob to switch b...

Page 21: ...attern Encoder Mode 2 Rotate A1 knob to switch between any of the eight 8 options listed in step 1 3 To check or set any of the options noted in step 1 refer to the table below Primary Output Freeze Mode Field 1 Note Rotate A2 knob to change setting between Field 1 Field 2 or Frame Sec AspRatio 16X9 Lbox Rotate A1 knob to change setting HD Config Outputs 1A 1B HD Config HD CloCap HD Timecode HD Le...

Page 22: ...switch between these two options Frame Rate 59 9 Hz Note Rotate A1 knob to switch between 50 Hz and 59 9 Hz Test Pattern 75 Bars Multiburst Sweep NTC7 Composite Luma Ramp YC Ramp YUV Ramp Blanking Note Rotate A1 knob to switch between these options Encoder Mode On Test Bars Off Note Rotate A1 knob to switch between these options 4 After setting or changing any settings press Take Enter to save you...

Page 23: ... Video Config options rotate the A1 knob until Proc Controls is highlighted on the screen and press Menu The following is an example of information displayed upon selecting Proc Controls Video Proc Controls HUE 0 0 deg GAIN 100 0 BLACK 0 m V CHROMA 100 0 2 Depending on which control you wish to set or change rotate one of the following knobs to make your selection A1 HUE A2 GAIN A3 BLACK A4 CHROMA...

Page 24: ... for Unity Note The SEL knob is also referred to as the A1 knob 2 Each time you rotate A1 knob one of the following screens appears Use the A2 A3 and A4 knobs to change the settings on each screen Color Corrector White Balance RED 1 000 GRN 1 000 BLU 1 000 Color Corrector Black Balance RED 1 000 GRN 1 000 BLU 1 000 Color Corrector Gamma Balance RED 1 00 GRN 1 00 BLU 1 00 Color Corrector Black Blk ...

Page 25: ... your HDFS 55X card s current settings to the factory default settings Step Action 1 With the control panel s main menu screen listing the Video Config options rotate A1 knob until User Reset is highlighted on the screen and press Menu The following is an example of information displayed upon selecting User Reset Reset User Controls Press TAKE Ready Note The word TAKE on a screen refers to the Tak...

Page 26: ...ain menu screen listing the Video Config options rotate A1 knob until Card Info is highlighted on the screen and press Menu The following is an example of information displayed upon selecting Card Info CARD INFO Card Type c 0 1 4 6 2006 11 28 udc error vid1 2006 11 01 vid2 2006 11 22 vid3 2006 12 18 aud 2006 08 04 2 Press Back to return to the main menu screen and rotate A1 knob to select another ...

Page 27: ...ontrol Panel Screen s Main Menu Sub Menu Items Status Alarms Minor or Major Alarms Errors Temperature and Over Temperature Threshold Input Cfg Input 1 or Input 2 Card Info Model CPU and FPGA Loads Alias Name Mode Reset Procs Reset Video Processing Amplifier VidProcess Color Corrector Full YUV Gamut Noise Reduce Legalizers Detail Enhance De Interlace Mode Output Cfg Test Patterns Pri Out Config Sec...

Page 28: ...nd side of screen The following is an example of information displayed upon selecting Status Alarms For major or minor alarms MajAlm NoVidLock MajLat NoVidLock MinAlm AudInErr MinLat AudInErr For errors DataErr OK ErrSecs 0 For temperature and Over Temperature Threshold 40 0 deg C OvrTempThresh 55 5 deg C 2 Rotate blue knob immediately below the OvrTempThresh setting at the bottom of the screen to...

Page 29: ... determine the following about your HDFS 55X card or change its settings What is the specific Model of your HDFS 55X card What are the release dates for your card s CPU and FPGA Loads Change your card s Alias Name Reset The Card s alias Note Each HDFS 55X card has a default name assigned at the factory You can assign an alias name to a card and that name is stored on the card in non volatile flash...

Page 30: ...sh to change rotate blue knob immediately below Change Letter until a selected letter digit is displayed 5 Repeat steps 3 and 4 until a new name has been selected 6 Press the small button next to reset top button on the right hand side of the screen to reset the alias back to the factory default Reset Procs Reset the Proc Amp Choose this option to reset your HDFS 55X card s Video Processing Amplif...

Page 31: ... set any of the three 3 options noted in step 1 refer to the table below Color Corrector If this option is not enabled the menu will be grayed out If this option is enabled the Color Correct menu will be lit up in yellow and you can change the following color values for the card o White Balance o Black Balance o Gamma o Black Level Stretch To reset color values to unity press Set CC to Unity To st...

Page 32: ...e lettering underneath 2 To check or set any of the options noted in step 1 refer to the table below Test Patterns a Press Test Patterns to activate the onboard test pattern generator b Press small button next to Enable to turn on feature c Rotate the blue knob below Pattern to select a desired pattern Pri Out Config Press Pri Out Config to access the following settings Timing Adjust Horizontal an...

Page 33: ...ings Step Action 1 From the control panel s main menu screen press the small button next to Card Reset third button down on the right hand side of the screen 2 To reset the card to the factory settings press the button next to Reset Note This procedure does not affect timing or calibration settings Freeze Choose this option to turn On or Off the HDFS 55X card s Freeze feature Step Action 1 From th...

Page 34: ...menu screen From here you can step through a series of screens offering options for configuring the card s Audio settings The two tables below present easy to use formats for configuring an HDFS 55X card s audio options using a RCP 502 Remote Control Panel The first table is for the HDFS 550 card and the second table is for the HDFS 551 and 552 cards The tables provide instructions on what knobs t...

Page 35: ...ES 2 1 Ch 03 AES 2 2 Ch 04 To change one of these four settings do the following Rotate A1 knob to change channel for AES 1 1 Rotate A2 knob to change channel for AES 1 2 Rotate A3 knob to change channel for AES 2 1 Rotate A4 knob to change channel for AES 2 2 Chan Lvl Mute Ph Audio Out Level Chan 1 4 o Ch 1 1 1 0 0 dB o Ch 2 1 2 0 0 dB o Ch 3 1 3 0 0 dB o Ch 4 1 4 0 0dB Chan 5 8 o Ch 5 2 1 0 0 dB...

Page 36: ...5 2 1 Off o Ch 6 2 2 Off o Ch 7 2 3 Off o Ch 8 2 4 Off Chan 9 12 o Ch 9 3 1 Off o Ch 10 3 2 Off o Ch 11 3 3 Off o Ch 12 3 4 Off Chan 13 16 o Ch 13 3 1 Off o Ch 14 3 2 Off o Ch 15 3 3 Off o Ch 16 3 4 Off Rotate A1 knob to advance through the four first level selections above 1 Chan 1 4 2 Chan 5 8 3 Chan 9 12 and 4 Ch 13 16 After making a selection press Menu to get additional selections specific to...

Page 37: ...onal selections specific to those channels see above Rotate A1 knob to switch between Normal and Invert for Chs 1 5 9 and 13 A2 knob for Chs 2 6 10 and 14 A3 knob for Chs 3 7 11 and 15 and A4 knob for Chs 4 8 12 and 16 Bank Lvl ALC Lim Grouped Channels Bank Level o BANK 1 0 0 dB o BANK 2 0 0 dB o BANK 3 0 0 dB o BANK 4 0 0 dB ALC o Bank Select 1 o ALC Enable Off o ALC Level 0 0 dBFS o ALC Rate 0 L...

Page 38: ...0 15 For Bank Config Rotate A1 knob to switch Ch 01 to from Ch 01 up to Ch 03 Rotate A2 knob to switch Ch 02 to from Ch 02 up to Ch 07 Rotate A3 knob to switch Ch 03 to from Ch 03 up to Ch 15 Rotate A4 knob to switch Ch 04 to from Lip Sync Tracking Medium Add Offset 0 000 sec Rotate A1 knob to switch Tracking between Slow Medium and Fast Rotate A2 knob to increase or decrease the sec setting Tone ...

Page 39: ...elow present easy to use formats for configuring an HDFS 55X card s audio options using a RCP 503 Remote Control Panel The first table is for the HDFS 550 card and the second table is for the HDFS 551 and HDFS 552 cards The tables provide instructions on what knobs to use to set each option Configuring Audio Settings on HDFS 550 Card From the Configuration screen press the small square button next...

Page 40: ...ed rotate blue knobs to change 0 0 dB for Ch 05 Ch 06 Ch 07 or Ch 08 With Grp 3 selected rotate blue knobs to change 0 0 dB for Ch 09 Ch 10 Ch 11 or Ch 12 With Grp 4 selected rotate blue knobs to change 0 0 dB for Ch 13 Ch 14 Ch 15 or Ch 16 Phase With Grp 1 selected press the small square button next to Phase o The settings under Ch 01 Ch 04 along the bottom of the screen change from 0 0 dB to Nor...

Page 41: ...seful for quickly setting audio levels for multiple channels simultaneously For example because of a particular hardware setup you may want to have Channels 1 6 set up in Bank 1 Channels 7 and 8 set up in Bank 2 Channels 9 11 in Bank 3 and Channels 12 16 in Bank 4 Complete the steps below to 1 Reset All Audio Gains to 0 0 dB and 2 set up Bank Config for four Banks of audio Reset All Audio Gains Pr...

Page 42: ...e Configuration screen press the small square button next to Input Status and the following screen example appears providing Audio In information for specific groups Audio In Status DEmbd Grp1 No Input No Input No Input No Input DEmbd Grp2 No Input No Input No Input No Input DEmbd Grp3 No Input No Input No Input No Input DEmbd Grp 4 No Input No Input No Input No Input AES in No Input No Input Tone...

Page 43: ...G 1 TG 2 TG 3 or TG 4 to increase or decrease the dBFS settings for that specific Tone Generator Lip Sync From the Configuration screen press the small square button next to Lip Sync and the following screen example appears FS 552 Audio Lip Sync Adjust Tracking Slow Add Offset 0 000 sec Rotate blue knob immediately below Tracking to switch its setting between Slow Medium and Fast Rotate blue knob ...

Page 44: ...isplay their settings for the channel you have selected Those settings do not change if there is no change for the channel you have selected If you wish to change the settings for is SRC SumWith and SumBalance for your selected channel rotate blue knob immediately below to make those changes Those changes will now be recorded for your selected channel Press the small square button next to AES Out ...

Page 45: ...dio ALC Bank ALC Peak Limiter Level 0 0 dBFS Rate 0 Level 0 0 dBFS Rate 0 Press the small square button next to ALC to switch its setting between Off and On Press the small square button next to Lim Limiter to switch its setting between Off and On Rotate blue knob immediately below the ALC Level setting to increase or decrease its dBFS setting Rotate blue knob immediately below the ALC Rate settin...

Page 46: ...12 Ch 13 to Ch 16 Rotate blue knob immediately below Ch 01 to Ch 04 Bank 1 to change the Ch 04 setting to a higher or lower channel number You will note that the numbers in the next cell Bank 2 to the right of the one you are working in will change to a higher or lower channel number depending on what you set up for Bank 1 Repeat this process for Bank 2 Bank 3 and Bank 4 AdjacentAudBrd From the Co...

Page 47: ...causes of problems identified here with ways to isolate them and render a solution Figure 13 Integrity System Flow Diagram 6 2 Recommended Network Configuration The recommended configuration for Integrity is to use an off the shelf Ethernet switch to connect all frames and RCPs For large systems multiple switches may be cascaded All devices are connected using Ethernet patch cables such as those u...

Page 48: ...e the controller card ZFCB in the frame is seated in its card socket properly or completely If the card is not seated properly it will result in a frame s inability to receive communications If the Remote 1 status LEDs are both extinguished this is possibly the cause of the communication failure Remove the pop off front cover turn the power supplies off then remove the inner center cover to access...

Page 49: ...is will verify that each panel works with the frame After ALL RCPs have been tested this way one at a time you are ready to connect multiple panels for the first time in this fault isolation process 7 Connect a second RCP in the same manner as the first to the Ethernet switch Verify that it communicates correctly with the Integrity system frame over the Ethernet Continue to add one RCP at a time v...

Page 50: ...m Description cardType One of nine card types FS UDC UCP x 550 551 552 etc cardAlias User assigned name string cardRev Software version cardTemp Card temperature in degrees Celsius overTempAlarm Card temperature greater than the threshold User defined setting that defaults to 55 degrees Celsius refAlarm Loss of Genlock vidAlarm Loss of input video vidInSel 0 Input 1 1 Input 2 majorAlarm 0 OK 1 Ove...

Page 51: ...ases jumpers will have been installed on your HDFS 55X card at the factory before the card was delivered and ready for installation However in the event that procedure needs to be corrected or repeated onsite this appendix provides information for installing the jumpers Figure 14 Jumpers on a Typical HDFS 55X Card Figure 15 User Selected Jumper Settings ...

Reviews: