background image

5-86

PFC-6030 • 5403595 • REV C-1 • 10/13

Relay Board (RLY-5)

The panel supports up to thirty-one (31) Relay Boards. Each RLY-5 provides five (5) Form-C relay outputs, which may be 

individually mapped to any zone.

To add and configure a relay board:

1.  Select 

RLY-5 

from the system panel.

2.  Click the 

Add Device button

 to display the 

“Add Device” window

.

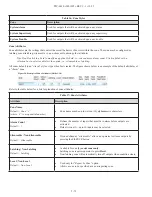
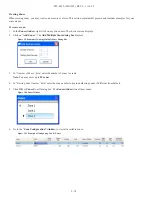
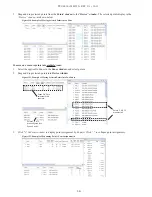
Figure 123. Example of the Add RLY-50 Window

3.  Double-click in the 

“Name” field

 to customize name. 

4.  Double-click in “

Address” field 

to adjust address, if needed.

5.  Repeat steps, as needed, to continue adding RLY-5s.

Fiber Interface Bridge (FIB-1000)

The panel supports up to thirty (30) FIB-1000 boards. This optional board allows the standard 4-wire P-Link bus to be converted 

to and/or from fiber optic cable.

To add and configure the FIB-1000:

1.  Select the 

applicable function

 from the system panel.

2.  Click the 

Add Device button

.  The 

“Add Device” window

 displays.

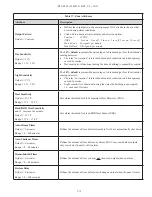
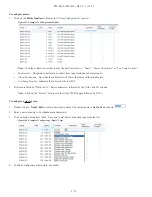
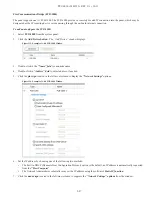
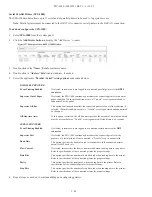
Figure 124. Example of the Add FIB-1000 Window

3.  Double-click in the 

“Name” field

 to customize name. 

4.  Double-click in “

Address” field 

to adjust address, if needed.

5.  Click in the 

"Class A" selection box,

 if applicable.

6.  Repeat steps, as needed, to continue adding FIB-1000s.

Summary of Contents for PFC-6030

Page 1: ...ol Panel Installation Operation Programming Manual Manual 5403595 Rev C 1 10 13 Potter Electric Signal Company LLC St Louis MO Customer Service 866 240 1870 Technical Support 866 956 1211 Fax 314 595...

Page 2: ...n or repair by unauthorized persons or if for any other reason POTTER determines that said product is not operating properly as a result of causes other than defective manufacture labeling or packagin...

Page 3: ...olator Device Load Calculation 2 10 Scenario 1 Class A Loop Isolated Devices Configuration 2 10 Scenario 2 Class B Loop Isolated Branch Configuration 2 11 Battery Connections 2 12 Main Supply Circuit...

Page 4: ...FIB 1000 Wiring 3 33 Serial Parallel Gateway Installation SPG 1000 3 34 DACT Installation 3 35 P Link Dip Switch Locations 3 36 Section 4 Operation 4 37 Control Panel Basic Operation 4 37 LCD Display...

Page 5: ...5 70 Mapping Zones Overview 5 70 Single Zones 5 70 Multiple Zones 5 70 Mapping Terminology 5 71 Zone Types Styles 5 71 Zone Attributes 5 72 Creating Zones 5 74 Configuring Zones 5 75 Configuring Poin...

Page 6: ...100 Configuration Characteristics 6 100 Maximum Wire Resistance Formula 6 100 Municipal Box Connection 6 101 Configuration Characteristics 6 101 Relay Outputs 6 101 PSN 1000 PSN 1000 E Operations 6 10...

Page 7: ...life safety applications System Features y y The PFC 6030 features a built in signaling line circuit SLC and is capable of supporting 30 Potter Nohmi protocol devices y y 3 5 Amp 24vdc Power Supply y...

Page 8: ...ssory to the panel that allows a serial or parallel printer connection up to 31 maximum per system SLC Loop Accessories Addressable Sensors y y Photoelectric Smoke Detector PSA y y Photoelectric Heat...

Page 9: ...the enclosure When possible make all cable entries from the sides bottom or rear of the cabinet Verify that they will not interfere with the batteries or other components y y The panel and system mus...

Page 10: ...NACs 3 Amp 1 Amp Maximum Load of 56 055 mA Maximum of 30 addressable points SLC Class A or B NAC Class A or B P Link Class A or B All are Low Voltage and Power Limited System Size Specifications Pleas...

Page 11: ...periphery allowing the installer to maintain separation between power limited and non power limited connections Wiring Types Wiring specifications must be followed to prevent damage or other consequen...

Page 12: ...6 PFC 6030 5403595 REV C 1 10 13 Cabinet Dimensions Figure 1 PFC 6030 Cabinet Dimensions DOOR 16 78 BACKBOX 16 56 DOOR 16 07 BACKBOX 15 77 3 75 DEPTH DEPTH 3 84 TOP LEFT SIDE RIGHT SIDE BOTTOM DWG 593...

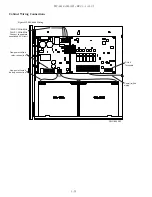
Page 13: ...lt 18Ahr 12Volt DWG 593 2 Cabinet Wiring Connections Figure 2 PFC 6030 Cabinet Wiring DWG 593 2 Non power limited battery connection 120VAC 50Hz 60Hz 240VAC 50Hz 60Hz Connect to separate unswitched AC...

Page 14: ...ote 6 25 10 25 215 RLY 5 Relay Current if applicable see Note 6 25 10 35 135 FCB 1000 25 25 FIB 1000 30 30 SPG 1000 40 40 NAC 1 NAC 2 SLC Current Draw refer to SLC Current Draw Worksheet for calculati...

Page 15: ...contact module 4 inch mount DCM 4 0 325 1 000 Monitored output module 4 inch mount MOM 4 Note 2 0 325 1 000 Twin relay module 4 inch mount TRM 4 0 325 1 000 Short circuit isolator SCI 0 325 2 34 Analo...

Page 16: ...uration In this configuration each sensor and isolator device module counts as one 1 when calculating the total device load Formula Total addressable devices Total isolators Total power unit allocatio...

Page 17: ...evices including isolators on the branch If the count is 8 allocate 8 as the device load If the count is 8 allocate the actual device count number Figure 4 Example of a Class B Loop Isolated Branches...

Page 18: ...ctions Panel Connections BATTERY 12 V Battery 12 V Battery DWG 593 5 Main Supply Circuit The AC terminals are located in the upper left hand portion of the main board The main board supervises the mai...

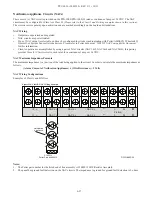
Page 19: ...ed below MUST be followed to ensure proper installation Maximum wiring resistance between two 2 Short Circuit Isolators SCIs must be less than 10 ohms Total resistance must be below 50 ohms Maximum wi...

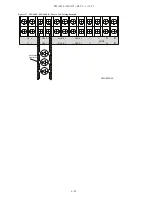
Page 20: ...Document TN51313e date XX XX 2009 WARNING All Terminals are power limited SIGNALING LISTED L U S 2 S 2 DWG 593 9 SCI SCI SCI SCI Notes 1 The Class A Style 7 requires installation of an isolator close...

Page 21: ...Monitored Output MOM 4 Analog Relay ARB Analog Sounder Base ASB and Addressable Pull Station APS modules Conventional Initiating Zones CIZM 4 Class A Figure 11 CIZM 4 Class A Note The resistance of ex...

Page 22: ...Wiring Example COM NO S S 5 1K 1 2W EOLR SLC Loop To Next Module From FACP or Previous Module Note The resistance of external wiring shall be less that 100 The capacitance of external wiring shall be...

Page 23: ...r to the figure below for an example of wiring a Class B DCM 4 Figure 16 DCM 4 with Two Class B Circuits S S SLC Loop To Next Module From FACP or Previous Module Dual Contact Module Model No DCM 4 LED...

Page 24: ...Analog Relay Base ARB Figure 20 Example of Analog Relay Base Wiring Analog Sounder Base Model No ASB S S S S TB1 24 24 S S SLC Loop 24 VDC 24 VDC From FACP or Previous Module SLC Loop 24 VDC 24 VDC To...

Page 25: ...e APS pull stations have terminals that allow the SLC to be wired directly to the device and then exit to the next device in the loop Refer to the wiring example shown below Figure 21 Example of Addre...

Page 26: ...lete addressing device 3 Repeat steps for each device Note The R22 LED is selected by default if the R22 LED is not lit press Power until it is reselected To address devices from the Panel 1 Press ENT...

Page 27: ...e SLC Addr Prog menu press 2 to address Mult device The Start Address XX prompt displays Modify starting address if needed and press ENTER The prompt Connect Device displays 2 Connect 1st device The A...

Page 28: ...this information y y The CA 6075 Class A Expander may be programmed to allow for operation of the NACs The expander adheres to the same circuit rating supervision and regulation as other circuits NAC...

Page 29: ...3 23 PFC 6030 5403595 REV C 1 10 13 Figure 24 NAC Class A Wiring Example NAC 1 NAC 2 Notification Appliance NAC 1 NAC 2 DWG 602 5A CA 6075 Class A card...

Page 30: ...CA 6075 Class A Expander Installation The Class A configuration requires the use of the CA 6075 Once the card is installed the additional terminals are provided for the return loop of the NAC The CA 6...

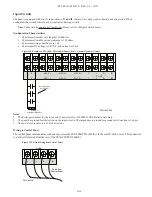
Page 31: ...00 E power expansion board refer to Section 6 PSN 1000 PSN 1000 E Installing Operating Programming for instructions on installing this appliance Configuration Characteristics y y P Link current rating...

Page 32: ...5 1 On Off Off Off Off 2 Off On Off Off Off 3 On On Off Off Off 4 Off Off On Off Off 5 On Off On Off Off 6 Off On On Off Off 7 On On On Off Off 8 Off Off Off On Off 9 On Off Off On Off 10 Off On Off...

Page 33: ...r to chart on the previous page for P Link DIP switch programming Figure 29 Annunciator Back Panel View LED Annunciators Installation LED 16 The panel supports up to ten 10 LED 16 annunciators which d...

Page 34: ...ming Figure 32 LED 16 Back Panel Showing Dip Switch Location LED Drivers Installation DRV 50 The panel supports up to ten 10 DRV 50s Each DRV 50 provides programmable LED outputs and 4 programmable dr...

Page 35: ...35 DRV 50 P7 Dry Contact inputs The higher current required for the LED outputs can be provided by the panel or from an auxiliary power source as shown below The auxiliary power can be any 24VDC sourc...

Page 36: ...panel cabinet or in either of the AE 8 or AE 14 accessory cabinets Figure 38 RLY 5 Board Showing Mounting Bracket The RLY 5 higher current required for the relay outputs can be provided by the panel o...

Page 37: ...porting functionality The FCB 1000 is controlled over the 4 wire P Link connection This then can be mounted inside the AE 8 or AE 14 accessory cabinets or the optional rack mount kit FCB 1000RM The FC...

Page 38: ...to and or from the fiber optic cable Utilizes multimode 62 5 125 micron fiber optic cable Cable Length up to 2000 meters or 6500 feet Installed in pairs refer to the FIB 1000 Wiring heading for detail...

Page 39: ...utgoing P Link connection Connect the 4 wire P Link on the FIB 1000 B to the P Link connection on the PSN 1000E To power the FIB 1000 B connect the 24VDC and terminals on PSN 1000E shown in Diagram 2...

Page 40: ...on SPG 1000 An optional SPG 1000 serial parallel gateway printer drive board can be mounted inside the AE 8 or AE 14 accessory enclosure or the AE RM rack mount enclosure kit The SPG 1000RM includes a...

Page 41: ...main control panel for convenience the UD 1000 is typically programmed as device ID 01 The UD 1000 must be installed prior to any other telephone equipment in the building to ensure proper operation A...

Page 42: ...used to connect the P1 on the UD 1000 and the P connection on the main panel board as shown in the illustrations below Setting Addresses The UD 1000 must be programmed with an address between one and...

Page 43: ...w for an example Figure 53 PFC 6030 Control Panel Display Note Authorized system operators must use a key to open the outer door of the cabinet LCD Display The LCD panel displays the standard Start up...

Page 44: ...el displays a LEFT and or RIGHT arrow this indicates more information may be viewed Displays the Main Menu or selects the current menu option Note The blinking indicates the current menu option Return...

Page 45: ...m conditions by illuminating and or flashing the applicable green red or amber indicators These are described in the table below Figure 57 Control Panel Status LEDs Table 8 Status LEDs LED Type LED Co...

Page 46: ...5 E mail Test 6 Server Status Esc Exit 1 SLC Tools 2 Point Control 3 Ethernet Status 4 DACT Test 5 DACT Reset 6 Erase History 7 Lamp Test 8 App Revisions 6 Programming 1 Username 2 Password Esc Exit 1...

Page 47: ...t Event Initial Event Auto display of first event Misc SLC Blink Y Normal Slow Off All settings allowed Misc Alarm Verification Time Y 0 60 Sec All settings allowed Misc Waterflow Delay Y 0 255 Sec 0...

Page 48: ...Sensitivity Y 1 1 3 5 Full range allowed Within listed range of sensor Zone Night Sensitivity Y 1 1 3 5 Full range allowed Within listed range of sensor Zone Fixed Heat Setting Y 135 F 185 F Full rang...

Page 49: ...Resettable Output Door Holder Output ANSI Output City Tie Output All settings allowed Specifies use of NAC circuit s Day Night Smoke Sensitivity Y Full listed range of smoke detector All settings all...

Page 50: ...LEARN 4 Connect Ethernet Cable 5 Upload Data to Computer 6 Program the System 7 Download Configuration File Note This approach may eliminate programming errors however these are only recommendations S...

Page 51: ...ed 3 Pts Found 4 Pts Removed 5 Pts Changed Esc Exit Note The abbreviation Pts refers to addressable SLC points Select Esc when finished reviewing results The system prompts to save or discard file 3 P...

Page 52: ...shown above represents an example of a panel s IP or identifier used for illustration purposes only The panel s IP is unique to each computer network Write down the IP address it is required to trans...

Page 53: ...ds history events file from panel to computer Uploads detector sensitivity status file from panel to computer Prints selected file The Transfers region is located at the bottom of the Programmer windo...

Page 54: ...ransfer dialog box displays Figure 61 Example of Transfer Upload Dialog Box 2 Verify that Upload is selected in the Transfer Type field 3 Enter the configuration filename in the Filename field or leav...

Page 55: ...tem Programming Configuring Points topic Downloading Configuration File to Panel The Download Configuration File to Panel icon allows you to copy all programming changes to the panel Notes Be sure to...

Page 56: ...t is performed that checks for rule violations if errors are encountered you may choose to either save with errors or cancel the save operation Figure 65 Example of Save Panel Dialog Box Notes 1 All s...

Page 57: ...nsfer Type field 3 Enter the file name in the Filename field or click the Browse button to select file name 4 Enter the IP address in the Transfer Via IP field Figure 68 Transfer Download Dialog Box 5...

Page 58: ...eld in the panel s buffer Up to 1 000 events are held in the buffer at one time This information may be used to troubleshoot errors or to assess ways to improve the system configuration To transfer ev...

Page 59: ...region and choose Add 2 Verify that Detector Status is selected in the Transfer Type field 3 Click OK The Transfers window displays results Figure 72 Example of Transfer Status 4 Double click file to...

Page 60: ...ed in the Transfers window to display the report 2 Adjust the width of the Event column to display the entire descriptions otherwise the Event information will be truncated on the printed report Tip D...

Page 61: ...cuts to efficiently configure your system Window Regions Areas What you select a function from the Panel window located on the left this determines the information displayed on the right The selected...

Page 62: ...default window position window is locked in place Auto Hide window is hidden when cursor is moved and tab displays as window placeholder point to window tab to redisplay Window Tab is explained below...

Page 63: ...Night Sensitivity setup Holiday schedule and other related sensitivity options E mail Reporting Schedule e mail reports by day and time setup e mail addresses and select type of report s to send to e...

Page 64: ...he Panel Configuration Screen User Name Password The default user name and password is Potter as shown below they can be changed to ensure that only authorized personnel can transfer data to and from...

Page 65: ...r to the figure shown below To enter site information 1 Click the Job Details program option The Job Details window displays Figure 80 Job Details Window 2 Click in each applicable field to enter info...

Page 66: ...not selected or enabled by default To enable day night sensitivity and setup holidays 1 Click on the Sensitivity option The Sensitivity window displays Figure 82 Example of the Day Night Sensitivity E...

Page 67: ...splays Figure 83 Example of Users Profile Window 2 Double click in the Name field to enter a descriptive user name 3 Click in the appropriate field selection boxes to grant access to each panel keypad...

Page 68: ...demand reports can be requested directly from the panel s Data Transfer function or remotely from a PC if the user has a valid e mail address programmed on the E mail Reporting window The panel addre...

Page 69: ...use the e mail feature the panel must be connected to a network with Internet connectivity This is usually accom plished by installing an Ethernet drop near the panel The IP address can be set one of...

Page 70: ...event s and or report s you wish to send to the applicable e mail address 4 An displays in each selected report type Figure 87 E mail Reporting showing Enable E mail Request E mail Sent from Panel To...

Page 71: ...fault Outgoing E mail Address E mail Report Requested from PC To request a report from a remote PC 1 Open or create a new e mail 2 In the To field enter the panel s e mail address as shown below Refer...

Page 72: ...ending the e mail must be added to the e mail list in the E mail Reporting section of the software as shown below If the sender is not in the list the panel will not respond The Enable E mail Requests...

Page 73: ...the event occurred event type and the event description or the point information Figure 91 Example of Job Details in System Status E mail When a history or detector sensitivity status e mail is receiv...

Page 74: ...txt History Comma Separated Value file Refer to Table 17 Zone Attributes in this Section for an explanation of Day Night Sensitivity settings System e mail communications and functions are intended f...

Page 75: ...early Monthly Weekly or Daily 3 Select the specific scheduling frequency i e Days to send for a Weekly reminder or Time for a Daily reminder 4 Click in Attach History and or Attach Detector Status sel...

Page 76: ...ng concepts are provided in this section Single Zones The LEARN feature creates or maps a basic one to one relationship where all devices are automatically grouped into one zone When all devices are i...

Page 77: ...to remove condition Non Latching Device will automatically reset when condition is no longer present i e smoke detector resets once condition clears Cross Zoning The purpose of creating cross zones i...

Page 78: ...re shown below is an example of the default attributes of a Alarm zone Figure 98 Example of Zone Attributes Fields 1 10 Refer to the table below for a brief explanation of zone attributes Table 17 Zon...

Page 79: ...for all smoke sensing detectors The term obscuration refers to the amount of reduction in air transparency caused by smoke Night sensitivity is functional during the times the building is unoccupied...

Page 80: ...dd Multiple Zones dialog box displays Figure 99 Examples of Adding Multiple Zones Dialog Box 3 In Number of Zones field enter the number of zones to create Note You may enter up to 99 zones 4 In Start...

Page 81: ...r descriptions of zone styles 4 Continue editing zone s fields Refer to the Zone Attributes Table for field descriptions Configuring Points This section addresses how to define or configure points thr...

Page 82: ...amming Potter Sync Drives Potter synchronized horns strobes Gentex Sync Drives Gentex synchronized horns strobes System Sensor Sync Drives System Sensor synchronized horns strobes Wheelock Sync Drives...

Page 83: ...TRM Addr NAC General Purpose Monitored Output Module MOM Addr Zone Module Two Wire Conventional Detector Module CIZM Addr Sounder Base Addressable Sounder Base ASB Addr Relay Base Addressable Relay Ba...

Page 84: ...lize the alarm verification feature Low Temp Trouble Indicates that a device is below 40 F 2 Devices are listed by Built in SLC device addresses followed by the NACs and I O circuits Note Click on the...

Page 85: ...e is deselected and only one 1 device will be configured 4 Click on device type from shortcut menu 5 Continue configuring other points as needed To configure a group of selective points 1 Click the fi...

Page 86: ...d deleted from zones through the Zones panel using the drag and drop technique The examples illustrate how to use shortcuts to expedite configuring zones and also to reinforce the interaction between...

Page 87: ...multiple zones 1 Select the applicable Zones in the Zones window and select points 2 Drag and drop selected points into Device window Figure 111 Example of Moving Selected Points into Two Zones 3 Clic...

Page 88: ...ilable Figure 113 Example of Group Bar in Points Window 2 The group by area region displays as shown Figure 114 Group by Area Field Note Click on group bar at any time to collapse region 3 Drag and dr...

Page 89: ...vated To create a cross zone 1 Create two or more Alarm or Supervisory type zone s and name appropriately 2 Configure and name devices 3 Move devices into zones 4 Open the Cross Zones window Click in...

Page 90: ...Figure 119 Unable to Add Dialog Box 3 Double click in the SLC Class field to select class type A or B 4 Double click in the P Link Class field to select class type A or B Remote Annunciators RA 6500...

Page 91: ...field to customize name 4 Double click in Address field to adjust address if needed 5 Repeat steps as needed to continue adding LED 16s LED Driver DRV 50 The panel supports up to ten 10 LED drivers Th...

Page 92: ...address if needed 5 Repeat steps as needed to continue adding RLY 5s Fiber Interface Bridge FIB 1000 The panel supports up to thirty 30 FIB 1000 boards This optional board allows the standard 4 wire P...

Page 93: ...ouble click in the Name field to customize name 4 Double click in Address field to adjust address if needed 5 Click the plus sign located in the left most column to display the Network Settings option...

Page 94: ...enerated and annunciated by the panel Off line time secs If this option is selected the off line time specifies the amount of time the condition must be present before a Trouble event is generated Def...

Page 95: ...o Send Autotest field 2 If the system has been programmed to use a dialer and two 2 phone lines are used DACT will alternate between lines on each daily call 3 If a DACT UD 1000 is installed and the I...

Page 96: ...In the example shown above the phone line requires that 9 is dialed to get an outside line The two commas instruct the dialer to pause 2 seconds before dialing the reporting account numbers 4 In the R...

Page 97: ...ies from the sides bottom or rear of the cabinet Verify that they will not interfere with the batteries or other components y y The panel must be tested and maintained in accordance with all local and...

Page 98: ...oltage Non Power Limited Battery Connection Low Voltage Non Power Limited Trouble Relay Low Voltage Non Power Limited Low AC Relay Low Voltage Non Power Limited Notification Device Circuits NACs Low V...

Page 99: ...Cabinet Installation The PSN 1000 PSN 1000 E slides into the guides located at the bottom of the panel and then secured with screws as shown in the following illustration Figure 134 PSN 1000 Panel Ins...

Page 100: ...Wiring Connections Figure 135 PSN 1000 Wiring DWG 602 23 120VAC 50Hz 60Hz 240VAC 50Hz 60Hz Connect to separate unswitched AC circuit Power limited wiring P Link Terminals Non power limited relay conn...

Page 101: ...pproximately 27 3 VDC and the circuit is supervised The maximum battery charging circuit is 1 0 amp DC The cabinet will house up to two 2 18 AH batteries Battery Circuit Calculation Before selecting t...

Page 102: ..._ 60 minutes per hour Alarm time minutes Example 5 minute alarm enter 12 10 minute alarm enter 6 ____ Total Standby AH Total Alarm AH Total Standby AH Total AH Efficiency Factor 0 85 Required AH Maxim...

Page 103: ...bility Document for this information Class A operation is accomplished by using a pair of NAC circuits NAC 1 2 NAC 3 4 and NAC 5 6 this pairing provides three 3 Class A circuits each rated for a conti...

Page 104: ...6 98 PFC 6030 5403595 REV C 1 10 13 Figure 137 PSN 1000 PSN 1000 E Class A NAC Wiring Example DWG 602 25 I1 NAC 1 NAC 5 NAC 3 A B Notification Appliance I2 NAC 2 NAC 4 NAC 6 A B P LINK...

Page 105: ...1000 PSN 1000 E Input Circuit Normal Open Dry Contact Notes 1 The Potter part number for the listed end of line assembly is 3005013 EOL Resistor Assembly 2 The panel has ground fault detection on the...

Page 106: ...6 500 feet y y Wiring is fully supervised and power limited Maximum Wire Resistance Formula The maximum resistance is based on the load placed on the circuit To calculate the maximum wire resistance u...

Page 107: ...ure 142 PSN 1000 Configured as Municipal Box I1 NAC 1 NAC 5 NAC 3 A B I2 NAC 2 NAC 4 NAC 6 A B P LINK Notes The EOL device shall be installed in the same electrical enclosure as the Municipal Box Muni...

Page 108: ...on Description AC Power Steady Green ON AC present OFF AC not present Low Battery Steady Flashes Amber OFF No Fault Flashing Low Battery conditions ON Battery Charger Failure Note The PSN 1000 transfe...

Page 109: ...and NAC 5 6 thus providing three 3 Class A circuits Adding a Power Supply To add and configure a power supply 1 Select the Power Supply function from the system panel The Add Device window displays F...

Page 110: ...er supply 1 Select the Power Supply function from the system panel to display all current power supplies Figure 147 Example of Power Supply Window Note The Internal Power Supply may not be deleted as...

Page 111: ...gure 149 Example of the IP Reporting Window Notes 1 A daily test can automatically be sent to a remote monitoring location the test time may be programmed through the General Options program window Ti...

Page 112: ...ication to the remote monitoring station y y Secondary IP Reporting account is used as the alternate path of communication to the remote monitoring station 3 In the Panel UDP Port field click to enter...

Page 113: ...eiver receives from the system panel and sends to the system panel y y Double click in the Supervision Interval field to adjust the amount of time in seconds that the panel s IP Communicator will send...

Page 114: ...Troubles Press arrows to view alarms troubles Conduct a Fire Drill Press the DRILL pushbutton press the RESET button to exit Drill mode View Point s Status Press ENTER to display the Main Menu Press...

Page 115: ...e Point Press ENTER Main Menu Press 2 Enable Disable enter panel s code Press 1 By Point Up Down to select Device Internal SLC PWR and press ENTER Enter Addr Ckt No and press ENTER Press Up Down to sc...

Page 116: ...em may also require an initialization string Refer to your manufacturer s instructions for this information To setup a modem 1 Select Options Communication The Communication Options dialog box display...

Page 117: ...es and speakers if installed to prevent sounding of evacuation signals Activate an input device i e manual station heat or smoke detector and check that all notification appliances function Notify Fir...

Page 118: ...ry The battery is to be tested at least annually and if the battery is showing signs of failure it is to be replaced The battery is to remain in the cabinet with nothing on or around the batteries Onl...

Page 119: ...Module DCM 4 Dual Contact Module TRM 4 Twin Relay Module MOM 4 Monitored Output Module CIZM 4 Conventional Input Zone Module SCI Short Circuit Isolator DACT DACR UD 1000 UD 1000 DACT The DACT transmi...

Page 120: ...DUP ADDR FACP found multiple devices with the same address Action Manually reassign address of one of the devices SLC LOOP SHORTED There is a short on the SLC loop wiring Action Locate short and repai...

Page 121: ...trol 3 Ethernet Status 4 DACT Test 5 DACT Reset 6 Erase History 7 Lamp Test 8 App Revisions 6 Programming 1 Username 2 Password Esc Exit 1 LEARN Mode 2 Panel Default 3 IP Settings 4 Dflt ID Pswd 5 Pro...

Page 122: ...not removed within 24 hours the buzzer will resound Silencing Trouble s When a trouble is occurring the local buzzer will sound until either all troubles have been acknowledged or the SILENCE button i...

Page 123: ......

Page 124: ......

Reviews: