


7-107
PFC-6030 • 5403595 • REV C-1 • 10/13
y
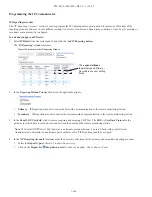
Click on the
Primary / Secondary Account Settings
expand ellipsis icon
to display additional setup options, as
shown below:
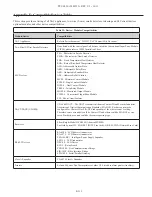
Figure 151. Example of Primary Account Settings "Expanded" Window
Notes
:
– Use the
scroll bar
to display additional fields if not shown on right.
– Click the
collapse icon
at any time
to hide the account setting fields.
y
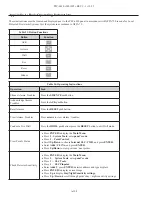
Enter the A
ccount ID
.
y
Select the applicable
Primary Format option:
CID / SIA
y
Click in the
Report Test Events selection box
to send
Test
signals to this account.
y
Double-click in the
Receiver IP field
and enter the IP address provided by the remote monitoring station.
y
Click on the
Protocol
drop-down arrow
to select
Fibro
.
Note:
Fibro communications is used with the Sur-Guard receiver.
y
Double-click in the
UDP port field
to enter the
Primary/Secondary port number
as provided by the remote
monitoring station.
Note
: The UDP port number is the pathway for data which the receiver receives from the system panel and sends to the
system panel.
y
Double-click in the
Supervision Interval field
to adjust the amount of time (
in seconds
) that the panel's IP
Communicator will send a supervision signal to the remote monitoring receiver.
– Default setting is 20 seconds.
– Contact the remote monitoring station to verify the correct setting. The receiver is programmed with a specific window
of time to "see" the supervision signal. If the supervision signal is not seen within the programmed time, the receiver
generates a
Trouble signal
after six (6) failed communication attempts.
y
Double-click in
Encryption Key
to enter an applicable number as provided by the remote monitoring station.
y
Click on the
Encryption Method
drop-down arrow
to select 128 bit, if applicable.
Note
: If the Encryption Method is set to "
None
", then an Encryption Key is not needed.
5. Click on the
collapse icon
to hide the account setting field when finished.
Reminder
: Click the
expand ellipsis icon
to review or modify the account settings at any time.
6. Repeat steps for each Primary / Secondary reporting account or to edit an account.
Click here to collapse
additional fields.


