background image


Connecting the Display  | 


9


Connecting the Display


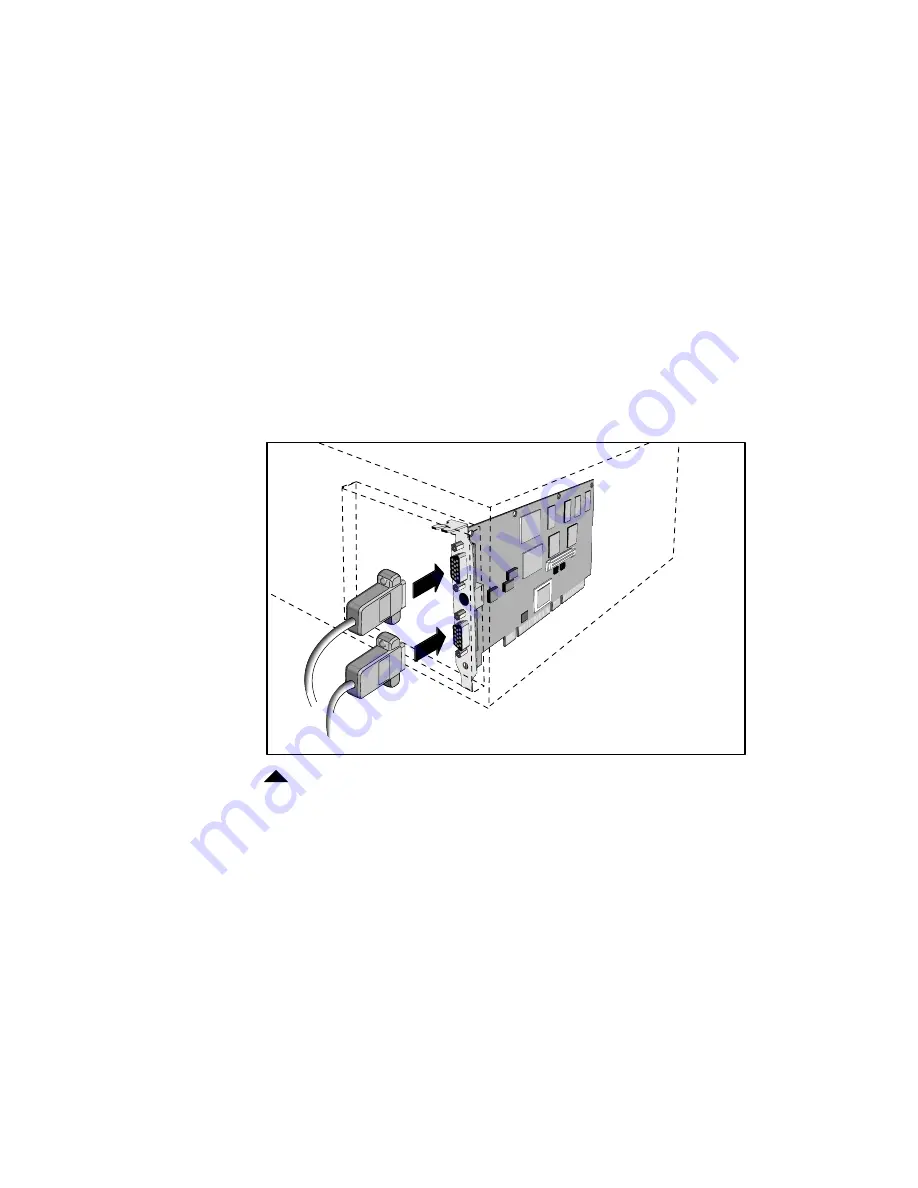
After you install the M2 board in your computer, connect 
your display(s) to the board using the cables provided. 
Grayscale cables have three connectors on each branch; color 
cables have five. (See the illustration on page 10.)


To connect a display to the board

1


Attach the DVI connector to the M2 board, securing 
the connection with the thumbscrews on the connector. 
(Refer to your display documentation for more 
information on connector assignments.)


2


Attach each output cable to the appropriate BNC 
terminal on your display.

Cable connections for one or more analog displays

MONITOR

1

2

Summary of Contents for Dome M2/PCI

Page 1: ...Dome M2 PCI Display Controller INSTALLATION GUIDE www planar com Windows XP Windows 2000 Windows NT 4 0 Solaris 2 5 1 or later...

Page 2: ...ME will not be liable for any damages resulting from the use of such information DOME imaging systems inc 400 Fifth Avenue Waltham MA 02451 8738 781 895 1155 phone 781 895 1133 fax Internet address fo...

Page 3: ...e of the following measures may reduce or eliminate the problem Move the equipment and the receiver to different branches of your AC electrical system Move the equipment away from the receiver with wh...

Page 4: ...Limits and methods of measurements for radio interference characteristics of industrial scientific and medical equipment IEC 1000 3 2 Harmonic emissions IEC 1000 3 3 Voltage fluctuations flicker emis...

Page 5: ...nments 17 Changing display properties 17 Changing the screen settings 19 Setting palette options 20 Setting display preferences 20 Setting driver options 20 General information 21 On board status 21 U...

Page 6: ...isplay Settings 55 Using the default display mode 55 Overriding the default display mode 56 Using Visual Classes 59 Setting the default display 60 Checking the default visual 61 Configuring the Window...

Page 7: ...d and install it into these computers PC system Sun PCI workstation This guide also describes how to install and configure the DOME drivers for these operating systems Microsoft Windows XP Microsoft W...

Page 8: ...lay Chapter 3 Windows 2000 Driver Instructions for installing and configuring the M2 driver for a Windows 2000 or XP system Chapter 4 Windows NT 4 0 Driver Instructions for installing and configuring...

Page 9: ...c type New or technical term book title or variable such as x Bold type File Open Menu choice Select the File menu then choose Open Key Key name such as Enter A note of important information about a p...

Page 10: ...mation about the board and its driver related DOME products or your operating system refer to these books Stereo Library Installation and Developer s Guide DIMPL Library Reference Microsoft Windows XP...

Page 11: ...y platform System Requirements Requirement PC Sun PCI Workstation System specs PCI slot per board 2 MB hard disk space 16 MB RAM CD ROM drive PCI slot per board 500 KB hard disk space for driver and D...

Page 12: ...his order to properly install the M2 board and its driver on a PC or a Sun PCI workstation 1 Set DIP switches on the board 2 Install the board 3 Connect the display to the board 4 Install the driver A...

Page 13: ...Board and Display Static electricity can damage the board When touching the board or parts of the motherboard take these precautions Wear an antistatic wrist strap Always keep one hand touching a met...

Page 14: ...setting is OFF for all switches on DIP switch S1 This table lists the options for switches on DIP switch S2 See pages 5 and 6 to set the switches in the correct position for your platform DIP Switch S...

Page 15: ...you use multiple M2 boards Enable VGA on the first M2 board you install and disable it on the additional boards you install Sun PCI workstation Disable VGA on all M2 boards slide switch 1 into the OFF...

Page 16: ...he M2 Board You can install the M2 board in either a 32 bit or 64 bit PCI slot Before you proceed with board installation check the safety precautions listed on page 3 Turn off your computer but leave...

Page 17: ...Installing the M2 Board 7 Removing a blank bracket or backplate Installing an M2 board Installed M2 board...

Page 18: ...port Windows 2000 and Solaris drivers The Windows NT 4 0 driver supports up to 8 M2 boards 16 screens For proper installation install all the boards first and then the drivers You cannot mix DOME boar...

Page 19: ...color cables have five See the illustration on page 10 To connect a display to the board 1 Attach the DVI connector to the M2 board securing the connection with the thumbscrews on the connector Refer...

Page 20: ...illustration applies to the DOME M2 cable If you are using a cable from another source the labeling may differ 3 Repeat step 2 for each display you are connecting to the M2 board Connecting the cable...

Page 21: ...tions menu Then press Enter 2 Log on with administrator privileges The InstallShield Wizard reports that it has found new hardware Click Cancel 3 Insert the WINM2 CD and open 63 WINM2 xxx where xxx is...

Page 22: ...on license agreement readme files and start copying files 7 Click Yes to continue the installation The Digital Signature Not Found dialog box appears for each display you install on a Windows 2000 sys...

Page 23: ...XP operating system XP users must click Continue Anyway on the Hardware Installation dialog box equivalent to the Digital Signature Not Found dialog box to continue the installation This dialog box a...

Page 24: ...k Next The Digital Signature Not Found dialog box appears 4 Click Yes to continue the installation The Digital Signature Not Found dialog box appears for each display you install and the End of Driver...

Page 25: ...pages 3 to 8 3 Check that all displays are connected and powered on 4 Log on with administrator privileges 5 Click No to exit the Wizard 6 Run Setup exe to modify the existing configuration See steps...

Page 26: ...Modes 6 Highlight the desired resolution and click OK 7 Select Apply OK from the Default Monitor and DOME M2 PCI Properties dialog box 8 Select Extend my Windows desktop onto this monitor and click Ap...

Page 27: ...display properties such as resolution and palette options using the DOME tab after the display is attached to the Windows 2000 desktop Use this tab To set the default display for DOME tab Displays att...

Page 28: ...lick the desktop and select Properties Settings The Settings tab appears 3 Select Default Monitor and DOME M2 PCI Properties from the Display list 4 Select Advanced DOME to select a resolution The DOM...

Page 29: ...1 Select a resolution and refresh rate from the Resolution field of the DOME tab and click Apply The DOME Display Resolution dialog box appears 2 Click OK within 15 seconds to accept the new settings...

Page 30: ...n Green Composite Sync Pedestal Refer to your display documentation for more information on display preferences Setting driver options You have these two choices for setting driver options Disable Dir...

Page 31: ...e screen interference by disabling video output to the red and blue video channels DOME recommends that you select Single channel Grayscale if you are using a grayscale display General information Gen...

Page 32: ...and removing the device through the Microsoft control panel The DOME control panel determines if you are uninstalling the devices in the correct order Remember these tips when uninstalling DOME devic...

Page 33: ...tings Control Panel Administrative Tools 2 Click Computer Management The Systems Tools dialog box appears 3 Click Device Manager 4 Click Display Adapters A list of currently installed display devices...

Page 34: ...the M2 board To uninstall a dual headed device 1 Right click on the desktop and select Properties Advanced for the sister device 2 Select DOME Uninstall DOME Device 3 Restart the computer Once you re...

Page 35: ...the adapter shown with the Display Warning icon Right click and choose Uninstall 9 Click OK on the Confirm Device Removal dialog box The device is now removed from the Windows 2000 system 10 Restart...

Page 36: ......

Page 37: ...dministrator privileges to change the display settings 3 Right click the desktop and select Properties Settings The Settings tab appears 4 Click Display Type The Display Type dialog box appears 5 Clic...

Page 38: ...ystems M2 PCI 9 Select DOME imaging systems M2 PCI then click OK The Third Party Drivers dialog box prompts you Do you wish to proceed 10 Click Yes A progress bar appears and the Installing Driver dia...

Page 39: ...ver set the display resolution and refresh rate You can then use the DOME tab to change display properties To set the display resolution 1 Log on with administrator privileges The Invalid Display Sett...

Page 40: ...Your display s must be connected to test the resolution and refresh rate The dialog box on your screen shows the values that exist in your binary mxpci cfg file which may be different from the values...

Page 41: ...erly 7 Click Yes if the test bitmap displayed correctly or No if it didn t If No the Testing Mode dialog box prompts you to try different settings for your display Click OK Repeat steps 3 to 8 to perf...

Page 42: ...VGA mode 12 Click Open to use the default configuration file mxpci cfg on your system The DOME tab appears 13 Click OK or Apply to activate all the new settings This message appears Do you want to res...

Page 43: ...roperties See pages 34 to 37 for more information on specific configuration options and features To change display properties 1 Right click the desktop and select Properties DOME The DOME tab appears...

Page 44: ...ch you need assistance and press F1 Changing the screen settings For more information on resolutions and refresh rates see Appendix A Resolutions and Refresh Rates on page 71 To change the resolution...

Page 45: ...r two screens In the Configuration field of the DOME tab click the screen number and orientation Then select Apply or OK Setting palette options See Appendix B Palette Options on page 81 Setting displ...

Page 46: ...In the Driver Options field select Disable DirectDraw Click Apply or OK DirectDraw is an API that allows direct manipulation of the video display DirectDraw applications expect the screen to be repres...

Page 47: ...g video output to the red and blue video channels DOME recommends that you select the Single channel Gray scale option if you are using a grayscale display On board status On board temperature in degr...

Page 48: ...ols directory If you want to use the DOME large fonts you must install them to your display properties To install DOME large fonts 1 Double click My Computer C DOME Tools A list of files appears 2 Dou...

Page 49: ...rs 7 Click the Scheme pull down arrow and select Windows Standard 8 Click OK To increase cursor size 1 Select Start Settings Control Panel Mouse Pointers The Pointers tab appears 2 Click the Scheme pu...

Page 50: ...the font size changes Icon Icons on the desktopb b If the Item or Font size is too large the icon and text may be cropped If this occurs adjust Icon spacing by right clicking on the desktop and choosi...

Page 51: ...OME DlgFix software automatically relocates all dialog boxes to the upper left screen preventing dialog boxes from splitting across screens Dialog box splits across screens when DlgFix is not running...

Page 52: ...gFix Type C dome tools DlgFix at the DOS prompt The DOME DlgFix icon appears on your taskbar to indicate that DlgFix is running To add DlgFix to the startup menu Type C dome tools DlgSetup at the DOS...

Page 53: ...ng on the display itself Rather it launches another screen saver that you select to protect the display Then after a predetermined number of minutes it uses DPMS to shut off the video power to the dis...

Page 54: ...ver 1 Right click the desktop and select Properties Screen Saver The Screen Saver tab appears 2 Select DOME DPMS Screen Saver from the list of screen savers 3 Set the Wait field with the time in minut...

Page 55: ...lay before DPMS power off mode is invoked You can select any of the other installed Windows screen savers to protect the display during that time The Settings and Preview buttons enable you to adjust...

Page 56: ...en saver displays that must elapse before the display enters power off mode in the Invoke DPMS after field 5 If desired select Wake at start of period to force the display panel to wake up if it is in...

Page 57: ...ode is invoked for the current time period power off mode starts only after a total of 45 minutes of user inactivity After being in power off mode for a long time the display can take as many as 30 mi...

Page 58: ......

Page 59: ...n usr lib The installation procedure for Solaris performs these tasks Adds the device driver Adds the OpenWindows loadable DDX driver Modifies the OWconfig file Installs the DOMEmdlib shared object li...

Page 60: ...x 2 DOMEmdlib DOME MD library sparc 1 1 x Select package s you wish to process or all to process all packages default all q 6 Press Return to install all packages or the number 1 one to install the DO...

Page 61: ...automatically causes previously hidden areas on the screen to pan or scroll into the visible area To enable the cursor to cross to another display without panning or scrolling the stereo display the d...

Page 62: ...be shown To display the right edge of the screen set bit one 1 of the M2_STEREO_PAN environment variable The snapping may also cause a portion of the wrapped around left edge of the framebuffer to dis...

Page 63: ...while switching to stereo mode 0 Top left corner of the framebuffer 1 Top center position of the framebuffer 2 Top right corner of the framebuffer 3 Bottom right corner of the framebuffer 4 Bottom cen...

Page 64: ...he file usr dt config Xconfig to etc dt config Xconfig and then edit etc dt config Xconfig 2 Find the line in etc dt config Xconfig that contains Dtlogin environment 3 Remove the pound sign to uncomme...

Page 65: ...Windows Using the default display mode on page 55 Overriding the default display mode on page 56 Using Visual Classes on page 59 Then read the appropriate section for your windowing environment Runnin...

Page 66: ...OWconfig file class XSCREENCONFIG name DOMEm2pci0Config device dev m2pci0 0 res 1600x1200 73Hz stereo 1024x1024 121Hz monitor domegray vda board m2pci 2hd xqa class XSCREENCONFIG name DOMEm2pci1Config...

Page 67: ...for any other XSCREENCONFIG section device dev m2pci0 0 This line indicates the installation of an M2 board to which the system assigned the instance of zero 0 The second zero 0 indicates that you are...

Page 68: ...the board file m2pci 2hd xqa The board file is located in the opt DOMEm2pci boards directory Do not modify these files See the second code sample on page 56 for the second head To select video pedest...

Page 69: ...seudoColor is the most common display type Some applications run only on displays with a PseudoColor default visual class When you connect an M2 board to a grayscale display you can configure it to em...

Page 70: ...file on page 57 To emulate a PseudoColor visual class start the X server using PseudoColor as the default visual class Then add defclass PseudoColor to the openwin command or to the Xservers file To...

Page 71: ...c vendor release number 3300 maximum request size 262140 bytes motion buffer size 256 bitmap unit bit order padding 32 MSBFirst 32 image byte order MSBFirst number of supported pixmap formats 2 suppor...

Page 72: ...tions backing store YES save unders YES current input event mask 0xd0001d KeyPressMask ButtonPressMask ButtonReleaseMask EnterWindowMask SubstructureRedirectMask PropertyChangeMask ColormapChangeMask...

Page 73: ...olor depth 8 planes size of colormap 8 entries red green blue masks 0x7 0x38 0xc0 significant bits in color specification 8 bits visual visual id 0x27 class StaticGray depth 8 planes size of colormap...

Page 74: ...Running OpenWindows For a one headed system type openwin dev dev m2pci0 0 For a two headed system type openwin dev dev m2pci0 0 dev dev m2pci0 1 Each screen has a name of the form dev m2pciy z where...

Page 75: ...cal local_uid console root usr openwin bin Xsun 0 nobanner To use one or more DOME devices Replace the second 0 in the preceding command line with the dev option flag and the appropriate device parame...

Page 76: ...display DPMS shuts off the video signal to the display when it is not in use This reduces the power con sumption and extends the life of the display You can enable DPMS through the Style Manager just...

Page 77: ...Configuring the Windowing Environment 67 2 Click Screen The Style Manager Screen dialog box appears...

Page 78: ...t on the mouse or key board until it invokes the screen saver You can set this time from 1 one to 120 minutes Remember these tips when you set the screen saver During times that you use the display fr...

Page 79: ...em to get to the ok prompt 2 Type setenv output device device node These examples describe how to change the console in Ultra 10 and Ultra 30 systems For more details refer to your Sun documentation 3...

Page 80: ...ation TQA To run the DOME calibration software on a Solaris 2 5 1 or later system use Calibration TQA 2 0 3 or later You can run Calibration TQA 2 0 3 or later on a system that includes both DOME boar...

Page 81: ...s for the M2 board in a Windows system All these resolutions can be set for pseudocolor 8 bit color or grayscale Resolutions and Refresh Rates Resolutiona a In pixels width by height Refresh Rate 1280...

Page 82: ...to a resolution that is supported by your display DIP Switch S1 Resolutiona a In pixels width x height 1 2 3 4 1280 x 1024 76 Hzb b Default OFF OFF OFF OFF 1280 x 1024 76 Hz ON OFF OFF OFF 1280 x 1024...

Page 83: ...modes Restore original modes configuration file The mode changes you make are stored in a dom file and the driver loads the dom file at boot time See Restore the original modes on page 76 for more in...

Page 84: ...tion of the mode you want to change 6 Edit the Mode Values section of the dialog box to create the mode you want 7 Click Test The Display Resolution dialog box appears The system is about to test the...

Page 85: ...72 Hz If you make changes that result in a new refresh rate of 76 Hz 1280 x 1024 x 8 76 Hz replaces 1280 x 1024 x 8 72 Hz when you save the mode 11 Click OK to close the Display Properties dialog box...

Page 86: ...d files are named m2pci dom and m2pci cfg At boot time the driver uses the dom file if it exists otherwise it uses the cfg file If the dom file exists the driver does not read the cfg file To restore...

Page 87: ...file for the M2 PCI board is M2PCI vid Change individual sync parameters in the text sync file or add new individual syncs at the end of the file to create a new mode Make sure there are no empty lin...

Page 88: ...rogram asks if you want to back up your existing cfg file 7 Type y The program rebuilds the cfg file according to the new syncs It puts the new cfg file into the appropriate directory It backs up the...

Page 89: ...e the new default display mode DOME recommends that you use the default display mode All switches on DIP switch S1 must be in the OFF position for the default display mode to take effect DIP Switch S1...

Page 90: ...ile Resolutiona a In pixels width by height Refresh Rate Color Mode 1280 x 1024b b Default 76 Hz Color 1280 x 1024 72 Hz Color 1200 x 1600 76 Hz Grayscale 1200 x 1600 66 Hz Grayscale 1600 x 1200 73 Hz...

Page 91: ...e DOME tab use the pull down menu to select a palette Then click Apply or OK DOME palette options must coordinate with the primary display All displays must be set to either palette devices or non pal...

Page 92: ...Options with Multiple Displays The SelectPalette and RealizePalette functions in the Microsoft Developer s Network or MSDN work across all displays if the primary panel is palettized The palettes of...

Page 93: ...lette reserves the first and last 10 entries in the palette for the Windows NT operating system but you can manipulate the middle 236 entries Your application can create a 256 entry gray ramp in any 8...

Page 94: ...he application assumes that a static palette is always ramped To run DOME calibration software with the nonlinear static gray palette use Calibration TQA 2 0 3 or later Static Gray Palette The static...

Page 95: ...palette use Calibration TQA 2 0 3 or later Color Palette The color palette displays 8 bits of color 3 bits of red 3 bits of green and 2 bits of blue You can change the pixel depth for color display th...

Page 96: ......

Page 97: ...rd Use Administrative Tools in the Windows control panel to uninstall a single headed DOME display board If you try to uninstall a single headed board by clicking Uninstall DOME Device on the DOME tab...

Page 98: ...ce on page 24 for the full procedure Unsigned Driver Load Error If an unsigned driver cannot be loaded message appears on the screen set the HKCU Software Policies Microsoft Windows NT Driver Signing...

Page 99: ...Catalog file with a digital signature If you select Warn the installation displays the message Digital Signature Not Found and prompts you to continue or cancel Overwriting Installation File The Confi...

Page 100: ......

Page 101: ...T 4 0 77 customizing appearance on Windows NT 4 0 40 sync parameters Windows 2000 74 Windows NT 4 0 77 D default display mode 55 58 overriding 56 58 OWconfig file editing 56 modifying 57 selecting vid...

Page 102: ...g boxes 41 42 fonts customizing on Windows NT 4 0 40 settings for high resolution displays 40 using DOME large 38 G grayscale display Solaris system 59 Windows systems 81 H help online 34 I increasing...

Page 103: ...running DlgFix 42 OpenWindows 64 S screen determining assignments 17 setting configuration Windows NT 4 0 driver 35 screen saver Solaris DPMS 66 68 Windows NT 4 0 43 47 setenv command 69 setting DIP...

Page 104: ...2000 system additional boards 15 configuring display 17 20 customizing sync parameters 73 76 desktop icons 83 determining screen assignments 17 installing driver 11 13 palette options 81 setting disp...

Reviews: