background image

19

2.6 Connecting RS232 Communication

RS232 control is not necessary for operation, but it is a convenient way to control Bay Cat Xs from a distance. If 
your installation will not use RS232 control, skip this section.

RS232 control has one big advantage: you can control all 
the units from a computer at a considerable distance from 
the wall. You can control: 

• units one at a time;

• several video walls separately;

• all the units in all the walls at the same time. 

Almost everything you can do with the remote, you can 

do with RS232 commands. Plus, you can send inquiries to 
the units and find out the current settings and values. 

RS232 connections are made with cables like those used 

for computer networks. These cables have eight (8) con-
ductors and have RJ-45 connectors on each end.

It is important that the cable has “straight through” 
connections. To know if your cable is correct, hold 
the two connectors side by side with the ends 
pointing in the same direction. Look at the side of 
the connectors that do not have the locking tab. If 
the colors of the wires inside the connector are the 
same left to right for both connectors, this is the 
correct cable. If the colors are mirror reflections of 
each other, it is the wrong type. 

You need an 

adapter

 to go from the computer’s 9-pin serial 

output connector to an RJ-45 connector. Adapters of this 
type are readily available at computer and electronic supply 
stores. You will only need one adapter; all the rest of the 
connections will be RJ-45 to RJ-45. 

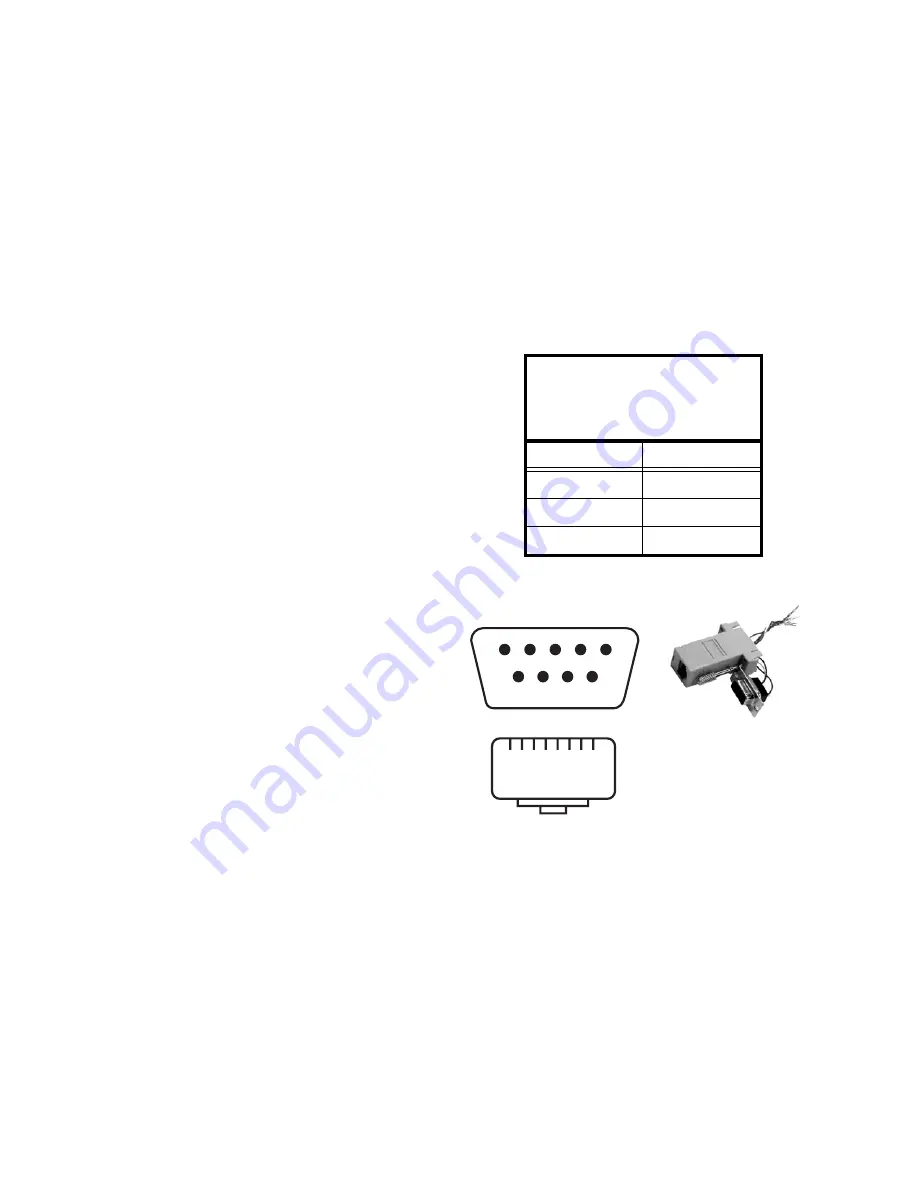
The adapter is not pre-wired. You will make three con-

nections inside the adapter, as described below. 

Connecting RS232 cables

1. Connect the adapter to the serial output connector of 

the controlling computer. (This computer does not have 
to be the same one as the computer used as a picture 
source.) The serial output is sometimes called the 
Comm Port, and sometimes there are two. 

If the serial output is a 25-pin connector, use a 25-
to-9-pin adapter, then the 9-pin to RJ-45 adapter. 

5

4

3

2

1

6

7

8

9

1

8

Wiring the adapter

To go from 9-pin D-sub serial connector on the back of the 
computer to an RJ45 connector, use a standard 
RJ45-to-9-pin adapter. Wire it internally as shown. The 
wiring shown for this adapter is correct for 

straight-

through

 cables. Straight-through cables are wired 1-to-1, 

2-to-2, etc. 

Yellow wire

pin 3

Black wire

pin 2

Green wire

pin 5

RJ45

9-pin

6

3

5

5

3

2

RJ45 looking into the socket

Summary of Contents for Bay Cat X SN-4620-1080

Page 1: ...Bay Cat X SN 4620 1080 User Guide ...

Page 2: ...2 ...

Page 3: ...SN 4620 1080 Bay Cat X 46 Direct view LCD Panel User Guide 020 0571 00B ...

Page 4: ...ement costs loss of profits loss of use or for any other incidental consequential indirect or special damages or for contribution or indemnity claims however caused Planar s liability shall be limited to actual direct damages not in excess of the amounts paid to Planar by buyer for the Product These limitations will apply to all claims including without limitation warranty contract indemnity tort ...

Page 5: ...Bay Cat X User Guide iii ...

Page 6: ...rces 31 3 2 4 Adjusting Levels for Video Sources 33 3 3 Aspect Ratio Settings 35 3 3 1 Adjusting Sharpness 41 3 3 2 Adjusting Position 43 3 3 3 Adjusting Color Balance 45 3 4 Tiling a Display 49 3 4 1 Zoom and Position 51 3 4 2 Viewport Adjustment 53 3 5 Advanced Options 55 3 5 1 Auto Setup Options 56 3 5 2 Menu Options 57 3 5 3 Miscellaneous Options 58 3 5 4 Backlight Control 59 3 6 Serial Port S...

Page 7: ...mote Control Buttons 123 6 3 Drawings 129 6 4 Connector Locations and Diagrams 131 6 5 Optimizing Your Planar Display 133 6 6 EDID What It Is and How It Works 135 Glossary of Terms 137 Specifications for Bay Cat X 141 Regulatory Information 143 Index 145 ...

Page 8: ...from VGA to UXGA in either analog or digital DVI For video it accepts NTSC PAL and SECAM as com posite component or S Video Most important it is easy to set up and adjust What features were added to Bay Cat X Bay Cat X was developed from Bay Cat SN 4610 1080 and adds these features and enhancements Can be ordered in two different configurations Base Model and Video Model Automatic ambient light se...

Page 9: ...tional accessories Free standing feet Adapter Plate WAL 4025 00 with hardware The Adapter Plate comes with 4 nuts and 8 metric screws The 4 nuts hold the Wall Bracket to the Adapter Plate The Adapter Plate can be bolted to a wall Or the Adapter Plate can be screwed onto an NEC plasma monitor display stand using the 8 metric screws Bay Cat X SN 4620 1080 User Guide ...

Page 10: ... adequate or safe The mounting method must be capable of holding 5 times this weight 275 lbs 125 kg for each display unit CAUTION The screen could be damaged by heavy pres sure Bay Cat X screens are protected with a cover glass to protect the LCD Some Bay Cat Xs are shipped at customer request without this protective glass In these the LCD is not pro tected Slight pressure on the LCD will cause di...

Page 11: ...XLOOH SUHQGUH FRQWDFW DYHF OHV DXWRULWpV ORFDOHV RX DYHF YRWUH UHYHQGHXU HW UHQVHLJQH YRXV VXU OD PpWKRGH GH PLVH DX UHEXW FRUUHFWH WDOLDQR Ŷ 6PDOWLPHQWR GHOOH DWWUH DWXUH HOHWWULFKH HG HOHWWURQLFKH XVDWH DSSOLFDELOH LQ WXWWD OD RPXQLWj XURSHD HG DOWUL 3DHVL XURSHL FKH DSSOLFDQR SURJUDPPL GL UDFFROWD GLIIHUHQ LDWD O VLPEROR WURYDWR VXO SURGRWWR R VXOOD VXD FRQIH LRQH LQGLFD FKH LO SURGRWWR QRQ SXz...

Page 12: ...GDVW JLOWLJ LQRP GHQ XURSHLVND XQLRQHQ 2P GX YLOO VOlQJD ERUW GHQ KlU SURGXNWHQ VND GX NRQWDNWD ORNDOD P QGLJKHWHU HOOHU nWHUI UVlOMDU RFK IUnJD HIWHU OlPSOLJ DYIDOOVPHWRG 3ROVNL Ŷ 8VXZDQLH XĪ WHJR VSU ĊWX HOHNWU F QHJR L HOHNWURQLF QHJR RW F NUDMyZ 8QLL XURSHMVNLHM L LQQ FK NUDMyZ HXURSHMVNLFK RGG LHOQ PL SURJUDPDPL ELyUNL RGSDGyZ 2EHFQRĞü WHJR V PEROX QD SURGXNFLH OXE QD RSDNRZDQLX SURGXNWHP R Q...

Page 13: ...6 ...

Page 14: ...s the LCD material can be scratched 3 Confirm that your DVI Board package contains four 4 mounting screws a replacement DVI cover panel and a disposable grounding wrist strap 4 On the back of the Bay Cat X remove the blank cover panel a Unscrew the two screws holding the blank panel in place Save the screws for the replacement panel you will install later b Remove the blank panel by pushing down s...

Page 15: ...the opening 7 Align the connector on the board with the connector in the opening Gently push the board into the connector The board is fully seated when the four screw holes are aligned 8 Screw down the four corners of the DVI board with the supplied mounting screws Use a grounding wrist strap not shown or other personal ESD devices to prevent damage to the board ...

Page 16: ...nto place Press down gently on the insertion end of the panel to help the tabs insert in the slots 10 Secure the DVI replacement cover panel using the screws you removed earlier As you insert the panel push down slightly on this end of the panel ...

Page 17: ...10 ...

Page 18: ... X Ventilation The Bay Cat X needs no space to the rear for ventilation However like all electronic devices it does produce some heat The space above the display should provide enough space so that heated air can get away This means you should not mount it into a sealed space with nowhere for the heated air to escape Portrait or Landscape The wall bracket always mounts the same way whether the dis...

Page 19: ...12 ...

Page 20: ... the first display practice using the lock lever to open and close the locking mechanism After the display is hung the connectors for video and power are a little difficult to see Some installers connect power and video cables just before hanging the display 1 Be sure the locking lever is in the open position The tab on the lever should not protrude below the bottom of the box 2 Using two persons ...

Page 21: ...over the lock and catch it Pull the lock back to unlock Unlocking from the bottom Slide the tool in from the bottom keep ing the open side of the hook to the left as shown Catch the lock and pull down Back side of the locking lever showing the two pins that the tool hooks onto ...

Page 22: ...g the power cord into the receptacle on the rear of the Bay Cat X Plug the other end into a good source of AC power When ready turn on the power switch Normal operation It is normal to leave the power connected and the power switch on all the time and turn the backlight on and off as desired For power receptacle dimensions see see Connector Locations and Diagrams on page 131 Power receptacle and p...

Page 23: ...16 ...

Page 24: ...al computer sources to the DVI connector Since computer sources are RGB you must set the Col orspace to RGB in the Picture menu Video Sources Connect composite video sources to the yellow RCA connector S Video sources to the S Video connector and component video sources to the red green and blue RCA connectors Component and S Video connectors accept NTSC and PAL video sources The composite connect...

Page 25: ...18 The Base Model shown above has only and Analog VGA connector The Video Model ...

Page 26: ...ht for both connectors this is the correct cable If the colors are mirror reflections of each other it is the wrong type You need an adapter to go from the computer s 9 pin serial output connector to an RJ 45 connector Adapters of this type are readily available at computer and electronic supply stores You will only need one adapter all the rest of the connections will be RJ 45 to RJ 45 The adapte...

Page 27: ... next unit s RS232 In Continue in this way until all units are in the loop The order of units in the loop does not matter because each unit in the array must have a unique address The loop through limit is approximately 30 units in typical situations However if the units are spaced far apart or the total length of the loop through is very long this limit may be reduced You may need multiple RS232 ...

Page 28: ...y take 10 seconds stop here If you have several sources connected press SOURCE again to go to the next one with a picture If you get no picture or have other trouble read the rest of these steps If you use a video source such as from a progressive DVD player on the Analog or Digital inputs manually change the Colorspace to YPbPr Otherwise the colors will be wrong 2 Press MENU The Main Menu display...

Page 29: ...the lower left corner About the remote The remote control operates with IR infra red signals going to the IR receiver The receiver is in the lower right corner in landscape mode in portrait mode it is in the lower left corner of the screen bezel behind a small hole Later to prevent accidental adjustment of the display disable the remote control function using an RS232 com mand A quick reference fo...

Page 30: ...What does Input Level do For analog computer sources adjusting to the computer s picture output means finding what that computer means by black and white Black is supposed to be a voltage of zero coming from the computer s video card but it almost never is White is supposed to be a voltage of 0 7 volts but it usually isn t either The Input Level adjustment process asks you to provide a picture fro...

Page 31: ...24 ...

Page 32: ...ayers have composite video and S Video out puts and sometimes have component video outputs from three RCA connectors Component video sources are assumed to be YPbPr so you do not need to specify the colorspace HDCP High Definition Copy Protection is not supported Composite Video and S Video These two inputs accept NTSC and PAL The Compos ite connector also accepts SECAM video To manually select th...

Page 33: ...00kHz Pixel Frequency 80 10MHz Horizontal Resolution 1366 Vertical Resolution 768 Frequency 1602 Phase 22 5 Sharpness Sharpest Input Levels Picture Source Analog Colorspace RGB Sync Type Separate H V Vertical Frequency frame locked 60Hz Horizontal Frequency 50 00kHz Pixel Frequency 80 10MHz Horizontal Resolution 1366 Vertical Resolution 768 Frequency 1602 Phase 22 5 Sharpness Sharpest Input Levels...

Page 34: ...splayed on the line just below Source This is grayed out because you can t adjust it Picture Source Comp Video Video Standard NTSC 60 Hz 3 58 MHz Vertical Frequency frame locked 60Hz Sharpness Sharpest Input Levels Picture Source Component YPbPr Video Standard NTSC 60 Hz 3 58 MHz Vertical Frequency frame locked 60Hz Sharpness Sharpest Input Levels ...

Page 35: ...28 ...

Page 36: ...vels Don t use these controls unless you have been briefed by Planar or you are familiar with black level adjustments These controls are usually not necessary To access the Input Levels menu on the Remote press LEVEL The Input Levels menu looks different for different col orspaces The Input Levels for Digital RGB sources is shown below The Input Levels menu for Digital YPbPr sources is shown below...

Page 37: ...30 ...

Page 38: ...then connect to a different com puter for the program Nor can you use the Bay Cat X s black test pattern Hint Display a black screen using Windows Paint program To adjust levels for UXGA sources that will be displayed in One to One scale mode perform your adjustments using Fill All scale mode and then switch back to One to One 2 To access the Input Levels menu on the Remote press LEVEL 3 In the In...

Page 39: ...o zero The idea is to just touch the zero level 4 Display an all white picture from the source computer Next adjust White Level gain until the Image Maxi mums just go to 255 Again do not push it up after the maximum is 255 Just touch the 255 point You must adjust Brightness first Contrast second If the three colors are not all at 255 or 254 adjust them separately Full automatic level adjustment Au...

Page 40: ...lor bar pattern from the video source you will use for the program material You can not use the color bar from the Test Patterns menu 2 In the Input Levels menu check Blue Only You should see only the alternate color bars all of them blue 3 Adjust Saturation to make the outer two color bars match Match them in brightness they will already match in color 4 Adjust Hue to make the inner two color bar...

Page 41: ...st Contrast Brightness Saturation and Hue on one Bay Cat X until it looks satisfactory 3 Adjust all the other Bay Cat Xs in the array so they have the same values for Contrast Brightness Satura tion and Hue as the first Bay Cat X Saturation Match Match Adjust Saturation so the outside bars match when Blue Only is checked Match Match Hue Adjust Hue so inside bars match when Blue Only is checked ...

Page 42: ...als are 1 33 Mov ies from DVDs vary depending on the original film format often 1 85 The larger the number the wider the picture seems When the incoming picture is a different aspect ratio from the screen Bay Cat X gives you six choices to make it fit Scale Mode Settings 1 To select the scaling mode on the remote press WALL The Aspect Ratio Wall menu displays If the Bay Cat X does not have a Big P...

Page 43: ... 1080i or WXGA Computer or 16X9 Source Fill All No distortion Compresses width to fit Stretches width of image Displays at native resolu tion without distortion Fill All makes the picture fit top to bottom and left to right regardless of how this stretches or compresses the picture Fill All distorts the picture when the aspect ratio of the incoming picture is not the same as the Bay Cat X screen C...

Page 44: ...spect ratio to 16 x 9 1 77 the standard for many DVD movies This will distort any pic ture other than 16X9 aspect ratio pictures Widescreen can be used to display anamorphic DVDs on an array Normal Video No distortion Compresses width to fit no border Fits height and width of image without distortion fills width with border Fits height of image com presses width and fills with border Normal Video ...

Page 45: ...tains the original size and aspect ratio of the picture This may leave blank areas on all four sides For instance a VGA picture 640 480 on a 16X9 display will occupy only a small area in the center of the screen For UXGA sources on a 16X9 display this will crop the picture top bottom and sides The primary use of One to One is to display the image without scaling artifacts and with minor cropping T...

Page 46: ... is not large enough to fill all units they are left blank Bottom Right positions the image starting with the bot tom rightmost unit then across and up If the image is not large enough to fill all the units they are left blank Border Color Settings Border Color determines the color of the extra space around the picture if it doesn t fill the screen The choices are Black White Red Green Blue Dark B...

Page 47: ...40 ...

Page 48: ...ct only when the image is scaled From the Aspect Ratio menu Main Aspect Ratio Wall select Scale Mode Press ENTER to move to the Scale Mode sub menu Use the up and down arrow keys to highlight the mode you need Press ENTER to select the mode The Scale Mode menu icons change to indicate the effect each mode will have on the picture based on the Justify and Scale Mode settings and the source resoluti...

Page 49: ...42 ...

Page 50: ...l These numbers get smaller as the picture moves up and to the left The Horizontal Position number shows the number of pixels from the beginning of H sync to the first active pixel Because there are many black pixels after H sync this num ber will not be zero when the picture is at the left border of the screen The Vertical Position number is the number of lines from V sync to the first active lin...

Page 51: ...44 ...

Page 52: ...ture in the Color Balance menu and select from 3200 K Warm 5500 K 6500ºK and 8500 K Cool Each of these selects a set of White Balance values to give the picture a warm 3200K to cool 8500K appear ance To adjust an array of Bay Cat Xs for Color Balance The object of color balancing is to make the individual units in an array show the same colors When we see a yel low car move across a video array fr...

Page 53: ... find the least bright dis play in the array This will be the baseline display and you will not adjust it All other displays will be adjusted to this baseline display Why pick the least bright display Why not pick the brightest and adjust to it When the White value is 100 the display is as bright as it can get You are adjusting for slight variations in backlight brightness 5 Choose a display next ...

Page 54: ...rs have colored bulbs at each end to tell you what the effect will be of moving a color toward that end Stand back from the display array and directly in front of it to get the overall view Small changes are difficult to see at first particularly with White Change the value by 4 or 5 steps to see the difference If you are going the wrong way go back and move it 4 or 5 steps in the other direction ...

Page 55: ...48 ...

Page 56: ...rray you ll need to use an external distribution amplifier For each unit set the Aspect Ratio Wall menu for the same array size Wall Width and Wall Height are the number of units wide and high for the picture This may be different from the physical array size You could build a 4x4 array of Bay Cat Xs and use Wall Mode to put a single picture on the four units in the upper left corner for instance ...

Page 57: ...imic the mind s function by hiding portions of the picture as if the mul lions were actually hiding the image and allow the distrib uted image to appear as one very large image To ensure that images containing diagonal lines remain correctly diagonal turn on Frame Compensation Depending on how closely you space the units you must determine how much of the picture to hide behind Bay Cat X s mullion...

Page 58: ... help make this point more clearly The picture is cropped and there is some extra picture to the right off the screens All the units can be zoomed out to make the picture larger in each direction Unit X cannot be zoomed in at the bottom or the left side because there is no more picture to pull onto the screen Unit Y cannot be zoomed in at the bottom but it can be zoomed in from the right because t...

Page 59: ...52 Zoom Top Left Arrows move top and left 0 0 0 0 LCD Resolution 1920 x 1080 This unit 1920 x 1080 Zoom Bottom Right Arrows move bottom and right 0 0 0 0 LCD Resolution 1920 x 1080 This unit 1920 x 1080 ...

Page 60: ...ion of the source picture Viewport shows the number of LCD pixels being used Main Menu Picture Size Position Aspect Ratio Wall Memory Diagnostics Advanced Options Program Information Size Position Picture Position Zoom Window Top Left Zoom Window Bottom Right Viewport Window Top Left Viewport Window Bottom Right Reset All Windows to Default Viewport Top Left Arrows move top and left 0 0 0 0 LCD Re...

Page 61: ...54 ...

Page 62: ...5 The remaining options are covered later in this section Miscellaneous Options see Miscellaneous Options on page 58 Serial Port Settings see Serial Port Settings on page 61 Menu Options see Menu Options on page 57 Main Menu Picture Size Position Aspect Ratio Wall Memory Diagnostics Advanced Options Program Information Advanced Options Color Balance Miscellaneous Options Backlight Settings Serial ...

Page 63: ...order given in the menu Do Quick Black White Levels searches for the bright est and darkest pixels in the picture and adjusts to these Black and White Levels are best done semi automatically see Adjusting Levels for Analog Sources on page 31 so leave this unchecked Do Frequency and Do Phase find the frequency and phase separately of the computer picture and adjust to them This works best on a pict...

Page 64: ... and right arrow keys on the up down keys to move the menu The number indicates how far down the screen the menu is in percent It is not possible to move the menu to the bottom of the screen Menu Timeout determines how many seconds the menu will stay on the screen without any activity Never Time out means the menus will not automatically disappear The maximum time is 60 seconds The shortest possib...

Page 65: ...he odd numbered lines are transmitted These two moments in time are known as fields On CRT television sets the even field persists on the phosphor long enough so that by the time the odd field gets there our eyes put it all together into one picture On digital displays the electronics reassembles the odd and even fields together into one image to display every sixtieth or fiftieth of a second If t...

Page 66: ...acklight switches to low intensity Thus if the ambient light drops the backlight dims 2 Set the Low Intensity at the level in percent of maxi mum you want the backlight to have when the ambient light falls below the threshold The Ambient Light at the top of the menu measures the ambient light in Lux As long as this number is above the Ambient Threshold number the backlight will be 100 Ambient Ligh...

Page 67: ...t ness A lower brightness will increase lamp life CAUTION Changing a failed backlight is a job for a quali fied service technician It is done at the factory not in the field Contact your Planar dealer For more information about these settings see Back light Control Menu Options on page 113 Backlight Control Auto Backlight on Turn Backlight off with no Source DPMS DPMS Delay 1 hr Backlight Control ...

Page 68: ...etter or number of the Group ID such as 8 In this way you can address the group as 8 and all the Bay Cat Xs in the string that have Group ID 8 and any Unit ID will execute the com mand Addressing Bay Cat X Part of the RS232 command will be an address This address may take several forms For example suppose we have 8 units in one area divided into two groups We might set the ID s of the units like t...

Page 69: ...ware upgrades you don t need to adjust the baud rate Diagnostics for RS232 To view RS232 port status on the remote press MONITOR twice The Serial Port Status RS232 menu lists items that concern RS232 For more information see Advanced Options Serial Port Settings on page 114 Controlling with RS232 commands The RS232 protocol the rules for controlling Bay Cat Xs with RS232 commands are given in a se...

Page 70: ... last ten settings Whenever a picture is shown from a new source with the same resolution as a previous picture the system recalls the previous settings rather than readjust everything This hap pens regardless of the check marks in Auto Adjust Options See also Auto Setup Options on page 56 For example suppose you display an NTSC picture in the composite input and set the Aspect Ratio and Position ...

Page 71: ...64 ...

Page 72: ...includes Input Levels Position and Frequency but it does not include Wall Mode and any Big Picture adjustments you made Those need to be recalled from memory slots The fastest most efficient way to change from one source to another or to change a wall from individual pictures to one big picture is to recall a memory All of this is saved even with AC off What the memories store selected source reso...

Page 73: ...ber allows you to save new set tings a checked slot has settings already saved to it You can overwrite what s already saved if you wish 4 Press ENTER The Save to Slot menu displays 5 Select Save Now and press ENTER Save 1 9 17 25 33 2 10 18 26 34 3 11 19 27 35 4 12 20 28 36 5 13 21 29 37 6 14 22 30 38 7 15 23 31 39 8 16 24 32 40 Save Save to Slot 1 Save Now Name AN 1366x768 Source Analog Colorspac...

Page 74: ... is saved for them Changing the name of the memory slot The default name is an abbreviated description of the contents In the example below the name tells you that the source is connected to Analog 1 which is an XGA picture This unit is part of a 2x2 array and it s the unit lower left corner column 1 row 2 Save Save to Slot Current 1 Save Now will overwrite occupied slot Name AN 1366x768 Source An...

Page 75: ...in If the memory already had data and the only change is to the name you will see Update Name on this item If you use RS232 control you can also use commands to send a string name to a memory slot saving time Save Save to Slot 1 Save Now Name AN 1366x768 Source Analog Colorspace RGB Resolution 1366 x 768 Wall 2 x 2 1 1 Scale Justify One to One Center Postion Overscan 168 19 0 Zoom UL LR 0 0 0 0 Vi...

Page 76: ...in that memory slot If the name is not the one you want press PREV and choose another memory 4 To recall the settings saved to this slot select Recall Now and press ENTER Recall 1 9 17 25 33 2 10 18 26 34 3 11 19 27 35 4 12 20 28 36 5 13 21 29 37 6 14 22 30 38 7 15 23 31 39 8 16 24 32 40 Recall Slot Number 17 Recall Now Name AN 1366x768 Source Analog Colorspace RGB Resolution 1366 x 768 Wall 2 x 2...

Page 77: ...repeat settings when comparing entire configurations You can revert to a known good setting when testing new configurations Recall Slot Number Current 17 Recall Now Name AN 1366x768 Source Analog Colorspace RGB Resolution 1366 x 768 Wall 2 x 2 1 1 Scale Justify One to One Center Postion Overscan 168 19 0 Zoom UL LR 0 0 0 0 Viewport UL LR 0 0 0 0 Frequency Phase 1602 22 5 Sharpness Normal Black Lev...

Page 78: ...nabled 4 In the Delete detail menu Delete Now is selected 5 Press ENTER 1 Use the left arrow to make the Yes red and press ENTER It is not necessary to delete the data in a memory slot before saving new data Saving will overwrite the stored data See Saving Configurations on page 66 Memory Recall Save Delete Delete 1 9 17 25 33 2 10 18 26 34 3 11 19 27 35 4 12 20 28 36 5 13 21 29 37 6 14 22 30 38 7...

Page 79: ...ector but a different computer you set up the Bay Cat X for a 1600x1200 60Hz You re adjust the Black and White Levels because they are different Still later you plug in the first computer with its 1024x768 65Hz picture Immediately the Bay Cat X recognizes that it has seen this signal type before and it recalls the Black and White Levels from its internal mem ory It does not Do Frequency or Phase o...

Page 80: ... You change the Color space setting to YPbPr If you switch back to Analog in the Picture menu the Bay Cat X switches back to the RGB Colorspace because Colorspace is specific to the input connector Possible issue with Input specific memory What happens if you switch back to Analog and the pic ture there is YPbPr The Bay Cat X has no way to know this no way to detect the difference between RGB and ...

Page 81: ...74 ...

Page 82: ...screen and leaking into the interior of the Bay Cat X Spray liquids on the cloth or towel not directly on the LCD Wipe the screen gently with a lint free cloth or lint free paper see Cloth below Turn the cloth over to the dry side and continue wiping to take up the haze Glass Wax is another good cleaner for mirrors and glass screens but it does not work well on acrylic screens It is a liquid in a ...

Page 83: ...76 ...

Page 84: ...press MONITOR twice The Test Patterns menu appears Check that no test patterns are selected If a test pattern is selected move the selector to None and press ENTER For more information see Test Patterns on page 83 Step 4 Check Power cable is con nected and power rocker switch is ON Reconnect cable or turn on unit If none of these steps have resolved the problem contact Technical Support Department...

Page 85: ...d by the Border Color in this menu Check the Aspect Ratio and Wall menu see Aspect Ratio Settings on page 35 Picture is too large or too small This could be a zoom adjustment particularly if you are using Planar s Big Picture Check the two Zoom menus and set them both so you see a zero on all four sides Then check the two Viewport menus and see that they read zero on all four sides see Zoom and Po...

Page 86: ...oblems on page 141 If your picture is visible but something is wrong with it Continued Symptom Possible Cause Explanation Further Action Bay Cat X doesn t respond to remote control Possible Cause Possible Resolution IR response disabled via RS232 Re enable IR response using RS232 commands Remote batteries are dead or improperly installed Replace or reinstall batteries Remote was not aimed at the I...

Page 87: ...80 ...

Page 88: ...m Time System Time is accumulated as long as the electronics module is on Serial Port Status menu Press MONITOR again to display the Serial Port Status Menu You can go directly to either of these menus from the main menu Neither of these menus have any control over the Bay Cat X so there is no highlight selector in any of them Commands Received the number of individual com mand strings received by...

Page 89: ...e display right now Setup Summary shows the current Color Balance set tings which are the ones in the global memory Color Bal ance settings are not saved in individual numbered memories The look of this menu varies depending on the currently selected source Setup Summary Source Analog Colorspace RGB Resolution 1920 x 1080 Wall 2 x 2 1 1 Scale Justify One to One Center Postion Overscan 169 20 0 Zoo...

Page 90: ...nd Blue Scales show 32 or 64 step scales You should be able to see all the steps clearly Colors shows a rainbow of colors and a gray scale at sev eral levels of saturation for testing uniformity Color Bars displays a pattern of the three primary colors and the primary combinations along with black and white This is similar to but not the same as color bars in the tele vision and video field These ...

Page 91: ...84 ...

Page 92: ...me locked 60Hz Horizontal Frequency 50 00kHz Pixel Frequency 80 10MHz Horizontal Resolution 1366 Vertical Resolution 768 Frequency 1602 Phase 22 5 Sharpness Sharpest Input Levels Pressing the FREQ PHASE key opens the Picture menu directly Main Menu Picture Size Position Aspect Ratio Wall Memory Diagnostics Advanced Options Program Information Analog Digital Component YPbPr S Video Composite For ex...

Page 93: ...al If the incoming signal does not conform to the one found in this mode table the resolution can be adjusted This should not normally be necessary Vertical Resolution The number of vertical lines or pixels from the top to the bottom of an image The pixel height of an image NTSC and PAL SDTV is 480 lines HDTV is 720 or 1080 Frequency The total number of pixels in a horizontal line including those ...

Page 94: ...ndard NTSC 60 Hz 3 58 MHz Vertical Frequency frame locked 60Hz Sharpness Sharpest Input Levels The Composite Component and S Video picture menus look the same Pressing the FREQ PHASE key opens the Picture menu directly Picture Source Comp Video Video Standard NTSC 60 Hz 3 58 MHz Vertical Frequency frame locked 60Hz Sharpness Sharpest Input Levels Picture Source S Video Video Standard NTSC 60 Hz 3 ...

Page 95: ...el Frequency The number of pixels per second in megahertz Horizontal Resolution The number of vertical lines or pixels from one side of an image to the other The pixel width of an image The resolution of an analog signal is determined from an internal mode table and the measured horizontal and vertical frequency of the signal If the incoming signal does not conform to the one found in this mode ta...

Page 96: ...set Black Level to Default Picture Source Digital Colorspace RGB Vertical Frequency frame locked 60Hz Horizontal Frequency 50 00kHz Horizontal Resolution 1366 Vertical Resolution 768 Sharpness Sharpest Input Levels Main Menu Picture Size Position Aspect Ratio Wall Memory Diagnostics Advanced Options Program Information Pressing the LEVEL key opens the Input Levels menu directly Input levels for An...

Page 97: ... allows you compensate for different amplitudes of signals by applying a gain to the signal This adjustment is sometimes known as contrast or gain The white level adjustment adjusts all three color channels at the same time White level is only for analog RGB signals Red Green Blue Individual adjustments for setting the white level for each of the three colors Brightness Similar to black level but ...

Page 98: ...pen the Zoom Bottom right menu Size Position Picture Position Zoom Window Top Left Zoom Window Bottom Right Viewport Window Top Left Viewport Window Bottom Right Reset All Windows to Default Picture Position Use arrow keys to move image Horizontal Position 168 Vertical Position 19 Main Menu Picture Size Position Aspect Ratio Wall Memory Diagnostics Advanced Options Program Information ...

Page 99: ... you can move the image verti cally using the buttons Pressing moves the image down Pressing moves the image up Zoom Window Top Left Zoom adjusts the size of the picture In Zoom Top Left the up down arrows move the top edge and the right left arrows move the left side Zoom Window Bottom Right Viewport Window Top Left Viewport shrinks the picture This feature is most useful when each unit in a wall...

Page 100: ...Overscan 0 Border Color Black Wall Width 1 Wall Height 1 Unit Column 1 Unit Row 1 Wall Mode Frame Compensation Frame Height 97 pixels Frame Width 157 pixels Fill All Crop Letterbox Pillarbox Widescreen 16x9 Normal Video 4x3 One to One Main Menu Picture Size Position Aspect Ratio Wall Memory Diagnostics Advanced Options Program Information ...

Page 101: ...hown with no overscan may have objectionable lines or other extraneous noise on the outer edges of the picture By agreement among the broadcast industry for standard definition television no titles or text will be chopped off with as much as 20 overscan No important action will be chopped off with as much as 10 overscan 0 to 20 Default 3 when image is Composite S Video Component or YPbPr 0 for ana...

Page 102: ...ain Menu Picture Size Position Aspect Ratio Wall Memory Diagnostics Advanced Options Program Information Pressing the SAVE key opens the Recall menu A second press opens the Save menu Recall Slot Number 17 Recall Now Name AN 1366x768 Source Analog Colorspace RGB Resolution 1366 x 768 Wall 2 x 2 1 1 Scale Justify One to One Center Postion Overscan 168 19 0 Zoom UL LR 0 0 0 0 Viewport UL LR 0 0 0 0 ...

Page 103: ...e the character at that position There are 24 character spaces available The default name is an abbreviation of the memory contents connector used resolution wall configuration and wall position if wall mode is on Source The type of input Analog Digital Component YPbPr S Video or Composite Colorspace The colorspace of the input either RGB or YPbPr Resolution The image resolution From 800 x 600 up ...

Page 104: ...Options Program Information Diagnostics Unit Status Serial Port Status Test Patterns Setup Summary Hours Unit Status Bay Cat L46 1920 x 1080 573 2410 Rev 1 2 Asset Tag Backlight Status OK Internal Temperature 32ºC Mode ID 31 HPer 3178 VLines 525 Pressing the MONITOR key opens the Unit Status menu directly ...

Page 105: ...peratures If thermal guidelines see Normal Use Thermal Guidelines on page 133 are exceeded and additional ventilation or cooling has been implemented this temperature may be used as a datapoint to determine if the temperature of the unit is being affected Mode ID The index number of the mode from the internal mode table for the incoming signal This is used in diagnosis of mode detection problems E...

Page 106: ...s Sent 773 UART Framing Errors 4 UART Overflow Errors 0 Group 0 Unit 0 19200 Baud Most Recent 115 111 108 117 105 111 110 63 13 st 1 st 2 st 3 lcd vertical resolution Diagnostics Unit Status Serial Port Status Test Patterns Setup Summary Hours Main Menu Picture Size Position Aspect Ratio Wall Memory Diagnostics Advanced Options Program Information Pressing the MONITOR key twice opens the Serial Po...

Page 107: ...a unit or units other than this one It will not be acted on or answered Not Addressed The last packet was received with address or via the binary non addressed pro tocol It will be acted on and answered If multiple units are connected on the RS 232 chain the answer may not be properly received since all units on the line will be talking at once Bytes Received Bytes Sent Counts the number of bytes ...

Page 108: ... Alignment Dashes Green Green Scale 4x4 Checkerboard Blue Blue Scale Uniformity Black Colors Focus Gray Color Bars Logo Diagnostics Unit Status Serial Port Status Test Patterns Setup Summary Hours Main Menu Picture Size Position Aspect Ratio Wall Memory Diagnostics Advanced Options Program Information ...

Page 109: ...e as color bars in the television and video field These bars are 100 saturated Grid Displays a large grid pattern with illuminated outer edge and is useful for aligning an image especially in rear projection applications Alignment Dashes Displays a set of one pixel wide six pixel long staggered alignment bars Used to ensure the same number of pixels are hidden on all sides in rear projection syste...

Page 110: ...e Custom Color White Gray Scale Grid Red Red Scale Alignment Dashes Green Green Scale 4x4 Checkerboard Blue Blue Scale Uniformity Black Colors Focus Gray Color Bars Logo Custom Test Pattern Color Red 65 Green 64 Blue 64 All ...

Page 111: ...Overscan 169 20 0 Zoom UL LR 0 0 0 0 Viewport UL LR 0 0 0 0 Frequency Phase 1602 22 5 Sharpness Normal White Balance 100 100 100 Gray Balance 7 7 7 Slot 9 Group B Unit 2 Diagnostics Unit Status Serial Port Status Test Patterns Setup Summary Hours Main Menu Picture Size Position Aspect Ratio Wall Memory Diagnostics Advanced Options Program Information ...

Page 112: ...he position and amount of overscan of the image on the screen Zoom UL LR The zoom adjustment settings see Size and Position Picture Position on page 91 Viewport UL LR The viewport adjustment settings see Size and Position Picture Position on page 91 Frequency Phase The frequency and phase settings see Picture Source Analog on page 85 Sharpness The sharpness setting see Picture Source Analog on pag...

Page 113: ...s System Time 00636 45 Running Time 00532 00 Diagnostics Unit Status Serial Port Status Test Patterns Setup Summary Hours Main Menu Picture Size Position Aspect Ratio Wall Memory Diagnostics Advanced Options Program Information ...

Page 114: ...ing Description Settings Values System Time The number of hours the electronics module has received power Running Time the total number of hours the backlights have been on This time is greater than or equal to the longer backlight time ...

Page 115: ...ite Balance All Clipboard Red 100 100 Green 100 100 Blue 100 100 Gray Balance All Red 7 7 Green 7 7 Blue 7 7 Test Pattern Off Hide Menu Copy to Clipboard Recall From Clipboard Reset to Defaults Main Menu Picture Size Position Aspect Ratio Wall Memory Diagnostics Advanced Options Program Information You can display the White Gray Grayscale and Col ors test patterns from the Test Pattern option Pres...

Page 116: ...other units in an array Red Adjusts the gamma of each of the colors separately allowing the user to change the color of gray to match other units in an array 0 15 Green Blue Test Pattern The four test patterns are the same patterns available from Main Diagnostics Test Patterns but are more conveniently accessed from this menu when you are using the remote to color balance units Off White Gray Gray...

Page 117: ... x 9 Press MISC once to open the Miscellaneous menu directly Advanced Options Color Balance Miscellaneous Options Backlight Settings Serial Port Settings Auto Setup Options Menu Options Message in Picture Set Clock Schedule Events Main Menu Picture Size Position Aspect Ratio Wall Memory Diagnostics Advanced Options Program Information ...

Page 118: ...It Works on page 135 Preferred Source Detec tion This tells the Bay Cat X which aspect ratio to use when the incoming signal may have several choices For instance 1024x768 and 1366x768 have similar signal timings and the Bay Cat X might choose the wrong one If your applica tion sometimes has 1024x768 but never 1366x768 set this control for 4x3 For more information see Preferred Source Detection on...

Page 119: ...DPMS DPMS Delay 1 hr Ambient Light 239 Lux Backlight Control Mode Auto Backlight Intensity 100 Ambient Threshold 99Lux Low Intensity 30 Advanced Options Color Balance Miscellaneous Options Backlight Settings Serial Port Settings Auto Setup Options Menu Options Message in Picture Set Clock Schedule Events Main Menu Picture Size Position Aspect Ratio Wall Memory Diagnostics Advanced Options Program ...

Page 120: ...anual When Backlight Control Mode is set to Manual Backlight Intensity Backlight Intensity can be controlled when Backlight Control Mode is Manual In Auto mode Backlight Intensity is read only 30 100 When Backlight Control Mode is set to Auto Ambient Light Ambient Light is the light currently in the immediate area of the Bay Cat X Ambient Threshold Ambient Threshold is the light intensity below wh...

Page 121: ...II Response Terminator CR Baud Rate 19200 Advanced Options Color Balance Miscellaneous Options Backlight Settings Serial Port Settings Auto Setup Options Menu Options Message in Picture Set Clock Schedule Events Main Menu Picture Size Position Aspect Ratio Wall Memory Diagnostics Advanced Options Program Information ...

Page 122: ...ords are returned Numeric numbers are returned or Data Only only the data value is returned ASCII Response Terminator ASCII Response Terminator is the non printing character or two character combination that will end each response sent This is useful for getting your particular host program to display returned commands on separate lines Windows type systems normally work best with CR LF UNIX and L...

Page 123: ...Frequency Do Phase Do Position Advanced Options Color Balance Miscellaneous Options Backlight Settings Serial Port Settings Auto Setup Options Menu Options Message in Picture Set Clock Schedule Events Main Menu Picture Size Position Aspect Ratio Wall Memory Diagnostics Advanced Options Program Information ...

Page 124: ...ic method is prone to small errors in the white level Semi automatic level adjustment is better For more information see Adjusting Levels for Analog Sources on page 31 Do Frequency Automatically adjust the frequency phase and position respectively of the image to optimal val ues based on the image it detects If the incoming image is all black at the time it is first received the unit will not be a...

Page 125: ...me Out Rotate Menu None Advanced Options Color Balance Miscellaneous Options Backlight Settings Serial Port Settings Auto Setup Options Menu Options Message in Picture Set Clock Schedule Events Main Menu Picture Size Position Aspect Ratio Wall Memory Diagnostics Advanced Options Program Information ...

Page 126: ...enus disappear after this time when there is no remote control activity 5 seconds to Never Time Out which means menus do not disappear Rotate Menu Rotates the menu for Portrait orientation It does not rotate the picture See Advanced Options on page 55 None clockwise counter clockwise For more information see Menu Options on page 57 ...

Page 127: ...0 seconds Advanced Options Color Balance Miscellaneous Options Backlight Settings Serial Port Settings Auto Setup Options Menu Options Message in Picture Set Clock Schedule Events Main Menu Picture Size Position Aspect Ratio Wall Memory Diagnostics Advanced Options Program Information ...

Page 128: ...IP Displays the last Message In Picture that was displayed Timeout Determines how long this message will be displayed 0 120 seconds 0 seconds means it will not time out To learn the complete MIP system and how to control it download the MIP Maker software from Planar s website ...

Page 129: ...ar com Bay Cat L46 X L40 573 2410 1920 x 1080 Rev 1 2 Code Generated Date GUI Generated Date Apr 7 2005 at 16 46 54 Apr 7 2005 at 16 46 57 When Planar upgrades firmware software used in the Bay Cat X it will be available on www Planar com Main Menu Picture Size Position Aspect Ratio Wall Memory Diagnostics Advanced Options Program Information ...

Page 130: ...es 525 Raise and lower val ues in menus If the current menu does not have value bars in it these but tons select the high lighted item Navigate through menus by highlighting items Select by pressing ENTER Turns curtain on and off When curtain is on source picture is blocked To redisplay the source picture press CURTAIN again If you have created a custom logo it is dis played Main Menu Picture Size...

Page 131: ...ite Level gain All 99 Red 99 Green 99 Blue 99 Picture Source Digital Colorspace RGB Vertical Frequency frame locked 60Hz Horizontal Frequency 50 00kHz Horizontal Resolution 1366 Vertical Resolution 768 Sharpness Sharpest Picture Source Comp Video Video Standard NTSC 60 Hz 3 58 MHz Vertical Frequency frame locked 60Hz Sharpness Sharpest Input Levels when source is Compos ite Component YPbPr or S Vi...

Page 132: ...et Black Level to Default Input levels for Digital YPbPr sources Input Levels Auto Black Level offset Auto White Level gain Center Point 64 124 99 Black Level offset All 79 Red 89 Green 67 Blue 83 White Level gain All 99 Red 99 Green 99 Blue 99 Input Levels Brightness 140 Contrast 165 Saturation 150 Hue 128 Blue Only Input levels for Analog RGB sources Input levels for Component YPbPr S Video and ...

Page 133: ...verscan 0 Border Color Black Wall Width 1 Wall Height 1 Unit Column 1 Unit Row 1 Wall Mode Frame Compensation Frame Height 97 pixels Frame Width 157 pixels Aspect Ratio and Wall Fill All Crop Letterbox Pillarbox Widescreen 16x9 Normal Video 4x3 One to One ...

Page 134: ...2 40 Save 1 9 17 25 33 2 10 18 26 34 3 11 19 27 35 4 12 20 28 36 5 13 21 29 37 6 14 22 30 38 7 15 23 31 39 8 16 24 32 40 Color Balance Color Temperature 8500K Cool White Balance All Clipboard Red 100 100 Green 100 100 Blue 100 100 Gray Balance All Red 7 7 Green 7 7 Blue 7 7 Test Pattern Off Hide Menu Copy to Clipboard Recall From Clipboard Reset to Defaults The first press of MISC displays the Col...

Page 135: ...Delay 1 hr Ambient Light 239 Lux Backlight Control Mode Auto Backlight Intensity 100 Ambient Threshold 99Lux Low Intensity 30 Serial Port Settings Group ID 1 Unit ID 1 ASCII Response Type Symbolic ASCII Response Terminator CR Baud Rate 19200 The fourth press of MISC displays the Serial Port Settings menu The fifth press of MISC displays the Auto Setup menu Auto Setup Options Retry on Lost Signal D...

Page 136: ...129 6 3 Drawings Dimensions in inches ...

Page 137: ...16 887 29 315 41 240 30 741 2 619 3 960 1 822 3 628 BEZEL BEZEL MASK OPENING BEZEL OPENING LCD QUALITY AREA 40 0925 22 950 44 040 26 135 1 000 655 315 250 188 443 40 227 OPENING 125 40 500 22 677 BEZEL MASK OPENING LCD QUALITY AREA 22 541 ...

Page 138: ...40 1 250 2 534 3 125 3 716 27 888 2 902 2 708 1 874 2 990 Bay Cat Video Model connector locations 5 4 3 2 1 6 7 8 9 Yellow wire pin 3 Black wire pin 2 Green wire pin 5 RJ45 9 pin 6 3 5 5 3 2 The wiring shown for this adapter is correct for straight through network cables RJ45 looking into the socket 1 8 ...

Page 139: ...132 ...

Page 140: ...f the power for 2 hours After 12 hours continuous use turn off the power for 1 hour For computer sources use the PC Power Management Properties to power off the monitor when it is not in use Display a black screen Research at Planar has shown that displaying a black image or turning off the AC power is the quickest way to dissipate the temporarily retained image a black image is available from the...

Page 141: ...correct itself once the thermal issue is adequately addressed WARNING Chronic overheating may shorten the unit lifespan and void your warranty In each case either moving the display away from a heat or light source providing shielding from that source or providing additional ventilation to ensure against heat buildup should be sufficient to address the thermal issue A built in thermal sensor on th...

Page 142: ... timings than can be stored in a data block of only 128 bytes Planar displays are capable of hundreds of resolutions but the EDID block has room to store only dozens This means that some video cards will not put out cer tain resolutions even though the connected Planar display is capable of handling them If the resolution you want to use is not listed in the Planar EDID and the video card won t li...

Page 143: ...136 ...

Page 144: ...ystem in which all the video information is sent on one wire Sometimes called C Video cube One display without regard to others that may be in an array with it See also unit display C Video Composite video a video distribution system in which all the video informa tion is sent on one wire DA Distribution amplifier a device that takes in one input and gives out many of the same type DAs are availab...

Page 145: ...See also NTSC and PAL SOG Sync on green usually for RGB sources source A source of pictures such as a com puter a VCR or a DVD player Term Meaning SVGA Super VGA a standard for distributing analog computer pictures with a reso lution of 800 pixels by 600 pixels S Video A video distribution system in which the luminance brightness and chrominance color are sent on sepa rate wires Short for Super Vi...

Page 146: ...139 YPbPr Designators for the three conductors in component video Y luminance signal Pb B Y blue luminance signal Pr R Y red luminance signal Term Meaning ...

Page 147: ...140 ...

Page 148: ...1 101 9 cm Height 22 6 57 4 cm Pixel pitch 0 648 0 648 mm Electrical and Heat Specification Maximum Minimum Typical Notes Video input amplitude Separate RGB analog 1 0 V p p 0 5 V p p 0 7 V p p 75 ohm termination Composite analog 5 0 V p p 0 3 V p p 75 ohm termination TTL H and V sync 5 0 V 2 5 V 3 5 V TTL at 330 ohm termination Input connectors DVI D Digital 15 pin HD D sub RCA Composite video NT...

Page 149: ...y 0 290 Response time 20msec 16msec 25 C 10 ms trise 6 ms tfall Number of colors 16 M Resolution 1920 1080 pixels Lamp life hours 60 000 to brightness Environmental Specification Maximum Minimum Typical Notes Temperature operating 30 C 86 F 0 C 32 F 25ºC All performance specifications are maintained within this temperature range See Optimizing Your Planar Display on page 133 non operating 60 C 140...

Page 150: ...8 Magnetic Field Immunity EN61000 4 11 Voltage Dips and Interrupts FCC Regulations This equipment has been tested and found to comply with the limits for a Class A digital device pursuant to Part 15 of the FCC rules These limits are designed to provide reasonable protection against harmful interference when the equipment is operated in a commercial environment This equipment generates uses and can...

Page 151: ...144 ...

Page 152: ...t ratio 93 definition of 35 menu 35 aspect ratio definition of 137 auto adjustment options 56 auto backlight control 59 auto codes 58 111 auto setup options where stored 65 automatic adjustment of levels 32 automatic adjustments 21 B backlight 1 auto on 21 brightness 46 control 59 intensity 113 life 142 status 59 backlight control 59 backlight control and status 59 backlight control mode 59 backli...

Page 153: ...ital black level 29 digital RGB sources 26 digital source adjusting to 29 dimensions 129 141 disabling the remote control 63 display definition of 137 do quick black white level 117 drawings 129 DVD player 25 DVI 25 DVI definition of 137 E EDID 135 electrical specifications 141 electronics module definition of 137 environmental specifications 142 F fan state of 81 fast key definition of 137 FCC re...

Page 154: ...ect ratio 35 auto adjustment options 56 Cube Status 81 delete 95 display of timing 57 H position 57 input levels 32 miscellaneous options where stored 65 orientation 57 picture 25 rotation 57 Serial Port Settings 61 setup summary 82 status 81 timeout 57 V position 57 zoom 92 message in picture 120 mirror cleaning 75 misc 108 110 112 miscellaneous options menu where stored 65 mode ID 98 model name ...

Page 155: ... of 138 RGBHV definition of 138 RGBS definition of 138 RJ45 adapter 131 RJ45 to 9 pin adapter 19 rotation menu 57 RS232 19 RS232 connecting 19 S safety 3 regulatory specifications 143 saturation 33 saturation where stored 65 save 66 to slot 66 save config after color balance 47 saved globally 72 saved parameters 72 saving settings 56 63 saving your work 66 scale drawings 129 scales red green blue ...

Page 156: ...ge retention troubleshooting curtain is on 77 image problems 78 menu not visible 77 no menu 77 screen is black 77 screen solid color not black 77 U uniformity 83 unit ID 61 115 unit definition of 138 UXGA definition of 138 V V position in menu options 57 ventilation 11 vertical position 43 VGA definition of 138 video composite definition of 137 definition of 138 input module definition of 138 vide...

Page 157: ...150 R J K O S T U V W X Y Z M Q N P R G I L F H B E C D A ...

Page 158: ... side of high contrast edges I see a solid green background has vertical bands in it Whenever I try to _______ I get a message on the screen that says _________ There is a black line on the left side and I can t move the picture over there with the Position control I see flashing red and amber lights on the screen Note the sequence of the colored lights It s impor tant Planar Display Serial Number...

Page 159: ... 2007 Planar Systems Inc All rights reserved 1195 NW Compton Drive Beaverton OR 97006 1992 Main Phone 1 503 748 1100 Technical Support Phone 1 503 748 5799 Fax 1 503 748 5532 www Planar com ts planar com ...

Reviews: