English
08
Chapter
23
En
For details, refer to Using the equalizer on
page 48.
5
Selects a track from the list.
For details, refer to Selecting files from
the file name list on page 24.
6
Displays the Phone menu screen.
For details, refer to Displaying the phone
menu on page 14.
7
Switches to the next or previous page of
touch panel keys.
8
Skips files forward or backward.
9
Changes the playback point by dragging
the key.
For details, refer to Operating the time bar
on page 11.
a
Switches the media file type.
For details, refer to Switching the media
file type on page 24.
b
Switches between playback and pause.
c
Uses “
Sound Retriever
” function.
For details, refer to Setting the “Sound
Retriever” function on page 55.
d
Plays files in random order.
For details, refer to Playing tracks in
random order on page 24.
e
Sets a repeat play range.
For details, refer to Setting a repeat play
range on page 24.
f
Searches for the part you want to play.
For details, refer to Searching for the part
you want to play on page 24.
g
Hides the touch panel keys.
Touching this area hides the touch panel
keys.
p
Touch anywhere on the LCD screen to
display the touch panel keys again.
h
Displays the DVD menu.
For details, refer to Operating the DVD
menu on page 24.
i
Switches the subtitle language.
For details, refer to Switching the subtitle
language on page 24.
j
Switches the audio language.
For details, refer to Switching the audio
language on page 24.
k
Stops playback.
l
Changes the wide screen mode.
For details, refer to Changing the wide
screen mode on page 55.
m
Moves ahead one frame (frame-by-frame
playback) or slows down playback speed
(slow-motion playback).
For details, refer to Frame-by-frame play-
back on page 24.
For details, refer to Slow motion playback
on page 25.
n
Performs an operation (such as resum-
ing) that is stored on the disc.
For details, refer to Returning to a speci-
fied scene on page 25.
o
Resumes playback (Bookmark).
For details, refer to Resuming playback
(Bookmark) on page 25.
p
Displays the DVD menu keypad.
For details, refer to Operating the DVD
menu using touch panel keys on page 25.
q
Changes the viewing angle (Multi-angle).
For details, refer to Switching the multi-
angle DVD display on page 25.
r
Selects the audio output.
For details, refer to Selecting the audio
output on page 25.
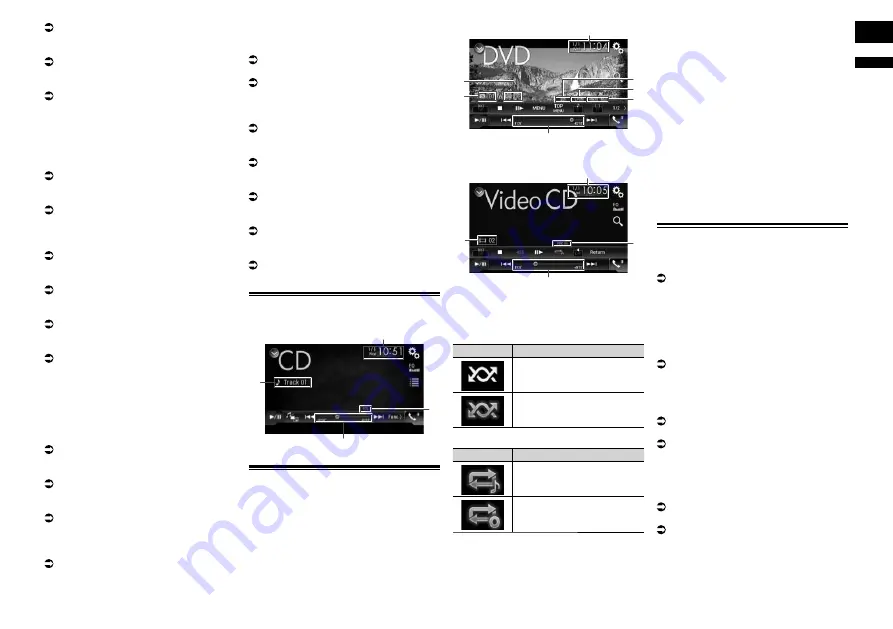
Reading the screen (for audio)
Example: CD
4
3
1
2
Reading the screen (for video)
Example: DVD
9
8
3
1
7
6
5
Example: Video CD
3
1
a
4
1
Current time and date
2
Playback condition indicator
Indicates the current playback condition.
Playing tracks in random order
Indicator
Meaning
Does not play tracks in ran-
dom order.
Plays all tracks in the current
disc in random order.
Setting a repeat play range
Indicator
Meaning
Repeats just the current
track.
Repeats the current disc.
3
Play time indicator
Shows the elapsed playing time within
the current file.
4
Track number indicator
Shows the number of the track currently
playing (when available).
5
Audio channel indicator
Shows the current audio channel type,
such as “
Mch
” (Multi-channel).
6
Digital sound format indicator
Shows which digital sound format (sur-
round sound format) has been selected.
7
Sampling frequency indicator
Shows the sampling frequency currently
playing.
8
Title number indicator
Shows the title number currently playing.
9
Chapter number indicator
Shows the chapter number currently
playing.
a
PBC ON indicator
Indicates that a disc with PBC On is
being played.
Starting procedure
1 Display the AV source selection
screen.
For details of the operations, refer to
Displaying the AV operation screen on
page 10.
2 Insert the disc you want to play
into the disc-loading slot.
The source changes and then playback will
start.
For details, refer to Inserting and ejecting
a disc on page 8.
p
If the disc is already set, touch [
Disc
] on
the source list or on the AV source selec-
tion screen.
For details, refer to Selecting a front
source on the source list on page 11.
For details, refer to Selecting a front
source on the AV source selection screen
on page 10.
3 Use the touch panel keys on the
screen to control the disc.
For details, refer to Using the touch panel
keys (for audio) on page 22.
For details, refer to Using the touch panel
keys (for video) on page 22.


