background image

Configuration and startup

3785_en_B

PHOENIX CONTACT

33

4.8.1

Socket settings

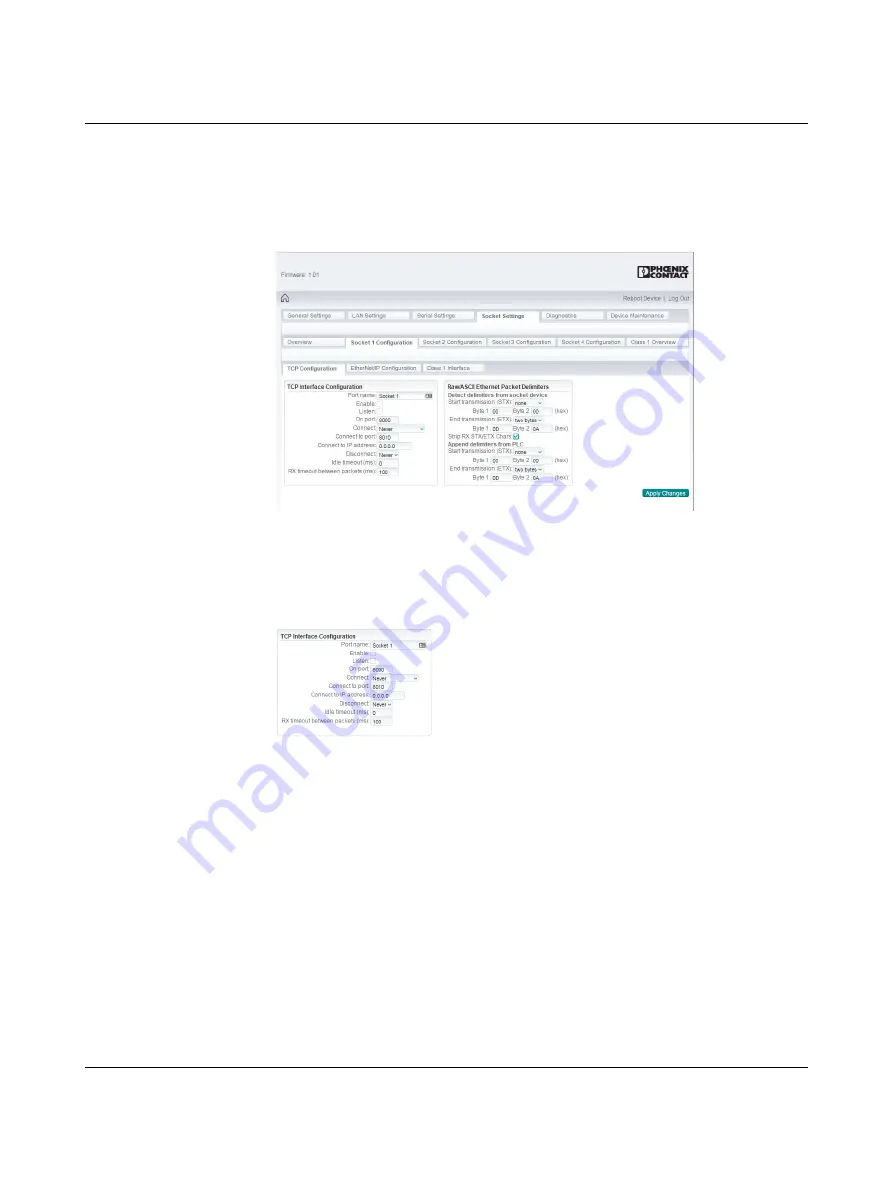
On the “Socket Configuration” page, specify the settings for each socket.

4.8.1.1

TCP configuration

Figure 4-14

“Socket Settings/Socket Configuration/TCP Configuration” page

The TCP configuration specifies how the GW EIP/ASCII... connects to a TCP/IP 
Raw/ASCII device, such as a bar code scanner.

1.

In the “TCP Interface Configuration” group, specify the TCP settings of the Ethernet 

port.

Figure 4-15

“TCP Interface Configuration” group

Port name: 

Enter a label for the port. This could correspond to the connected device, 

for example “Label Scanner” for easy identification.

Enable: 

This must be checked to use the port as a socket.

Listen: 

Check the “Listen” box so that the GW EIP/ASCII... listens for incoming TCP/IP 

socket connections on the port number specified in the “On port” field.

On port: 

Enter the TCP port number on which the GW EIP/ASCII... listens for 

connections. 

Connect: 

If 

Enable

 is selected, this setting determines how to connect to a device. If 

Never

 is selected, the 

GW EIP/ASCII... does not attempt to make a connection. If 

Always

 is selected, the GW EIP/ASCII... ma

intains a permanent connection to the 

device specified by the “Connect to IP address” and “Connect to port” fields.

Connect to IP address: 

Enter an IP address to which the 

GW EIP/ASCII... 

initiates a 

connection. Use the standard AAA.BBB.CCC.DDD format.

Connect to port: 

Enter a TCP Port number to which the GW EIP/ASCII... initiates a 

connection.

Summary of Contents for 2702772

Page 1: ...User manual UM EN GW EIP ASCII Protocol converter for ASCII to EtherNet IP...

Page 2: ...phoenixcontact com 3785_en_B Protocol converter for ASCII to EtherNet IP Designation Order No GW EIP ASCII 1E 1DB9 GW EIP ASCII 1E 2DB9 GW EIP ASCII 2E 2DB9 GW EIP ASCII 2E 4DB9 2702772 2702773 270277...

Page 3: ...3 2 Mounting 13 3 3 Data interfaces 15 3 3 1 Connecting the V 24 RS 232 cable 15 3 3 2 Connecting the RS 422 cable 16 3 3 3 Connecting the RS 485 cable 16 3 3 4 Connecting the Ethernet cable 17 3 4 C...

Page 4: ...finition object 74hex 55 5 4 Informational objects 57 5 4 1 Identity object 01hex 1 instance 57 5 4 2 Status word 58 5 4 3 Message router object 02hex 59 5 4 4 Connection manager object 06hex 60 5 4 5...

Page 5: ...7 1 Resetting the device 79 7 1 1 Hardware reset 79 7 1 2 Software reset 79 7 2 LEDs 79 8 EDS files 81 8 1 Add the GW EIP ASCII to RSLinx 81 8 2 Add the EDS file to RSLinx 81 8 3 Troubleshooting RSLi...

Page 6: ...GW EIP ASCII 4 PHOENIX CONTACT 3785_en_B...

Page 7: ...less system is a Class A item of equipment and may cause radio interference in residential areas In this case the operator may be required to implement appropriate measures and to pay the costs incurr...

Page 8: ...or non hazardous locations only This equipment is an open type device meant to be installed in an enclosure suitable for the environment that is only accessible with the use of a tool 1 4 2 Installati...

Page 9: ...tric Select Modicon series and LMC058 Panasonic FP7 Mitsubishi select Q series AutomationDirect Productivity 1000 2000 3000 Do more H2 DM1E B R X20 system CodeSys Soft PLCs Many other PLCs SCADA syste...

Page 10: ...et port and one RS 232 422 485 serial port with a D SUB 9 connector Figure 2 1 GW EIP ASCII 1E 1DB9 Table 2 2 GW EIP ASCII 1E 1DB9 structure Item Description 1 Power connector 2 P1 D SUB 9 connector 3...

Page 11: ...32 422 485 serial ports with D SUB 9 connectors Figure 2 2 GW EIP ASCII 1E 2DB9 Table 2 3 GW EIP ASCII 1E 2DB9 structure Item Description 1 Power connector 2 P1 D SUB 9 connector 3 Ethernet port RJ45...

Page 12: ...h D SUB 9 connectors Figure 2 3 GW EIP ASCII 2E 2DB9 Table 2 4 GW EIP ASCII 2E 2DB9 structure Item Description 1 Power connector 2 P1 D SUB 9 connector 3 Ethernet link status LED 4 E2 Ethernet port RJ...

Page 13: ...2 4 GW EIP ASCII 2E 4DB9 Table 2 5 GW EIP ASCII 2E 4DB9 structure Item Description 1 Power connector 2 P3 D SUB 9 connector 3 Ethernet link status LED 4 E2 Ethernet port RJ45 5 Ethernet activity stat...

Page 14: ...GW EIP ASCII 12 PHOENIX CONTACT 3785_en_B...

Page 15: ...the device yourself but replace it with an equivalent device Repairs may be carried out only by the manufacturer The manufacturer is not liable for any damage caused by violation of the prescribed re...

Page 16: ...e 1 Use a suitable screwdriver to release the locking mechanism A on the snap on foot of the device 2 Hold on to the device by the housing cover and carefully tilt it upward B 3 Remove the device from...

Page 17: ...a PC Connect the GW EIP ASCII to the V 24 RS 232 device to be connected for example a PC by way of the PSM KA 9SUB 9 BB 2 METER V 24 RS 232 cable Order No 2799474 The cable is an interface cable with...

Page 18: ...In RS 485 mode an RS 485 network with several I O devices can be created Use a twisted pair common shielded bus cable to connect the I O devices Connect the individual conductors of the data cable to...

Page 19: ...d of the chain so it is recommended to overload and test for performance in the environment The application may also limit the total number of ports that may be installed Some basic guidelines are lis...

Page 20: ...nection CAUTION Incorrect connection may result in damage to equipment and or serious personal injury Only qualified personnel may connect the power start up and operate this device According to the s...

Page 21: ...lf the current parameters and the operating state are clearly displayed 4 3 Login To log in 1 Set the IP address of the connected PC to the subnetwork of the GW EIP ASCII for example IP 192 168 254 10...

Page 22: ...2 Home screen Advanced settings can be accessed through the menu at the top of the screen The Home screen can be accessed at any time by clicking the Home button in the upper left corner of the web ba...

Page 23: ...the listed information 3 If desired change the listed information The Device Identification group provides fields for entering descriptive information about individual devices Device Name Enter a nam...

Page 24: ...P Address page 2 Select the method for assigning the LAN IP address If a DHCP server assigns an IP address click the Automatic address assignment DHCP button If using static IP addresses click the Man...

Page 25: ...er to decrypt traffic on SSL TLS connections that use RSA encryption during handshaking It is used to sign the RSA server certificate in order to verify that the GW EIP ASCII is authorized to use the...

Page 26: ...w Class 1 multicast addresses are allocated When Automatic default is selected the GW EIP ASCII gateway uses the standard automatic multicast address mechanism When User Defined is selected the GW EIP...

Page 27: ...ial settings 1 Click the Serial Settings tab to configure the serial port s The Overview page provides a quick summary of the current configuration of the serial port s 2 Click the appropriate configu...

Page 28: ...ce Shipping Label for example for easy identification Port mode Select the port operating mode Available settings are RS 232 RS 422 RS 485 2 wire RS 485 4 wire M and RS 485 4 wire S where M indicates...

Page 29: ...the start of the next data packet If one byte is selected the GW EIP ASCII starts to collect data when the STX byte is detected If the first byte is not the STX byte it discards the byte The GW EIP A...

Page 30: ...byte is selected the GW EIP ASCII adds one byte the beginning of the packet If two bytes is selected the GW EIP ASCII appends two bytes Byte 1 Specifies the character that represents the first STX by...

Page 31: ...include Class 1 or full object support Only Write to File and communication using PCCC MSG instructions is provided Transfer mode to PLC Specifies how the Raw ASCII data will be transferred via Ether...

Page 32: ...he PLC and the GW EIP ASCII Maximum RX packet size When Write to Tag File or Polling in the Transfer mode to PLC field are selected this setting specifies the maximum acceptable size of a received ser...

Page 33: ...isabled all transmit messages are transmitted regardless if the sequence number has been incremented or not Disable Rx Queue to PLC Select this option to only receive the last received data packet If...

Page 34: ...the configuration related to each Ethernet TCP IP connection of the GW EIP ASCII device Figure 4 13 Socket Settings Overview page 2 To edit the configuration of an Ethernet TCP IP connection click th...

Page 35: ...ation Enable This must be checked to use the port as a socket Listen Check the Listen box so that the GW EIP ASCII listens for incoming TCP IP socket connections on the port number specified in the On...

Page 36: ...tes The GW EIP ASCII continues to discard the bytes until it finds the two STX bytes Byte 1 Specifies the character that represents the first STX byte The GW EIP ASCII looks for this character in the...

Page 37: ...ne byte or two bytes marking the end of the serial packet The length indicates the number of ETX bytes if none is selected this function is disabled If one byte is selected one ETX byte is appended to...

Page 38: ...GW EIP ASCII do not overflow The default is Class 1 Transfer mode from PLC Specifies the EtherNet IP transfer mode from the PLC for this port When Write Msg is selected the PLC writes the data to the...

Page 39: ...ence number When a duplicate sequence number is received and the Transfer mode from PLC field is set to Write Msg the message is rejected and the Duplicate Transmit Sequence Error Count counter increm...

Page 40: ...38 PHOENIX CONTACT 3785_en_B 4 8 2 1 Class 1 overview The Class 1 Overview pages provide an array of highly informative Class 1 interface information to aid when programming a PLC Figure 4 17 Class 1...

Page 41: ...displays the number of bytes transmitted from the serial port TX packet count This displays the number of serial packets transmitted from the serial port RX byte count This displays the number of byt...

Page 42: ...II socket port RX packet count The number of packets received by the GW EIP ASCII socket port To PLC dropped packet count Displays the number of dropped packets that were intended for the PLC To PLC t...

Page 43: ...nnections established Displays the total number of established connections Connections timed out Displays the number of connections that have closed due to a time out Connections closed Displays the n...

Page 44: ...class errors Displays the number of unsupported CIP request instance errors These errors occur when a message with an invalid class is received by the GW EIP ASCII Unsupported CIP instance errors Dis...

Page 45: ...message and up to 128 messages are logged This helps with debugging serial connectivity problems displaying the proper start and end of transmission bytes and diagnosing device problems Click the Res...

Page 46: ...ick the Reset Log button at any time to clear the log Figure 4 21 Ethernet Logs page The format is as follows Pkt n ddd hh mm ss mmm Rx Tx data ddd days since last system restart hh hours since last s...

Page 47: ...ange the password used to access the web server Figure 4 22 Password page The GW EIP ASCII has administrator level passwords The administrator level user may make changes to the configuration The defa...

Page 48: ...return the GW EIP ASCII to the original factory defaults including the IP address Figure 4 23 Restore Defaults page 2 Check the Check the box to confirm box 3 Click the Apply Changes button Note that...

Page 49: ...iles page 2 Click the Save Logfile button to save the log as a text file for future use or review the log in the web browser The log displays information about the device such as when a PC created or...

Page 50: ...sers from applying the system configuration file to an unapproved node to gain access to the network 3 Click the Save Configuration button to open a dialog box where the file name and storage location...

Page 51: ...ick the Browse button and navigate to the file in the Browse dialog box 4 Highlight the file to select it and then click the Close button 5 Click the Apply Changes button to install the firmware NOTE...

Page 52: ...GW EIP ASCII 50 PHOENIX CONTACT 3785_en_B...

Page 53: ...f the actual receive data message All unused bytes in a message returned to the PLC are filled with zeros The GW EIP ASCII supports serial packets of up 1518 bytes and socket packets up to 2048 bytes...

Page 54: ...eived from the PLC may contain extra unused data All unused bytes in a message are ignored A Get command returns the last successfully transmitted serial socket packet 5 2 EtherNet IP interface profil...

Page 55: ...a array Array of USINT 0 255 3 Receive GW EIP ASCII to PLC produced data sequence number Normally sent to the PLC from the GW EIP ASCII in data transfer UINT 0 65535 FFFFhex Set Get 5 Transmit PLC to...

Page 56: ...serial packets over 440 bytes the GW EIP ASCII places the data into a sequence of tags These tags must meet the following criteria Must be of type SINT The entire sequence must be large enough to cont...

Page 57: ...EIP ASCII Get 3 Num instances UINT Number of ports on the GW EIP ASCII Get Table 5 8 Socket port data transfer object instance attributes Attribute ID Name Data type Data value Access rule 1 Transmit...

Page 58: ...so have the same sequence number Socket packets up to 2048 bytes may be received while operating with the Write To Tag field set to Transfer to PLC For serial packets over 440 bytes the GW EIP ASCII p...

Page 59: ...ss rule 1 Revision UINT 1 Get 2 Max class UINT 1 Get 3 Max instance UINT 1 Get 4 Maximum number class attributes UINT 7 Get 5 Maximum number instance attributes UINT 7 Get Table 5 12 Identity object i...

Page 60: ...n 0000 Indicates the system is not operational It may be in any of the following states system startup configuration in process idle or critical major fault 8 0 No recoverable minor fault No error his...

Page 61: ...ue Access rule 1 Revision UINT 1 Get 2 Max class UINT 1 Get 3 Max instance UINT 1 Get 4 Optional attribute list UINT 2 Get 5 Option service list UINT 1 Get 6 Maximum number class attributes UINT 7 Get...

Page 62: ...x Attribute ID Name Data type Data value Access rule 1 Open requests UINT 0 0xFFFFFFFF Set Get 2 Open format rejects UINT 0 0xFFFFFFFF Set Get 3 Open resource rejects UINT 0 0xFFFFFFFF Set Get 4 Open...

Page 63: ...hex Service code Implemented in class Implemented in instance Service name Table 5 21 Port object class attributes F4hex 1 instance Attribute ID Name Data type Data value Access rule 1 Revision UINT 2...

Page 64: ...name Array of UINT Backplane Get 7 Node address USINT 2 10hex 0hex Get 10 Port routing capabilities UDINT 17hex Bit 0 Routing of incoming Unconnected Messaging supported Bit 1 Routing of outgoing Unco...

Page 65: ...Get Table 5 25 TCP IP object instance attributes Attribute ID Name Data type Data value Access rule 1 Status DWORD Bit 0 0 The interface configuration attribute has not been configured 1 The interface...

Page 66: ...255 Default 1 Get 9 IP multicast address configuration Structure of Allocation control USINT 0 Default algorithm 1 Configuration Set Reserved USINT 0 Set Num multicast address UINT 1 32 Set Start mult...

Page 67: ...models GW 1E 3 Two Ethernet port models GW 2E Get 4 Optional attribute list UINT 4 Get 6 Maximum number class attributes UINT 7 Get 7 Maximum number instance attributes UINT 11 Get Table 5 28 Etherne...

Page 68: ...2E models Instance 1 IP Address E1 external 1 Instance 2 IP Address E2 external 2 Instance 3 IP Address Internal Get 11 Interface capability UDINT Capability bits Interface capabilities other than spe...

Page 69: ...4Bhex No Yes Execute_PCCC Table 5 31 Message structure for message name requests Name Data type Description Length USINT Length of requester ID Vendor UINT Vendor number of requester Serial Number UD...

Page 70: ...ta to the GW EIP ASCII Table 5 33 Supported PCCC command types Types FNC Description 0Fhex 67hex PLC 5 typed write 0Fhex 68hex PLC 5 typed read 0Fhex A2hex SLC 500 protected typed read with three addr...

Page 71: ...the initial output instance or up to the total length of the remaining output instances For example the write may begin at output instance 109 and be the length of output instance 109 or begin at ins...

Page 72: ...utput instances For example the write may begin at output instance 109 and be the length of output instance 109 or begin at instance 109 with a length of output instances 109 110 113 and 114 Only one...

Page 73: ...Transmit data to socket ports 1 to 2 BYTE array length 4 maximum RX packet size 0 255 Set 113 Transmit data to socket ports 1 to 2 BYTE array length 4 maximum RX packet size 0 255 Set 114 Transmit dat...

Page 74: ...r Name Data type Data value Access rule 109 Transmit data to serial ports 1 to 4 Transmit data to socket ports 1 to 4 BYTE array length 4 maximum RX packet size 0 255 Set 110 Transmit data to serial p...

Page 75: ...e set to MicroLogix When configuring the GW EIP ASCII to operate in Write to Tag File mode enter the file name starting with the standard file format i e N10 0 Polling is performed through the PLC 5 S...

Page 76: ...sion R or later Series D Revision H or later Series E Revision G or later Enhanced PLC 5 attached to Ethernet module 785 L11B 1785 L20B 1785 L30B 1785 L40B 1785 L40L 1785 L60B 1785 L60L 1785 L80B Seri...

Page 77: ...NTs 101 INTs PLC 5 234 SINTs 117 INTs PLC 5 typed read 104 CLX 234 SINTs 117 INTs SLC 252 SINTs 126 INTs PLC 5 238 SINTs 119 INTs CLX 230 SINTs 115 INTs SLC 248 SINTs 124 INTs PLC 5 234 SINTs 117 INTs...

Page 78: ...SCII supports serial packets of up 1518 bytes and socket packets up to 2048 bytes when Write to Tag File is selected in the Transfer mode to PLC field When large packets of data are received the data...

Page 79: ...ast successfully transmitted serial socket packet 6 6 Sequence number messages PLC 5 and SLC typed read and typed write messages can read and modify both receive and transmit produced data sequence nu...

Page 80: ...setting may need to be increased in order to ensure the PLC program processes the data before the message is overwritten by the next incoming message 6 7 2 Polling The Polling option allows the PLC t...

Page 81: ...er a successful reset the module returns to the factory default address 192 168 254 254 7 1 2 Software reset To force a software reset 1 Start the web server and navigate to the Device Maintenance Res...

Page 82: ...GW EIP ASCII 80 PHOENIX CONTACT 3785_en_B...

Page 83: ...the Server s IP Address or Hostname field and then click the OK button 7 Click the RSWho button to verify that RSLinx can communicate with the GW EIP ASCII 8 2 Add the EDS file to RSLinx 1 Open the E...

Page 84: ...form the following procedure 1 Navigate to the File Exit menu and then click the Shutdown option to exit and shutdown RSLinx 2 Remove the following files from the hard drive Program Files Rockwell Sof...

Page 85: ...ure 4 4 LAN Settings IP Address page 22 Figure 4 5 LAN Settings Security page 23 Figure 4 6 LAN Settings EtherNet IP Stack page 24 Figure 4 7 Serial Settings Overview page 25 Figure 4 8 Serial Setting...

Page 86: ...cs Communication Statistics page 39 Figure 4 19 PLC Interface page 41 Figure 4 20 Serial Log page 43 Figure 4 21 Ethernet Logs page 44 Figure 4 22 Password page 45 Figure 4 23 Restore Defaults page 46...

Page 87: ...ons 54 Table 5 7 Socket port data transfer object class attributes 55 Table 5 8 Socket port data transfer object instance attributes 55 Table 5 9 Socket port data transfer object common services 56 Ta...

Page 88: ...ssage name responses 67 Table 5 33 Supported PCCC command types 68 Table 5 34 Assembly object class attributes F6hex 68 Table 5 35 Assembly object instance attributes 69 Table 5 36 Assembly object com...

Page 89: ...products in your specific application in particular with regard to observing the applicable standards and regulations All information made available in the technical data is supplied without any accom...

Page 90: ...products Subsidiaries If there are any problems that cannot be solved using the documentation please contact your Phoenix Contact subsidiary Subsidiary contact information is available at phoenixconta...

Reviews: