background image

Show Files

43

500ML Lighting Control Console

Operation Guide

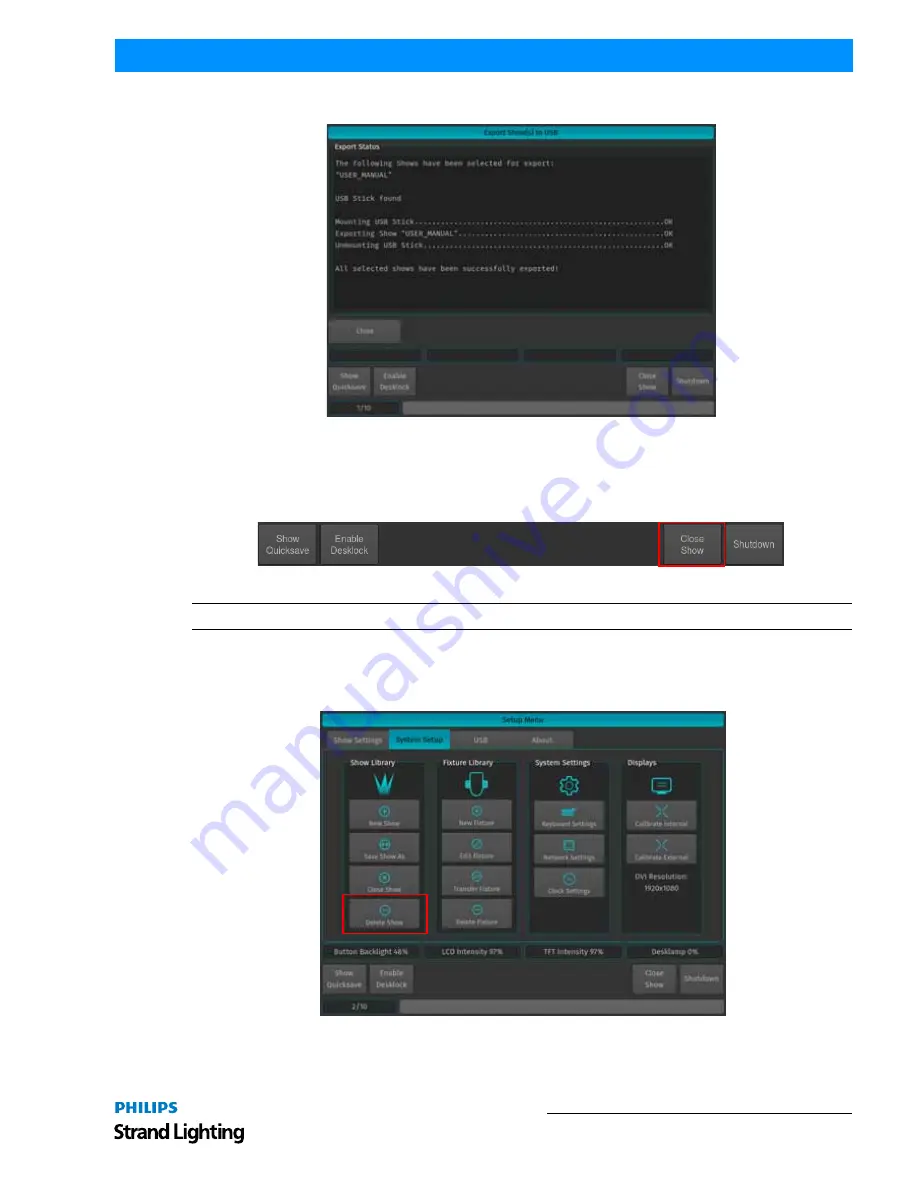
When the process finished successfully, click on the Close button as indicated in 

Figure 63

.

Figure 63:  Export Show(s) to USB Screen - Export Completed

Closing a Show

To load a show (as described in 

"Loading an Existing Show" on page 38

), you must close any open shows. Do this by

pressing [SETUP] and then pressing the Close Show button on the Setup Toolbar (

Figure 64

).

Figure 64:  Setup Toolbar - Closing a Show

Note:  

If there are no shows loaded, the 500ML Lighting Control Console will not output DMX.

Deleting Shows from Console Memory

From the Welcome Screen hit the Settings button. Once the window opens select to the System Setup tab. Then, hit
the Delete Show button as shown in 

Figure 65

.

Figure 65:  Setup Menu - Delete Show


Summary of Contents for Strand Lighting

Page 1: ...For OS Version 1 04 and Up ...

Page 2: ...aucune responsibilité sur toute erreur ou ommission inscrite dans ce manuel Pour tous commentaires ou suggestions concernant des corrections et ou les mises à jour de ce manuel veuillez s il vous plait contacter le bureau de Philips Strand Lighting le plus proche Note Information contained in this document may not be duplicated in full or in part by any person without prior written approval of Phi...

Page 3: ...cluding the following a READ AND FOLLOW ALL SAFETY INSTRUCTIONS b Do not use outdoors c Do not mount near gas or electric heaters d Equipment should be mounted in locations and at heights where it will not readily be subjected to tampering by unauthorized personnel e The use of accessory equipment not recommended by the manufacturer may cause an unsafe condition f Do not use this equipment for oth...

Page 4: ...10 Network Port 10 DVI Port 10 BASIC CONCEPTS Hybrid Console 11 Fixtures vs Channels 11 Priorities Concepts 11 What is LTP and HTP 11 HTP Highest Takes Precedence 11 LTP Latest Takes Precedence 11 Priority Stacks 11 Tracking 13 The Fixture Library Concept 14 System Library 15 User Library 15 Show Library 15 The Graphical User Interface 16 Screens 16 Encoder Labels 17 Toolbars 17 Available Toolbars...

Page 5: ...Reacting to Grandmaster Fader 53 Change DMX Patch 54 Unpatch 56 Manual Patch 56 Auto Patch 57 Change Fixture Type 57 Clone Fixtures 60 Delete Fixtures 63 Working with Fixtures 63 Selecting Fixtures 63 Selection Order 63 Selecting Fixtures Using Keypad Command Line 64 Selecting Deselecting Fixtures Using Fixture Pool Window 65 Selecting Fixtures Using a Previously Recorded Group 65 Selecting Fixtur...

Page 6: ...ufacturer 88 Filter Gels by Search Function 88 Altering Color Values Using Color Picker 89 Using Stored Presets As a Reference 89 Loading Values Instead of Referencing from a Preset 89 Loading Values from Current Output 89 Loading Values from a Cuelist 89 Fanning Spreading Values Across Fixtures 90 Fan Any Value using Encoders 90 Fan Intensity Values using Keypad 90 Fan Mode Options 91 Fanning wit...

Page 7: ...125 Assigning a Speedmaster 126 Assigning a Fademaster 126 Moving Masters 127 Deleting a Master 127 Configuring Fader and Button Functions 127 Fader Setting Options 128 Button and Fader Functions 128 Working with Fader Pages 130 Changing Fader Pages 131 Template Page 131 Editing Fader Pages 131 Setting Inputs and Outputs 132 ArtNET and Shownet Output Setup 132 ShowNet Network DMX 133 Enable DMX Ou...

Page 8: ...s 165 Updating Console Software 167 Updating Console Software via USB Key 167 Updating Console Software via Internet Connection 170 Calibrating Touchscreens 172 Calibrating Internal Console Touchscreen 172 Calibrating External Console Touchscreen 173 HOTKEYS General Hotkeys 174 Programmer Hotkeys 174 Output Screen Hotkeys 174 Library Editor Hotkeys 174 External Keyboard Hotkeys 174 ...

Page 9: ... for those busking moments Using industry standard methods of control the user interface is quick to understand allowing the operation to appeal both to the casual and professional operator alike With a robust construction the 500ML console provides you with a smart way to create and play back great lighting for all your important events 3 Included Items Each 500ML Lighting Control Console include...

Page 10: ...trol Console consists of multiple master controls each consisting of a fader and flash go pause back buttons Masters are grouped into blocks of four whereas each group has a LCD screen to display the current fader s state 8 Inch Color TFT Display On Off Button USB 2 0 Ports Encoders Multifunction Wheel Backlit Command Programming Keys Bump Buttons Faders Fader Play Pause Reverse Buttons Status Dis...

Page 11: ...same time Most keys that alter memories for example Rec Edit Delete also open up a pool window if you keep pressing the button at the same time you are striking a key like Preset or Cuelist Encoders The 500ML Lighting Control Console is supplied with four encoders These encoders rotate in either direction to quickly set desired values for different attributes during programming Multifunction Wheel...

Page 12: ...ernal screen DVI to HDMI adapters may be used to convert the signal to HDMI however compatibility of the adapter display and console should be checked prior to the show Desk Lamp D C 5V operatio n 1 Shield GN D 2 Negativ e 3 Positiv e 1 Groun d 2 Data 3 Data 4 5 N C 1 Shiel d 2 Hot 3 Cold USB DVI NETWORK MIDI I N OU T THR U SMPTE DMX512A Univers e 1 DMX512A Univers e 2 DMX512A Univers e 3 DMX512A ...

Page 13: ...e set on Preset bank 2 is reduced to 40 the Output level will be at 50 since the value set by the first Preset bank is now the highest value hence output Unlike other consoles we have laid out the way the console decides which parameter of a moving light fixture should be treated as a dimmable channel quite smartly we let you decide when creating a library The intensity faders will also control ev...

Page 14: ... can see the High Priority option is only affecting LTP channels Switching off Cuelists Let s take our example from above and have a look at what happens Remember all cuelists have been started in a particular order This would produce the following output After stopping Cuelist 2 the following values are output Priority Level Type Notes Highest 7 Highlight 6 Grandmaster 5 Fixture Group Submasters ...

Page 15: ...hange the states of these Here is a closer look at what happened and at what would be stored in the cues if we think of this chain of events as a cuelist Examples General Example The following example shows the intensities of four fixtures in three cues on a Non Tracking console With a tracking console however the recorded information would be If the intensity has not been changed or touched then ...

Page 16: ... or even acts The ML Console is taking care of maintaining the tracking state and will always calculate all values as if the cuelist was played back in order Track Thru End Sometimes it is desirable to track values from the last cue in the cuelist to the first cue A real live example for this is a looping cuelist that creates a color chase that when you run it first should set the fixtures intensi...

Page 17: ...r Library is fully editable by the user and is not replaced or deleted during software updates It is stored on the flash disk of the console and its fixture types are available to all existing or new shows Show Library The show library resides within the Showfile Before a fixture can be patched it needs to be added to the Show Library The Show Library is stored within the Showfile and hence will b...

Page 18: ...al as well as the external display Figure 4 On Board LCD Screen Screens The console shows context sensitive screens for each step of the show creation This way it only shows functionality you need for a specific task The Cuelist View Window Figure 5 will only show information that is necessary to understand and read your cuelist whereas the Programmer Values Window Figure 6 on page 17 will only sh...

Page 19: ...alues Figure 7 Record Encoder Labels Figure 8 Programmer Encoder Labels Toolbars Toolbars are context sensitive aid and provide quick access to multiple different functions Some toolbars are stacked on top of each other such as the Default Toolbar Example When the Default toolbar is shown clicking on Fixture Selection will take you to the Fixture Selection toolbar To go back to the Default toolbar...

Page 20: ...n Options Toolbar Programmer Feature Toolbar The Programmer Feature Toolbar is used to allow quick access to fixture attributes assigned to the rotary encoders It is opened by pressing any of the I Intensity F Focus C Color or B Beam console keys and will either disappear by clicking on any of the feature groups or after a given timeout Figure 12 Programmer Feature Toolbar Open Toolbar The Open To...

Page 21: ... pressing the REC console key Figure 14 Record Toolbar Delete Toolbar The Delete Toolbar similar to the Record Toolbar it shows several options useful for deleting objects The toolbar is shown after pressing the DELETE console key Figure 15 Delete Toolbar Delete Object Only deletes the selected Object Delete All Deletes the selected Object and all directly connected Objects Example When Delete All...

Page 22: ...e Invalid or Incomplete Command Command Line Syntax In general the Command Line Syntax needs to be entered in Action Source Target form When no Action is specified the source Item will be selected See Table 1 Command Line Syntax on page 20 for more information Table 1 Command Line Syntax Commands interacting with a visual object such as a Pool Item or a Faders Pause Back Button will be executed au...

Page 23: ...l to quickly navigate around the console during programming As an example Holding RECORD while pressing the GROUP button opens up the Group Pool and keeps the Record Keyword in the command line allowing to directly record the Group 5 Pool Windows and Pool Items About Pools Pools are used throughout the console to provide a quick and easy way to interact with Groups Presets and Cuelists If a single...

Page 24: ...uelist on the dark gray header and they have a status indicator that shows the current cue or if the cuelist is not running the cue that would be started and status of the cuelist Figure 23 Cuelist Pool Items The background color of the status indicators visually describe the different cuelist states Fixture Pool and the Level View About the Fixture Level View The Fixture Pool or Fixture Level Vie...

Page 25: ...g in Screens and Pools Many screens provide the ability to scroll using the Encoder or the Multifunction Wheel If a Screen supports Scrolling using the Encoders the Encoder labels will read Scroll together with an explanation of what will be scrolled All screens that contain scrollable contents refer to Figure 25 on page 24 may be scrolled by pressing the SHIFT key while turning the multifunction ...

Page 26: ...ver a Keypad Dialog is shown the keypad on the faceplate of the console or the multifunctional wheel may be used to set values The multifunction wheel will increment or decrement values the keypad may be used to directly enter values or to increment decrement values using the or Key ENTER closes the dialog Figure 26 Keypad Dialog Example ...

Page 27: ... over your show file It consists of 6 different views that show Fixture Group Preset and Cuelist Pools as well as fader labels Pool Items may either be selected or deselected by using a standard USB Mouse or a touchscreen Fader labels also provide you with a quick overview of assigned Masters Additionally the current date and time and incoming Timecode is shown and the Timecode input may be enable...

Page 28: ...up Preset and Cuelist Pool The Type of the Preset Pool may be set using the buttons provided in the Pools Toolbar Figure 30 Quad Mixed Screen 2 Quad Preset Button The Quad Preset View contains four Preset Pools The Types of the Preset Pool are predefined as Intensity Focus Color and beam but may be changed using the buttons provided in each Pools Toolbar Figure 31 Quad Preset Screen ...

Page 29: ...Level View contains one large Fixture Pool providing a quick overview of the current fixtures Figure 33 Level View Screen 5 Cuelist View Button The Cuelist View contains Fixture Levels and Cuelist views providing a quick overview of fixture values and the selected cuelist as shown in Figure 34 on page 28 In addition to the internal cuelist view the external cuelist view provides playback controls ...

Page 30: ...ONCEPTS Figure 34 Cuelist View Screen 6 Quad Cuelists Button The Quad Cuelists View contains four Cuelist Pools whereas each pool may have a different mode and may be scrolled differently This makes it a perfect view for busking Figure 35 Quad Cuelists Screen ...

Page 31: ...licking on the Timecode Enabled Disabled button in the Quick Options section of the external Screen Figure 37 Quick Options Screen Timecode Disabled Enabled Button Timecode Status Indicator The Timecode Status Indicator shows to which type of timecode the console is listening to and if the timecode reception is enabled If timecode signal is not detected when the timecode is active the text color w...

Page 32: ...the cuelist is in Note Clicking into the dark gray part of the fader item will open up the Edit Fader menu for that master which allows to configure fader and button settings If the assigned object is a cuelist clicking into the part that contains the status info of the cuelist will open up the Cuelist View for that cuelist on the internal touchscreen display Abbreviation Item GM Grand Master Fade...

Page 33: ...cable to the consoles network port Use the supplied AC power cable to connect the console to a grounded AC power source The console operates on an AC voltage of 100 to 240VAC Refer to Figure 2 on page 10 for console connections Boot the Console After making all the necessary connections to the DMX control and or ArtNET ShowNet networks external peripherals etc the console is ready for use To begin...

Page 34: ...layout time date and network settings These settings are saved in the console not show files From the Welcome Screen Figure 42 select the Settings button Figure 42 Welcome Screen Settings The System Setup Window Figure 43 will open Figure 43 Setup Menu System Setup Settings Note You may change system settings while a showfile is opened To do this press the SETUP key on the faceplate and select the...

Page 35: ...by others settings only Changing this setting does not affect the on screen keyboard Figure 44 Keyboard Settings Button The Keyboard Settings dialog as shown in may now be used to change the systems language to match your USB keyboard by others Select the appropriate setting from the drop down box You can use the Test field to test and verify the setting As soon as you are done click on Close Figu...

Page 36: ...ked to the date Change the Date To change system Date click on Edit Date Use the encoders to adjust the date Please note the labels on the Encoder Bar will change to read Day Month and Year Change the Time To change the system Time select Edit Time Use the encoders to adjust the time accordingly Please note the labels on the Encoder Bar will change to read Hours Minutes and Seconds Once settings a...

Page 37: ...ine software update function Figure 49 Network Setup Window Note Before setting the options in this screen it is advisable to contact your local network administrator for the best way to configure the console to operate within your network IP Address Settings DHCP or Manual You have the option to assign an IP Address manually Manual or select Dynamic Host Configuration Protocol DHCP DHCP is a netw...

Page 38: ...e console s Ethernet port if manual configuration has been selected Use the Edit button on the right of the text field to set The DNS Server is only needed should you wish to connect your console to the Internet To Save Changes Click on Apply Changes to apply the changes and store the settings permanently To Cancel Changes Click on Cancel to revert to your previous configuration Current Ethernet S...

Page 39: ...ia a saved showfile Note Showfiles contain all of your show related settings like fixture schedule and patching input settings groups presets cues master assignments etc Creating a New Show On the console s 8 inch TFT touchscreen display hit the Create New Show button on the Welcome Screen refer to Figure 51 Figure 51 Create New Show Option Alternatively you may open the Setup Dialog by hitting th...

Page 40: ...osed the console will return to the Welcome Screen as shown in Figure 51 on page 37 After selecting the show file name from the drop down menu refer to Figure 51 on page 37 a hit the Open button the console s 8 inch TFT touchscreen display Note Shows stored on a USB Key need to be imported into the console memory before they can be opened Importing Shows from a USB Key From the Welcome Screen hit ...

Page 41: ... to import and hit the Import button on the touchscreen display Figure 55 Select Show to Import A confirmation screen will appear with a brief summary of the show or shows to be imported as displayed in Figure 56 Click on Import button to start the process of loading the show s Figure 56 Import Show s from USB Import Status of Selected Shows ...

Page 42: ...iles Show Quicksave We recommend to save your show frequently to insure information is not lost in case of a power loss interruption etc You may do this by pressing SETUP and hitting the Show Quicksave button on the Setup Toolbar Figure 58 Setup Toolbar Show Quicksave Show Autosave Feature The 500ML console offers a Show Autosave feature that will make sure your showfile is automatically saved in ...

Page 43: ...matically continue with the new showfile preventing further changes to the previous show file To save as a new showfile press SETUP and change to the System Setup tab Click on Save Show As The on screen keyboard will appear to allow you to name the showfile Enter the new showfile name and press Enter to complete the process Figure 59 Setup Menu Save Show As Exporting a Show to USB Key At the Welco...

Page 44: ...xport button on the touchscreen display to export them to the USB key Figure 61 Select Show s to Export Screen Exporting Shows to USB Key A confirmation screen will appear confirming your selection s to be exported as shown in Figure 62 Click the Export button to export the show s to the USB Key The Export Status field will now display the export process Figure 62 Export Show s to USB Screen Confi...

Page 45: ...age 38 you must close any open shows Do this by pressing SETUP and then pressing the Close Show button on the Setup Toolbar Figure 64 Figure 64 Setup Toolbar Closing a Show Note If there are no shows loaded the 500ML Lighting Control Console will not output DMX Deleting Shows from Console Memory From the Welcome Screen hit the Settings button Once the window opens select to the System Setup tab Th...

Page 46: ... Example Note You cannot delete a show that is currently loaded To close a show refer to Closing a Show on page 43 5 Showfile Settings The 500ML Lighting Console keeps different options that are related to the Showfile reduced to a minimum However this section will cover the different customization options All Showfile related settings Including Fixture Schedule and Patch are set within the Show S...

Page 47: ... Touchscreen Intensity Turning the third rotary encoder while the Setup Menu Show Settings screen is shown will set the brightness of the TFT Touchscreen display Figure 70 TFT Display Brightness Adjustment Setting Setting Desk Lamp Intensity Turning the third rotary encoder while the Setup Menu Show Settings screen is shown will set the brightness of the LED Desk Lamp supplied with unit Figure 71 ...

Page 48: ... will have a different speed and acceleration than setting a DMX default value or a percentage Figure 73 Encoder Setup Window Encoder Sensitivity defines the amount of rotation needed until the value will be decreased or increased whereas the Encoder Acceleration specifies the amount of additional speed up if the encoder is turned faster You may use the encoders to test the settings while this scr...

Page 49: ...ttings Add Fixtures The Select Fixture from Show Library screen Figure 75 will appear allowing you to pick the fixture type from the show library If the show library does not yet contain the fixture of the choice click on Add Library to add fixtures from the Sys tem or User Library to the Show If the list already contains the desired fixture type select it and click on Next which will skip the nex...

Page 50: ...the top part of the screen In order to complete the examples shown in this guide search for vari 3000 and select the Philips Vari Lite VL3000 Spot from the list To clear your search click the Reset Filter button After selection click on the Next button Alternatively you may select the fixture by using the Manufacturer Type and Mode fields Figure 77 Select Library Fixture Search and Selection Scree...

Page 51: ...78 Enter Fixture Count Screen Patching Fixtures As shown in Figure 79 on page 50 this window is used to patch our fixtures to the DMX universes There are three different options available to choose from No Patch The fixtures will be added but not patched See Unpatch on page 56 Manual Patch The fixtures will be added and patched to the address and universe user specified See Manual Patch on page 56...

Page 52: ...ress to 1 and click on Finish Configuring Existing Fixtures Should you desire to modify the User Number Fixture Name Options Patch or Type for a fixture that has already been added to the show open up the Setup Menu by pressing SETUP select the Show Settings tab and click on Configure Fixtures as illustrated in Figure 80 Figure 80 Setup Menu Show Settings Tab Configure Fixtures ...

Page 53: ...r by selecting the rows of fixtures within the Configure Fixtures screen Figure 82 Configure Fixtures Screen Header The header of the Configure Fixtures Screen Table shows the following information Label Description Fixture The fixture column shows at which the position the fixture may be found in the fixture pool User This column show the User Number of the fixture Name This is the fixture type o...

Page 54: ...rder to change the User Number open the Configure Fixtures Screen as described in section Configuring existing Fixtures and hit the User Number button as shown in Figure 83 Figure 83 Configure Fixtures Change User Number An on screen keypad will open allowing you to set or edit fixture User Numbers as shown in Figure 84 Click on OK when done or click Cancel to abandon any changes you made Figure 8...

Page 55: ...5 Configure Fixtures Change Fixture Name An on screen keyboard will be shown Figure 85 Notice the Auto Number button next to the Fixture Name Textfield If Auto Number is active 500ML console will automatically assign numbers to the Fixture Name based on the selection order Click on Enter when done The console will ask for confirmation Click on Ok Figure 86 Enter Fixture Name Window Inverting Pan T...

Page 56: ... is keep This ensures that only modified values are applied to the fixtures Select if a fixture s Pan or Tilt should be inverted or not and if the selected Fixtures should react to the 500ML console s grandmaster fader Select the appropriate options from the drop down menus and click on OK to finish Change DMX Patch To change the DMX Patch for a single or multiple fixtures at once select the fixtu...

Page 57: ...ide Figure 89 Configure Fixtures Change Pan Tilt Invert The Patch Fixtures window will open Figure 89 Figure 90 Patch Fixtures Window Within the Patch Fixtures window you are presented with several options Unpatch Manual Patch Auto Patch Each is described below ...

Page 58: ... which the Fixtures shall be patched from the dropdown menu Then either enter the Address using the Keypad shown on the right hand side of the screen or the Keypad on the consoles faceplate Figure 92 Patch Fixtures Window Manual Patch Option You may also select an address visually by hitting the Select Address button This will open up a new screen see Figure 93 on page 57 enabling you to select th...

Page 59: ...o not fit onto the next DMX Universe However the Auto Patch option Figure 94 will always patch all of the selected fixtures in one big block This means that should there not be sufficient space to patch all fixtures in between other fixtures no fixture will be patched Figure 94 Patch Fixtures Window Auto Patch Option Change Fixture Type To change the type of a single or multiple fixtures at once s...

Page 60: ...ype window will open Figure 96 asking you to select the new fixture type from the Show Library If the desired fixture is in the Show Library already select it from the list and click on Next and skip the next steps If the desired fixture type is not yet in the Show Library click on Add Library Figure 96 Select New Fixture Type Window ...

Page 61: ...rary Click on Next when done Figure 97 Select Library Window Adding or Changing Fixture Types A menu that allows you to pick a fixture type will appear As shown in Figure 98 you may search for fixtures using the filter field shown in the top part of the screen Alternatively you may select the fixture by selecting the Manufacturer Type and Mode Click on Next when done Figure 98 Select Library Windo...

Page 62: ... to proceed to the Configure Fixtures window to patch the fixtures Figure 100 Replace Fixture Result Confirmation Window Important Notes If the new fixtures will fit into the DMX Footprint of the previous fixtures the DMX Patch will be kept If not the new fixtures need to be re patched within the console When swapping fixture types programming will be kept when possible Please note that color mix ...

Page 63: ...would like to clone You may either select the fixtures from the list or by using the keypad You may also select Fixture Groups on the external screen Selection order is taken into account After selection click on Next Figure 102 Clone Fixtures Window The console will now ask for the amount of fixtures to add and for the types of programming to be cloned refer to Figure 103 on page 62 You may choos...

Page 64: ... the Clone process will be shown The new fixtures are still unpatched and do not have user numbers assigned to them Click on Patch Window to proceed to the Configure Fixtures window to assign a Patch and User Numbers Fixtures without User Numbers are shown at the End of the Fixture list Note For more information on assigning a Patch and User numbers please see Change DMX Patch on page 54 and Chang...

Page 65: ...ng the Keypad or the external Screen After your selections click Next The console will ask for confirmation of your selections Figure 106 Delete Fixtures Selection Window 2 Working with Fixtures Selecting Fixtures Before you can start altering any values or programming you need to select the fixtures you would like to work with There are four different ways to select your fixtures Selection Order ...

Page 66: ... simply do so by typing their user numbers as assigned in Adding Fixtures to a Show on page 47 You may use the THRU and keys to further extend your selection to include some or all fixtures Figure 108 Command Line Interface Fixture Selection Fixture selection examples 501 THRU ENTER will select all fixtures following fixture 501 until a different fixture type starts or a gap in the numbering schem...

Page 67: ...ommand Line Interface GROUP 1 ENTER Note Working with Groups on page 73 for more information about working with Group Pools Selecting Fixtures using Selection Toolbar When the main toolbar is shown Figure 110 click on the first button that reads Fixture Selection The Selection toolbar will now be shown Its selection options will be applied to all fixtures in case you do not have fixtures selected ...

Page 68: ...o Selection Toolbar Note To clear or deselect selected fixtures from Sub Selection refer to Deselecting all Fixtures on page 65 Fixtures with Values Selection This will select all fixtures that have values set in the programmer It does not take the Sub Selection memory into account This is especially useful after loading a cue for editing or to simply select all fixtures in the programmer Figure 1...

Page 69: ...he second selects all odd fixtures Figure 115 Selection Toolbar Even Odd Fixture Selection Example 1 Select Fixture 501 thru 510 2 Press the Even Odd button on the selection toolbar 3 To select all odd fixtures of the overall selection set 501 thru 510 press the Even Odd button again Half Fixture Selection If no selection has previously been made Half will on the first press of the button select t...

Page 70: ...onsole will now select random fixtures out of the memorized fixture selection 3 To randomly select different fixtures out of the memorized fixture selection press the Random button again Note Since the Random fixture selection function is really random screen shots may differ from the examples shown Invert Selection Clicking on Invert Selection will invert the current selection Invert extends to e...

Page 71: ...ure out of every three fixtures 1 To select fixtures 501 to 512 2 Type 1 3 ENTER on the keypad 3 To select every second fixture out of three type 2 3 ENTER 4 To select every third fixture out of three type 3 3 ENTER Please note you may also combine the modulo function with more advanced functions 1 Select fixtures 501 to 512 2 Type 1 2 3 ENTER on the keypad translates into Select each first and se...

Page 72: ... open the Edit Group Screen Now click on Smart Name An on screen keyboard which will rename both the group and all fixtures in the group will be shown For more information see Working with Groups on page 73 Using the Edit Fixture Window You may also use the Edit Fixture Window to rename a fixture Please see Assigning Names to Fixtures on page 69 for more details Editing Fixture Libraries To edit a...

Page 73: ...ay also use the Command line Interface paired with visual fixture selection Hit the FIXTURE key while striking the ASSIGN key The Fixture Pool window will be shown Now select the fixture from within the Fixture Pool Window followed by the GO or PAUSE BACK key of the fader that should act as the Dimmer Master The Off Window may be used to easily switch off running cuelists and to get an overview of...

Page 74: ...n Fixture Pool Window Edit Name Clicking on the Edit Name button will open up an on screen keyboard allowing you to rename this particular fixture Clear User Number Clicking on the Clear User Number button will remove a fixture s User Number Please note that after you did this the only way to select this fixture is to use the Fixture Pool Window Set User Number The Set User Number button will open...

Page 75: ...d hold the REC button and then press the GROUP button The Groups pool window Figure 124 will appear Select any empty slot an empty box with a number in the corner to store a new Fixture Group Note You may also hit the REC key only and select an empty Group Item in the External Monitors Group Pool Window Figure 124 Groups Pool Window Storing a Group Using Command Line Interface As soon as you selec...

Page 76: ...a dialog window asking you what to do will open up Figure 127 Click on Merge into Group Figure 127 Merge or Replace Group Window Note You may also hit the REC key only and select the target Group Item in the External Monitors Group Pool Window Merge Fixture s into Group using Command Line Interface Press the REC key followed by the GROUP key You may now select the Merge Option in the Record Toolba...

Page 77: ...dialog window asking you what to do will open up Figure 130 Click on Remove from Group Figure 130 Merge or Replace Group Window Note You may also hit the REC key only and select the target Group Item in the External Monitors Group Pool Window Removing Fixture s from Group using Command Line Interface Press the REC key followed by the GROUP key You may now select the Remove Option in the Record Too...

Page 78: ...t the target Group Item in the External Monitors Group Pool Window If you did not select an option from the Record Toolbar a dialog window asking you what to do will open up Figure 133 Click on Replace Group Figure 133 Merge or Replace Group Window Replacing a Group using the Command Line Interface Press the REC key followed by the GROUP key You may now select the Replace Option in the Record Tool...

Page 79: ...also use the and THRU keys to further extend your selection GROUP 1 12 will select group 1 and 12 GROUP 1 THRU 4 2 will select group 1 through 4 but will not select group 2 Naming a Group Assigning Names using Group Pool Window Hit the GROUP key while holding down the ASSIGN key The Group Pool window will be shown The command line will still read Assign Now press the ASSIGN key again The command l...

Page 80: ...oups using the Command line approach by pressing the COPY Then hit the GROUP key followed by the source Group ID in this case 1 Now enter the destination Group ID ie 5 Hit ENTER to complete the command Figure 138 Command Line Interface Copying Groups Moving Groups Move Groups using Group Pool Window Press and hold the MOVE key while holding down the GROUP key The Group Pool window will be shown No...

Page 81: ...xture group If the Group Master is at full then the fixtures that this group contains will be at the level determined by the playbacks Programmer and so on When the master s level is reduced the contained fixtures intensity will be reduced in proportion to the master For example if you have the fixture at 80 intensity in a cue that is being output and the master of the group is at 50 a fixture int...

Page 82: ...ontained fixtures Figure 143 Edit Group Window To open the Edit Group Window type EDIT GROUP followed by the ID of the group you would like to edit eg 31 Finish the command by pressing ENTER Alternatively you may use the Group Pool window to select the Group Press the GROUP key whilst holding down the EDIT key Select the Group you would like to edit Set Group Name Clicking on the Set Group Name bu...

Page 83: ...he programming happens As soon as you modify a fixture s attribute values by using any of the input methods for values it will be displayed in the programmer The programmer always takes precedence over cuelists this way you can at any point in a show modify the look on stage For a more in depth look on how priorities are managed in the console have a look at Priorities Concepts on page 11 Differen...

Page 84: ...cks to re gain control over the fixture attributes contained in the programmer the programmer needs to be cleared out This happens in three steps with each press of the CLEAR key The first press of the CLEAR key will un touch all values however they are still in the programmer overriding the playback The second press of the CLEAR button will remove all values from the programmer and playback value...

Page 85: ...is a convenience function that by default will touch all parameters predefined attribute groups as soon as one of the other attributes in the attribute group is touched In example If you touch the Cyan attribute s value the console will automatically touch Magenta and Yellow as well The same holds true for Hue and Saturation as well as Red Green and Blue as well as Pan and Tilt This is to make sur...

Page 86: ...specially useful should you find yourself in an unstructured show with lots of live access The fade time can be set using the second and the snap time the time after channels set to snap in the library will snap to their new value by turning the third encoder after pressing the REC button Figure 152 Record Toolbar To remove delete the Record command in the command line press REC a second time when...

Page 87: ...er priority Highlight remains active until you press the Highlight key again It also applies to sub selections meaning you may use highlight to find a specific light by stepping through the selected fixtures using the LAST or NEXT key Hightlight s status is indicated by a LED above the key To see how the Highlight function works 1 Select Fixtures 501 through 512 2 Press the HIGHLIGHT key Figure 15...

Page 88: ...d Syntax Table 2 Keypad Value Syntax Entry Fixture must be selected Examples Keypad Entry Meaning FULL Will set the selected fixtures to 100 Will set the selected fixtures to 100 VALUE Will set the selected fixtures Intensity DMX Value to VALUE VALUE A THRU VALUE B Will fan the Intensity for selected fixtures from VALUE A to VALUE B For Example 0 THRU 100 with 3 selected fixtures will set fixture ...

Page 89: ...e Group 1 Press the F focus parameter key The Programmer window will appear and the encoder labels will now read the selected features of pan and tilt To cycle through the available feature groups i e from Position to Pan Tilt speed simply press the feature button again or press the appropriate button on the IFCB Toolbar Note To quickly toggle through values in 25 steps just press on the Encoder k...

Page 90: ...nother option to look for colors is the integrated text search field Just type what you are searching for into the search field If you do not have a USB Keyboard attached click on the keyboard button to open up the on screen keyboard Figure 159 Swatch Book Filters by Search Function Note You can combine full text searches with the manufacturer drop down menu For example entering Amber into the sea...

Page 91: ...as a Hard Value on page 106 for more information Loading Values from Current Output To grab all values that are currently being output for the selected fixtures hold down the SHIFT key and press the LOAD key simultaneously This will grab all values from the console s playback engine but before any Group or Fixture Master Dimmers are calculated For Example Your fixture is programmed in a cue that i...

Page 92: ...on please see Selection Order on page 63 Note Take care when choosing the initial base value for the fan as the attribute values can neither go below 0 nor higher than 100 Make sure there is enough of the value range left for the value to fan Fan Any Value using Encoders Fanning using the Encoders for value entry will always use the current value that is output of a parameter as base point All val...

Page 93: ...l move the least Fan Options Left The first fixture in the selection order remains unchanged while the values of the last fixture change the most VALUE A THRU VALUE B Will fan the Intensity for selected fixtures from VALUE A to VALUE B For Example 0 THRU 100 with 3 selected fixtures will set fixture 1 to 0 fixture 2 to 50 and fixture 3 to 100 VALUE A THRU THRU VALUE B Will fan the Intensity for se...

Page 94: ...ng set to three will generate four identical fan patterns with three fixtures each Figure 163 Fanning using Setting of 3 Grouping You may set the number of Groups from the Fan Options toolbar To open the fan options toolbar hit the Fan Options button from within the default toolbar as illustrated in Figure 164 Figure 164 Default Toolbar Fan Options After doing so the Fan Options Toolbar will be sh...

Page 95: ...ow select the Pool Item of the appropriate Fixture Remove All Attributes for a Fixture Group from the Programmer To remove all attribute values for group of fixtures ie Group 1 from the programmer press the OFF key followed by GROUP 1 ENTER It is also possible to enter the command for a range of fixtures OFF GROUP 5 6 ENTER You may also use a Group Pool Window for visual selection of the Fixture T...

Page 96: ...ure Name button is enabled Fixture Names will be shown in the Output Value table Figure 168 Output Window Show Name Button Show Fixture Type If the Show Type button is enabled the Fixtures Types are be shown in the Output Value table Figure 169 Output Window Show Type Button Background Color State Light Grey This value is output using the Default Value set in the Library Red This value is in the p...

Page 97: ...re 170 Output Window All Fixtures Button Selected Only Button The Selected Only button displays only those fixtures in the showfile you select Figure 171 Output Window Select Only Button Output Value Button The Output Value button will display a list of values that are currently being outputted for the fixture Figure 172 Output Window Output Value Button ...

Page 98: ...y fixture parameter Figure 174 Output Window FX Effect Source Button 6 Working with Effects Effect FX Basics You can use effects to create a mathematical function that is used to alter attribute values in a repeating fashion Effects created on the 500ML control console are stored into Cues Effects are applied to attributes using effect rows within an effect table that apply mathematical functions ...

Page 99: ...FX Programmer All changes in the effects programmer will be applied to the selected fixtures only including modification and the creation and deletion of effects Effects will either use the Programmer Value as a Base Value or if no programmer value is set for an attribute that is being modified by an effect the effect will use the current value determined by the playback during playback time as th...

Page 100: ...ther pan or tilt Figure 176 Effect Size Attribute Speed Effect Attribute The speed effect attribute defines how fast one complete cycle of the effect will be for each individual fixture Its format is CPM which means Cycles per minute and could well be translated to BPM Beats per minute Adjusting the effect speed increases or decreases the number of cycles it completes per minute When combining eff...

Page 101: ...0 means the start and end points are not shifted whereas 360 means they are shifted by a full duration of the effect Figure 178 Effect Offset Attribute Duty Cycle Effect Attribute The Duty Cycle attribute defines how long the duration of the effect within a cycle is It is assigned as a percentage Note The Jump effect form requires the duty cycle to be smaller than 100 in order to function correctl...

Page 102: ...ct the effect you would like to modify by clicking on the button that reads the effect type and parameter shown in the first column of the Effects Programmer In order to modify the dimmer effect that we just created select the button that reads Simple FX Dimmer to select this effect You may also select multiple effect rows to adjust them simultaneously Now that the effect is selected the encoders ...

Page 103: ...to make global changes to the show very simply and quickly rather than having to re program every cue individually Presets allow intensity focus position attributes color and beam parameters to be recorded to be easily accessible during programming and live operation Presets are stored in Preset pools which are divided into Sub Pools All Intensity Focus Color Beam Each Pool type will filter attrib...

Page 104: ...nt record options from the Record toolbar after pressing the REC button For more info see Record Toolbar on page 19 Naming a Preset Assigning Names Using Preset Pool Window Hit the PRESET key while holding down the ASSIGN key The Preset Pool window will be shown The command line will still read Assign Now press the ASSIGN key again The command line will now read Name Now select the Preset Pool typ...

Page 105: ...C key and simultaneously press the PRESET key The Preset Pool window will open Select the Preset Pool type using the Preset Pools toolbar and select the preset you would like to remove values from within the pool window i e Preset 1 A window asking you what to do will be opened Select Remove to remove touched attributes from the preset Alternatively you may also select Remove from the Record toolb...

Page 106: ...e you changed your values accordingly to replace a previously stored preset press and hold the REC key and simultaneously press the PRESET key The Preset Pool window will open Select the Preset Pool type using the Preset Pools toolbar and select the preset you would like to replace within the pool window i e Preset 1 A window asking you what to do will open Figure 188 Select Replace to replace the...

Page 107: ...e Preset Pool window will open Select the Preset Pool type using the Preset Pools toolbar and select the preset you would like to update from the pool window i e Preset 1 A window asking you what to do will be opened Select Merge to update the presets content with the touched attributes Alternatively you may also select Merge from the Record toolbar after hitting the REC Key which will prevent the...

Page 108: ...and deselect presets by clicking on them Alternatively you may select any preset using the external monitor s Preset Pool Selecting Presets Using Command Line Interface Press the PRESET key In the Command Line Interface using the keypad type the number of the preset you would like to select i e 1 followed by ENTER Recalling a Preset as a Hard Value If you select Presets this way they will be recor...

Page 109: ...SET key The Preset Pool window will be shown Now select the Preset Pool type using the Preset Pools toolbar and select the preset you would like to move followed by the destination Pool Item Moving Presets using the Command Line Interface You may move presets using the command line approach by pressing the MOVE key Then hit the PRESET key followed by the source Preset ID in this case 1 Now enter t...

Page 110: ... whilst holding down the EDIT key Select the Preset Pool type using the Preset Pools toolbar and select the preset you would like to edit Set Preset Name Clicking on the Set Group Name button will open up an on screen keyboard allowing you to rename this particular Group Merge to Programmer Clicking on the Merge to Programmer button will load the presets contents without referencing to the preset ...

Page 111: ... recorded This state is indicated by the background color of the value in the programmer See Different States of Fixture Attribute Values on page 81 for more information Note Sometimes it might be desirable to modify or touch all attributes for selected fixtures prior to recording a cue This may be used to create a Blocking cue To do so press SHIFT and LOAD at the same time Storing a Cuelist to a ...

Page 112: ...and hold the REC key and simultaneously press the CUELIST key The Cuelist Pool window Figure 198 will open Select a cuelist to store the cue Figure 198 Cuelists Pool Window Alternatively with an external monitor attached you may directly record to a cuelist in a cuelist pool on the external monitor by pressing REC followed by the desired cuelist in a Cuelist Pool window Storing Cues in Cuelists Us...

Page 113: ...ple Cuelists at once by using the THRU and modifier keys to further extend your selection The Enter Cuelist Name window will appear Figure 200 Figure 200 Enter Cuelist Name Window Keyboard Copying Cuelists Copying Cuelists using the Cuelist Pool Window Press and hold the COPY key while holding down the CUELIST key The Cuelist Pool window will be shown Now select the cuelist you would like to copy ...

Page 114: ...ETE Key while selecting a Cuelist for deletion the Confirm dialog will be omitted and the Delete Keyword in the command line will remain active Deleting Cuelists using Command Line Interface You may delete cuelists using the command line approach by pressing the DELETE followed by the CUELIST key and the ID of the List you would like to delete ie 12 Please note you may delete multiple cuelists by ...

Page 115: ...ting the appropriate Cue Figure 205 Merge into Existing Cue Window Select Cue Removing Content from Cues First touch the attributes you would like to remove Press the REC key select the Remove option from the record toolbar and select the appropriate cuelist by the either a master s Figure 196 on page 109 Play or Pause Back Key or by selecting the cuelist in a Cuelist Pool Window If the Cuelist Po...

Page 116: ... option from the record toolbar and select the appropriate Cuelist by the either a master s Figure 196 on page 109 Play or Pause Back Key or by selecting the Cuelist in a Cuelist Pool Window If the Cuelist Pool window is not yet shown keep the REC key pressed while pressing the CUELIST button on the keypad prior to selecting Replace from the record toolbar Figure 209 Record Toolbar Replace Button ...

Page 117: ...on from the record toolbar and select the appropriate cuelist by the either a master s Figure 196 on page 109 Play or Pause Back Key or by selecting the cuelist in a Cuelist Pool Window If the Cuelist Pool window is not yet shown keep the REC key pressed while pressing the CUELIST button on the keypad prior to selecting Insert from the record toolbar Figure 212 Record Toolbar Insert Button You may...

Page 118: ...uelist Pool Window If the Cuelist Pool window is not yet shown keep the DELETE key pressed while pressing the CUELIST button on the keypad prior to selecting the Delete Cues option from the Delete Toolbar Figure 215 Delete Toolbar Delete Cues Button You may also use the command line approach by press the DELETE key followed by the CUELIST key Now select the Delete Cue option from the Delete Toolba...

Page 119: ...a Cuelist Pool Window If the Cuelist Pool window is not yet shown keep the LOAD key pressed while pressing the CUELIST button on the keypad You may also use the command line approach by press the LOAD key followed by the CUELIST key Type the number of the cuelist you would like to load a cue from in i e 1 Now press ENTER to execute the command Figure 218 Figure 218 Command Line Interface Load Cuel...

Page 120: ...ld like to assign i e 1 Then press the desired master s Play or Pause Back Key Figure 220 Command Line Interface Assign a Cuelist to a Master Fader Cuelist View Cue Sheet Window To change cuelist timing or cue names you need to do so in a Cuelist window Cuelist View Figure 221 may also be used as a Cue Sheet indicating the current previous and next cues Figure 221 Cuelist View Cue Sheet Window Ope...

Page 121: ...Names and Timings To change Cue Names and Timings you first need to open up a Cuelist Window as described previously As soon as the Cuelist View Figure 221 for the appropriate cuelist has been opened up select the cell with the value you would like to change Press the SET key and enter the desired timing value Cue This column indicates the cue number which may not be changed Name This is the name ...

Page 122: ...list on the external monitor Figure 224 Edit Cuelist Window Example The Edit Cuelist window consists of two different tabs Basic and Timing Setup The Basic tab contains all cuelist configuration options The Timing Setup tab contains cue timing options Note All options in the Edit Cuelist window will be applied directly without pressing the OK Button Saving Options as Default Specified options may ...

Page 123: ...in that cuelist will be compared to others by the Latest Takes Precedence principle except the dimmer values which will be compared by dimmer level That means that values will override values which have been output previously except for the dimmer value Here the cuelist set to HTP with the highest dim mer level will be output HTP High Priority All values being stored in that cuelist will be compar...

Page 124: ...th transition instead of just snapping fixtures to their default or other output values The default Outfade time is 2 Seconds Off Options The selections are Off if Overwritten Off by default This cuelist will switch itself off when all of its values have been overridden by different cuelists Don t Off other Cuelists Off by default This cuelist will not switch off other cuelists even if it override...

Page 125: ... be used to convert Next Times to Timecode times This way it is possible to Learn Timing for a cuelist while not receiving Timecode and later set the Cuelist Trigger to Timecode Then you just need to enter the Timecode Start Time as described above and hit the Convert Next Time to Timecode button Playing Cuelists Starting Stopping Cuelists using Cuelist Pool Window Press and hold the OPEN key and ...

Page 126: ... That means you may assign the same single cuelist to multiple masters and configure each master differently Assigning a Grandmaster The Grandmaster provides an overall inhibitive fader for all fixture Intensities To assign a fader to act as the Grandmaster press the ASSIGN key followed by the GO or PAUSE BACK key of the fader that should act as the Grandmaster The Assign Master Fader window Figur...

Page 127: ...p s ID in example GROUP 1 Now select the GO or PAUSE BACK key of the fader that should act as the Dimmer Master Figure 229 Command Line Interface Assigning a Fixture Group to a Master Fader Using the Group Pool Window You may also use the command line Interface paired with visual fixture selection Press and hold the GROUP key and press the ASSIGN key The Group Pool window will be shown Now select ...

Page 128: ...r Window Speedmasters Note For more information on configuring cuelists to listen to a Speedmaster please see Master Speeds on page 129 Assigning a Fademaster Press the ASSIGN key followed by the GO or PAUSE BACK key of the fader that should act as the Fademaster A window will open asking you what to assign to this master Select one of the three different Fademasters Figure 232 Assign Master Fader...

Page 129: ...K key of the master you would like to delete Figure 234 Delete Toolbar Delete All Button WARNING Delete All cannot be undone Use with care Configuring Fader and Button Functions Each fader and button function may be customized on a per master basis in order to provide maximum flexibility when it comes to operating a show To edit a master s Go Pause Back and fader function press EDIT followed by th...

Page 130: ...still resides at 48 nothing will happen to the Group Masters value until the Fader physically reached the value of 49 It will apply new values only if it has been Picked up or Fetched at the previous value Example without Fetch Mode You are on Page 1 and Master 1 contains a Group Master that has the fader set to 48 You change to Fader Page 2 where a different object is assigned to Master 1 and mov...

Page 131: ...ing the button Flash Go Off Will flash the master s fader value to 100 and switch on the cuelist The cuelist will be switched Off when releasing the button Flash Off Will flash the master s fader value to 100 and switch off the cuelist when releasing the button It will not start the cuelist Off Switches off the cuelist using the Off time to fade out given in the cuelist options Instant Off Switche...

Page 132: ...ader Function Action of Button Press Disabled Master Speed The fader controls the Speed in a range of 0 10s to 10s Button Function Action of Button Press Disabled Time Increase Adds the amount of time entered in the combobox Time Decrease Subtracts the amount of time entered in the combobox Time Multiply Multiplies the time of the Fademaster by the entered amount Time Divide Divides the time of th...

Page 133: ... is a good use case for this function To be able to set your page to the template for setup purposes please open up the Cuelist Directory window and select Template Page from the list of pages and press the Goto Page button Editing Fader Pages Adding Pages Open the Fader Page Directory window and click on Append to add a new page behind the last one or click on Insert to insert a page in front of ...

Page 134: ...ped by Artistic Licence Engineering UK Ltd and is open for implementation without charge It is typically implemented in ArtNet to DMX converters often called nodes and being driven from a lighting desk or similar software operating as a transmitter ArtNet compatible products are made available by dozens of companies however not all ArtNet to DMX converter units are built complying with the ArtNet ...

Page 135: ...niverse numbers rather than as discrete NetSlots Figure 243 XDMX ShowNet NetSlot Addressing Notes Where the XDMX start address is omitted the system defaults to sending the levels commencing at ShowNet Net slot 1 Where you are to be using multiple consoles on a Strand ShowNet network you should select different ShowNet XDMX Start values for each console to avoid any conflicts Where more than one U...

Page 136: ... the Showfile Figure 244 Setup Menu Show Settings DMX Output ArtNet Setup To enable ArtNet Output refer to ArtNet Setup on page 134 for more information tick the Enable ArtNet checkbox as shown in Figure 245 To configure each Universe select it from the List and press the SET key A new screen allowing to enable or disable the ArtNet Output as well as to configure the ArtNet Universe for this Unive...

Page 137: ... Output refer to ShowNet Setup on page 135 for more information tick the Enable ShowNet checkbox To configure each Universe select it from the list and press the SET key A new screen allowing to enable or disable ShowNet Output as well as to set the start Slot for this universe will be shown Figure 247 DMX Output Configuration Window Enable ShowNet ...

Page 138: ...the Showfile Figure 249 Setup Menu Show Settings Timecode Input Timecode Setup Internal Timecode Should you wish to use the internal Timecode set the Timecode Source to Internal Generator You may now define the frame rate and the Start and Stop Time of the internal timecode The stop time is used to either stop the timecode as soon as it reaches set time or to loop if enabled the timecode Looping t...

Page 139: ...select the appropriate source from the Timecode Source dropdown Please note that the console will auto detect the framerate of the incoming signal hence no further configuration is needed Any received Timecode will be output through the MIDI Out connector That means the console converts SMPTE Timecode to MIDI Timecode The console will always listen to timecode however Cues are only triggered if th...

Page 140: ...gs Tab and select MIDI Input from the Input Output Groupbox All settings made in this screen are stored in the Showfile Figure 252 MIDI Input Configuration Show Current MIDI Input To enable MIDI Monitoring tick the Show Current Midi Input checkbox The console will now show received MIDI signals Figure 253 Show Current Midi Input Setup the MIDI Input To setup the configurable MIDI Input click on th...

Page 141: ...Triggers To edit an existing MIDI Input trigger select it from the List of Triggers and click on the Edit button The MIDI Trigger Setup Window will be shown Figure 257 MIDI Input Configuration Edit MIDI Trigger Delete MIDI Triggers To delete an existing MIDI Input trigger select it from the List of Triggers and click on the Delete button Figure 258 MIDI Input Configuration Delete MIDI Trigger Movi...

Page 142: ... given MIDI Channel Hence Program changes do only consist of a single command as opposed to a Note On or Off command eg Channel 6 Program Change 2 is considered as one complete command Program Change commands are translated into so called Single On Triggers Controller Events Control Change Controller Events or Control Changes are usually used by MIDI Synthesizers to remotely control potentiometers...

Page 143: ... the console will also learn the appropriate MIDI channel MIDI Trigger Setup Window Step 2 of 2 Target Selection The Midi Trigger Target Setup window is used to define what the previously added Midi Source will trigger When you are done press the OK button to close the wizard Figure 261 MIDI Input Trigger Setup Step 2 2 Item Type This will select the type of the Item that will be triggered by the ...

Page 144: ...flash the dimmer value of the cuelist to defined Issues a Go Command when a Note On Command is received Issues an Off command when a Note Off is received Speed Flash Will temporary flash the speed value of the cuelist to defined value Speed Flash Go Will temporary flash the speed value of the cuelist to the defined value Issues an On command when a Note On is received Speed Flash Off Will temporar...

Page 145: ...ff portion is received Master Fade TapSync Measures the time between received Note On commands and sets the Fademaster to that amount Increase Time Time of the Fademaster will be increased by given amount Decrease Time Time of the Fademaster will be decreased by given amount Multiply Time Time of the Fademaster will be multiplied by given amount Divide Time Time of the Fademaster will be divided b...

Page 146: ...ty stack but does not advance through the cuelist Grandmaster Toggle Blackout Blackout Mode will toggle Master Speed TapSync Measures the time between Note On commands and sets the Speed Master to that amount Increase Time Time of the Speed Master will be increased by given amount Decrease Time Time of the Speed Master will be decreased by given amount Multiply Time Time of the Speed Master will b...

Page 147: ...you opened up a new blank show you may enter your desired PIN Code straight away If you previously set a code you need to enter it Item Action Description Fixture Dimmer Level The Controller Event Value will set the Fixture Master Dimmer level Group Dimmer Level The Controller Event Value will set the Group Master Dimmer level Cuelist Dimmer Value The Controller Event Value will set the Cuelist Di...

Page 148: ... Lighting does not receive or keep user set PIN codes Once you establish a PIN code write it down and keep it in a safe place in case you forget the PIN code you set Locking the Console To lock the console and prevent any modifications of the showfile or playback press the SETUP key and hit the Enable Desklock button on the Setup Toolbar Figure 264 Figure 264 Setup Toolbar Enable Desklock Button N...

Page 149: ...Philips Strand Lighting does not receive or keep user set PIN codes Once you establish a PIN code write it down and keep it in a safe place in case you forget the PIN code you set 13 Editing the Fixture Library This section is set to help you should you wish to change a fixture type s DMX footprint or default values or in case you create a new fixture that is not yet contained in the library From ...

Page 150: ...g Control Console 148 Programming Figure 267 Setup Menu System Setup Tab From Within a Show To edit the fixture library from within a show file press the Setup key and select the System Setup Figure 268 Setup Menu System Setup Tab ...

Page 151: ...he top row of buttons Figure 271 is used to append or insert new channels clear a channels mapping or to delete a channel completely Additionally it may be used to add a Virtual Dimmer to the Fixture if Color Mixing attributes are present Figure 271 Library Editor Channel Setup Menu Bar With Channel Setup page shown a table showing the mapping of the DMX Channels of a Fixture to the Fixtures Param...

Page 152: ...hat can be output DMX Max This is the maximum DMX Value for this parameter that may be output Note If you select two parameter cells and press the SET key the console will automatically assign the coarse channel of the parameter to the first selected cell and the fine channel to the second selected cell Select Parameter Menu The Select Parameter Menu is used to select the Parameter mapped to a cha...

Page 153: ...braries To edit an existing fixture library click on Edit Fixture contained in the Fixture Library Groupbox as indicated in Figure 275 Figure 275 System Setup Tab A screen Figure 276 on page 152 asking you in which library the fixture you would like to edit is residing in will be shown Select the appropriate Library type and click on Next ...

Page 154: ...in the top part of the screen Alternatively you may select the fixture by selecting the Manufacturer Type and Mode Click on Edit when done Figure 277 Select Fixture Type Dialog The Library Editor will be shown Figure 278 on page 153 allowing you to make changes to the fixture type Click on Save and Close when done Note If you edit a Fixture in the User Library and are using the same fixture type i...

Page 155: ...Control Console Operation Guide Figure 278 Library Editor Add a new Fixture to the Library To edit an existing fixture library click on New Fixture contained in the Fixture Library Groupbox as indicated In Figure 279 Figure 279 System Setup Tab ...

Page 156: ...fy the Manufacturer Fixture Type Short Type and Fixture DMX Mode In order to create a fixture from scratch make sure Create Empty Fixture is selected Click on Next when done Figure 280 Create New Fixture Library Window A screen asking you for the amount of DMX Channels the new resulting fixture is having is shown When done click Create Figure 281 Create New Fixture Enter Channel Count ...

Page 157: ...xisting Fixture Type as a Template A screen asking a few questions in regards to the new fixture will be shown You need to specify the Manufacturer Fixture Type Short Type and Fixture DMX Mode In order to start using an existing fixture as a template select Use Existing Fixture as Template and hit the Select Template Fixture button Figure 283 Create new Fixture Library A screen Figure 284 on page ...

Page 158: ...late Fixture A menu that allows you to pick a fixture type will appear You may search for fixtures using the filter field shown in the top part of the screen Alternatively you may select the fixture by selecting the Manufacturer Type and Mode Click on Select when done Figure 285 Select Fixture Type Screen ...

Page 159: ...in Make sure you entered a Manufacturer and Name for the new Fixture Type and hit the Next button when done Figure 286 Create New Fixture Library The Library Editor See Fixture Library Editor on page 149 will be shown allowing you to make changes to the fixture type Click on Save and Close when done Figure 287 Library Editor ...

Page 160: ...fixtures between the different library types may arise In order to do so go to the System Setup Menu and select Transfer Fixture Figure 288 System Setup Window Transfer Fixture Selection A screen asking for the source Library of the Fixture type is shown Select the desired Library and click on Next Figure 289 Select Source Library ...

Page 161: ...ing the filter field shown in the top part of the screen Alternatively you may select the fixture by selecting the Manufacturer Type and Mode Click on Next when done Figure 290 Select Fixture Type Screen A screen asking for the destination Library of the Fixture type is shown Select the desired Library and click on Transfer Figure 291 Select Destination Library ...

Page 162: ...g A dialog asking for confirmation will be shown If all is good click on Yes Figure 292 Confirm or Cancel Transfer Delete a Fixture Type Do delete a fixture type head to the System Setup Menu and select Delete Fixture Figure 293 System Setup Window Delete Fixture ...

Page 163: ...sired Library and click on Next Figure 294 Select Source Library A menu that allows you to pick a fixture type will appear You may search for fixtures using the filter field shown in the top part of the screen Alternatively you may select the fixture by selecting the Manufacturer Type and Mode Click on Next when done Figure 295 Select Fixture Type Screen ...

Page 164: ...Operation Guide 500ML Lighting Control Console 162 Programming A dialog asking for confirmation will be shown If all is good click on Yes Figure 296 Confirm or Cancel Deletion Screen ...

Page 165: ...Figure 297 Should a show be open and running open the Setup Dialog by striking the SETUP key on the console s front panel instead Once the Setup Menu is shown switch to the USB tab and hit the Library Export button Figure 297 Setup Menu Library Export You will now be presented with a list of libraries as shown in Figure 298 Select the Library Type you would like to copy to the USB key and hit the ...

Page 166: ...your selection click on Export button to copy the selected Libraries onto the USB Key Figure 299 Export Library Window A confirmation window will be shown with a brief summary of the Library or Libraries that will be exported Click on Export to copy the Library file onto the USB Key The Export Status box will now display the export progress Figure 300 Export Library Window Export Status ...

Page 167: ...ries Connect USB key to console with the library fixture file loaded From the Welcome Screen hit the Settings button as illustrated in Figure 301 Should a show be open and running open the Setup Dialog by striking the SETUP key on the console s front panel instead Once the Setup Menu is shown switch to the USB tab and hit the Library Import button Figure 301 Setup Menu Library Import ...

Page 168: ...rt button on the touchscreen display y Figure 302 Import Fixture Library Window A screen asking for confirmation will be shown with a brief summary of the Library or Libraries to be imported Click on Import button as indicated in Figure 302 to start the process that imports the selected Libraries to the console The Import Status box will now display the import process Figure 303 Import Library Win...

Page 169: ...ia USB Key CAUTION Before updating the console software make sure you have made backups of all important show and library files In order to update the software on the console make sure you have downloaded the appropriate software from the Strand Lighting website Copy the downloaded file with the file extension swu to the strandml software_update folder on the USB key supplied with the console Figu...

Page 170: ...w Updating Console Software via USB Note You must reboot restart the console in order for the new software to take effect WARNING During the update process DO NOT disconnect power OR switch off the console This may render the console un bootable Allow the the process to finish completely The console s screen will present you with a list if applicable of available software updates found on your USB...

Page 171: ...ting Control Console Operation Guide A wizard will lead you through a few steps as shown in Figure 308 and Figure 309 Figure 308 Software Update Window Software Update Confirmation Figure 309 Software Update Window Perform Update Confirmation ...

Page 172: ... CAUTION Before updating the console software make sure you have made backups of all important show and library files In order to update the software on the console using an Internet connection make sure the console network interface is properly configured and that the console has Internet access Navigate to the Setup Menu by pressing SETUP and select the USB tab Click on Online Update in the Main...

Page 173: ...ware Update Window Downloading Online Software Note You must reboot restart the console in order for the new software to take effect WARNING During the update process DO NOT disconnect power OR switch off the console This may render the console un bootable Allow the the process to finish completely A wizard will lead you through a few steps to load the new software as shown in Figure 313 and Figur...

Page 174: ...Figure 315 Figure 315 Software Update Window Reboot Now 3 Calibrating Touchscreens Calibrating Internal Console Touchscreen Sometimes it may be necessary to recalibrate the internal touchscreen To do this as illustrated in Figure 316 on page 173 access the Setup Menu by pressing SETUP and select the System Setup tab Click on Calibrate Internal Note You may also use a USB mouse not supplied by othe...

Page 175: ... was purhcased and is connected to the console it may be necessary from time to time to recalibrate the external touchscreen To do this as illustrated in Figure 317 access the Setup Menu by pressing SETUP and select the System Setup tab Click on Calibrate External Note You may also use a USB mouse not supplied by others attached to the console Figure 317 Setup Menu Window Calibrate External Touchs...

Page 176: ...AR Will revert back to the last programmer state Unclear Programmer SHIFT LAST Will deselect all fixtures SHIFT NEXT Will select all fixtures of the current selection set if applicable LAST NEXT Will select all fixtures of the current selection set if applicable SHIFT Will show fine values in programmer and allows for fine adjustment of parameters using the encoders Holding down the FAN Button aut...

Page 177: ...External Keyboard Hotkeys 175 500ML Lighting Control Console Operation Guide Notes ...

Page 178: ......

Reviews: