background image

Recording a Cue or Look

69

Palette II Lighting Control Console

Installation & Setup Guide

3. Look Pages

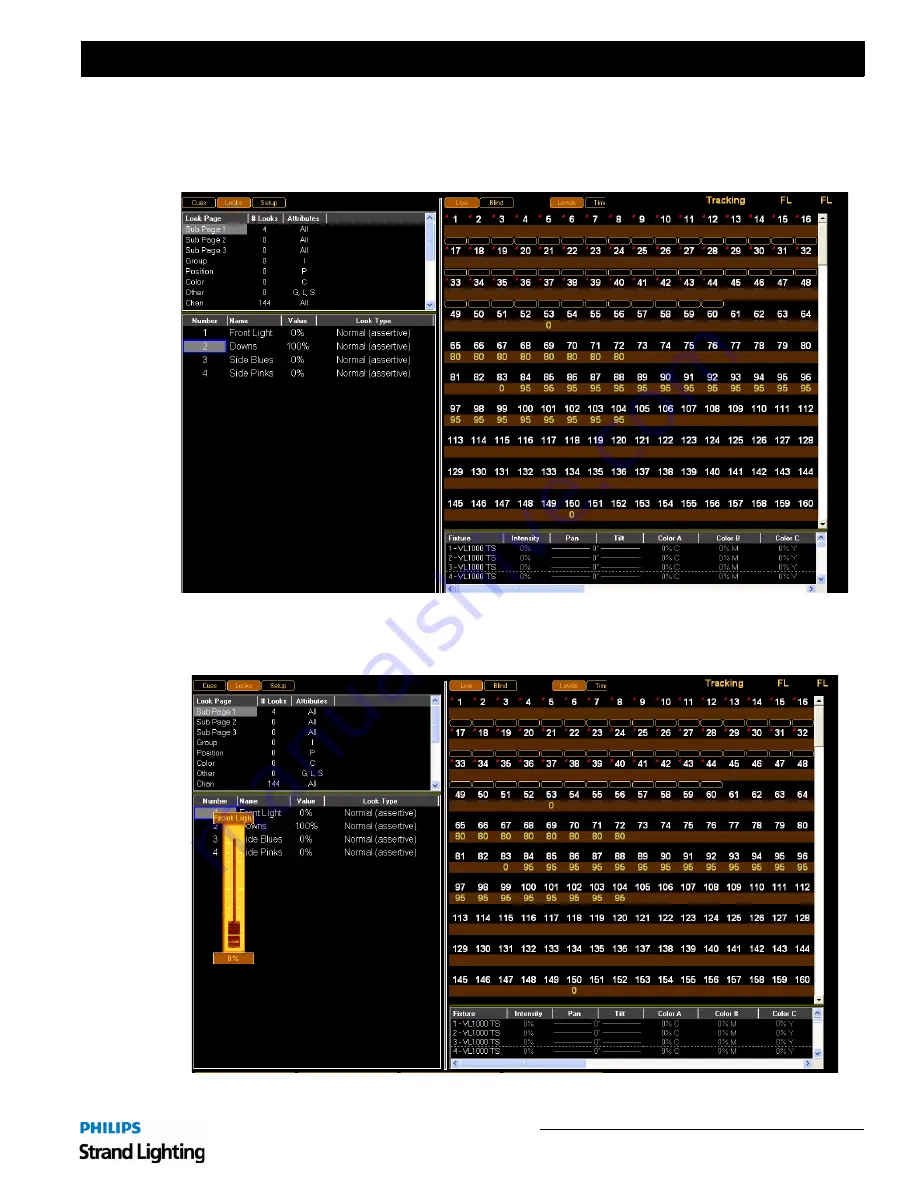
By clicking the icon in the top left-hand corner of your screen titled "Look," you will be taken to the Look screen. 
Here you are able to access all of your Looks pages and individual Looks within those pages. 

You have the ability to bring up each individual look by clicking on that Look and dragging up the Virtual Look 
Slider to the appropriate percentage, 

or

 by changing the percentage in the values column. The values within that Look 

will be displayed in the channel grid.

Summary of Contents for basicPalette II

Page 1: ......

Page 2: ...me aucune responsibilité sur toute erreur ou ommission inscrite dans ce manuel Pour tous commentaires ou suggestions concernant des corrections et ou les mises à jour de ce manuel veuillez s ll vous plait contacter le bureau de Strand Lighting le plus proche Information contained in this document may not be duplicated in full or in part by any person without prior written approval of Strand Lighti...

Page 3: ...f PALETTE if available provided that you return the defective copy of PALETTE to HCI within thirty 30 days of the date you receive it You acknowledge that this Section sets forth Your SOLE AND EXCLUSIVE remedy and HCI s SOLE AND EXCLUSIVE liability for breach of warranty or any other duty 6 Limitation of Liability YOU ACKNOWLEDGE THAT HCI IS PROVIDING PALETTE AS IS UNDER NO CIRCUMSTANCES INCLUDING...

Page 4: ...Installation Setup Guide Palette II Lighting Control Console ii Notes ...

Page 5: ...een 4 Optional Accessories sold separately 4 Software Upgrades 5 Control Channel Upgrades 5 Features Standard Features 6 Optional Add On Features 6 Software Overview PaletteOS Software 7 Off Line Editor 7 Control of Connected Devices 7 External Control 7 Chapter 2 Installation and Power Up Unpack Site Requirements 10 Product Care 10 Unpack and Assemble Components 10 Hook Up Connecting Console Comp...

Page 6: ...erical Keypad 20 Miscellaneous 20 M Keys 21 Softkeys 21 Dialogue Navigation Function 21 Tools and View Function 21 Playback Controls Layout 22 Playbacks 22 Level Wheel 22 Button Details Plus Minus At Full Out 23 Arrows 23 Blind 23 Copy 24 Cue 24 Dead Black Out Buttons DBO 24 Delete 24 Edit 24 Go 24 Goto 25 Group 25 Halt Back 25 Load 25 Look 26 Move 26 Number Buttons 26 On 26 Off 26 Previous and Ne...

Page 7: ...Backup 50 Remote Engine 50 Restoring the Software Updating or Re Installing PaletteOS Software 51 Chapter 4 Setup Accessory Hardware Components Overview 54 Preset Scene Mode 54 A B C D 54 Dead Black Out DBO 56 Console Setup 56 QWERTY Keyboard Cue List Control 56 Level Entry Mode 57 Console Personalities 57 Macro Editor and Commands 58 Chapter 5 Operation Selecting Channels and Setting Levels Chann...

Page 8: ...Installation Setup Guide Palette II Lighting Control Console vi Appendix A Specifications Palette II Lighting Control Console 72 Appendix B Software Tips Helpful Tips and Shortcuts 74 ...

Page 9: ...indoor use only This equipment is designed and manufactured to comply with international safety standards IEC950 UL1950 CS950 and is intended for use as part of a lighting control system It must not be used for other purposes where there is a risk of safety to persons The equipment contains power voltages socket outlets will be installed near the equipment and be easily accessible Working Voltage ...

Page 10: ...For a complete list of support and field service contacts go to www strandlighting com select the Support tab and then the Support Field Service Contacts link Additional Resources For additional resources and documentation please visit our website at www strandlighting com For a printed or printable version of the Palette Series Software User Manual or Web based Help Manual visit www strandlightin...

Page 11: ...3 Palette II Lighting Control Console Installation Setup Guide 1 Overview Components Features Software Overview ...

Page 12: ... use of a touchscreen monitor Due to mouse driver requirements only ELO Touchscreens should be used ELO touchscreens can be purchased from ELO TouchSystems www elotouch com The AccuTouch 3000 series models are recommended since they feature resistive technology i e you can point with objects other than your finger such as a pen etc Purchase the USB type NOT serial If connecting a touchscreen some ...

Page 13: ... at www strandlighting com 6 Control Channel Upgrades The control channel functionality included with your console is pre authorized at the level initially purchased However the channel count can be easily upgraded at any time To purchase a control channel upgrade for your Palette II Lighting Control Console please contact your Authorized Strand Lighting Dealer Note You may need to purchase ShowNe...

Page 14: ...zard Moving light patch Astronomical time clock and time events Macros Playback 32 channel two scene operation presetPalette 32 64 48 channel two scene operation presetPalette 48 96 16 submasters with individual bump buttons and integrated LED presetPalette 32 64 and basicPalette 32 submasters with individual bump buttons and integrated LED presetPalette 48 96 classicPalette Timed manual fader pai...

Page 15: ...formation on its graphical screen allowing the user to work faster and more effi ciently PaletteOS can be upgraded at no additional cost when new software becomes available 2 Off Line Editor A free off line editor and remote video software is available at www strandlighting com 3 Control of Connected Devices Control of connected devices and or lighting systems is achieved by using the console desk...

Page 16: ...Installation Setup Guide Palette II Lighting Control Console 8 Overview Notes ...

Page 17: ...9 Palette II Lighting Control Console Installation Setup Guide 2 Installation and Power Up Unpack Hook Up Console Power Up ...

Page 18: ... power requirements 2 Product Care In the event the console needs to be cleaned remove all power from unit and use only a very mild soap on a damp cloth Dry immediately with a soft lint free cloth after cleaning Never use harsh chemicals such as window cleaners paint removers vinyl conditioners etc It is recommended to gently blow out the sub pots and desk occasionally to prevent build up of dust ...

Page 19: ... 2 Connect monitor or touchscreen sold separately Step 3 Connect USB mouse and keyboard Figure 1 Connecting Console Components 2 DMX512 Output The console provides two standard XLR 5 pin connectors for connecting to DMX512 devices Each connector supports one DMX512 universe of 512 DMX channels DMX512 Out Audio 2 USB 2 Network Monitor HDB 15F Serial DB 9M Power Monitor RJ 45 HDB 15F Processor PROCE...

Page 20: ...ted pair Ethernet cable from the back of the console to a wireless Access Port and then from the Access Port though the air to the RFU with wire less receiver 4 Vision net The console can interface with Strand Vision net systems In this configuration the console s DB9 Serial port can be connected to a Vision net RS232 Programming Station which in turn connects to a Vision net control station The f...

Page 21: ... console s personality This can be found under Hardware Setup then clicking on Console You will notice several options to choose from a GeniusPro 500 series GP Command line entry Utilizes the British spelling of words for example colour vs color and anticlockwise vs counterclockwise This also uses the 500 series channel colors magenta is up cyan is tracking b LightPalette 500 series LP Command lin...

Page 22: ...le 1 5 0 will set channel 1 to 50 b Record Includes Subs when checked this will include levels that are outputting from submasters when recording cues or looks The default is unchecked This status will appear on the command line when you press RECORD by showing you either LIVE SUBS or LIVE SUBS c Show Cue List Controls when checked this will display the cue list control icon bar above the existing...

Page 23: ...15 Palette II Lighting Control Console Installation Setup Guide 3 Controls Desk Layout Button Details Software Configuration Restoring the Software ...

Page 24: ...ndividual bump buttons and integrated LED Dead Black Out Buttons configurable Provides a momentary or toggle full stage black out Programming Buttons Provides direct access to channels playback control console setup and display options Level Wheel Will change intensity of selected channel While attribute softkey is engaged it will change the attribute value Playback Control configurable A B automa...

Page 25: ...ump buttons and integrated LED Dead Black Out Buttons configurable Provides a momentary or toggle full stage black out Programming Buttons Provides direct access to channels playback control console setup and display options Level Wheel Will change intensity of selected channel While attribute softkey is engaged it will change the attribute value Playback Control configurable A B automatic timed f...

Page 26: ...ene mode or 64 channels in single scene mode The bottom row contains 16 submasters On the 48 96 version there are 96 sliders for preset control of either 48 channels in two scene mode or 96 channels in single scene mode The bottom row contains 32 submasters Programming Buttons Provides direct access to channels playback control console setup and display options Level Wheel Will change intensity of...

Page 27: ...elp system TOOLS Press SHIFT TOOLS to change current tool functions such as color picker channel check flash etc MOVE Moves a Cue or Look COPY Copies fixture attributes Cues or Looks DELETE Deletes Cues and Looks VIEW Accesses information about selected cue channel look group function key etc RECORD Stores lighting state as a Cue or Look Ex RECORD CUE 1 ENTER UNDO Allows undoing of the last level ...

Page 28: ...N Key Level The default is 80 OFF Takes intensity value to zero for all selected channels Used to enter specific intensity value for all selected channels REM DIM Switches all channels except those which are selected off CLEAR Used to clear back entries one at a time on the command line Shifted version clears the entire com mand line 0 9 10 Key Numerical Entry ARROWS Moves blue box or changes valu...

Page 29: ...ge 19 for location of the ALT key The LEDs on each softkey will light up to let you know that the softkey is available with the Lower bank illuminating amber and the Upper bank illuminating green Dialogue Navigation Function If a PaletteOS software dialogue box is active each of the softkeys will provide a related function For example if the Record As Cue dialogue is active pressing S1 prompts Cue...

Page 30: ...ackward through a selected cue list Playback Faders Controls Fade times in out cross faders intensity masters scene masters or Look page mas ter The playback faders can be setup to control different things as determined by the PaletteOS software See A B C D on page 54 for more details or refer to Hardware Setup in the PaletteOS software Help Menu 7 Level Wheel The console features a level wheel wh...

Page 31: ...ugh 10 to 50 1 1 0 1 0 1 0 0 ENTER would set fixtures 1 through 10 to levels 10 20 30 40 50 60 70 80 90 and 100 respectively 2 Arrows The arrow keys move the blue box in the Cue List Look view and patch displays To change a value press the EDIT button Holding down the SHIFT key and pressing the Up or Down arrows selects a range Once a range is selected press EDIT then type in a new value to change...

Page 32: ... feature allows removal of recorded items from a show For example DELETE CUE 1 ENTER and DELETE LOOK 1 ENTER SHIFT DELETE will activate the Delete dialogue box 8 Edit Pressing the EDIT button allows changes to the highlighted cells in the Cue List or Look display times labels follows etc or in the patch displays Move the blue highlighted cells using the ARROW KEYS If a range is selected typing in ...

Page 33: ...nning cues on its Cue List A cue is running when the Green LED on the GO button is flashing If a Cue List is halted flashing Red LED pressing this button again will back up the Cue List If the Cue List is releasing both the GO and the HALT BACK LEDs will be flashing SHIFT BACK will go to the previous cue in recorded time This is very useful for encores 13 Load Note For those familiar with previous...

Page 34: ...er the selected cue s to new cue s While the Move dialogue box is open you can also select a new numbering scheme Press MOVE LOOK ENTER to move Looks Press SHIFT MOVE BUMP BUMP to quickly move Looks Use MOVE ENTER to move attributes from one channel to another 16 Number Buttons By default when typing on an empty command line these buttons will select Channels Use in conjunction with the other keys...

Page 35: ...Look will be recorded including the levels Using the GROUP button you can bring back the selected channels and set them to any level using the level wheel or keypad Note The Red LED will be on any time there is a change that has not been recorded 21 Undo The Undo feature will reverse many commands UNDO ENTER will reverse the last level change UNDO RECORD UPDATE DELETE and GOTO can all be reversed ...

Page 36: ...s Use with STEP FORWARD BACKWARD buttons to go to the top or bottom of a Cue List Use with ARROW KEYS to select a range of cells with the blue box Use with GO to assert the appropriate Cue List Use with BACK to run the previous cue in cue time Use with UP or DOWN to adjust the selected channel s level by one percent Use with Split Crossfaders or Single Crossfaders A B C D fader setup under S3 Hard...

Page 37: ... RECORD TYPE you now have four options to choose from in the M keys M1 M4 26 Step Forward Step Back Pressing the relevant button steps you through the selected Cue List using the step time set in the properties of the Cue List VIEW SELECT If the Cue List is active GO had been pressed at some point the effect will be seen on stage If it is not active only the Cue List pointer will move awaiting a G...

Page 38: ...ate dialogue box for increased information on what can be updated based on what has changed If you have changed tracking levels or palettes you can select different items from the list to update i e Track Back and Palette Update If you have used the LOAD button to load a Cue or Look once you make the changes press UPDT to store the changes and release any selected channels You will not be able to ...

Page 39: ...dated dialogue box or updates Loaded items in all other personalities via command line V View Opens View Properties dialogue box Z Back Halts running cues backs up the Cue List SHIFTED Go Back in time Arrow Keys Moves the blue box Backspace Used in the command line to delete characters or de select fixtures Delete Deletes highlighted cue or puts delete on command line for deleting Cues Looks or le...

Page 40: ...available in the software s Help Menu 2 Cue List Directory The Cue List directory shows what Cue Lists are in the the current show file and ready for playback It shows the current cue the next cue to be run and any count down times Channel Grid Help Menu Attribute Grid Status Window Display Softkeys Running Cue Cue List Cue List Directory and Attribute Wheel Display Colors in Grid Command Line Eff...

Page 41: ...ls and effects in a cue in an user friendly display Users can select levels or times in both Live and Blind modes to see what is happening during playback or programming If you have patched moving lights in your show the Attribute Grid will appear below the channel Grid Use the display menu S5 or the main windows menu to toggle on or off each grid 5 Status Window Display The Status Window display ...

Page 42: ...mapped network drives Internet connectivity and more The Control Panel appears as soon as you exit the PaletteOS To access these special features use the Control Panel shown above to launch applications system configuration and maintenance tools and to view system information The S4 System softkey will access many features in the control panel Note You may have to press Backspace to access the mai...

Page 43: ...onsole Web Browser The Web Browser icon launches the installed web browser for node configuration rack configuration and Internet activity Notepad The Notepad icon opens the notepad which will allow you to take notes and edit text Note that you can save your txt document anywhere on the D drive except in the Horizon folder Feel free to make your own directory structures to suite your organizationa...

Page 44: ...k icon accesses the Windows networking tools for advanced network configuration If the console can be connected to the facility s network networking capabilities such as mapped network drives and Internet connection can be accessed Most LANs have a DHCP Server Dynamic Host Configuration Protocol that automatically assigns network properties such as the IP address In most network situations the con...

Page 45: ... At Local Area Connection Properties select Internet Protocol Version 4 TCP Pv4 and click Properties a Choose Use the following IP address typically 192 168 0 68 b Type in the static IP address and appropriate Subnet mask provided by the network administrator c Type in a Default gateway if access to an outside of the LAN connection i e connect to other networks or Internet is required d Type in a ...

Page 46: ...ich is important if using Astronomical Events or want to synchronize the system with World Time Services click Change time zone button and choose the appropriate time zone Check Daylight Savings Time box for adjusting to time changes The PaletteOS must be restarted for the Time Zone change to take effect The Internet Time tab determines whether or not the console will look to World Time Servers on...

Page 47: ...con opens the Display Settings dialogue box Here you can adjust the resolution and configuration for two monitors Screen Saver Preferences Clicking the Screen Saver Preferences icon opens the Screen Saver Settings dialogue box Here you can adjust or turn off the screen saver settings Note that the Change Power Settings options is not accessible ...

Page 48: ...s are recommended since they feature resistive technology i e you can point with objects other than your finger such as a pen etc Purchase the USB type NOT the serial type After you have installed a touchscreen monitor you will need to calibrate the screen To do this click the Touch Screen Calibration icon The ELO Touchscreen Properties dialogue box will allow you to change various options for tou...

Page 49: ...board icon opens the virtual keyboard Regional Settings Clicking the Regional Settings icon opens the Regional and Language Options dialogue box Here you can adjust the regional location keyboard and other input languages Volume Control The Volume Control icon opens the volume fader Here you can adjust the volume of the audio output ...

Page 50: ...ue box Here the applications processes services performance data and other things can be viewed Note that accessing this screen is not part of normal operation Command Prompt The Command Prompt icon opens the system s command prompt which is primarily for technical support Only access this with full knowledge of the consequences of your actions ...

Page 51: ...Series HP LaserJet 1100 Series HP Color LaserJet 2000 Series USB Printers Installing a USB printer should be plug and play and communication should be established immediately Other Printers In the event that communication is not established immediately it is likely caused by trying to install a printer that is not on Strand Lighting s recommended printer list If this is the case you may attempt to...

Page 52: ...as already established a shared printer on the LAN and given you privileges to connect to and use it Once a printer has been added it will become the default printer check marked You can add more than one printer you will just have to choose which one you want to print to if it is not the default printer The console also prints to Adobe Portable Document Format PDF files These files can be saved t...

Page 53: ...tings The Firewall Settings icon opens the Windows Firewall Settings dialogue box Here you can adjust the firewall settings of the console s computer Defrag Drive The Defrag Drive icon opens the Disk Defragmenter dialogue box Here you can clean up your hard drive by performing the defrag optimization ...

Page 54: ...s from technical support Update Palette Software The Update Palette Software icon opens the Palette Software Upgrades dialogue box Here you can perform a software update by launching a software update file Hardware Test The Hardware Test icon opens the console test options screen This functions allow you to perform a hardware test to determine if there are any malfunctions with the buttons and sli...

Page 55: ...nsole select the panel to test and then activate all hardware elements Any odd behavior should be reported to an Authorized Service Center for diagnosis Launch Debugger The Launch Debugger icon launches the Engine Status program and then the PaletteOS This should only be used when directed by a technical support specialist ...

Page 56: ...irected by a technical support specialist Delete All Settings The Delete All Settings icon allows you to return the console to its factory default settings End Console Processes The End Console Processes icon will stop all console programs from running This should only be done by an authorized service center or by instruction from a technical support specialist ...

Page 57: ... and settings Run Shutdown Controls and Application List Launch Show PaletteOS This button launches the PaletteOS software application so you can begin programming a new show or load an existing show file The button will also return users to the Palette Operating Software window Application List Click the arrow to bring up the list of PaletteOS applications that are available ...

Page 58: ...he backup and continue unscathed The second device must have equal authorization to the main system but it can be in the form of a second console or simply a Horizon Universal Key on a networked laptop If you have installed Palette PC you will find a Palette Backup shortcut in the Palette section of your START menu To launch a tracking backup session from another console CTRL click on the Palette ...

Page 59: ...tte console software Control Panel will launch Step 5 From Control Panel open File Manager Step 6 At folders list locate the inserted USB key and select upgrade file PaletteOSX X X exe Step 7 Press Ctrl C to copy Step 8 Select D SavedInstalls folder on console hard drive Step 9 Press Ctrl V to paste The file should copy from the USB key to the console s hard drive Step 10 Unplug USB key Step 11 Do...

Page 60: ...Installation Setup Guide Palette II Lighting Control Console 52 Controls Notes ...

Page 61: ...alette II Lighting Control Console Installation Setup Guide 4 Setup Accessory Hardware Components Note This chapter provides software operations which are necessary to configure console hardware components ...

Page 62: ...e This is achieved on a PresetPalette only by selecting either the PRESET button for 2 scene operation or by pressing WIDE for single scene operation 2 A B C D The A B and C D faders have multiple purposes On a new show file the A B faders are configured as disabled Note Regardless of configuration of the A B and C D faders the SELECT HALT BACK and GO buttons will function as normal on the appropr...

Page 63: ...re ready to execute the next manual fade You do not need to exercise the full travel of the handles to re load the next cue Look Page 1 2 Master in this mode the left fader will act as a master for submaster page 1 and the right fader will act as a master for submaster page 2 Look Page 1 2 Crossfader in this mode the left fader will act as a master for submaster page 1 as normal and the right fade...

Page 64: ...e will black the stage out and pressing it again will restore it While the DBO is on the red LED will flash rapidly Note The red LED on the DBO button will flash slowly if the level of the handle is between 1 and 99 4 Console Setup QWERTY Keyboard Cue List Control By default the QWERTY keyboard will control the displayed Cue List For example the Spacebar executes a Go the Z key executes a Pause or...

Page 65: ...Digit Entry Channel goes straight to the desired level after a percentage is entered following the key i e the ENTER key is not used 1 7 0 Channel 1 goes to 70 Console Personalities The following Console Personality modes are available Each mode offers a slightly different method of colors and spellings The modes are as follows GeniusPro 500 series GP British spelling 500 series colors magenta is ...

Page 66: ...ommand is assigned to the Cue Action of a cue the macro icon will appear in the Action column You can add a Command to a cue by moving the blue box to the Action column and pressing Insert A Cue Action dialogue box will open Click on Macro or press S5 to add a Macro Command The Macro Editor will appear The main S11 tab on the left should be set to Command showing the commands available in the list...

Page 67: ... Any arguments parameters of the command will be listed Double click on the Value column to set an appropriate value then click OK You can Insert as many individual commands as you like for each macro and order them by selecting their line and use S5 and S6 to move them Up and Down in the list ...

Page 68: ...Installation Setup Guide Palette II Lighting Control Console 60 Setup Notes ...

Page 69: ...uide 5 Operation Selecting Channels and Setting Levels Recording a Cue or Look Note This chapter provides software operations which will get the system up and running For complete software operation instructions refer to the Palette Series Software User Manual ...

Page 70: ...selected with the mouse or with keystrokes Selected channels are identified in the channel grid by a red highlight around the channel The level may still be controlled by other means i e Cue Lists or Look Masters Until you specify that you want to change the level you do not have control over it with the wheel or keypad Once a level is altered the red outline will fill in and a white triangle delt...

Page 71: ...try type 1 THRU 1 0 0 5 ENTER Note Typing 1 THRU 1 0 1 2 7 ENTER will set fixtures 1 through 10 to 50 in any mode The decimal point identifies setting DMX512 values Notes Alternately you can select channels and roll the wheel to increase or decrease their level from the current position Holding down SHIFT while rolling the wheel changes the values in Decimal rather than Percent To set a level of 5...

Page 72: ...of the cue list the Record dialogue box will be automatically stuffed with the next whole number if the last cue is a whole number If it s a point cue then the next point cue will be sug gested Detailed Description Step 1 Set the levels you want to record in a cue The levels can be set by any method using the mouse the keypad Looks Groups etc Step 2 Press RECORD or click the Record button on the T...

Page 73: ...n existing cue and don t select Update you will see the dialogue box shown below after you press ENTER S8 Check Record Minus Subs if you don t want to pull in levels from recorded submasters that are active on stage S9 Opens the Attribute dialogue box to filter what will be recorded in this cue Notes If you double click S5 or any other softkey it will solo Position That is all other check marks wi...

Page 74: ...bove Pressing Cancel will close this dialogue box and return to the Record dialogue box Step 6 The recorded cue appears on the cue list Note on Recording Ranges of Cues If you want to record values through a range of cues enter the range using the X Y syntax in the S2 box As soon as you type the symbol for Thru the Label Cue Timing and Update control become inactive When recording through a range ...

Page 75: ... numeric values by 0 1 You can quickly record a cue to a cue list that is not currently selected by pressing RECORD SELECT Detailed Description These versions work via the command line as opposed to the Record Cue dialogue box Access to all options within the dialogue box can be found in the softkeys If a softkey is showing a green arrow clicking on this softkey will enable more softkeys directly ...

Page 76: ...ce Stored in this manner the look with work with other looks depending upon the order in which the looks were activated The last one will assert over a previous one c Exclusive stored in this manner the levels are now controlled exclusively by this look Cues other looks and manual control will not override It can ONLY be controlled by that look d Inhibitive stored in this manner the look handle or...

Page 77: ... be taken to the Look screen Here you are able to access all of your Looks pages and individual Looks within those pages You have the ability to bring up each individual look by clicking on that Look and dragging up the Virtual Look Slider to the appropriate percentage or by changing the percentage in the values column The values within that Look will be displayed in the channel grid ...

Page 78: ...Installation Setup Guide Palette II Lighting Control Console 70 Operation If you move the blue box over to Look Type you now have the ability to set your Look to various types ...

Page 79: ...71 Palette II Lighting Control Console Installation Setup Guide A Specifications ...

Page 80: ...2kg 92804 classicPalette II 250 Console 26 8 lbs 12 2kg 92805 classicPalette II 500 Console 26 8 lbs 12 2kg Dimensions LxWxH 92800 basicPalette II Console 25 2 x 17 8 x 4 5 640 x 452 x 115mm 92801 32 64 presetPalette II Console 39 x 17 8 x 4 5 991 x 452 x 115mm 92802 48 96 presetPalette II Console 52 7 x 17 8 x 4 5 1339 x 452 x 115mm 92803 classicPalette II 150 Console 25 2 x 17 8 x 4 5 640 x 452 ...

Page 81: ...73 Palette II Lighting Control Console Installation Setup Guide B Software Tips ...

Page 82: ...werful You can change the attribute behavior of your moving lights by VIEWing the properties of a Look Master The Show Options has a field where you can set the level for the ON button Double pressing the ON button will always give you 100 Every dialogue box has a small blue question mark in it Press this button to get context sensitive help Palette II supports 100 Priority levels for Looks and Cu...

Page 83: ...l two scene masters You can write a Block cue by selecting the ALL Levels Block Cue Record option in the record dialogue box or just by right clicking on a cue and selecting Block Cue A horizontal line above the cue will show you that no channels will track into this cue You can rearrange the column in the Cue List by clicking and dragging the column headers Use the Tools button to open Virtual 5X...

Page 84: ...l technology allows you to do things like control color mixing lights in six different color spaces Flash channel a TOOL works whether or not you have channels selected before you initialize the tool If you type channel TOOLS FLASH that channel will start flashing You can then type another channel number and press enter to jump to it Use the level wheel to scroll through channel quickly Once you c...

Page 85: ...x to the first column in the cue list on the desired cue and press EDIT This is equivalent to double clicking on that cell with the mouse Using S2 SHOW OPTIONS you can give each Cue List their own default Step times Back times and Release times Your console worklights can have separate levels Choose the desired levels in S3 HARDWARE SETUP You can right click to Clear or Copy the contents of the Hi...

Page 86: ...er Fade Then select the NEXT CUE to be linked to the first When controlling moving lights group multiple attributes together and control them simultaneously by holding down combinations of S1 S4 and rolling the level wheel Palettes can be nested If you build Position A from raw values then build Position B using Position A updating Position A will affect Position B You can Flip moving head channel...

Page 87: ...Notes ...

Page 88: ...Part No 2 450181 010 ...

Reviews: