Software Configuration
37
Palette II Lighting Control Console
Installation & Setup Guide
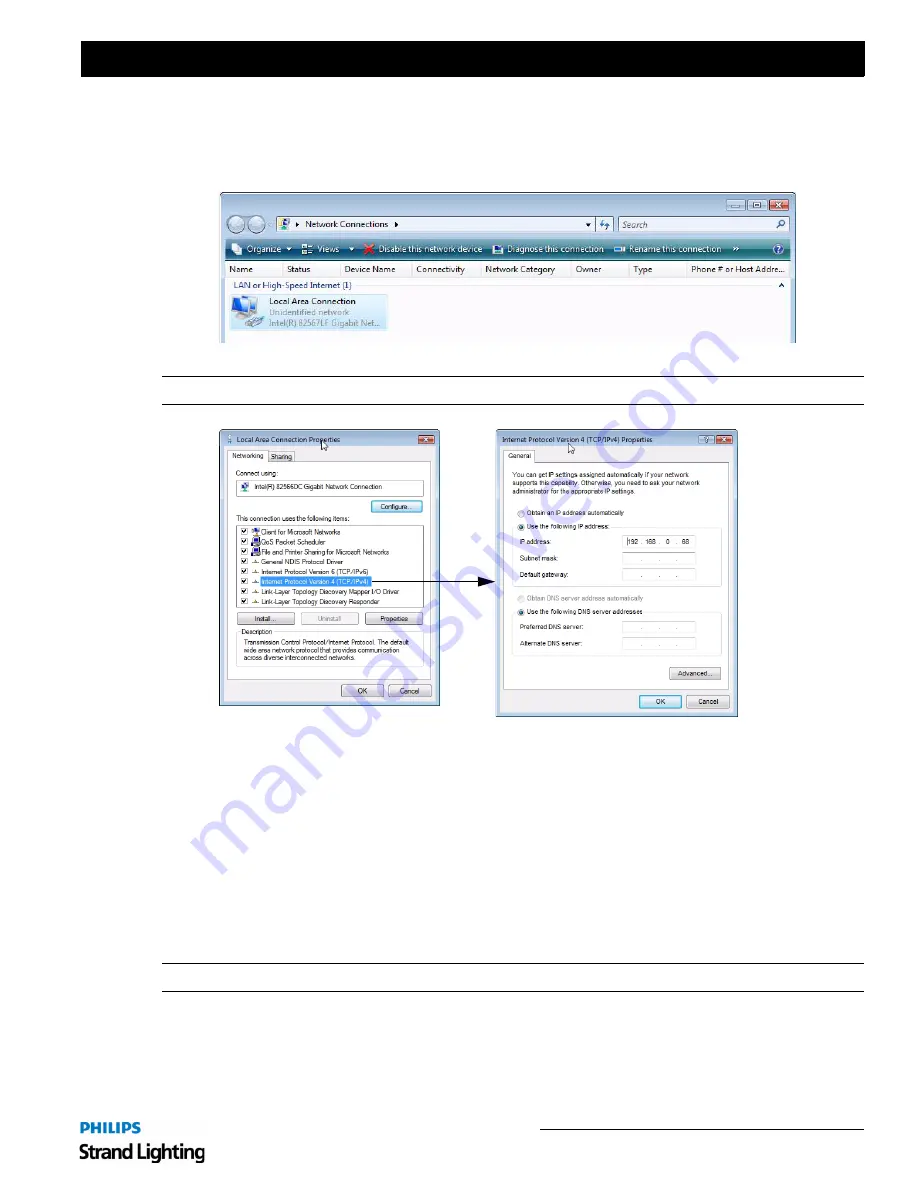
If a Static IP address is required, then follow the steps below to setup a network connection.
To manually setup a network connection:
Step 1. At Control Panel, click "Advanced Network" icon.
Step 2. Select "Local Area Connection" and then click "Change settings of this connection."
Note:
Default gateway and DNS server will not need to be set for all local networking solutions.
Step 3. At Local Area Connection Properties, select "Internet Protocol Version 4 (TCP/Pv4)" and click
"Properties."
a. Choose "Use the following IP address" (typically 192.168.0.68).
b. Type in the static IP address and appropriate Subnet mask provided by the network administrator.
c. Type in a Default gateway if access to an outside of the LAN connection (i.e. connect to other networks
or Internet) is required.
d. Type in a Preferred DNS (Domain Name Server) for computer and website lookups.
e. Click "OK."
f. Click "OK" in the "Local Area Connection Properties" dialogue box.
g. Close the "Network Connections" window.
Note:
There is no need to reboot the processor for network changes to take affect.
Summary of Contents for basicPalette II
Page 1: ......
Page 4: ...Installation Setup Guide Palette II Lighting Control Console ii Notes ...
Page 16: ...Installation Setup Guide Palette II Lighting Control Console 8 Overview Notes ...
Page 60: ...Installation Setup Guide Palette II Lighting Control Console 52 Controls Notes ...
Page 68: ...Installation Setup Guide Palette II Lighting Control Console 60 Setup Notes ...
Page 79: ...71 Palette II Lighting Control Console Installation Setup Guide A Specifications ...
Page 81: ...73 Palette II Lighting Control Console Installation Setup Guide B Software Tips ...
Page 87: ...Notes ...
Page 88: ...Part No 2 450181 010 ...


