background image

62

3.7 What Mode Detect Does

In the Mode Detect menu, you decide which of several actions are automatic or manual, and what 

types of messages will appear on the screen.

The Panther must know what type of source picture 
it is displaying: SXGA, UXGA, and others for com-
puter sources; NTSC, PAL, SECAM for video sources. 
This is the mode, the type of source picture the Pan-
ther will use. If the mode does not match the actual 
source picture, the image will be very distorted or 
may not display at all. 

To choose the mode automatically

• Press Auto Setup on the remote. 
• In the Source Select menu, select Find Mode and 

press 

ENTER

.

• Set Auto Detect on in the Mode Detect menu. 

Whenever the resolution changes, Find Mode 
starts and settles on the new one. 

To choose the mode manually, select Mode in the 
Source Select menu and press +/– until the right 
mode appears. 

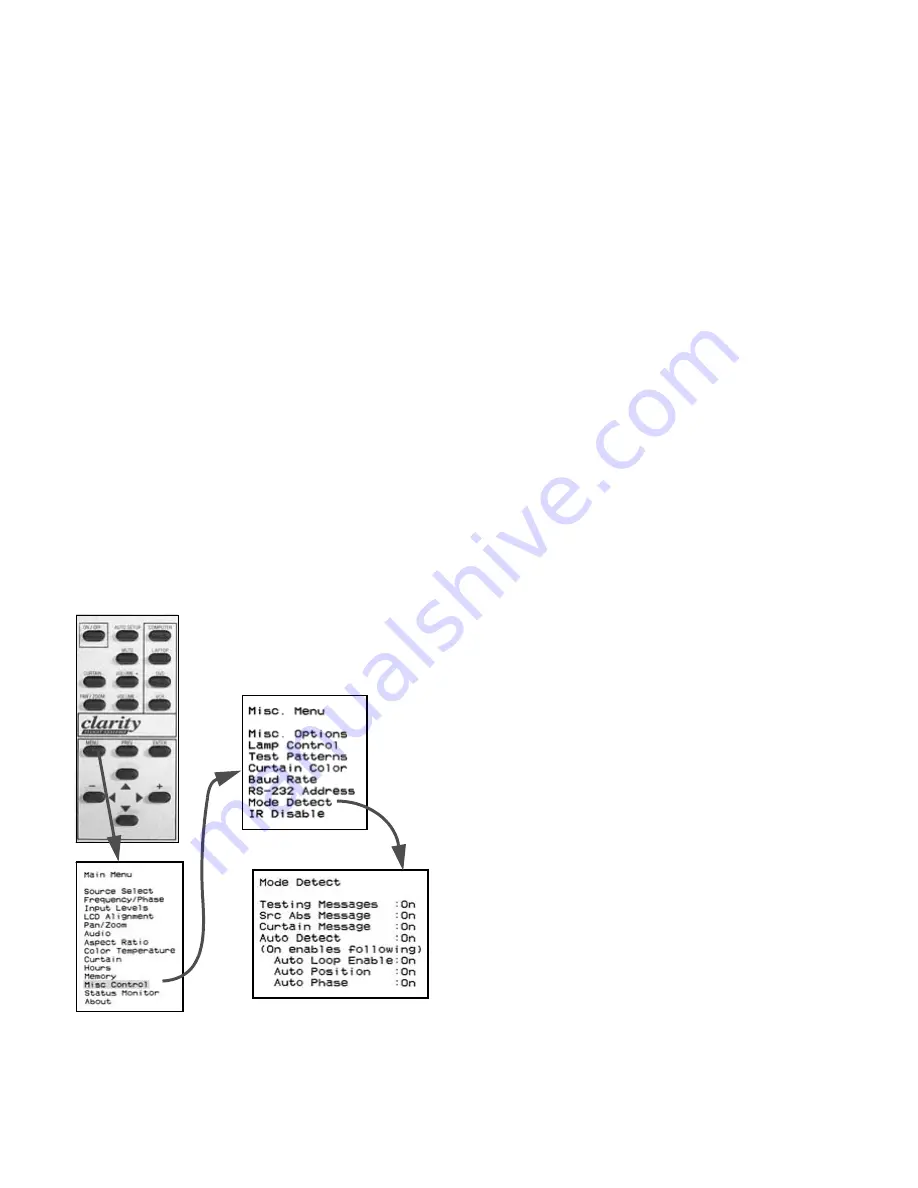
To open the Mode Detect menu, press 

MENU

 > Misc 

Control > Mode Detect.

Auto Detect On

When the source mode changes, for instance from 

UXGA to XGA, the Mode Detect process starts. If the 
Panther is successful in finding the mode, then

• if Auto Phase is On, phase is automatically set;
• if Auto Position in on, the pixel in the upper left 

corner of the picture is put in the upper left corner 
of the LCD.

If Auto Loop Enable is On, and the Panther cannot 
find the mode on the first try, it will keep testing and 
testing until it is successful. 

Auto Detect Off

The items below Auto Detect are grayed out when 

Auto Detect is off. If the mode changes, the Panther 
does not look for a new mode. However, when you 
press 

AUTO


SETUP

 or select and start Find Mode, Auto 

Detect goes through the mode search process once

If Freq/Phase or Position are On, these automatic 

systems will occur, even though they are grayed out in 
the Mode Detect menu. However, 

AUTO


SETUP

 and 

Find Mode make it happen only once, even if Auto 
Loop Enable is On. 

Messages

If Testing Messages is on, a message appears let-

ting you know what is happening during Auto Detect: 

• Testing H/V (separate H & V sync)
• Testing CMP (composite sync)
• Testing SOG (sync on green). 

If Src Abs Message is on, a sign saying, ‘Source 

Absent’ appears on the screen whenever there is no 
source on the selected connector. This message turns 
off after 30 seconds. 

When Curtain Message is on, a Curtain sign 

appears whenever you turn on the User Curtain. This 
message covers up either of the other messages. 

Lack of a valid source will also turn on the source 

absent Curtain. The default color is black, but you 
can change this in the Curtain menu. (See “Curtain 
and Its Colors” on page 86.)

Summary of Contents for PN-6730-UXP

Page 1: ...Panther PN 6730 UXP PN 6740 UXP Guide User ...

Page 2: ......

Page 3: ...i PN 6730 UXP PN 6740 UXP Panther 67 Display Unit User s Guide 070 0097 01 5 February 2003 ...

Page 4: ...or registered trademarks of their respective companies Disclaimer The information contained in this document is subject to change without notice Clarity Visual Systems Company makes no warranty of any kind with regard to this material While every pre caution has been taken in the preparation of this manual Clarity Visual Systems shall not be liable for errors or omissions contained herein or for i...

Page 5: ... actually exist and were not caused by accident misuse neglect alteration improper installation repair or improper testing Clarity will have a reasonable time to make repairs to replace Products or to credit Buyer s account LIMITATIONS Any written warranty offered by Clarity is in lieu of all other warranties express or implied Clarity neither assumes nor authorizes any other person to assume any ...

Page 6: ...iv ...

Page 7: ...necting Audio 28 2 7 Connecting RS232 Control Cables 30 3 Adjusting the Picture 33 3 1 Quick Selection and Adjustment 34 3 2 A Tour of the Remote Control 36 3 3 Selecting the Source 38 3 3 1 Audio Follows Picture Sources 40 3 4 Adjusting For a Good Picture 42 3 4 1 Adjustments for Computer and Laptop 44 3 4 2 More About Computer and Laptop 46 3 4 3 Adjustments for DVD and VCR 48 3 4 4 Setup for Di...

Page 8: ...ommand List 96 5 4 Index of RS232 Commands 104 5 5 Index of RS232 Codes 106 6 Troubleshooting 107 6 1 Solving Power and Startup Problems 108 6 2 Solving Image Problems 110 6 3 Reading the On Screen Diagnostic Code 112 6 4 Aligning the LCD 114 6 5 Getting Technical Support 116 7 Routine Maintenance 119 7 1 Changing Lamps 120 7 2 Changing the Air Filter 122 7 3 Cleaning the Screen Mirror 124 7 4 Upg...

Page 9: ...vii ...

Page 10: ...viii ...

Page 11: ...1 1 About the Panther 1 1 Questions About the Panther 2 1 2 Your Personal Safety Is Important 4 ...

Page 12: ...ve See facing page for a full list of acceptable resolutions and formats What options are available for the Panther There are two models PN 6730 UXP which does not have audio and PN 6740 UXP which has audio Beyond that there are no options What is the difference between the Panther UXP and the earlier model called Panther UX The Panther UXP has two lamps instead of four and it uses a redesigned il...

Page 13: ... 65 1344 70 56 5 75 1328 75 60 2 78 75 1312 80 64 85 5 1376 85 68 77 94 5 1376 1280 1024 SXGA 60 64 108 1688 60 a 63 5 109 9 1730 70 77 4 130 6 1726 75 80 135 1688 85 91 1 157 5 1728 1600 1200 UXGA 60 75 162 2160 640 480 MAC 67 34 97 31 33 859 832 624 75 49 72 57 28 1152 720 x 480p HDTV 60 31 54 27 858 1280 720p 60 45 74 25 1650 1920 1080i 30 33 75 74 25 2200 720 400 VESA 70 31 47 28 32 936 720 40...

Page 14: ...weighs about 350 lbs 160 kg and it is not designed to be lifted Roll it into place WARNING The lamps need very high voltages to ignite around 20 000 volts WARNING The lamps produce lots of light and UV radia tion ultra violet as well UV light can damage your retinas After the light leaves the lamps and passes through the LCD there is no more UV Never look directly a lamp that is lit WARNING The la...

Page 15: ...5 ...

Page 16: ...6 ...

Page 17: ... Connecting Power 14 2 5 Connecting Picture Sources 16 2 5 1 Using Analog Computer Sources 18 2 5 2 Using Digital Computer Sources 20 2 5 3 Using RGBS Sources 22 2 5 4 Using Composite and S Video Sources 24 2 5 5 Special Notes for 1080i 1024i Modes 26 2 6 Connecting Audio 28 2 7 Connecting RS232 Control Cables 30 ...

Page 18: ...structions that were on the outside of the container Tools 9 16 socket wrench At least two persons 1 Unbolt and remove top 1 Remove all 2 bolts 3 places on one vertical end 3 places on opposite vertical end 2 places 1 Remove L shaped side panel 1 Remove 3 bolts 2 at bottom edge 1 Remove remaining side panel ...

Page 19: ...son push up on end of Panther display Pull 5 strap first 2 Then pull 6 strap One end of packing case is now on the floor 1 Hold display to prevent it from rolling and remove 7 bolts 2 places 2 Roll Panther display slowly down the ramp 1 Panther out of packing crate Disassemble crate further for storage ...

Page 20: ...top or any other computer to the VGA connector on the left side of the Panther 4 If you are using sound from the laptop connect the sound output from the computer to the Lap top connector on the Panther s audio input panel at the rear right 5 Plug in the power cord to an AC socket Turn on the AC Master switch 6 For neatness dress the cords on the rear panel through the slot and out the bottom cuto...

Page 21: ... a Lamp On command Wait a few more seconds and try again When the Lamps start to turn on the Lamp LED next to the Lamp On switch on the front panel turns green 1 Press the Laptop button on the front panel Or on the remote The Laptop LED on the front panel will be green if the source picture is valid amber if it is not valid or missing 2 Control the volume of sound with the two but tons beneath the...

Page 22: ...he Panther from its shipping container page 8 and roll it into place 2 Connect a AC power 14 b picture sources 16 26 c and audio sources 28 Electronic setup 1 Select the source picture 38 2 If using a computer source a adjust to the computer s picture levels 46 b and frequency and phase 46 3 If using a video source adjust color and bright ness if necessary 48 4 Select a Color Temperature for the p...

Page 23: ...13 ...

Page 24: ...a circuit breaker It lights when the switch is ON and AC power is available to it The AC Master is not lit if it is OFF or there is no AC power available If there is an overload the circuit breaker switch will move to the OFF position Reset the breaker by switching it to the ON position However a circuit breaker that trips is a sign of trouble Find the trouble first or call a qualified service per...

Page 25: ...15 AC Master switch AC power in ...

Page 26: ...h DVI loop thru is not infinite DVI inputs require much less setup and adjust ment You adjust the picture in the first Panther only the one with the analog input Setup time is reduced What s in a name The inputs Computer and Laptop are identi cal You can use the Computer Analog 1 input with a laptop computer And you can plug a tower computer into the Laptop Analog 2 input In the same way the S Vid...

Page 27: ...17 Video inputs and outputs as seen from the rear of the Panther The Analog 2 In connector is initially connected to the Laptop connector on the side of the Panther ...

Page 28: ...ered output for loop thru The Analog 2 Input is initially connected to the Laptop connector on the side of the Panther The range of supported computer resolutions including refresh vertical rate is listed in the table on the facing page The electronics module as seen from the rear of the display Picture Source Connectors Picture comes in Selected with Remote Picture goes out Analog 1 Computer butt...

Page 29: ... 65 1344 70 56 5 75 1328 75 60 2 78 75 1312 80 64 85 5 1376 85 68 77 94 5 1376 1280 1024 SXGA 60 64 108 1688 60 a 63 5 109 9 1730 70 77 4 130 6 1726 75 80 135 1688 85 91 1 157 5 1728 1600 1200 UXGA 60 75 162 2160 640 480 MAC 67 34 97 31 33 859 832 624 75 49 72 57 28 1152 720 x 480p HDTV 60 31 54 27 858 1280 720p 60 45 74 25 1650 1920 1080i 30 33 75 74 25 2200 720 400 VESA 70 31 47 28 32 936 720 40...

Page 30: ...tal Output is always the picture on the selected input Digital pictures may also have video characteristics when a video picture is looped out of the Digital Out connector and video is the selected source The electronics module as seen from the rear of the display Picture Source Connectors Picture comes in Selected with Remote Picture goes out Analog 1 Computer button Analog 1 and Digital Analog 2...

Page 31: ... 65 1344 70 56 5 75 1328 75 60 2 78 75 1312 80 64 85 5 1376 85 68 77 94 5 1376 1280 1024 SXGA 60 64 108 1688 60 a 63 5 109 9 1730 70 77 4 130 6 1726 75 80 135 1688 85 91 1 157 5 1728 1600 1200 UXGA 60 75 162 2160 640 480 MAC 67 34 97 31 33 859 832 624 75 49 72 57 28 1152 720 x 480p HDTV 60 31 54 27 858 1280 720p 60 45 74 25 1650 1920 1080i 30 33 75 74 25 2200 720 400 VESA 70 31 47 28 32 936 720 40...

Page 32: ...lay on three or four BNC connectors you will need to provide an adapter to 15 pin RGB inputs can be in computer like format in which case the range of acceptable resolutions is the same as for the Analog inputs as shown in the table The electronics module as seen from the rear of the display Picture Source Connectors Picture comes in Selected with Remote Picture goes out Analog 1 Computer button A...

Page 33: ... 65 1344 70 56 5 75 1328 75 60 2 78 75 1312 80 64 85 5 1376 85 68 77 94 5 1376 1280 1024 SXGA 60 64 108 1688 60 a 63 5 109 9 1730 70 77 4 130 6 1726 75 80 135 1688 85 91 1 157 5 1728 1600 1200 UXGA 60 75 162 2160 640 480 MAC 67 34 97 31 33 859 832 624 75 49 72 57 28 1152 720 x 480p HDTV 60 31 54 27 858 1280 720p 60 45 74 25 1650 1920 1080i 30 33 75 74 25 2200 720 400 VESA 70 31 47 28 32 936 720 40...

Page 34: ...s particularly the ones that come free with VCRs are low quality Looping through a series string of these will quickly degrade the picture The usual effect is loss of chroma color The electronics module as seen from the rear of the display Picture Source Connectors Picture comes in Selected with Remote Picture goes out Analog 1 Computer button Analog 1 and Digital Analog 2 Laptop button Analog 2 a...

Page 35: ...25 Video Formats Supported in Composite and S Video Connectors Name Active lines Vertical Rate Horizontal Rate NTSC 525 60 Hz 59 94 15 734 kHz PAL 625 50 Hz 15 25 kHz SECAM 625 50 Hz 15 25 kHz ...

Page 36: ...en fields producing a broken looking picture This effect appears only in Wall Mode but it may come and go as you move the picture with Position To fix this open the Misc Options menu Use the LEFT and RIGHT arrow keys on the remote to turn Invert Odd Even on and off This toggle changes which of the two interlaced fields is regarded by the electronics module as the first field It doesn t matter whet...

Page 37: ...27 ...

Page 38: ... input Select a picture source also selects the audio source as shown opposite The Digital picture input is associated with the Computer Analog 1 audio input Variable Line Out The Line Out connectors are line level You must have an external amplifier to drive external speakers The Line Out level is variable that is the volume control affects both the internal speakers and the level from the Variab...

Page 39: ...29 Each video input is associated with an audio input The Digital input is associated with the Computer audio input ...

Page 40: ...pter to go from the computer s 9 pin serial output connector to an RJ 45 connector Adapt ers of this type are readily available at computer and electronic supply stores You will only need one adapter all the rest of the connections will be RJ 45 to RJ 45 The adapter is not pre wired You will make three connections inside the adapter as described on the facing page and in Connector Diagrams on page...

Page 41: ... use a standard RJ45 to 9 pin adapter and connect it internally as shown The wiring shown for this adapter is correct for straight thru cables Straight thru cables are wired 1 to 1 2 to 2 etc Yellow wire pin 3 Black wire pin 2 Green wire pin 5 RJ45 9 pin 6 3 5 5 3 2 Connector panel seen from rear ...

Page 42: ...32 ...

Page 43: ...uter and Laptop 44 3 4 2 More About Computer and Laptop 46 3 4 3 Adjustments for DVD and VCR 48 3 4 4 Setup for Digital Sources 50 3 4 5 Color Temperature 52 3 5 Making the Picture Fit the Screen 54 3 5 1 Pan and Zoom 56 3 5 2 Adjusting the LCD Position 58 3 6 Lamp Control and Lamp Resting 60 3 7 What Mode Detect Does 62 3 8 Saving the Settings 64 3 8 1 How to Save 66 3 8 2 Recalling What You Save...

Page 44: ...ptop You can make a black picture quickly with Windows Paint program 4 On the remote press MENU Input Levels ENTER Auto Black Adjust ENTER Black Level must be finished before White Level 5 Display a white picture from the laptop Make one with Windows Paint 6 Select Auto White Adjust down arrow in the Analog Level menu and press ENTER The Panther is now adjusted for this laptop 7 If necessary press...

Page 45: ...pty memory no mark and press enter Saving and Naming Memories d and press ENTER e Use the up down buttons to write anything Use the left right buttons to move sideways f Press PREV to exit The name you wrote now appears at the top of the list when that number is selected d Press the up arrow ...

Page 46: ...two Volume buttons change the vol ume and open the Audio menu which has Balance and other controls for ste reo sound Mute turns off all sound Turns the lamp on and off Turns on and off a curtain which is usually black and blocks all pictures Opens the Pan Zoom menu to enlarge or shrink the pic ture slightly and to move it up down and right left Makes the Panther seek and find the cor rect resoluti...

Page 47: ...evious menu sometimes and closes the last menu Goes to the selected menu Enters the value Confirms the action For action in the Pan Zoom menu see Pan and Zoom on page 56 Moves the highlight up and down Changes the selected value For action in the Pan Zoom menu see Pan and Zoom on page 56 ...

Page 48: ...e than that Mode also means the vertical frequency the number of blank lines at the bottom of the picture which you don t see and the number of blank pixels at the end of each line which you also don t see During the Mode Detect cycle the Panther looks at the incoming picture and determines how to set itself to display the picture properly This takes sev eral seconds and during this time the curta...

Page 49: ...er Auto Detect is on or off you can force Mode Detect by pressing Auto Setup in the remote This is the relationship between the source select buttons on the remote and the connectors in the back of the Panther ...

Page 50: ...deo together These optional connectors are in the right hand section at the rear of the Panther The Variable Line Out connectors provide a way to feed the audio to an external amplifier and speak ers It is labeled Variable because the Panther s vol ume control does affect this output level If you use the Digital connector for a picture source connect its audio to the Computer Analog 1 connec tors ...

Page 51: ...41 Picture connectors seen from the rear Audio connectors seen from the rear Digital connector uses Computer Ana log 1 audio in ...

Page 52: ... may vary in color or brightness One may look washed out the other may have no detail in the darker areas Fortunately Panther has an excellent way to over come these differences And it only takes a few min utes Most of these adjustments quick and easy You only have to open a menu and push a button and the Panther does all the rest The table on the opposite page shows which adjustments you need to ...

Page 53: ...er Analog 2 Laptop Black Level page 44 White Level page 44 Frequency Phase page 46 S Video DVD Composite VCR Brightness all on page 48 Contrast Hue Saturation Digital none For all inputs you may want to adjust these Position Pan up down right left Zoom in or out Aspect ratio Color Temp ...

Page 54: ...vel The process takes about one second If the picture is not close enough to black a message appears This prevents adjusting the black level when the picture is white but it does not prevent other mistakes Auto White Adjust You must do Black Adjust first 1 Show a white picture from the computer that will be used for program material If the Analog Level menu is still visible skip to Step 4 2 Press ...

Page 55: ...e black and white lev els using the Auto Level With the highlight on All as shown here the and arrow keys change all three Black Levels together With the highlight on Green as shown here the and arrow keys change only the Green Level of Black Adjust Manually adjusting black and white levels ...

Page 56: ...uter used for the program material It does not work to set these levels with one computer and then connect a different computer as the source of the program material Adjusting the Frequency also changes the width of the picture However do not use this control for width adjustment Use Pan Zoom The numbers for Frequency and Phase do not have any meaning They are there just to let you know which way ...

Page 57: ...47 Select Find Phase or Find Freq Phase and If auto won t work with this picture If the currently selected source is NOT Computer or Laptop this message appears If automatic Find works ...

Page 58: ...e Sample val ues are at 001 the color range for the displayed image will decrease 5 Display an all white image from the video source Frame 50823 on Reference Recordings A Video Standard test disk has this picture 6 Set the Sample values for R G and B as close to 254 as possible while keeping the Contrast num ber as low as possible a If the initial Sample values are less than 254 increase the Contr...

Page 59: ...49 Saturation Match Match Adjust Saturation so the outside bars match when Blue Only is checked Match Match Hue Adjust Hue so inside bars match when Blue Only is checked ...

Page 60: ...d Mode and press ENTER Level and Freq Phase adjustments to not apply to digital pictures so these two will not function even if they are on in the Mode Detect menu Auto Position will run if it is on If you try to enter the Frequency Phase menu when Digital is the current source you get Black and White Level do not apply to digital pic tures either If you try to open the Input Level menu when Digit...

Page 61: ...51 ...

Page 62: ...tely for each memory See Adjustments for DVD and VCR on page 48 Custom Color Balance If you want to adjust the overall colors more pre cisely select Custom Color Balance and press ENTER This opens the Color Balance menu Values for White balance and Gray balance will already be established by the Color and Gamma set tings above The White balance controls adjust the overall hue and brightness of the...

Page 63: ...53 ...

Page 64: ...at the top and bottom The system expands the picture horizontally until it fits the screen no distortion 1 Fill the screen for height without distortion and let the sides be cropped off The system expands the picture vertically until if fits the screen no distortion 1 Fill the screen for width and stretch it to fit verti cally The system expands the picture horizontally until it fits the screen th...

Page 65: ...ram shows the possibili ties available when the aspect ratio of the source picture is greater than 1 33 Fill Bottom Top Center Fill Right Center Left Image Fit Horizontal Image Fit This diagram shows the possibili ties available when the aspect ratio of the source picture is less than 1 33 ...

Page 66: ...oom Press ENTER to move the highlight selector to Zoom Use the left right arrow keys to zoom the pic ture larger and smaller Zoom occurs from the center in all four directions Default Press ENTER to move the highlight selector to default and press the left arrow key This restores the default size zoom of the picture and moves the upper left corner of the picture to the upper left cor ner of the sc...

Page 67: ...57 ...

Page 68: ... or Horizontal and use the left right buttons to change the position The but tons drive motors that turn completely so the left or right button may move the pattern in either direc tion Press and hold for continuous motion Adjust the pattern to hide about 3 pixels at each edge Size Size in adjusted by rotating the objective lens The objective lens is the lens that points up at the mirror You can s...

Page 69: ...59 LCD rotated left side down Move left edge up or right edge down LCD shifted sideways to the left LCD image too small Rotate with lens LCD squarely aligned and the correct size ...

Page 70: ...or two If Lamp Count is 1 and Lamp Con trol is on when one lamp fails the other will turn on to provide backup Lamp Rest is the feature that cycles the lamps every 24 hours It is either Enabled are Disabled See the Lamp Count 2 and Lamp Count 1 tables above Rest Starts at sets the hour when lamp resting starts You can set the hour 24 hour time only not the minutes Current Time shows the present ti...

Page 71: ...ng will not happen Lamp resting is not required It is recommended by the lamp manufacturer At the time of this writing there is no hard data comparing lamp life with and without resting What if one lamp has failed If one of the lamps has already failed when the Rest time comes around no resting occurs If the lamp that was off fails to turn on the first lamp does not go off ...

Page 72: ...ft corner of the picture is put in the upper left corner of the LCD If Auto Loop Enable is On and the Panther cannot find the mode on the first try it will keep testing and testing until it is successful Auto Detect Off The items below Auto Detect are grayed out when Auto Detect is off If the mode changes the Panther does not look for a new mode However when you press AUTO SETUP or select and star...

Page 73: ...ether Find Mode is started automatically or manually it starts seek ing the mode Analog and Digital sources only If Auto Phase is on the Panther starts to find the correct phase If Auto Position is on the Panther puts the upper left corner of the picture in the upper left corner of the screen This is very fast and you may not see Auto Pos in the menu ...

Page 74: ...hat must change during a program Active Settings is RAM Whatever is here determines how the picture is displayed All memories store set tings from this RAM and recall settings to it The table shows what is saved in the numbered memories what is saved globally and what is not saved in the memories at all Everything saved in numbered memories is also saved in source memo ries when the source is chan...

Page 75: ...Recall AC on Analog 1 memory Digital memory S video memory C video memory Analog 2 memory Memory 71 Memory 72 Close menu remote idle 5 sec Any change made with menus or RS232 or Auto Detect Current Settings memory Switch sources Switch sources ...

Page 76: ...CMPTR After Step 3 above do this 1 Press the up arrow This moves the highlight to Name 2 To erase the current name press ENTER Then use the up down arrows to cycle through letters numbers and punctuation Use the left right arrows to move along the line 3 To make a space move right with the arrow 4 When the name is complete press ENTER This moves the highlight on Yes 5 Press ENTER again to save the...

Page 77: ...p arrow to highlight Name Press ENTER to erase the current name Use the arrow keys to move left and right Use the up down keys to write the name you want Press ENTER to move down to Yes Press ENTER again to save this memory The new name now appears at the top of the Save list ...

Page 78: ... will open 4 At the bottom of the menu Yes should be high lighted Press ENTER How to read the Save Recall menus By default the Save and Recall menus show the memory number selected source mode of that source If you wrote a custom Name for the memory this name shows instead of the default name Selected source Mode SVGA 800 600 etc is the mode for computer sources The number following this is the re...

Page 79: ...69 ...

Page 80: ...e Settings and press ENTER 4 Arrow up down or sideways to highlight the mem ory you want to delete If the memory is not cur rently used it will be grayed out and unchecked Otherwise it will be bold and the box will be checked 5 Press ENTER 6 The Delete menu will appear as shown opposite with the number of the memory that you want to delete next to the Delete title Be sure that is the memory you wi...

Page 81: ...71 ...

Page 82: ...72 ...

Page 83: ...her 4 1 Controlling the Lamps 74 4 2 Controlling Audio 76 4 3 Reading the Inside LEDs 78 4 4 Reading the Status Menus 80 4 5 The Hours Menu 82 4 6 Setting Some Conditions 84 4 7 Curtain and Its Colors 86 4 8 Test Patterns 88 ...

Page 84: ...ng The system is currently trying to light this lamp If the lamp is good this process will take only a few seconds If the lamp is not good this could take more than a minute Failed The system tried this lamp but it would not light Shutdown The system is about to turn this lamp off If a lamp fails to light on the first try the system waits 2 seconds and tries to ignite that lamp again It tries 15 t...

Page 85: ...75 ...

Page 86: ... lowers the sound level of the inter nal speakers and the external speakers if you have them connected Mute turns off or on the sound for internal and external speakers Loudness boosts the bass and treble Int Spkrs turns off or on the internal speak ers but leaves the external speakers untouched Tone Treble adjusts the relative volume of the highs Bass adjusts the relative volume of the lows Balan...

Page 87: ...77 Volume buttons are beneath the panel Volume up Volume down ...

Page 88: ...s a thermal cutoff switch not associated with the temperature sensors If either of these opens this LED turns red and the lamps will not light The Interlock LED will turn green when the Lamp Bay door is closed again or the thermal cut off switch is reset See Lockout below Lockout is red whenever the Interlock LED turns red As long as it is red you cannot light the lamps The only way to turn off th...

Page 89: ...e approach ing limit RS232 Data On green for one second when any RS232 data is received RS232 CMD On green for one second when data for this cube is received Remote IR Flickers whenever IR is detected from any source including Remote Standby Normal lamps on Ready for Lamp ON command Lockout Normal Standby or lamps on Lamps can t be lit during this time wait An interlock or other failure event occu...

Page 90: ...How to Save on page 66 Serial Status Current setting in the Baud Rate menu page 92 Current RS232 address settings page 92 Number of messages Received and Transmitted for each of the four ports Port 1 is RS232 In and Out Port 2 is the Load Date and Trace connectors Bottom four rows show Parity errors not used Overrun of UART capacity Breaks in reception or transmission and Framing errors on the two...

Page 91: ...81 ...

Page 92: ... the optical engine have been used You cannot reset this Lamp Hours should show how long the lamp has been used You can reset these times Lamp Hours will only be accurate if you take care to reset the hours when the lamp is changed and not reset hours otherwise Lamps are not warranted to last for any particular number of hours A lamp life of 6 000 hours means that half the lamps in a large sampnle...

Page 93: ...83 ...

Page 94: ...all remote control buttons are disabled This is useful to prevent accidental changes to the settings The Lamp Off button will still turn off the lamps in this condition and when they are turned back on IR is not disabled To enable IR control again without having to turn off and on the lamps press ENTER The IR Disable menu opens with the highlight on No Press ENTER again and all remote buttons oper...

Page 95: ...85 ...

Page 96: ...rtain and press ENTER 3 Highlight Curtain Colors and press ENTER 4 Select the condition and press ENTER 5 Select the color 6 Press PREV to return to back up and select another condition or press PREV several times to back out of the all menus For most applications the screen should be black under each of these conditions and this is the default setting However you may set them differently so you w...

Page 97: ...87 Turns on or off the User curtain immediately without showing a menu ...

Page 98: ... Gray is also used for color balancing and you can turn it on from the Color Balance menu Red Green and Blue can be used to look for stuck pixels Alignment is used to adjust the position and size of the LCD s image This pattern has a series of short dashes all around the edge of the picture The dashes indicate the outside six pixels on each edge Geometry is used to adjust the position and size of ...

Page 99: ...89 ...

Page 100: ...90 ...

Page 101: ...91 5 Controlling with RS232 Commands 5 1 Controlling the Displays with RS232 92 5 2 Sending RS232 Commands 94 5 3 RS232 Command List 96 5 4 Index of RS232 Commands 104 5 5 Index of RS232 Codes 106 ...

Page 102: ...e left right arrow keys to change the Group Address Range 0 15 which is 0 F in hexadecimal notation 3 Highlight Unit and choose Unit Address for this display The addresses are shown in both hex 0 9 A F and decimal 00 15 When sending commands to displays with RS232 you always use the hex form of the address 1 Press PREV the menus What address to use You may address the displays with any addressing ...

Page 103: ...93 ...

Page 104: ...l the displays with an address starting in 0 turn on their lamps In single address only one display responds to the command If the command is 0203PON 03 then only display 03 will turn on its lamps In single address and only in single address the dis play responds to the computer acknowledging the command Acknowledging commands A display acknowledges a command only if the command is addressed to it...

Page 105: ...2A 74 4A J 106 6A j 11 0B 43 2B 75 4B K 107 6B k 12 0C 44 2C 76 4C L 108 6C l 13 0D 45 2D 77 4D M 109 6D m 14 0E 46 2E 78 4E N 110 6E n 15 0F 47 2F 79 4F O 111 6F o 16 10 48 30 0 80 50 P 112 70 p 17 11 49 31 1 81 51 Q 113 71 q 18 12 50 32 2 82 52 R 114 72 r 19 13 51 33 3 83 53 S 115 73 s 20 14 52 34 4 84 54 T 116 74 t 21 15 53 35 5 85 55 U 117 75 u 22 16 54 36 6 86 56 V 118 76 v 23 17 55 37 7 87 5...

Page 106: ... data in the response Set is followed by a value in binary hex or ascii text as noted Set commands can be addressed to individual dis plays or to groups substitute an ascii character for this symbol in the com mand line substitute a binary hex value for this symbol in the command line R o w Function RS232 Commands RS232 Data Comments Incr Decr Get Set System Controls 1 Lamp On Off PON POF PO State...

Page 107: ...nt lamp Etc 13 Lamp Status LA Send LA where is lamp number 1 or 2 Responses are LAN lamp on LAF lamp off LAK lamp striking LAS lamp shutting down LAD lamp failed 14 Read Lamp Hours L see Com ments Requires two commands to get value L1 Get Front Lamp high byte L2 Get Front Lamp low byte L3 Get Rear Lamp high byte L4 Get Rear Lamp low byte 15 Lamp Hours Reset LR Reset Lamp Hours to zero Lamp number ...

Page 108: ...lobal settings SAA Saves all settings not assigned to memory numbers 26 Auto Save SV0 SVW1 SV 0 off 1 on 27 H in V sync HV1 HV0 HV 0 off no H in V sync prevents system from sensing no H in V sync as a fault 1 Normal H is in V sync Input Level 28 Auto adjust White Input Level AWL 29 Input White Level Adjust ALL LAU LAD IA 0 255 30 Input White Level Adjust Red LRU LRD LR IR 31 Input White Level Adju...

Page 109: ...y GBU GBD GB RB 51 Gamma Control GON GOF GO 1 on 0 off Auto Detect 52 Auto Detect AT0 AT1 AT 0 Auto Detect off 1 Auto Detect on 2 Actuate Auto Detect one time 53 Source Absent Message AS0 AS1 AS 0 Source Absent messages off 1 Source Absent messages on 54 Curtain Message CM0 CM1 CM 0 off 1 on 55 Auto Message AM0 AM1 AM 0 Auto Detect messages off 1 Auto Detect messages on 56 Auto Frequency Phase AF ...

Page 110: ... Green TG Set test signal green level 0 255 72 Test Signal Data Blue TB Set test signal blue level 0 255 Temperature Fans Motors 73 Temperature Sensors T see Com ments Temperature Sensor 1 4 Response is binary C temp of sensor 74 Fan Status FS Get Fan status 1 bit for each fan 0 Power Supply Fan 1 Exhaust Fan 1 2 Exhaust Fan 2 75 LCD Motor motorRight Edge M1F M1B The directions F B Forward Back in...

Page 111: ...irst Display is updated when the low byte is sent 98 Get Set Saturation high byte F5 E5 99 Get Set Saturation low byte F6 E6 100 Hue D4U D4D 512 to 512 0 is default Send high byte first Display is updated when the low byte is sent 101 Get Set Hue high byte F7 E7 102 Get Set Hue low byte F8 E8 Audio Controls 103 Volume VAU VAD VA SV 0 100 VAU and VAD adjust volume by one unit of audio resolution Vo...

Page 112: ...d UNK Unknown command 119 Parameter Error ERR Parameter outside range R o w Function RS232 Commands RS232 Data Comments Incr Decr Get Set R00 R01 R02 R10 R11 R12 R20 R21 R22 R30 R31 R32 R40 R41 R42 R50 R51 R52 R60 R61 R62 R70 R71 R72 R80 R81 R82 The RS232 codes here produce the effect of pushing the corresponding buttons on the remote control For instance sending the code 05R20 will toggle the Cur...

Page 113: ...103 ...

Page 114: ...rizontal Aspect Ratio 78 Horizontal LCD Motor 76 Hours Lamp Read 14 Hours Runtime Read 18 19 Hours System Read 16 17 H Position Left Right 5 Hue 100 I ID version 113 Input Black Offset Adjust ALL 34 Input Black Offset Adjust Blue 37 Input Black Offset Adjust Green 36 Input Black Offset Adjust Red 35 Input Level 27 28 33 Input Level Data Blue 40 Input Level Data Green 39 Input Level Data Red 38 Inp...

Page 115: ...t Signal Black Field 61 Test Signal Blue Field 65 Test Signal Data Blue 72 Test Signal Data Green 71 Test Signal Data Red 70 Test Signal Geometry 67 Test Signal Gray Scale 68 Test Signal Green Field 64 Test Signal inquiry 69 Test Signal Red Field 63 Test Signal White Field 60 Test Signal Disable 59 U Unknown Command 118 UXGA 21 V Version ID 113 Vertical Aspect Ratio 79 Vertical Position 4 VESA 21 ...

Page 116: ...D number 101 DB 98 DG 98 DR 98 99 E ERR 102 F F number 101 FR 96 FS 100 FW 96 G GB 99 GE 100 GE1 100 GG 99 GO 99 GR 99 GRN 100 GRY 100 H HF 96 HP 96 HV 98 I IA 98 IB 98 IG 98 IM 98 IN 98 IO 96 IR 98 L L 97 LA 97 98 LB 98 LC 97 LF 99 LG 98 LR 97 98 M M number 100 N NAK 102 O OA 98 OB 98 OD 98 OR 98 P P00 102 PH 96 PNG 102 PO 96 PR 96 PW 96 Q QA 98 QB 98 QG 98 QR 98 R RB 99 RC 98 RED 100 RG 99 RH 97...

Page 117: ...107 6 Troubleshooting 6 1 Solving Power and Startup Problems 108 6 2 Solving Image Problems 110 6 3 Reading the On Screen Diagnostic Code 112 6 4 Aligning the LCD 114 6 5 Getting Technical Support 116 ...

Page 118: ... the remote or RS232 or Auto Lamp On 5 All fans run The system attempts to ignite each lamp in turn with a one second delay between each lamp start It always starts with Lamp 1 fol lowed by lamp 2 If the Lamp Bay door is open and its interlock switch is open no lamps will ignite If lamps are already on when the door opens they all go off When the Lamp Bay door is opened the Lockout LED goes red To...

Page 119: ... lit Any inside LEDs red AC Master switch lit No Yes Check AC source turn switch on Check Power Supply and Electronics Module No Interlock LED red No Yes Lockout LED red Close Lamp Bay cover No Yes Turn AC Master switch off then turn it back on Yes Both lamp LEDs red Yes Startup was successful Yes No Any Fan LED red No Try new lamps check ballast connections Yes Check that fan replace if necessary...

Page 120: ...nts for Computer and Laptop on page 44 There is a dark line of no video on the top bottom left or right side Go to Check the Aspect Ratio setting as described in Pan and Zoom on page 56 and Adjusting the LCD Position on page 58 The image is too large or too small This may be due to improper lens adjustment Check this at Adjusting the LCD Position on page 58 If you are using Clarity s Big Picture i...

Page 121: ...111 ...

Page 122: ...ENTER you will see the On Screen Diagnostic Code This will usually be a steady amber light The code is built so you can read it even if you have trouble seeing color One color always stays on three times as long as the other so you can read the code by the sequence of colors or by the time sequence Panther UXP On Screen Diagnostic Codes Condition Priority Each block represents 0 2 seconds Starts w...

Page 123: ...re approach ing limit RS232 Data On green for one second when any RS232 data is received RS232 CMD On green for one second when data for this cube is received Remote IR Flickers whenever IR is detected from any source including Remote Standby Normal lamps on Ready for Lamp ON command Lockout Normal Standby or lamps on Lamps can t be lit during this time wait An interlock or other failure event occ...

Page 124: ...screen no matter how far you move the LCD horizontally If this happens highlight Alignment Dashes again and press the or a few times to make all six dashes appear Then move the highlight up to the three motor controls and continue 8 There is also a Geometry Pattern which has three pixels on the outside border and one pixels boxes 9 Adjust the LCD to hide the number of pixels shown in the table 10 ...

Page 125: ... the picture is rotated use the Left or Right Edge controls If the picture is moved left or right use the Horizontal control This is the Geometry Pattern If the picture is too small rotate the lens clockwise ...

Page 126: ...you see Un helpful language It looks funny The picture doesn t look right The image is bad It isn t working Helpful language I see horizontal streaks from the right side of high contrast edges A solid green background has vertical bands in it Whenever I try to _______ I get a message on the screen that says _________ The lamp did not come on When I swapped it with another lamp it still did not com...

Page 127: ...117 Arrow points to the serial number Serial number sticker showing location of the serial number ...

Page 128: ...118 ...

Page 129: ...119 7 Routine Maintenance 7 1 Changing Lamps 120 7 2 Changing the Air Filter 122 7 3 Cleaning the Screen Mirror 124 7 4 Upgrading Firmware 126 ...

Page 130: ... move the ballast out of the way 7 Release the clips on either side of the lamp open them all the way 8 Slide the lamp assembly straight back and lift it out It is a requirement to cycle power off and then on whenever the Lamp Bay door is opened Neither lamp will light unless you do this To install lamps If you have just removed a lamp and everything is still open skip to Step 3 1 Turn off the AC ...

Page 131: ...121 Lamp Bay from rear Rear lamp removed Remember You must cycle the AC power after you change lamps Turn it off then on again ...

Page 132: ...er at one cor ner and remove the filter 5 Install the new filter with the wire side facing inside 6 Close the Air Intake Bay door and be sure the pins go in their proper holes CAUTION The spring loaded pins must be visible on the top of the cover as you close it 7 Close the rear panel 8 At the Electronics Bay reconnect the power cord and turn on the main power switch To clean the air filter If the...

Page 133: ...take Bay is below Audio Input panel Pull in two spring loaded pins at rear and lift cover Inside the Air Intake Bay as seen from the front You will be looking at it from the rear Screw holding air filter bracket ...

Page 134: ...it dry Wipe up the powder with a clean dry cloth Cleaners NOT to use Do not use any cleaner that has an abrasive mate rial such as sink and porcelain cleaners or clean ing compounds that contain pumice These damage the anti reflective coating Do not use alcohol on the screen unless you use it in very small very controlled areas not near the edge Alcohol will dissolve some of the material of the bl...

Page 135: ...125 ...

Page 136: ... clarityvi sual com Reseller area Check the current firmware version Look at the About menu MENU About to see if you need to upgrade Connect the PC to the Use a female 9 pin to RJ45 adapter available at electronics and computer stores and wire it as shown Connect a straight thru cable with RJ45 connec tors at each end computer network cable from the adapter to the Load Data connector Do NOT use th...

Page 137: ... upgrade firmware is an executable file Click on the file name to start the download and follow the on screen instructions 1 You see this screen first 2 Then you see this one 3 In the third screen you choose the Comm Port in an strange way 4 If you have trouble this is how to abort Clicking OK on this screen starts the download ...

Page 138: ...128 ...

Page 139: ...132 Audio 132 Aspect Ratio 133 Color Temperature 133 Curtain 134 Hours 134 Save 135 Recall 135 Delete for details see page 70 135 Misc Control 136 Status Monitor 137 Prev 138 Enter 138 8 2 On Screen Diagnostic Codes and LEDs 140 8 4 Glossary of Terms 144 8 5 Regulatory Information 148 8 6 Specifications 150 ...

Page 140: ...130 8 1 Menu Structures Source Select for details see page 38 Freq Phase for details see page 46 If Computer or Laptop is the selected source If Digital or DVD or VCR is the selected source ...

Page 141: ...31 Input Levelsfor details see page 44 and 48 If Computer Laptop is the selected source If DVD or VCR is the selected source If Digital is the selected source LCD Alignmentfor details see page 114 and 58 ...

Page 142: ...132 Pan Zoomfor details see page 56 In the Pan Zoom menu use ENTER to move the cursor Audiofor details see page 40 ...

Page 143: ...133 Aspect Ratiofor details see page 56 Color Temperaturefor details see page 52 ...

Page 144: ...134 Turns on or off the User curtain immediately without showing a menu Curtainfor details see page 86 Hoursfor details see page 82 ...

Page 145: ...135 Savefor details see page 66 Recallfor details see page 68 Delete for details see page 70 ...

Page 146: ...136 Misc Controlfor details see page 84 ...

Page 147: ...137 Status Monitorfor details see page 80 ...

Page 148: ...oom menu Enter moves the cursor from Pan to Zoom to Default and back to Pan Moves cursor highlight up and down Special up down up turns on the On Screen Diagnostic Code whether lamps are on or off Adjusts values Right moves to next menu when there is one In the Pan Zoom the left right keys are defined in the menu ...

Page 149: ...139 ...

Page 150: ...Amber R R Lamp failure either lamp 7 Amber R Amber Sensor approached limit 8 Amber R Standby state 4 9 Amber Amber Lamps on no alarms 10 Amber on continuously R Red 1 Sensor over limit and Temp Monitor is On 2 Conditions 1 2 3 or 4 will cause Lockout After fixing the problem you may see Condition 5 Lockout You must cycle AC power off then on to reset the Lockout condition 3 Sensor over limit and T...

Page 151: ...re approach ing limit RS232 Data On green for one second when any RS232 data is received RS232 CMD On green for one second when data for this cube is received Remote IR Flickers whenever IR is detected from any source including Remote Standby Normal lamps on Ready for Lamp ON command Lockout Normal Standby or lamps on Lamps can t be lit during this time wait An interlock or other failure event occ...

Page 152: ...ction 8 No connection RS232 In Out is same RJ45 connector viewed from the outside looking into it as the cable does 1 2 4 3 S Video In and Out female connector 1 Ground 2 Ground 3 Y Luma 4 C Chroma Wiring the adapter To change the RJ45 connectors to 9 pin D sub connectors use a standard RJ45 to 9 pin adapter and connect it internally as shown The wiring shown for this adapter is correct for straig...

Page 153: ...143 ...

Page 154: ...C Video Composite video a video distribution system in which all the video informa tion is sent on one wire DA Distribution amplifier a device that takes in one input and gives out many of the same type DAs are available for video computer and digital signals display One display unit without regard to others that may be in a wall with it See also cube unit DVI Digital Video Interface a standard fo...

Page 155: ...X Lion UX WN 6720 UX Panther UX PN 6740 UX PN 6730 UX Panther UXP Models WN 6740 UXP audio and WN 6730 UXP no audio a stand alone 67 display with 1600 1200 resolution two 200 watt lamps power supply The device that converts the mains AC voltage to other voltages that the rest of the display can use remote The remote control RGB Red green blue three parts of a video signal sent on separate wires RG...

Page 156: ...raphics Adapter a standard for distributing analog computer pic tures with a resolution of 640 pixels by 480 pixels video In this manual video means NTSC PAL or SECAM pictures VIM Video Input Module a optional board which plugs into the electronics mod ule that allows S Video and composite video inputs wall A group of displays physically bolted together Not possible with Panthers Wildcat Model WN ...

Page 157: ...147 ...

Page 158: ... harmful interference to radio or television reception which can be determined by turning the equipment off and on the user is encouraged to try to correct the interference by one or more of the following measures Reorient or relocate receiving antenna Increase separation between equipment and receiver Connect equipment to an outlet on a circuit different from that to which the receiver is connect...

Page 159: ...149 ...

Page 160: ...inimum Typical Notes Video input amplitude Separate RGB analog 1 4 V p p 0 35 V p p 0 7 V p p 75 ohm termination Composite analog sync 5 0 V p p 0 3 V p p 75 ohm termination TTL H and V sync 5 0 V 2 5 V 3 5 V TTL at 330 ohm termination Input connectors 15 pin D sub female Analog 1 Analog 2 In and Out DVI Digital In and Out DVI std no DDC BNC Composite video 4 pin DIN S Video In and Out RJ45 RS232 ...

Page 161: ... of image quality It combines the effects of brightness contrast and ambient light to yield a more meaningful measurement for evaluating perceived image quality See www ClarityVisual com for more information on QVM and image quality 1 400 with four lamps QVM at 50 viewing angle 300 Brightness uniformity 80 ANSI 13 point standard Contrast ratio 1 500 Dark room Resolution see table page 152 Lamp lif...

Page 162: ...XGA 60 48 4 65 1344 70 56 5 75 1328 75 60 2 78 75 1312 80 64 85 5 1376 85 68 77 94 5 1376 1280 1024 SXGA 60 64 108 1688 60 a 63 5 109 9 1730 70 77 4 130 6 1726 75 80 135 1688 85 91 1 157 5 1728 1600 1200 UXGA 60 75 162 2160 640 480 MAC 67 34 97 31 33 859 832 624 75 49 72 57 28 1152 720 x 480p HDTV 60 31 54 27 858 1280 720p 60 45 74 25 1650 1920 1080i 30 33 75 74 25 2200 720 400 VESA 70 31 47 28 32...

Page 163: ...153 ...

Page 164: ...154 ...

Page 165: ... 92 94 unit 92 94 which to use 92 Address Select 84 menu 92 136 Adjust all 52 adjusting color 52 for digital sources 50 levels manually 44 RGB levels 44 size of the image 58 values in menus 138 adjusting color 44 52 air flow behind Panther 2 aligning image 114 LCD 58 114 Alignment Dashes 114 in LCD Panel Alignment menu 58 amber LED 78 ambient operating temperature 2 151 amplitude video input 150 A...

Page 166: ...definition of 144 Composite video input 16 Composite selecting 38 Computer source selecting 38 conformity declaration of 148 connecting picture source cables 16 connecting power cables 14 connecting RS232 30 connector Load Data 126 connectors and remote buttons 39 audio line out 28 diagrams of 142 locations of 18 20 container shipping 8 Contrast 48 Cool color temperature 52 cords dressing neatly 1...

Page 167: ...a 52 Geometry Pattern 114 Geometry Pattern in LCD Panel Alignment menu 58 Geometry test pattern 88 Get command 96 Glass Wax 124 global address 92 94 graphics gamma 52 Gray balance 52 Gray Scale test pattern 88 Gray test pattern 88 green LED 78 Green test pattern 88 green screen is 110 group address 92 H H V sync definition of 144 H Freq for analog digital inputs 3 19 21 23 152 Hardware Versions me...

Page 168: ... definition of 144 motors 114 moving 114 position 114 rotated 59 rotated illustration of 115 rotating 114 shifted sideways 59 LCD Alignment 58 menu 114 131 LED fan 78 front panel 38 inside diagnostic 78 interlock 78 IR 78 lamp 78 lockout 78 On Screen Diagnostic Codes 108 power supply 78 Remote IR 78 RS232 CMD 78 RS232 data 78 standby 78 temperature 78 LED definition of 144 LED inside table of 79 1...

Page 169: ...tion of 145 Mute 76 mute control on remote 36 N NAK 94 naming memories 66 native resolution definition of 145 no source 79 113 141 noisy picture 110 None test pattern 88 non UXP definition of 145 Normal color temperature 52 normal startup sequence 108 NTSC 16 38 definition of 145 O objective lens 58 odd even field selection in 1080i 26 On Screen Status Code 108 112 140 operating temperature 2 151 ...

Page 170: ...nition of 145 level adjust 44 RGBHV definition of 145 RGBS 22 definition of 145 RJ45 adapter 126 RJ45 to 9 pin adapter 30 31 142 rotated LCD illustration of 115 RS232 address 92 address current 80 address structure of 94 CMD LED 78 codes index of 106 commands index of 104 commands list of 96 connecting 30 Data LED 78 Decr command 96 Get command 96 In connector diagram of 142 Incr command 96 list o...

Page 171: ...145 sync composite definition of 144 H V definition of 144 on green definition of 145 sync on green definition of 145 System Hours 82 Systems Hours menu 134 T table of ascii values 95 table of inside LEDs 79 113 141 technical support 116 temperature approaching limit 79 112 113 140 141 exceeds limit 79 113 141 LED 78 operating 2 151 over temp 112 140 terms used in this manual meanings of 144 Test ...

Page 172: ... definition of 146 viewing angle 151 VIM definition of 146 voltages high 4 Volume control 76 volume control of external speakers 28 volume control on remote 36 W wall definition of 146 Warm color temperature 52 weight 2 150 what you will do 12 White Adjust 44 White balance 52 white level see White Adjust 44 White test pattern 88 white screen is too 110 Wildcat definition of 146 Windows shutdown sc...

Page 173: ...740 UXP USER S GUIDE PART NUMBER 070 0097 01 You may fax this form to Clarity Visual Systems Attention Manuals at 1 503 570 4657 Or you may email comments and corrections to Manuals ClarityVisual com If you use email please mention the 070 part number listed above What I like about this manual We love to read this part What I don t like about this manual We read this part too Error s I found in th...

Page 174: ...164 ...

Page 175: ...165 ...

Page 176: ...ted All rights reserved Clarity Visual Systems 9025 SW Hillman Court Suite 3122 Wilsonville OR 97070 7708 USA Main Phone 1 503 570 0700 Customer Service Phone 1 503 570 4634 Fax 1 503 570 4657 www ClarityVisual com Service ClarityVisual com ...

Reviews: