


8
9
GB
Our products have been developed to achieve the highest standards in quality, functionality and
design. We hope you enjoy the new REVOLUTION hair trimmer from PALSON.
Before using for the first time:
Before using this hair trimmer for the first time, charge it fully for an hour and a half to activate the
internal rechargeable battery. It comes with four combs: 3, 6, 9 and 12 mm.
Keep this manual for future queries.
Instructions:
This hair trimmer can be used when plugged in or cordless.
1. Connect the adaptor to the battery jack at the base of the hair trimmer and then plug the
adaptor into the mains electricity (make sure the voltage coincides with the specifications
on the adaptor label). Total charging time is an hour and a half. It can also be charged by
connecting the charger to the base of the hair trimmer. When it is fully charged, it can be used
continuously for over 45 minutes. The indicator light will show the battery level.
2. Press the switch lightly before you begin using it. If the battery level is too low, charge it using
the adaptor provided.
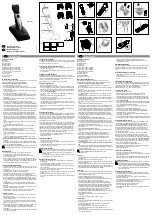
3. This model comes with adjustable blades so you can change the blade cutting position (Fig. 1).
4. This device is not intended for use by people (including children) with reduced physical,
sensory or mental capacities, or who lack the required knowledge or experience, unless they
are supervised or follow instructions regarding how to use the appliance given by the person
responsible for their safety. Children must be supervised to make sure they do not play with
the device.
5. If the power cable is damaged it must be replaced by the manufacturer or its authorised
technical service, or a qualified technician to avoid danger.
Attaching and removing the blade
1. To attach the blade, insert it into the slot and then press down on the whole section until you
hear it click. Fig. 2 (in the direction indicated by the arrow)
2. To remove it, hold the trimmer by the other end and gently pull the blade away from the device.
Fig. 3 (in the direction indicated by the arrow).
How to use the comb
1. Adjust the side arms of the comb on either side of trimmer to form an angle of 90° with the blade
on the lower part before you click it into place. Fig. 4 (in the direction indicated by the arrow)
2. To remove the comb, pull the side arms apart from the main body of the trimmer. Fig. 5 (in the
direction indicated by the arrow)
Blade maintenance
1. Push the blade away from the trimmer and then use the cleaning brush to remove any hair on
the blade. Lubricate the space that separates the fixed blade from the movable blade with 2
or 3 drops of oil.
2. Clean the blade after every few uses.
Charging
- Do not charge the hair trimmer if the temperature is below 0 °C or above 40 °C.
- Do not charge the trimmer in direct perpendicular sunlight or close to a heat source.
- The standard charge time is an hour and a half. To avoid damaging the battery, do not charge
for any longer.
Precautions
- To clean the main body, only use a cloth that has been slightly moistened with water or a mild
soapy solution.
- Never use corrosive solutions.
- Do not submerge the hair trimmer in water.
- Keep it out of the reach of children.
- This trimmer may get hot during use or when charging, which is absolutely normal.
- Never hold the trimmer by the power cable to avoid damaging it and prevent accidents.
- Do not manipulate the moving parts unduly.
ENVIRONMENTAL PROTECTION
Electrical products must not be thrown away with domestic waste. This device must be taken to
your local recycling centre to be disposed of safely.
Thank you for placing your trust in one of our products.
Summary of Contents for REVOLUTION
Page 11: ...20 21 GR REVOLUTION de PALSON 4 3 6 9 12 mm 1 45 2 3 1 4 5 1 2 2 3 1 90 4 2 5 1 2 3 2 0 C 40 C...
Page 12: ...22 23 RU REVOLUTION PALSON 4 3 6 9 12 1 45 2 3 1 4 5 1 2 2 3 1 90 4 2 5 1 2 3 2 0 C 40 C...
Page 13: ...24 25 AR...
Page 16: ...30 31 BG REVOLUTION PALSON 4 3 6 9 12 1 45 2 3 1 4 5 1 2 2 2 1 90 4 2 5 1 2 3 2 0 C 40 C...