background image

Airflow Precautions

“Electrical Specifications” on page 18

“Airflow Precautions” on page 19

“Rack Compatibility” on page 20

“Rack Precautions” on page 20

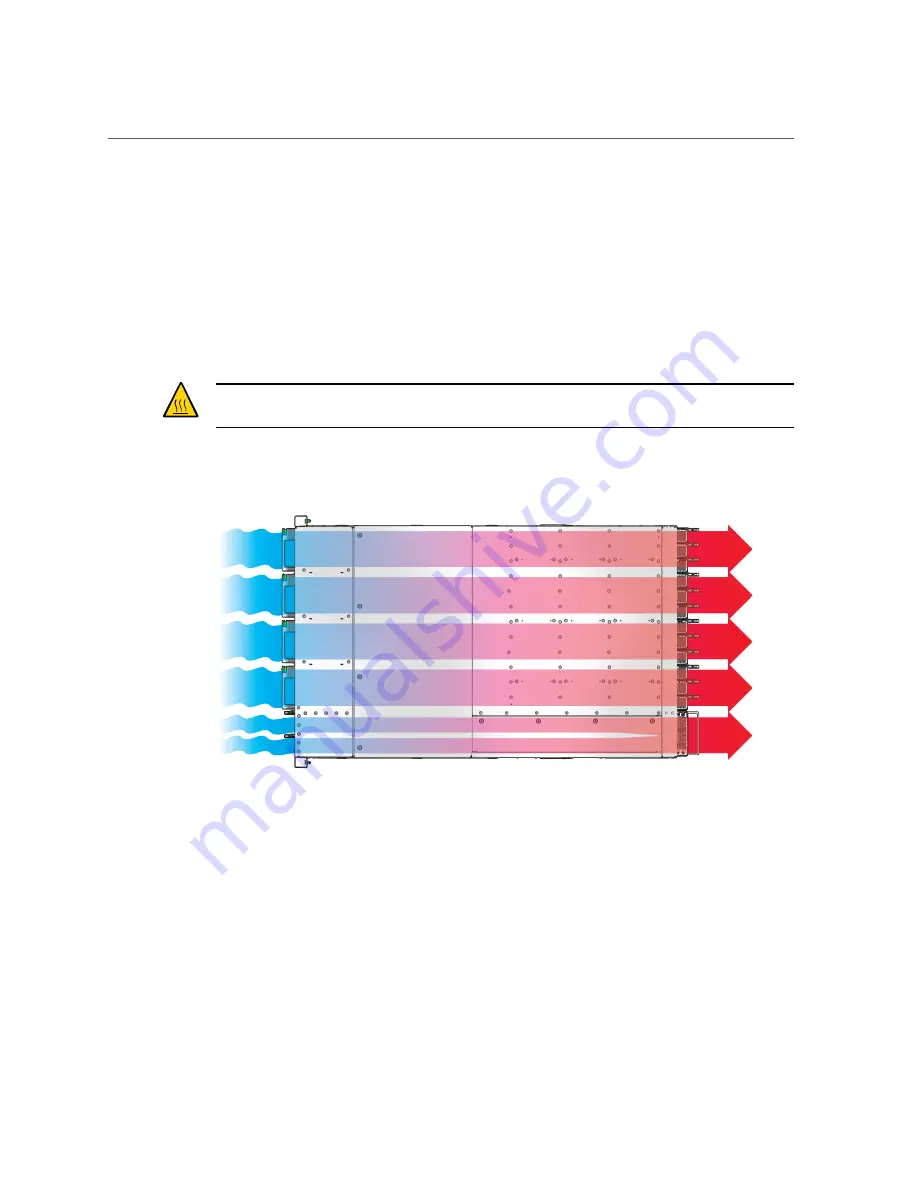
Airflow Precautions

Caution - 

Proper airflow is essential for keeping the switch's internal temperatures within a safe

operating range.

Air flows from the front (fan end) of the switch to the rear (connector end) of the switch.

Follow these guidelines to ensure unrestricted airflow in the switch:

Install the switch so that the front faces the cool aisle and the rear faces the warm aisle.

Do not direct warm air into the switch.

Prevent recirculation of air within a rack or cabinet.

Ensure that either a module or a filler panel is in place while the switch is operating.

Route cables so that they do not interfere with airflow.

Related Information

“Physical Specifications” on page 17

Confirming Specifications

19

Summary of Contents for Fabric Interconnect F2-12

Page 1: ...Oracle Fabric Interconnect F2 12 Installation Guide Part No E74400 01 November 2016...

Page 2: ......

Page 3: ...dangerous applications including applications that may create a risk of personal injury If you use this software or hardware in dangerous applications then you shall be responsible to take all appropr...

Page 4: ...risque notamment dans des applications pouvant causer des dommages corporels Si vous utilisez ce logiciel ou mat riel dans le cadre d applications dangereuses il est de votre responsabilit de prendre...

Page 5: ...ysical Specifications 17 Electrical Specifications 18 Environmental Specifications 18 Airflow Precautions 19 Rack Compatibility 20 Rack Precautions 20 Preparing for Installation 23 Shipping Kit 24 Rec...

Page 6: ...e PrizmMT Cables 66 Connect the QSFP Cables 69 Connect the LC Cables 71 Secure Cables to the Cable Management Comb 73 Powering On the Switch 75 Connect the SER MGT Cable 75 Connect a Serial Management...

Page 7: ...4 Verify Connectivity 96 Run the Oracle Fabric OS Configuration Wizard 102 Oracle Fabric OS Configuration Wizard Parameters 104 Log In to the Oracle Fabric OS Interface 105 Log In to the Oracle Fabric...

Page 8: ...8 Oracle Fabric Interconnect F2 12 Installation Guide November 2016...

Page 9: ...nced experience installing network hardware This document uses the terms virtualization switch and switch to refer to the Oracle Fabric Interconnect F2 12 Product Documentation Library Documentation a...

Page 10: ...10 Oracle Fabric Interconnect F2 12 Installation Guide November 2016...

Page 11: ...e 89 Installation Task Overview Perform these steps in the order presented to install the switch Step Description Links 1 Familiarize yourself with the switch Switch Overview on page 13 Front Panel Co...

Page 12: ...age 62 Connect the RJ 45 Ethernet Cables on page 63 Connect the PrizmMT Cables on page 66 Connect the QSFP Cables on page 69 Connect the LC Cables on page 71 Secure Cables to the Cable Management Comb...

Page 13: ...modules appropriate for your data center Through I O modules the switch can support up to 48 4x IB ports 24 16Gb FC ports 48 10GBASE T ports 48 40G Ethernet ports or a mixture of these ports to provid...

Page 14: ...ed for network management through DHCP However the procedures in this document are serial management focused with instructions to configure static IP addresses if desired Related Information Installat...

Page 15: ...ot aisle The switch can be populated with any mixture of Oracle F2 I O modules as needed for your deployment The illustration shows an example of one hardware configuration for the switch No Descripti...

Page 16: ...Oracle F2 10 Gb and 40 Gb Ethernet module 8 Filler Panel 9 Oracle F2 Dual Port 16Gb Fibre Channel module 10 Oracle F2 Long Range InfiniBand module 11 Oracle F2 Quad Port 10GBASE T module Related Infor...

Page 17: ...page 20 Rack Precautions on page 20 Related Information Understanding the Switch on page 11 Preparing for Installation on page 23 Installing the Switch on page 29 Connecting Cables on page 51 Powering...

Page 18: ...mately equally divided among the operating power supplies Related Information Physical Specifications on page 17 Environmental Specifications on page 18 Airflow Precautions on page 19 Rack Compatibili...

Page 19: ...h to the rear connector end of the switch Follow these guidelines to ensure unrestricted airflow in the switch Install the switch so that the front faces the cool aisle and the rear faces the warm ais...

Page 20: ...eavy and tip over Deploy your rack s anti tilt legs to prevent the rack from tipping during equipment installation Caution Elevated Operating Ambient Temperature If the switch is installed in a closed...

Page 21: ...otection and supply wiring Caution Reliable Grounding Maintain reliable grounding of rackmounted equipment Give particular attention to supply connections other than direct connections to the branch c...

Page 22: ...22 Oracle Fabric Interconnect F2 12 Installation Guide November 2016...

Page 23: ...ng Precautions on page 26 ESD Precautions on page 27 Installation Tools on page 27 Related Information Understanding the Switch on page 11 Confirming Specifications on page 17 Installing the Switch on...

Page 24: ...and right shelf rails 3 Documentation 4 Power cords 5 Cable management comb 6 Fasteners 7 Mushroom screw kit for use with shelf rails Related Information Handling Precautions on page 26 24 Oracle Fab...

Page 25: ...the SP within the switch 6 Record the SP MAC ID to the document 7 In the Network Interfaces table of the sheet find the secondary MAC ID This is the MAC ID of the SCP within the switch 8 Record the SC...

Page 26: ...P address and host name for the SCP MAC ID you recorded Record this IP address and host name for future reference When the switch is connected to the management network and powered on the SP and SCP w...

Page 27: ...n antistatic wrist strap that is attached to either the mat or a metal portion of the switch chassis Related Information Shipping Kit on page 24 Handling Precautions on page 26 Installation Tools on p...

Page 28: ...Installation Tools Gloves Related Information Shipping Kit on page 24 Handling Precautions on page 26 ESD Precautions on page 27 28 Oracle Fabric Interconnect F2 12 Installation Guide November 2016...

Page 29: ...ch Remove a Filler Panel on page 47 Install an I O Module on page 42 Related Information Understanding the Switch on page 11 Confirming Specifications on page 17 Preparing for Installation on page 23...

Page 30: ...ark the Rack on page 30 Install the Rackmount Hardware on page 32 Install the Cable Management Comb on page 37 Route the Power Cords and Management Cables on page 38 Install the Switch on page 39 Inst...

Page 31: ...you when marking the other rack posts 4 Install the rackmount hardware See Install the Rackmount Hardware on page 32 Related Information Stabilize the Rack on page 29 Install the Rackmount Hardware on...

Page 32: ...e 1 Identify the prerequisite and subsequent installation tasks that you must perform in conjunction with this task See Installation Task Overview on page 11 2 Identify the left and right shelf rails...

Page 33: ...Install the Rackmount Hardware 3 Insert the mushroom screw into the last screw hole on the interior of the shelf rail Installing the Switch 33...

Page 34: ...of the rack position the rear of the shelf rail into the rear rack post 5 Press the shelf rail into the rear rack post while pressing and releasing the release tab The shelf rail secures to the rear r...

Page 35: ...ing and releasing the release tab The shelf rail secures to the front rack post 8 Repeat Step 4 through Step 7 for the right shelf rail 9 Install a 10 32 cage nut into each rear rack post in the upper...

Page 36: ...Repeat to install a 10 32 cage nut into the other rear rack post 10 Install the cable management comb See Install the Cable Management Comb on page 37 Related Information Stabilize the Rack on page 29...

Page 37: ...management comb to where you just installed the 10 32 cage nuts 3 Using a No 2 Philips screwdriver secure the upper mounting holes of the cable management comb to the 10 32 cage nuts with two 10 32 s...

Page 38: ...panel or receptacles at the rear of the rack 3 Route the network management cable and serial management cable if a full time serial management cable will be used from their respective hubs concentrato...

Page 39: ...le are used to raise the switch to the shelf rails 1 Identify the prerequisite and subsequent installation tasks that you must perform in conjunction with this task See Installation Task Overview on p...

Page 40: ...cket 5 If the screws are not seated in each bracket s slot slide the switch out far enough to realign the brackets and screws then slide the switch in again The switch is correctly installed when you...

Page 41: ...hat now See Install an I O Module on page 42 If you are not installing additional components go to Step 8 8 Consider your next task See Optional Assemble the QSFP Cables on page 58 or Optional Assembl...

Page 42: ...lled in any module slot in the chassis 1 Identify the prerequisite and subsequent installation tasks that you must perform in conjunction with this task See Installation Task Overview on page 11 2 If...

Page 43: ...ing the I O module See Remove a Filler Panel on page 47 6 On the I O module squeeze the upper and lower halves of the release lever together and swing the release lever to the fully open position 7 Al...

Page 44: ...Install an I O Module The LEDs and data cable receptacles face you and the release lever is to the lower right 44 Oracle Fabric Interconnect F2 12 Installation Guide November 2016...

Page 45: ...de the I O module into the chassis until the release lever begins to rise then close the release lever to secure the I O module in the slot 9 Repeat Step 4 to Step 8 for all I O modules to be installe...

Page 46: ...58 or Optional Assemble the SFP Cables on page 60 See Route the Cables on page 62 Related Information Stabilize the Rack on page 29 Mark the Rack on page 30 Install the Rackmount Hardware on page 32 I...

Page 47: ...ler panels only as you replace them with an I O module in a one for one basis 1 Identify the prerequisite and subsequent installation tasks that you must perform in conjunction with this task See Inst...

Page 48: ...ueeze the upper and lower halves of the release lever together and pull the lever in a downward motion The filler panel is unseated from the slot connection 48 Oracle Fabric Interconnect F2 12 Install...

Page 49: ...e filler panel from the switch chassis c Use your free hand to take the weight of the filler panel as it comes free of the chassis d Set the filler panel aside 3 Finish installing an I O module See In...

Page 50: ...on page 30 Install the Rackmount Hardware on page 32 Install the Cable Management Comb on page 37 Route the Power Cords and Management Cables on page 38 Install the Switch on page 39 Install an I O M...

Page 51: ...es on page 60 Route the data cables Route the Cables on page 62 Connect the data cables Connect the RJ 45 Ethernet Cables on page 63 Connect the PrizmMT Cables on page 66 Connect the QSFP Cables on pa...

Page 52: ...ot be used reliably if it is more than 30 feet 9 meters long Power supplies Country specific power cords shipped with the switch supply facility power to the switch from power distribution units insid...

Page 53: ...b on page 73 Standard MT and PrizmMT Cables Even though PrizmMT and standard MT optical fiber cables look similar they are not PrizmMT cables use clear plastic ferrules that have lenses to focus the l...

Page 54: ...close attention when connecting these cables Do not confuse one connector with the other Damage might occur The following illustration shows the difference between the standard MT cable and the Prizm...

Page 55: ...ut a dust cap on each end to prevent dust and debris from accumulating Before connecting the cable Clean every connection both sides every time the connection is to be mated Even when the dust caps ar...

Page 56: ...on page 63 Connect the PrizmMT Cables on page 66 Connect the QSFP Cables on page 69 Secure Cables to the Cable Management Comb on page 73 General Cable Precautions To prevent data cable damage you mu...

Page 57: ...d loop fastener for bundling and securing cables Do not drag the cable or its connectors over any surface Carry the entire cable to and from the points of connection Do not force the cable connector i...

Page 58: ...on Task Overview on page 11 2 Remove the QSFP optical transceivers and fiber optic cables from their packaging 3 Sort the components into groupings ready for assembly If you are assembling an InfiniBa...

Page 59: ...ver until it clicks 8 Consider your next step If you are assembling an InfiniBand cable or Ethernet pass through cable repeat Step 4 to Step 7 for the other end of the cable and then go to Step 10 If...

Page 60: ...ransceivers must be clean and optically clear before assembly Do not remove the protective caps from the optical fiber cable or the plugs from the transceivers until instructed to do so 1 Identify the...

Page 61: ...cal transceivers and LC connectors 9 Repeat from Step 3 for all data cables to be assembled 10 Route the data cables See Route the Cables on page 62 Related Information Chassis Cable Requirements on p...

Page 62: ...ional Assemble the QSFP Cables on page 58 or Optional Assemble the SFP Cables on page 60 3 Prepare and verify that the nodes or hosts are operational properly configured and ready to accept fabric or...

Page 63: ...ge 63 Connect the PrizmMT Cables on page 66 Connect the QSFP Cables on page 69 Secure Cables to the Cable Management Comb on page 73 Connect the RJ 45 Ethernet Cables Use this procedure to connect RJ...

Page 64: ...Connect the RJ 45 Ethernet Cables For the chassis the tab on the connector is up 64 Oracle Fabric Interconnect F2 12 Installation Guide November 2016...

Page 65: ...Insert the connector into the receptacle until it clicks securing it in place 4 Lay the cable into a slot on the cable management comb 5 Repeat Step 2 and Step 3 for each cable to be connected 6 Consi...

Page 66: ...s to the Cable Management Comb on page 73 Connect the PrizmMT Cables Use this procedure to connect the PrizmMT cables to the chassis gateway ports Note Only PrizmMT receptacles labeled 5 and 6 are for...

Page 67: ...r 4 Remove the protective cap from the cable connector and visually inspect the connector The connector should be clean and free of dirt or debris 5 Identify the cable alignment features on the cable...

Page 68: ...the tip of the ferrule into the center of the port 7 Firmly press the PrizmMT connector into the receptacle until you feel the connector securely latch into the receptacle 8 Lay the cable into a slot...

Page 69: ...e 52 Standard MT and PrizmMT Cables on page 53 Standard MT and PrizmMT Cable Precautions on page 55 General Cable Precautions on page 56 Optional Assemble the QSFP Cables on page 58 Optional Assemble...

Page 70: ...sure that the L groove is to the right 5 Slowly move the connector in As you slide the connector in the shell should be in the center of the QSFP receptacle If the connector stops or binds after about...

Page 71: ...the SFP Cables on page 60 Route the Cables on page 62 Connect the RJ 45 Ethernet Cables on page 63 Connect the PrizmMT Cables on page 66 Secure Cables to the Cable Management Comb on page 73 Connect t...

Page 72: ...8 for each cable to be connected 8 Secure the cables to the cable management Comb See Secure Cables to the Cable Management Comb on page 73 Related Information Chassis Cable Requirements on page 51 I...

Page 73: ...verview on page 11 2 While connecting the RJ 45 SFP QSFP and PrizmMT cables to the switch lay the cables into an available slot on the cable management comb 3 Route the data cables so that they do not...

Page 74: ...s on page 51 I O Module Cable Requirements on page 52 Standard MT and PrizmMT Cables on page 53 Standard MT and PrizmMT Cable Precautions on page 55 General Cable Precautions on page 56 Optional Assem...

Page 75: ...ER MGT on page 82 Assign a Static IP Address to the SP on page 83 Assign a Static IP Address to the SCP on page 85 Log in to the SP through the network management interface Log In to the SP Network Ma...

Page 76: ...Device to the SER MGT Port on page 77 Related Information Connect a Serial Management Device to the SER MGT Port on page 77 Connect Power Cords on page 77 Power On the Switch on page 81 Log In to the...

Page 77: ...her cables with servicing the switch or with other systems 5 Connect the power cords See Connect Power Cords on page 77 Related Information Connect the SER MGT Cable on page 75 Connect Power Cords on...

Page 78: ...ds 3 Lower the retaining wire from in front of the power receptacles at the rear of the switch chassis 4 Plug both power cords into the receptacles 78 Oracle Fabric Interconnect F2 12 Installation Gui...

Page 79: ...Connect Power Cords In this illustration AC1 is the left power receptacle and AC0 is the right power receptacle Powering On the Switch 79...

Page 80: ...e facility power receptacle or power distribution device Note To provide redundancy connect each power cord to a separate power source The switch can operate with only one power source but there is no...

Page 81: ...on with this task See Installation Task Overview on page 11 2 Ensure that Nodes of the IB fabric and hosts of the Ethernet and Fibre Channel networks are operational and securely cabled to the switch...

Page 82: ...erial Management Device to the SER MGT Port on page 77 Connect Power Cords on page 77 Log In to the SP SER MGT on page 82 Assign a Static IP Address to the SP on page 83 Assign a Static IP Address to...

Page 83: ...on page 83 Related Information Connect the SER MGT Cable on page 75 Connect a Serial Management Device to the SER MGT Port on page 77 Connect Power Cords on page 77 Power On the Switch on page 81 Assi...

Page 84: ...ay 123 45 67 1 pendingipnetmask 255 255 255 0 Set pendingipdiscovery to static Set pendingipaddress to 123 45 67 89 Set pendingipgateway to 123 45 67 1 Set pendingipnetmask to 255 255 255 0 4 Commit t...

Page 85: ...SP SER MGT on page 82 or Log In to the SP Network Management on page 86 3 Start the host console start HOST console Are you sure you want to start HOST console y n y Serial console started To stop typ...

Page 86: ...nect the SER MGT Cable on page 75 Connect a Serial Management Device to the SER MGT Port on page 77 Connect Power Cords on page 77 Power On the Switch on page 81 Log In to the SP SER MGT on page 82 As...

Page 87: ...LOM shell prompt is displayed 3 Verify switch functionality See Verify LED Status on page 89 Related Information Connect the SER MGT Cable on page 75 Connect a Serial Management Device to the SER MGT...

Page 88: ...88 Oracle Fabric Interconnect F2 12 Installation Guide November 2016...

Page 89: ...ivity on page 96 Administer the switch Log In to the Oracle Fabric OS Interface on page 105 Run the Oracle Fabric OS Configuration Wizard on page 102 Oracle Fabric OS Configuration Wizard Parameters o...

Page 90: ...nal on page 94 Related Information Verify That the Switch Is Operational on page 94 Verify Connectivity on page 96 Log In to the Oracle Fabric Manager Interface on page 106 Log In to the Oracle Fabric...

Page 91: ...rational on page 94 Verify Connectivity on page 96 Log In to the Oracle Fabric Manager Interface on page 106 Log In to the Oracle Fabric OS Interface on page 105 Run the Oracle Fabric OS Configuration...

Page 92: ...ions On 12 VDC is supplied Off No DC voltage is present Attention Amber Indicates these conditions On Fault detected 12 VDC shut down Off No faults detected AC Green Indicates these conditions On AC p...

Page 93: ...02 Oracle Fabric OS Configuration Wizard Parameters on page 104 I O Module Status LEDs Glyph Name Color State and Meaning Attention Amber Indicates these conditions On Fault detected Off No faults det...

Page 94: ...ify the prerequisite and subsequent installation tasks that you must perform in conjunction with this task See Installation Task Overview on page 11 2 Access the Oracle ILOM CLI See Log In to the SP S...

Page 95: ...ng Fans Fan_6 health OK System Cooling Fans Fan_7 health OK System Networking health OK System Networking Switches Switch_0 health OK System Networking Switches Switch_1 health OK System Networking Mo...

Page 96: ...ation Wizard Parameters on page 104 Verify Connectivity 1 Identify the prerequisite and subsequent installation tasks that you must perform in conjunction with this task See Installation Task Overview...

Page 97: ...n Gi0 10 not connected Half Auto Auto MDIX on Gi0 11 connected Full 1 Gbps Auto Auto MDIX on Gi0 12 connected Full 1 Gbps Auto Auto MDIX on Gi0 13 not connected Half Auto Auto MDIX on Gi0 14 connected...

Page 98: ...onsole y n y Serial console started To stop type ESC b Press Enter to display the login prompt hostname login Password where hostname is the host name of the SCP c Use the appropriate option to comple...

Page 99: ...utput slot Slot number as seen on the rear panel state Operational and administrative state of the I O module in the listed slot descr An optional description of the module or slot type Type of module...

Page 100: ...ernet10GbPort up up 0 10 1 gwEthernet10GbPort up up 0 10 2 gwEthernet10GbPort up up 0 10 3 gwEthernet10GbPort up up 0 10 4 gwEthernet10GbPort up up 0 embedded 5 gwEthernet40GbPort up up 0 embedded 6 g...

Page 101: ...ear panel or port number for the interface Note In the output embedded is the group of on board interfaces at the left rear of the switch state Operational and administrative state of the listed port...

Page 102: ...e proceeding The Oracle Fabric OS configuration wizard runs the first time the switch is started or after each time the system configuration is reset or cleared To run the Oracle Fabric OS configurati...

Page 103: ...e Fabric OS configuration wizard to run Type Y 5 Answer the questions as the wizard requests When completed the wizard reboots the Oracle Fabric OS 6 Return to verifying the switch connectivity or log...

Page 104: ...ssword 1 8 Zero bypasses the parameter If yes what is the minimum number of upper case letters in the password 1 8 What is the password for the root user Note This password will also be used to log in...

Page 105: ...racle Fabric OS configuration wizard can you manage the switch through the Oracle Fabric OS Interface 1 Choose a method of accessing the Oracle Fabric OS interface From a management network attached h...

Page 106: ...ic OS Configuration Wizard on page 102 Otherwise you can now administer the switch through the Oracle Fabric OS Refer to the Oracle Fabric OS documentation for further instructions Related Information...

Page 107: ...ger Dashboard is displayed 6 From the Navigation pane open the Managed Devices folder and click Discovery Devices 7 Find the switch in the list of devices and highlight it 8 Click the check mark icon...

Page 108: ...on page 94 Verify Connectivity on page 96 Log In to the Oracle Fabric OS Interface on page 105 Run the Oracle Fabric OS Configuration Wizard on page 102 Oracle Fabric OS Configuration Wizard Parameter...

Page 109: ...adapter Physical device such as an HCA or NIC that enables a host to communicate through a fabric or network C CFM Cubic feet per minute A standard of measuring airflow CMB Abbreviation for cable mana...

Page 110: ...nality fan module A hot swappable replaceable component that provides cooling air to the chassis interior Fibre Channel A data transference technology used primarily for storage systems FM Abbreviatio...

Page 111: ...See also LDAP long range IB module I O module for the Oracle Fabric Interconnect F2 12 that supports QDR IB throughput over distances up to 40 kilometers LR IB IOM I O module for the Oracle Fabric In...

Page 112: ...niBand functionality over long distances Oracle F2 Quad Port 10GBASE T Module An I O module that provides four 10GbE interface functionality Oracle Fabric Interconnect F2 12 A virtualization switch Se...

Page 113: ...aces the Subnet Manager and so on The SCP might also be the chassis host See also SP SEFOS Sun Ethernet Fabric Operating System The operating system used by the EMS module to administer the Ethernet n...

Page 114: ...Typically is the end with fan modules and power supplies switch rear The exhaust end of the switch chassis that faces the hot aisle when mounted in a rack Typically is the end populated with high spee...

Page 115: ...ting 62 securing to cable management comb 73 SFP 60 standard MT 53 cage nuts 30 chassis LEDs 90 components front panel 14 rear panel 15 configuration wizard Oracle Fabric OS parameters 104 running 102...

Page 116: ...e Fabric Manager 106 Oracle Fabric OS 105 SCP Oracle Fabric Manager interface 106 Oracle Fabric OS interface 105 SP network management 86 SER MGT 82 M MAC address 25 MAC ID SCP 25 SP 25 module install...

Page 117: ...77 SFP cables assembling 60 connecting 69 precautions 56 shipping kit 24 SP assigning DHCP IP address 26 assigning static IP address 83 login network management 86 SER MGT 82 specifications 17 electri...

Page 118: ...118 Oracle Fabric Interconnect F2 12 Installation Guide November 2016...

Reviews: