


60
optics11.com
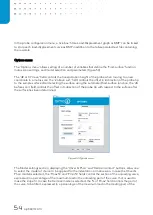
The ‘ADC’ menu displays the photodiode and data acquisition settings. By using the
‘Scan
wavelength’ feature in the ‘Wavelength scan’ menu, the Offset and Gain values for conversion of
the raw photodiode voltage to fit the 0-10V range is automatically performed. In case the automatic
procedure fails, the ADC menu provides the opportunity to manually adjust the offset and gain
settings. Also, the automatic adjustment of the offset and gain settings can be switched off by
unticking the ‘Auto adj.’ box. Is this is done, the ‘Scan wavelength’ function in the Modulation menu
will tune the laser without setting offset and gain values, which can be convenient for manual setting
offset and gain values. Always make sure the ‘Modulation’ box is ticked before performing an
experiment.
In the ‘Output’ menu you can adjust the signal output at the ‘Front out’ either as a ‘Straight’, which
displays the modulated signal or as a demodulated by switching to ‘Demodul.’ The range and
sensitivity parameters can be changed in the maintenance menu in the software, but it is
recommended to keep them at the default settings.
The
‘Modulation’
menu contains the controls to induce a small modulation on top of the laser
output signal by quickly and continuously modulating the laser wavelength. This modulation is
required for the Piuma to function properly and should always be turned on when performing
indentations. The modulation is active when the
mode is set to ‘On’
; the menu will now show the
controls to change the frequency, amplitude and offset of the modulation signal. In normal
operation, these will not have to be changed.
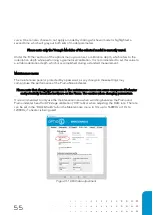
In the ‘Maintenance’ menu the modulation phase shift and the lock
-in amplification can be adjusted
to certain parameters. The default settings are 80.0
degree for the ‘DDS Phase shift’ and 10.0
V for
the ‘Lock
-
in gain’ and should not be cha
nged.
Summary of Contents for CHIARO NANOINDENTER
Page 1: ...PIUMA NANOINDENTER USER MANUAL ...
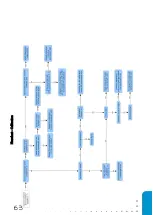
Page 63: ...63 Flowchart Calibration ...
Page 65: ......