


11
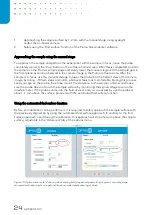
This action initiates the homing of the X-Y stage of the Piuma Nanoindenter: The stage will move to
the front-
left corner, set the current ‘X’ and ‘Y’ coordinates to ‘0’ and subsequently move to the last
coordinate set in the matrix scan parameters.
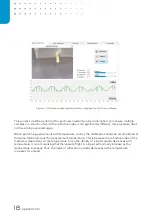
After this, the system state will switch to ‘ready’, as
indicated in the status bar in the home screen.
2.2
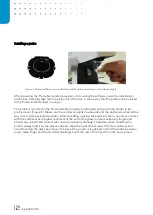
Mounting a probe to the Piuma Nanoindenter
Selecting the right probe
Although a specific probe can measure a wide range of Young’s Moduli, selecting a probe with
suitable parameters that match with the specific sample properties can enhance the quality of the
measurement. For a softer sample, a probe with a less stiff cantilever is needed, and vice-versa, to
ensure that significant cantilever bending as well as significant sample indentation is achieved
during measurements. If the probe is either to stiff or too soft, there will be minimal cantilever
bending or indentation respectively, resulting in a less optimal signal-to-noise ratio.
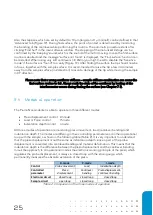
Advised cantilever stiffness is provided
for ranges of sample Young’
s moduli in the table below:
Sample Young’s modulus
Advised cantilever stiffness range
10 Pa
–
10 kPa
0.05 N/m
1 kPa
–
500 kPa
0.5 N/m
500 kPa
–
10 MPa
5 N/m
10 MPa
–
100 MPa
50 N/m
100 MPa
–
1 GPa
500 N/m
Table 1: Advised stiffness ranges for expected Young
’
s Moduli.
These are estimated for a tip radius of 50 µm, for smaller and larger tip sizes slightly softer and
stiffer cantilevers should be used, respectively. In case of doubt, please do not hesitate to contact
Optics11 for advice.
Summary of Contents for CHIARO NANOINDENTER
Page 1: ...PIUMA NANOINDENTER USER MANUAL ...
Page 63: ...63 Flowchart Calibration ...
Page 65: ......