4
Print Operations
4-42
d-Color MF350/250/201Plus
4.7
Sending a fax
Fax operations
2
Reminder
To use the fax function, you must install the optional fax kit onto this machine. In addition, you must
enable the fax kit on the Configure tab after installation.
1
Create the data you want to send using any application.
2
From the [File] menu, select "Print".
3
From "Printer Name", select "xxxxxxx FAX".
4
Click the [Preferences] button or the [Properties] button to change the fax driver settings as necessary.
–
By clicking the [Preferences] button or the [Properties] button in the Print dialog box, you can specify
the settings of each model in the FAX Printing Preferences dialog box that appears. For details, refer
to "Setting up the fax driver for Windows" on page 4-50.
5
Click the [Print] button.
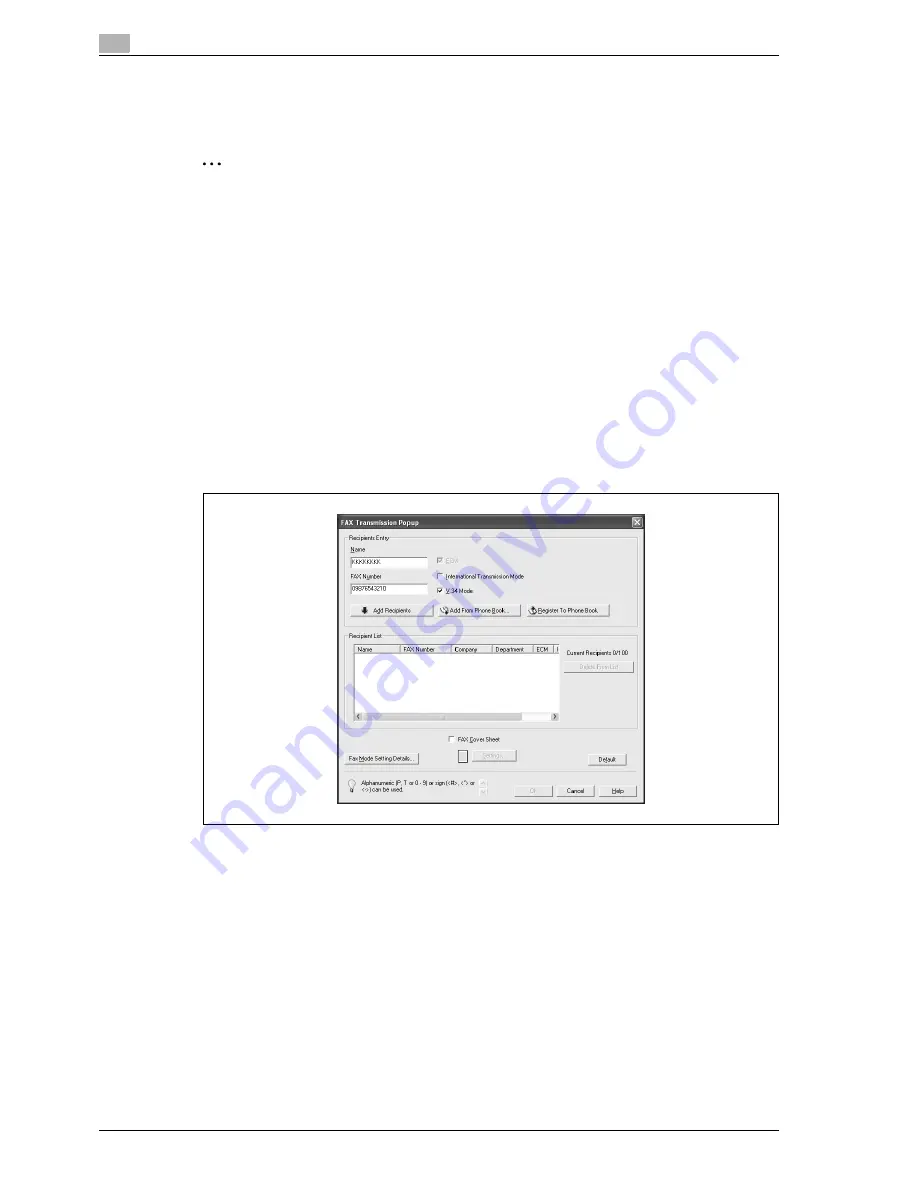
The FAX Transmission Popup dialog box appears.
6
Enter the recipient’s name and fax number in the "Name" and "FAX Number" text boxes.
–
Up to 80 characters can be entered in the "Name" text box.
–
Up to 38 characters (numbers 0 through 9, hyphens (-), #, *, P, and T) can be entered in the "FAX
Number" text box. To send a fax overseas, be sure to enter the country code first.
–
Change the transmission mode as necessary.
ECM: Specifies the ECM (Error Correction Mode). If the "V.34 Mode" check box is selected, the
"ECM" check box cannot be cleared.
International Transmission Mode: Slows the speed when sending faxes overseas. Select this check
box if errors occur when sending faxes overseas.
V.34 Mode: Specifies the Super G3 fax mode. For normal fax operations, leave this check box
selected. Clear it only if it is not possible to transmit in the recipient’s mode.
–
The fax numbers that are registered in the phone book can be specified by clicking the [Add From
Phone Book] button. For details, refer to "Selecting a recipient from the phone book" on page 4-44.
–
The names and fax numbers that were entered can be added to the phone book’s "Simple Entry"
folder by clicking the [Register To Phone Book] button.
Summary of Contents for d-Color 201Plus
Page 15: ...1 Introduction...
Page 16: ......
Page 21: ...2 Installation and operation precautions...
Page 22: ......
Page 39: ...3 Copy Operations...
Page 40: ......
Page 187: ...4 Print Operations...
Page 188: ......
Page 243: ...5 Box Operations...
Page 244: ......
Page 287: ...6 Network Scan Fax Network Fax Operations...
Page 288: ......
Page 418: ...6 Network Scan Fax Network Fax Operations 6 132 d Color MF350 250 201Plus...
Page 419: ...7 Web Connection Operation...
Page 420: ......
Page 426: ...7 Web Connection Operation 7 8 d Color MF350 250 201Plus...
Page 427: ...8 Appendix...
Page 428: ......
Page 446: ...8 Appendix 8 20 d Color MF350 250 201Plus...
Page 447: ...9 Index...
Page 448: ......


