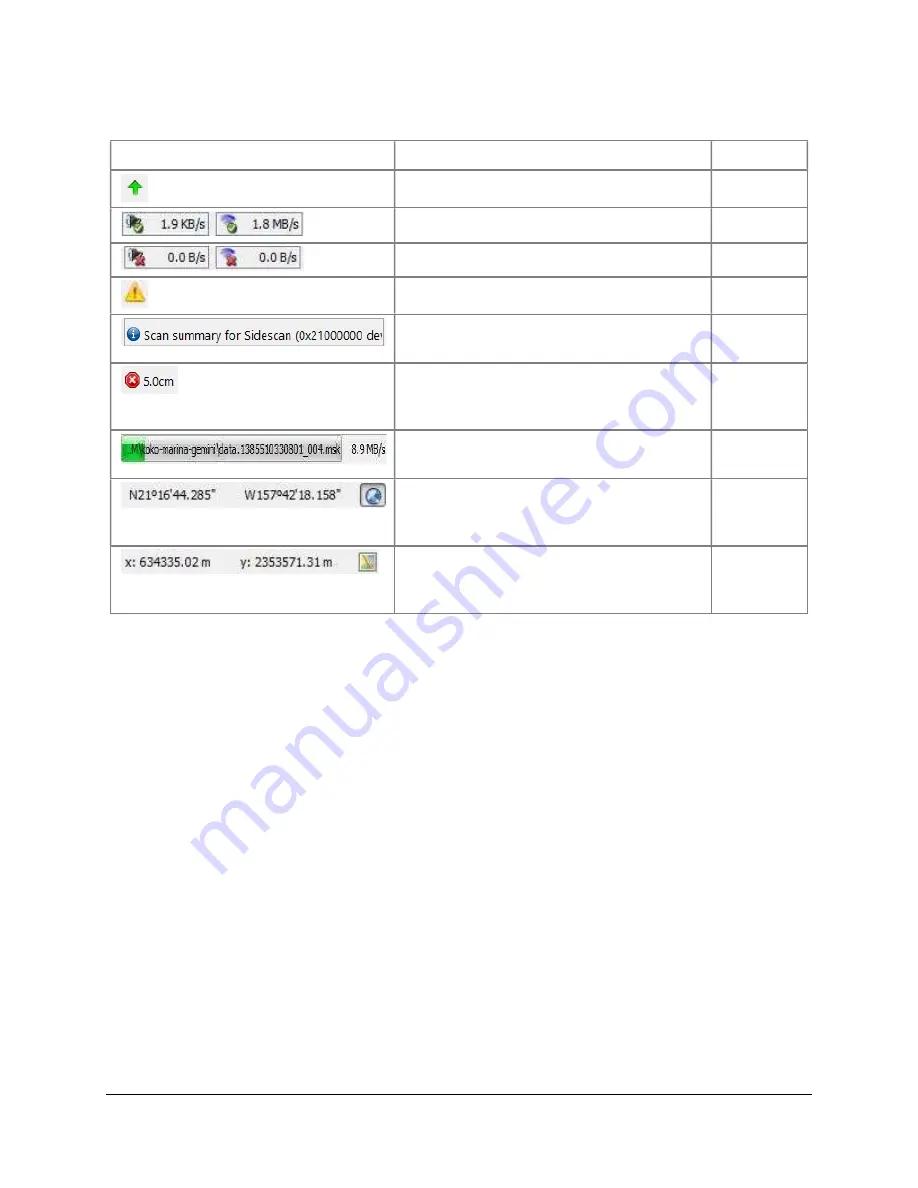
background image

SAMM 


User Manual 

21 

Table 5. Status bar  
Icon/Output 

Definition  

Mode 


New version available 

All 


Sensors connected, shows data rate 

Acquisition 


Sensors not connected  

Acquisition 


An error occurred 

All 


Scrolling Event Log bar, click to open the 
Event Log window. 

All 


Button to cancel file 
acquisition/playback/loading, also 
indicates current mosaic resolution 

All 


File acquisition/playback/loading 
progress 

All 


Position of cursor in mosaic window in 
GPS coordinates, click toggle button for 
XY 

All 

  Position of cursor in mosaic window in 

UTM coordinates, click toggle button for 
Degrees 

All 


This page is intentionally left blank.  


Summary of Contents for SAMM

Page 1: ...and Alone Mosaicking Module User Manual Oceanic Imaging Consultants Inc 1144 10th Avenue Suite 200 Honolulu Hawai i 96816 2442 Phone 808 539 3706 Fax 808 791 4075 Email support oicinc com Web www oici...

Page 2: ...ic Imaging Consultants Inc makes no warranty for the use of its products and assumes no responsibility for any errors that may appear in this document nor does it make a commitment to update the infor...

Page 3: ...1 2 Sensor Offsets 23 4 2 Display Tab 24 4 2 1 General 24 4 2 2 Swath Colormap 25 4 2 3 Units of measure 25 4 3 Mosaic Tab 26 4 3 1 General 26 4 3 2 MSK output connected live sonars 27 4 4 Contacts t...

Page 4: ...ontrols 55 R2Sonic Sonar Controls 56 Marine Electronics Dolphin Sea View 57 6 4 5 Edgetech Discover Klein SonarPro and GeoDAS 59 Edgetech Discover 59 Klein SonarPro 60 GeoDAS 61 7 DISPLAY AND PROCESSI...

Page 5: ...END ACQUISITION AND CLOSE PROJECT 92 Figures Figure 1 SAMM installation process and dialogs 10 Figure 2 SAMM opening dialog allowing creation of new project opening existing or mission import 12 Figu...

Page 6: ...and the same data with lower gain 56 Figure 48 R2Sonic Sonar Controls 56 Figure 49 Dolphin Sea View Interfacing 57 Figure 50 Dolphin Sea View Controls 57 Figure 51 Blueprint Oculus Interfacing 58 Figu...

Page 7: ...4 Table 13 Contact Display Commands 76 Table 14 Contact Attribution Commands 80 Table 15 Contact Organization Commands 84 AcronymsandAbbreviations cm centimeter CPU central processing unit ENC Electro...

Page 8: ...low process described in that section which serves as a review of the commands available in SAMM and how to execute them Selected sections also include an interactive tutorial for demonstrating some o...

Page 9: ...SAMM User Manual 7...

Page 10: ...SAMM assumes your GPS receiver is set to the WGS 1984 reference datum but supports user configuration of datum SAMM directly interfaces to the Tritech Gemini 720 the R2Sonic 202x the Marine Electronic...

Page 11: ...phics processing unit GPU but a GPU does provide better performance SAMM will automatically offload computation intensive tasks such as mosaicking and high quality rendering to the GPU when the GPU su...

Page 12: ...o install SAMM 1 Put the disc in your disc drive and navigate to the install folder 2 Create a folder on your local C drive named SAMM_DEMO for continuity with OIC training materials 3 Copy the demo_d...

Page 13: ...n click on the program folder and finally click on SAMM If SAMM has detected multiple crashes it may present you with the option of switching to software mode upon launch You might find it beneficial...

Page 14: ...working directory For continuity with OIC training materials we suggest that you use the SAMM_DEMO folder that you copied the data to earlier The default directory is my documents samm_projects which...

Page 15: ...ssion data analysis Table 2 Create or Open Project To create a new project To open an existing project To open a recent existing project 1 Click New project tab 2 Click Browse path to open the Select...

Page 16: ...are referred to as the mosaic or the processed dataset The procedure of drawing the swaths in the mosaic window is called mosaicking the swaths SAMM only logs or records data when in acquisition mode...

Page 17: ...data properties Opens Metadata Properties window only available in playback acquisition mode Display the forward look window Opens the Forward Look window Display the sidelook waterfall window Opens t...

Page 18: ...to the entire survey GoTo button Launches the Go To Dialog allowing users to specify a starting location on a map and zoom in Used in mission planning mode Auto adjust the display to follow the senso...

Page 19: ...ound velocity and time synchronization a real time estimation of navigation latency These metadata appear on the sidebar in playback and acquisition mode Figure 5 SAMM retrieves these metadata feeds f...

Page 20: ...onar users sonar controls are implemented directly in the native software To hide the sonar controls click the Sonar controls title bar Figure 7 Sonar Controls 3 3 5 Processing Controls Processing con...

Page 21: ...Processing Controls panel If you close the Forward Look window reopen it by clicking on the Display the forward look window icon in the toolbar Figure 10 Forward Look Window 3 5 Waterfall Window The w...

Page 22: ...ties window allows you to view the header and packet information for the current sonar ping and the current navigation message Open the desired section to monitor the message of interest in real time...

Page 23: ...nt Log bar click to open the Event Log window All Button to cancel file acquisition playback loading also indicates current mosaic resolution All File acquisition playback loading progress All Positio...

Page 24: ...ain toolbar Figure 13 The user has the option to specify survey projection and offsets units of measure mosaic resolution and logging details contact messaging and review of dongle and license propert...

Page 25: ...ported in SAMM Australian Coordinate System British National Grid Japanese Coordinate System Geodetic lon lat WGS 1984 Mercator Equator New Zealand Coordinate System and the U S State Plane Coordinate...

Page 26: ...tween the reported pointing direction of the heading source and the actual pointing direction of the heading source If you have a magnetic compass and know the declination the difference between north...

Page 27: ...Figure 17 Swath Colormap Panel The Mosaic in progress swath refers to the swath that SAMM is currently mosaicking The Completed swaths are those swaths that are completely mosaicked SAMM has nine bui...

Page 28: ...ees Fahrenheit Degrees Kelvin Properties To change the units of measure 1 Click the Configuration icon 2 In the Units of measure subpanel in the Display tab click the dropdown menu for any field and c...

Page 29: ...ard Raw data rates from modern sensors can easily exceed 100KB sec While workstations media and operating systems can handle large file sizes please consider your workflow memory and file transfer lim...

Page 30: ...3 Update Panel 4 6 Rendering Method SAMM either uses software or hardware to render swaths and perform computations The method used depends on your available hardware which SAMM auto detects SAMM uses...

Page 31: ...nt of the mosaic window Clicking the Selected language prompt at next launch command will display the language selection dropdown menu upon the next launch 4 8 Configuration Tutorial Table provides in...

Page 32: ...k that your Configuration window matches Figure 25 reference point using the same numbering convention in the Hdg field enter the heading bias in degrees in the Compass bias field enter the heading mo...

Page 33: ...Web Mapping Service World Imagery basemap underneath locally added files An Internet connection must be available for this option 5 2 Raster vs Vector File Types Geospatial data are stored as two type...

Page 34: ...ed by clicking the Chart background options icon in the toolbar hosts the chart database list and several buttons Figure 26 shows an empty chart database list in the basic window The basic chart loade...

Page 35: ...d Figure 27 Select Overlay Type Error Message If this window appears you likely picked the wrong file type from a family of files sharing the same name but with different file extensions If you know y...

Page 36: ...ick Cancel then unload the orange Loading file in the chart database If you intentionally loaded the text file specify the format of the text file using the fields in the window SAMM will render two d...

Page 37: ...basic interface Hide Hides the chart from the auto load function but does not remove it from the database The ArcGIS World Imagery provides high resolution worldwide coverage It displays under the ot...

Page 38: ...sort the table by column and select unpin disable unload and hide charts The context menu features are the same as those available in the basic interface except that when charts are unloaded they do...

Page 39: ...d as many folders as you have containing relevant geospatial data The scanning algorithm in the next step will recursively search inside all subfolders For simplicity consider saving all of your backg...

Page 40: ...his helps you get a feel for each type of chart file if you are unfamiliar and also shows you the geographic extent and level of detail present in each file To preview a chart click on the chart previ...

Page 41: ...e Type column as they are loaded to the chart database The list doesn t forget any file types loaded in all of SAMM s history so it may present file types that are not present in the database anymore...

Page 42: ...but this does not affect the display Gray Hidden charts are highlighted in grey when they are shown They are hidden from the auto loader You may toggle their display in the chart database on and off...

Page 43: ...oolbar 1 Click the Chart background options icon in SAMM s toolbar 2 Click the Advanced button 3 Click the Folders tab 4 Click Add Folder 5 Navigate to and click the folder containing charts and or ge...

Page 44: ...x next to the chart In the chart database table right click on the chart and click on Disable charts or Enable charts Restrict the auto load feature to a certain number of raster vector charts In the...

Page 45: ...e metadata sources and the Fourth part provides instructions for interfacing with supported sonar systems The Add data dropdown menu Figure 34 accessed by clicking the Add data icon controls file load...

Page 46: ...w swaths for them in the same project 5 Click Open 6 Monitor file loading progress in the status bar on the bottom right The swaths display when all files are loaded 6 1 2 Advanced Load Files Advanced...

Page 47: ...and watch mosaic being created with user inputs such as breaking the swath at line turns and marking targets To Add data for playback mode 1 Click the Add data icon 2 Click Playback files 3 Navigate...

Page 48: ...files as necessary 6 Set mosaic resolution 7 Set mosaicking options or FLS or SLS data For FLS data set the arc and range as well as ground range altitude data needs to be recorded and invert beams Fo...

Page 49: ...oes not support adding data from widely disparate locations to the same project at this time Please start a new project for each new region of operation 6 2 Load Files from Directory Similar to the Lo...

Page 50: ...the 3 modes Load existing files only Monitor and load new files include existing files Monitor and load new files only 5 Select file type from the dropdown list Note that SAMM can load data files of t...

Page 51: ...the Global Positioning System GPS satellite constellation Confirm that your navigational system is set to the WGS 1984 datum To configure the metadata input 1 Click the Add Data icon 2 Click Connect t...

Page 52: ...des without remaining stationary the resulting mosaic may be distorted see the M3 manual for reference To interface with the M3 sonar 1 Launch the M3 sonar software and connect the sonar as usual 2 La...

Page 53: ...uter do not change the IP address from 127 0 0 1 If the sonar software is running on a different computer that is networked to the SAMM computer select an appropriate network from the Network interfac...

Page 54: ...with ProViewer 1 Launch ProViewer version 4 3 or newer and connect to the sonar as usual Configure NMEA settings via the NMEA GPS tab in the application settings menu Figure 42 SAMM requires GGA HDT...

Page 55: ...from the Network interface dropdown and enter the IP address of the computer running the ProViewer software in the IP address field Do not change the port number from 1152 unless you changed it in the...

Page 56: ...ing see section 6 3 8 Click the Connect button 9 Monitor the connection status in the Device status popup and in the status bar on the bottom left Acquisition begins automatically SAMM flashes a warni...

Page 57: ...roperties by clicking the Properties icon on the main toolbar and identifying the problem from the attributes Gemini Sonar Controls The Gemini sonar controls include range and gain slider bars a check...

Page 58: ...hen it has pushed the last processed ping to the receiving software If you disable auto ping mode the sonar will wait to ping until it has received the command to ping from SAMM If the ping backlog ge...

Page 59: ...ot have a dedicated source of heading check the box for Bearing to utilize the built in compass Figure 49 Figure 49 Dolphin Sea View Interfacing The Dolphin Sea View controls include range gain clutte...

Page 60: ...re gain is automatically adjusted during data acquisition We highly recommend that you do not enable this function Figure 51 Figure 51 Blueprint Oculus Interfacing The Blueprint Oculus controls includ...

Page 61: ...ist and click Load 7 In the Edgetech Discover interface window Figure 53 set processing parameters as necessary 8 If SAMM and the Discover software are running on the same computer do not change the I...

Page 62: ...parameters as necessary Figure 54 SAMM interface to Klein SonarPro 8 If SAMM and the SonarPro software are running on the same computer do not change the IP address from 127 0 0 1 If the SonarPro soft...

Page 63: ...arameters as necessary Figure 55 GeoDAS UDP Broadcast Settings 9 If SAMM and GeoDAS are running on the same computer do not change the IP address from 127 0 0 1 If GeoDAS is running on a different com...

Page 64: ...SAMM User Manual 62 This page is intentionally left blank...

Page 65: ...The GUI allows control the content and geographic boundaries of the mosaic window This manual described how to load background content charts and imagery into the mosaic window in Section 5 Table list...

Page 66: ...he Rendering controls panel can be modified Select multiple consecutive swaths Click the first swath to select it then hold Shift and click the last swath Select multiple nonconsecutive swaths Click t...

Page 67: ...0330801_039_ds msk_2 appears in the Swath list 14 Click on data 1385510330801_037_ds msk and then click Delete The swath disappears from the mosaic display This does not affect the raw data the files...

Page 68: ...in the Processing controls panel on the sidebar Figure 58 and Figure 59 The FLS processing options are as follows Arc Coverage Adjusting these values trims the outer arc range of the FLS imagery data...

Page 69: ...n be smoothed by applying Despike and Smoothing filters Note that processing options in the Processing controls on the sidebar are applied to the currently processed swath only 7 4 2 Swath Properties...

Page 70: ...rks with a push pin icon and to turn on or off plotting of the actual target snippets over the mosaic These options do NOT delete targets unselecting them just de clutters the mosaic display The Mosai...

Page 71: ...Drag the right Rng range slider bar to 60 The sector outline shrinks to 60 of its full coverage in the Forward Look and mosaic windows The swath coverage shrinks correspondingly as SAMM draws it in t...

Page 72: ...ile adjusting the vertical feathering affects the clarity of the entire image Figure 63 Figure 63 Feathering Effect 7 In the Swath list select the swath that is currently being mosaicked and click the...

Page 73: ...SAMM User Manual 71 This page is intentionally left blank...

Page 74: ...splay 3 Attribute or provide data about the contacts 4 Organize the contacts 5 Export a contact report 6 Optionally broadcast contacts to a remote NMEA compatible plotter 8 1 Mark Contacts To build yo...

Page 75: ...Mosaic window Click on the target A contact thumbnail is saved in the database The thumbnail appears in the mosaic window A small blue marker appears over the mosaic marking the recorded position of...

Page 76: ...contacts display Select multiple adjacent contacts by clicking on the first thumbnail holding Shift and clicking on the last thumbnail Select multiple non adjacent contacts by clicking on a thumbnail...

Page 77: ...isplay The Name Comment Altitude and Depth fields are directly fillable in the properties table Position Size Sensor Position Sensor Heading and Range are defined by the contact mark Position and Rang...

Page 78: ...s Window Element Command Action All Resize elements Hover over the element edges and click and drag Show hide the properties table In the toolbar click the Properties Tiles icon In the contact display...

Page 79: ...ward you Press the keys Use a two finger scroll away from you Zoom to contact In the contact display when zoomed in press the spacebar Pan In the toolbar click the Pan Zoom icon and in the contact dis...

Page 80: ...ocation identifiers or swath number if you have a need to sort by location If the purpose of your survey was to identify and locate disposed ordnance for example you would obviously define tags for as...

Page 81: ...ght In order to calculate the contact height the sensor altitude at the contact s position and shadow length must be known To calculate the height enter the altitude in the Altitude field of the prope...

Page 82: ...thumbnail list right click on a thumbnail hover over Tags and click Assign new tag Enter the tag name and click OK This adds the new tag to the contact and the database Assign tag to contact In the t...

Page 83: ...e object and drag the mouse in the direction the shadow is cast Release the mouse button at the far edge of the shadow Calculate Height In the Properties table enter the altitude of the sensor at the...

Page 84: ...e search terms To search by name enter the name in the Search field You may also search the tags list for tag names To do this either click on the Search dropdown menu in the thumbnail list or right c...

Page 85: ...ng or descending order A small up arrow signifies ascending while a small down arrow signifies descending To remove contact s from the staging table select them in the table and either click the Remov...

Page 86: ...select the contact s right click on the selected thumbnails tiles and click Delete contact s or press the delete key Deletion is permanent As an alternative to deletion you may choose to export these...

Page 87: ...from staging table In the staging table click on the contact s to select then click the Remove contact s from staging table icon In the staging table click the contact s to select then right click an...

Page 88: ...isplays the width in meters 7 Measure the length and shadow length in the same manner Measure the shadow in the direction the shadow is cast You can enter the altitude if known in the properties table...

Page 89: ...SAMM User Manual 87 This page is intentionally left blank...

Page 90: ...Figure 70 Meta data properties window 9 2 Select tool The select tool allows the user to select swaths or contact markers in the Mosaic window When a swath is clicked in the mosaic window the correspo...

Page 91: ...y available in post processing mode If you are in acquisition or playback mode exit the mode by clicking the Add Data icon with red x on the toolbar New formats for export are discussed in Appendix A...

Page 92: ...GeoTIFFs SAMM subdivides exported areas into smaller areas 2 048 x 2 048 pixels referred to as tiles Tiles are useful when working with survey data that will result in excessively large file sizes du...

Page 93: ...ure that you are in post processing mode Click the Add Data icon with red x to exit from acquisition or playback mode 2 Arrange the swaths with the clearest images on top click and drag from the Swath...

Page 94: ...lbar and click Yes in the popup window to end playback or acquisition SAMM stops painting swaths The PPI and vessel icon disappear and the Live info Playback controls Processing controls also disappea...

Reviews: