background image

SPLITMUX

  -  Installation and Operation Manual

HOTMOUSE

7

Hotmouse Menu - ACTIVATING

Activate Hotmouse Cursor and press the right mouse button to open the Hotmouse Menu.  The Hotmouse 

Menu can also be opened via touch screen: tap the screen twice, and leave your finger pressed on the touch 

screen after the second tap (tap – hold, like a double click without lifting the finger on the second click), until the 

Hotmous Menu opens.

By clicking outside the Hotmouse Menu, you can open the Hotmouse Cursor to enlarge and reposition PiPs 

(only in PiP mode), switch channels and modify Win Mode.

After you are finished using the Hotmouse Cursor, the Hotmouse Menu will reopen. Menu appearance varies 

depending on display mode (Full / Quad / PiP / Win). This menu allows you to carry out switching operations 

and change display mode settings.

Hotmouse Menu - OPERATING

The Hotmouse Menu allows you to carry out switching operations and to enter PiP settings by mouse click  

(left mouse button).
Click Help on the Hotmouse Menu for information on the individual symbols.


.

HOTMOUSE MENU  -  ACTIVATING / OPERATING

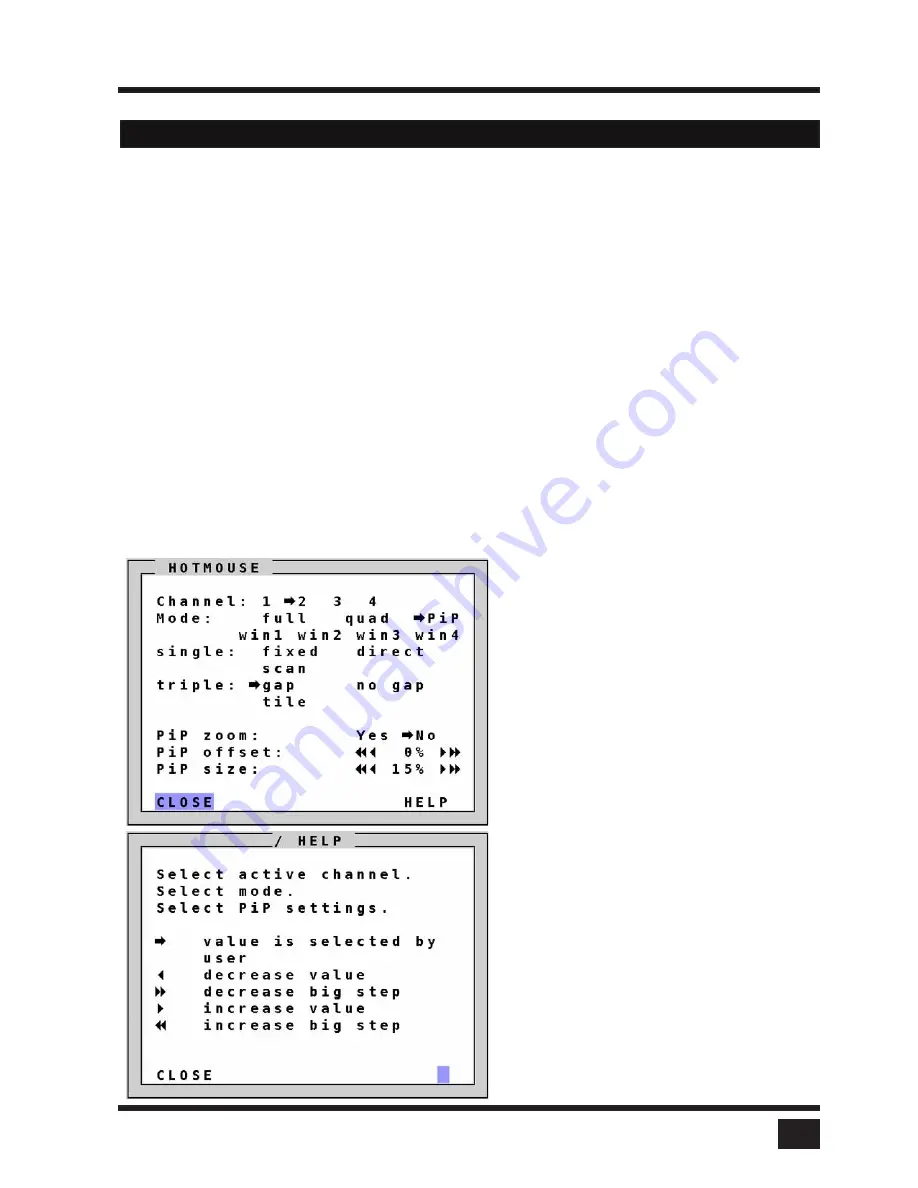
Click on HELP to open the HOTMOUSE HELP 

window.

Hotmouse Menu in PiP-mode

Click with the left mouse button on 

the arrow symbols to either increase 

or decrease the values in question. 

Clicking on the outer arrow symbols 

sets the minimum or maximum 

value.

After having completed the settings, 

click on CLOSE to close the 

Hotmouse Menu window and exit 

the Hotmouse Function.

Summary of Contents for SPLITMUX-DVI-4RT

Page 1: ...MAN157 Rev Date 3 12 14 SPLITMUX DVI 4RT Quad Screen Video Splitter Installation and Operation Manual SPLITMUX Series...

Page 2: ...r Drive Aurora Ohio 44202 CHANGES The material in this guide is for information only and is subject to change without notice Network Technologies Inc reserves the right to make changes in the product...

Page 3: ...uch screen trackball 11 Connecting sources computers 12 Connecting USB devices 12 Powering up the system 12 Connecting AUDIO 13 ON SCREEN DISPLAY 14 OSD OVERVIEW 14 OSD MAIN MENU WINDOW 16 OSD NAVIGAT...

Page 4: ...EN WIDTH 57 PHASE 57 FORMAT 58 OSD COMPUTER CHANNEL MAPPING 60 AUDIO 61 NAME 1 4 62 keyboard 63 MOUSE 64 RESET PS 2 65 EDID DDC 65 OSD USB device 1 4 usb port status 69 switching mode 70 change DeVICE...

Page 5: ...84 DECLARATION OF CONFORMITY 84 FCC DECLARATION 85 keyboard Commands 86 DEVICE CONFIGURATION PROGRAM 89 FIRMWARE UPDATE 93 SERIAL CABLE 95 Dcp Xml Remote Control 96 SUPPORTED TOUCH SCREEN CONTROLLER...

Page 6: ...ch displaying the entire screen contents of one source t Fullscreen mode In Fullscreen mode one of the four sources is displayed in full screen size and maximum resolution PiP mode Picture in Picture...

Page 7: ...connection Transparent USB 2 0 SPLITMUX features a transparent high speed USB 2 0 matrix USB 2 0 devices e g printer external memory memory stick webcam 3D mouse finger printer can be switched to comp...

Page 8: ...2 4 USB Console ports 1 DVI I 2 USB for keyboard and mouse USB 2 0 ports 4 transparent high speed USB 2 0 Audio 3 5mm analog stereo jack digital cinch connector TOSLINK optical audio Maximum distance...

Page 9: ...ice to a grounded power supply Installation Ensure that the device is disconnected from the mains before performing any installation work Unplug the device or disconnect the power supply Cables Only u...

Page 10: ...green there is no signal at the video input of the selected channel An LED lights up yellow when there is a signal at the video input but another channel has been selected When the LED is dark there i...

Page 11: ...ode PiP button Press to switch to picture in picture mode PiP Win button Press to switch to Win mode You can also select the active channel using hotkey and the arrow keys The selection window closes...

Page 12: ...ion setting is not supported by the monitor After setting the correct output resolution 640x480 60 you can choose a resolution the connected monitor supports in the OSD Alternatively hold buttons 1 an...

Page 13: ...ION FRONT PANEL Additional button functions Calling up OSD Press and hold PiP and Win buttons simultaneously for 2 seconds to open the OSD menu HARDWARE Note While the OSD menu is open the active comp...

Page 14: ...ard and mouse computer 9 Four transparent high speed USB 2 0 ports 1 Power Plug for enclosed power cable 2 Audio ports Connect external speakers or headphones to the 3 5mm analog stereo jack or digita...

Page 15: ...d mouse touch or trackball console Two USB ports allow connecting keyboard mouse touch screen or trackball Using a USB Hub you can connect multiple keyboards and mice They will work in share mode with...

Page 16: ...ole monitor keyboard mouse touch screen trackball Connect your monitor to the monitor port of SPLITMUX via VGA DVI cable analog or DVI cable digital up to 20 meters For greater distances use a DVI or...

Page 17: ...a USB device to one of the four transparent USB ports to switch it to computers connected to SPLITMUX SPLITMUX supports transparent USB devices such as printer external memory 3D mouse and finger pri...

Page 18: ...alog stereo jack 2 Digital cinch connector 3 TOSLINK optical audio jack After the speakers have been physically connected to the SPLITMUX Open the OSD and navigate to COMPUTER AUDIO Enable audio outpu...

Page 19: ...RESET Reset to factory default settings CONSOLE VIDEO OUTPUT Video resolution and frequency KEYBOARD Keyboard layout TOUCH SCREEN Calibration Mouse key emulation Enlarge on touch FADE Indicate use of...

Page 20: ...eyboard PC1 PC2 PC3 or USB MOUSE Display type of mouse PS 2 PS 2 Wheel or USB Set USB mouse positioning absolute relative RESET PS 2 Reset PS 2 mouse and keyboard EDID DDC Program input EDID USB DEVIC...

Page 21: ...otely open the OSD via ConfDev program on an external PC with serial or USB connection OSD MAIN MENU WINDOW On Screen Display OSD The OSD pops up in the center of the screen on top of the video image...

Page 22: ...vious window higher menu level or exit the OSD Changes in parameters are saved automatically Navigation using the buttons on the front panel Navigation using the buttons on the front panel is analogou...

Page 23: ...the window the HDCP status of the four input signals is displayed When a checkbox is marked the source is transmitting an HDMI signal with HDCP encoding SPLITMUX displays this signal only when HDCP e...

Page 24: ...lt is CTRL ALT For double click hotkey commands you can choose one key which is double clicked pressed twice quickly to enter the command mode Selectable keys are CTRL SHIFT ALT and SCROLL To change t...

Page 25: ...te Hotmouse operation Navigate to Enable Hotmouse Change the setting to Yes There are two modes of Hotmouse operation Hotmouse Cursor and Hotmouse Menu While Hotmouse Cursor supports only a limited se...

Page 26: ...e period 1 to 30 seconds after which the selector will close automatically Default setting is 5 seconds OSD SYSTEM QUAD MODE To open the active channel in Quad mode Press hotkey Q The yellow border in...

Page 27: ...ctive channels OSD SYSTEM WIN MODE Pop Up Buttons Move the hotmouse cursor to the top right corner of the signal window and the following buttons will appear Open OSD hotmouse context menu Swap signal...

Page 28: ...SELECT to open the OSD POSITION window Use this function to move the OSD window to any position on the screen OSD LANGUAGE Navigate with the arrow keys in the SYSTEM menu to the entry OSD LANGUAGE an...

Page 29: ...d password This six digit password is enclosed separately with the deliverables of SPLITMUX and should only be accessible to authorized persons administrators etc After entering the password on the ke...

Page 30: ...that only show display modes and device settings SYSTEM HDCP CONSOLE VIDEO OUTPUT EDID VIDEO INPUT STATUS COMPUTER NAME 1 4 KEYBOARD MOUSE EDID DDC HELP HOTKEY ABOUT CONTACT SECURITY LEVEL 6 As secur...

Page 31: ...4 with the following additional settings in the OSD SYSTEM OSD LANGUAGE VIDEO BRIGHTNESS CONTRAST HORIZ POSITION VERT POSITION SCREEN WIDTH PHASE USB DEVICE 1 4 SECURITY LEVEL 2 As security level 3 wi...

Page 32: ...o signal input x is not shown in Quad mode b PiP images are not displayed on screen c these channels are not selectable in Fullscreen mode For example if you have connected three computers channel 1 t...

Page 33: ...rol unit to the RS 232 port RJ 45 on the SPLITMUX rear panel To synchronize several devices special Y cables are required Settings for the connection are Transfer rate 57600 baud 8 data bits no parity...

Page 34: ...devices always start by first switching on the device at the end of the chain When the device has completed its startup phase and sent its DCP messages switch on the next device in the chain Finally s...

Page 35: ...a the serial Y to the RX input of SPLITMUX 2 SPLITMUX 2 adopts the settings and sends a DCP message via TX output over the Y cable to the RX input of SPLITMUX 3 The synchronization chain can have any...

Page 36: ...ies are possible up to security level 7 The table below shows the maximum security levels for simple element settings These settings may be changed via DCP up to the specified protection level Maximum...

Page 37: ...menu is called up the current start configuration is displayed To modify your start configuration change parameters in the channel mode and PiP fields Press ESC to save the new parameters and exit th...

Page 38: ...ly one other screen If SINGLE is selected Use the option PiP CHANNEL to define which channel should appear in the single window See the section Display Modes for details PiP size Adjust the size of Pi...

Page 39: ...om the center of the PiP images by a factor of 2 Offset from top Use this option to change the position of PiP images PiP images can be moved vertically to any position on the screen s right hand marg...

Page 40: ...sources are displayed three PiP images OSD MODE CURRENT START PiP Triple gap PiP images are displayed with a gap in place of the active channel Triple no gap PiP images are displayed without a gap Tr...

Page 41: ...2 3 or 4 to switch the full image Single fixed One channel is selected to be displayed as permanent PiP image Only the active channel full image can be switched Press front panel buttons 1 2 3 or 4 to...

Page 42: ...n the WIN MODE window Select the channel window mode position and window size in the window WIN MODE The arrows can be used to select the horizontal or vertical position or size of the windows Activat...

Page 43: ...ure to check monitor quality pixel errors contrast changes etc or the functionality of the video output of the SPLITMUX It is recommended to use all available test patterns for the test procedure To e...

Page 44: ...tings including the start mode set in MODE START Additionally EDID data from the 4 inputs is also saved For details on creating an external backup to a file see the section Device Configuration Progra...

Page 45: ...complete reset and reboot of SPLITMUX with factory defaults FACTORY DEFAULTS SYSTEM HOTKEY Multiple Hotkey Hotkey Ctrl Alt HOTMOUSE ON Hotmouse timeout 5 sec QUAD MODE Channel selection timeout 5 sec...

Page 46: ...CONTRAST 56 all channels HORIZ POSITION auto all channels VERT POSITION auto all channels SCREEN WIDTH 0 screen width correction of all channels PHASE 0 all channels FORMAT Fit to screen No all chann...

Page 47: ...ist shown on the right and press ENTER SELECT for the new video format The new output mode is visible for 10 seconds Within this time you can either accept the new setting by pressing ENTER SELECT or...

Page 48: ...Navigate with the arrow keys in the CONSOLE menu to the entry KEYBOARD Press ENTER SELECT to open the KEYBOARD window Set the keyboard layout to the desired language English Deutsch German Espa ol Sp...

Page 49: ...Connect the USB port of the touch screen to the SPLITMUX console USB port Please see page 9 for a description of the SPLITMUX ports Calibration After connecting a touch screen to SPLITMUX for the fir...

Page 50: ...or hygienic reasons in industrial production and automation for operation with gloves or in vehicles and aircraft where robust components are required Touch in quad mode Check this box to switch a qua...

Page 51: ...Menu will reopen Mouse position Absolute mouse position SPLITMUX works best together with touch screens when using absolute mouse positioning mode with the connected computers To enable absolute mouse...

Page 52: ......

Page 53: ...o output are connected to SPLITMUX but only one keyboard and mouse to operate the computer If you use graphics cards with multiple video outputs you must assign the computer s mouse and keyboard to th...

Page 54: ...d Note The background is shown only in Win mode Default color for the other modes is black OSD CONSOLE BACKGROUND Use BACKGROUND COLOR to set the color of the background Enter the desired color in 24...

Page 55: ...ilities This information is stored in the monitor by the manufacturer and can be read by SPLITMUX or graphics card via a monitor cable s Display Data Channel DCC interface OSD CONSOLE EDID Use the EDI...

Page 56: ...s ENTER SELECT to open the INPUT STATUS window OSD VIDEO INPUT STATUS Resolutions at the four video inputs are shown under INPUT STATUS Resolution recognition at the four video inputs is automatic Som...

Page 57: ...the DVI VGA window Go to Select input signal and define which video signal VGA or DVI is to be displayed If the setting DVI VGA is selected SPLITMUX will first check the digital input If there is no...

Page 58: ...n selected all of the channel are rotated to the same degree Rotation limitation at 90 and 270 If the channels overlap the monitor display should have a total of lines no higher than 2028 If the aspec...

Page 59: ...he window VIDEO CROPPING enter a value from 0 999 for the left right top and bottom side of the channel to be cropped Use the arrows to increase or decrease the value either in single digits or in inc...

Page 60: ...with analog input only Use arrow keys to navigate in the VIDEO menu to the entry BRIGHTNESS or CONTRAST and press ENTER SELECT to open the BRIGHTNESS or CONTRAST window Use this feature to adjust the...

Page 61: ...ION and press ENTER SELECT to open the HORIZ POSITION or VERT POSITION window In case of incorrect horizontal position of a computer screen use this feature to adjust the computer screen manually Use...

Page 62: ...dth number of horizontal pixels is defined by the VESA standard If the screen appears blurred change this setting to improve screen quality PHASE with analog input only Use arrow keys to navigate in V...

Page 63: ...wide screen monitor aspect ratio 16 10 in Quad mode a video input with a different aspect ratio is normally displayed with black borders to the left and right If fit to screen is enabled the image is...

Page 64: ...creen aspect ratio e g 4 3 PiPs are placed aside the full image of the active channel in the black bar on the right side The full image of the active channel is displayed left aligned on the screen re...

Page 65: ...NG menu assignment between physical input ports and logical channels can be changed This can be useful for instance if computer needs to be shown on another position on the quad screen without having...

Page 66: ...To ensure that the audio source is the computer being currently operated select active channel from the list For a fixed audio source select one of the computers from the list Switch channel on audio...

Page 67: ...the entry NAME 1 4 and press ENTER SELECT to open the NAME 1 4 window OSD COMPUTER NAME 1 4 Use the section NAME to assign a name to each of the four windows displayed when HOTMOUSE is in use Move the...

Page 68: ...BOARD Use arrow keys to navigate in the COMPUTER menu to the entry KEYBOARD and press ENTER SELECT to open the KEYBOARD window Use this display feature to identify which keyboard type USB PC1 PC2 or P...

Page 69: ...er half of the MOUSE window shows which mouse type USB PS 2 or PS 2 wheel has been recognized at which computer port USB mouse positioning For USB ports you may specify absolute or relative mouse posi...

Page 70: ...RESET PS 2 and press ENTER SELECT to open the RESET PS 2 window Use arrow keys t u or and keys to select the channel 1 to 4 you wish to reset and confirm by pressing ENTER SELECT EDID DDC This window...

Page 71: ...DC continued OSD COMPUTER EDID DDC continued Use arrow keys to select the channel EDID information Press ENTER SELECT to open the window with detailed settings for this EDID Select a video mode for th...

Page 72: ...e the changes to all four input EDIDs Alternatively the EDID data of the connected display can be used To do this navigate to SAME AS DISPLAY EDID and press ENTER SELECT SAME AS DISPLAY EDID write the...

Page 73: ...monitor EDID to input 3 WRITE TO INPUT 4 write the monitor EDID to input 4 WRITE TO ALL INPUTS write the monitor EDID to all inputs OSD COMPUTER EDID DDC Note The content of the input EDIDS can be res...

Page 74: ...o the entry USB DEVICE 1 4 and press ENTER SELECT to open the window OSD USB DEVICE 1 4 Status display of the transparent USB 2 0 switch Connections from USB port to computer are shown OFF Port is not...

Page 75: ...d In order to prevent data loss stop the USB device before switching To switch press ENTER SELECT This switching mode is recommended for USB devices with risk of data loss e g USB stick printer extern...

Page 76: ...d to rename the USB device or use the front panel buttons as described in the OSD Exit the menu The new name will automatically be saved and displayed in the other menus OSD USB DEVICE 1 4 CHANGE NAME...

Page 77: ...menu to the desired line and press ENTER SELECT to open the corresponding window HELP ABOUT displays the current revision levels hardware and firmware HELP HOTKEY provides a guide to hotkey shortcuts...

Page 78: ...e your finger pressed on the touch screen after the second tap tap hold like a double click without lifting the finger on the second click until the hotmouse menu opens Now click outside the hotmouse...

Page 79: ...rsor in Quad mode Switching active channel mouse keyboard Activate Hotmouse Cursor To change the active channel switching mouse and keyboard position the Hotmouse Cursor in the respective channel fiel...

Page 80: ...the PiP image area hold down the left mouse button and drag the PiPs to the desired vertical position Hotmouse Cursor IN PIP MODE Note When the Hotmouse Cursor moves over a PiP image its appearance c...

Page 81: ...Cursor Hold down the left mouse button and drag the Hotmouse Cursor to the left to increase PiP image size or to the right to reduce PiP image size Scaling PiP images up Scaling PiP images down Hotmo...

Page 82: ...ursor IN WIN MODE Note When the Hotmouse Cursor moves over a window its appearance changes arrows channel number Note As soon as the Hotmouse Cursor moves over a window its appearance changes arrows p...

Page 83: ...s over a window its appearance changes arrows pointing up down left and right Example Repositioning the windows Channel 2 is active and the hotmouse is activated Channel 2 is moved to a new location o...

Page 84: ...ursor the Hotmouse Menu will reopen Menu appearance varies depending on display mode Full Quad PiP Win This menu allows you to carry out switching operations and change display mode settings Hotmouse...

Page 85: ...ft mouse button to activate it You can also switch to a different mode with the left mouse button Hotmouse Menu FULLSCREEN MODE Use the mouse to navigate to a channel in the Hotmouse Menu and click th...

Page 86: ...PiP images and PiP zoom Change PiP mode triple triple gap single fixed single direct single scan and scan time Triple gap PiP images are displayed with a gap in place of the active channel Triple no g...

Page 87: ...e Menu Win Mode Hotmouse Menu MODES 2 4 Single scan Cycles through the PiP images at a set interval Use the section Mode in the hotmouse menu in WIN mode to save the position of your channel windows F...

Page 88: ...e unit we will repair your unit free of charge during our warranty period Please pack the device carefully if possible in its original packaging and send it to Network Technologies Inc 1275 Danner Dri...

Page 89: ...SPLITMUX Installation and Operation Manual ANNEX 84 DECLARATION OF CONFORMITY...

Page 90: ...ment is operated in a commercial environment Operation of this equipment in a residential area is likely to cause interference in which case the user at his own expense will be required to take whatev...

Page 91: ...Y Further examples Double click key Double click one key hotkey and immediately press the command key within 2 seconds COMMAND Hotkey and in sequence As double click hotkey you can choose one of the f...

Page 92: ...the numeric keypad Switch the active channel with hotkey and the arrow keys In PiP mode the active channel automatically is displayed as full image HK W Quad mode Fullscreen mode PiP mode Win mode Co...

Page 93: ...arent status of current win mode Undo up to ten previous actions Redo up to ten previous actions Select Win mode HK Y Hotkeys for Win mode HK I HK V HK O HK U M HK Open OSD Directly open OSD USB Devic...

Page 94: ...or RS 232 COM port Your SPLITMUX The installation CD containing the confdevEn exe program The enclosed serial cable RJ45 DB9 adaptor RJ45 CAT5 cable Use the serial cable to connect the COM port of the...

Page 95: ...onnected to Remote OSD operation Click the green arrow to open the On Screen Display OSD of SPLITMUX remotely on your external Windows computer Now the main OSD menu is open and ready for navigation D...

Page 96: ...e that of the monitor connected If an image of another format needs to be used it must first be converted into a bitmap There are free tools available like Gimp or Paint NET to do this conversion MS p...

Page 97: ...ATION The Save As dialog will appear and you can save the configuration to the desired location LOADING A CONFIGURATION ConfDev can be used to load device configurations from a file on your PC Open th...

Page 98: ...o connect the COM port of your computer to the RS232 port on SPLITMUX OR 1b Use the USB cable to connect the USB port of your computer to the USB port on SPLITMUX Note the virtual com port USB driver...

Page 99: ...nual ANNEX 94 Update firmware of SPLITMUX continued Additionally the upgrade process is indicated by an OSD window on your remote computer After successful update SPLITMUX restarts without changing co...

Page 100: ...port at the rear panel of SPLITMUX This adaptor is connected to your external serial control device e g computer To the adaptor any CAT5 cable can be connected The CAT5 cable again is connected to th...

Page 101: ...XML can be found at http www w3 org XML The XML scheme for DCP can be found on the enclosed CD under the name dcp xsd For a detailed description on how to use DCP XML with SPLITMUX please see the DCP...

Page 102: ...sed including in touch screens manufactured by 3M Microtouch TrollTouch The Bergquist Company 3M MicroTouch MicroTouch EX II new release delivered since 2009 with support of HID MicroTouch DST only re...

Page 103: ...22 50 CEA 861 E HDTVp 1280x720 60 60 CEA 861 E WXGA 1280x768 60 60 DMT UWXGA 1280x960 60 60 DMT UWXGA 1280x960 85 85 DMT SXGA 1280x1024 g 50 50 CVT SXGA 1280x1024 60 60 x DMT SXGA 1280x1024 g 72 72 CV...

Page 104: ...A 1280 1024 50 SXGA 1280 1024 60 SXGA 1280 1024 75 SXGA 1400 1050 50 SXGA 1400 1050 60 UXGA 1600 1200 50 UXGA 1600 1200 60 UXGAr 1600 1200 50 UXGAr 1600 1200 60 XGA B 1152 864 75 UWXGA 1280 960 60 UWX...

Page 105: ...annels or to switch the display mode of any of the SPLITMUX units in the master slave system Different levels master or slave require different types of hotkeys For example keep the hotkey default set...

Page 106: ...page 19 2 Keep the default hot key as Ctrl Alt for each Slave unit You now want to set the WIN mode for the slaves to display the channels just the way you want to view them and save that configuratio...

Page 107: ...eset Win 2 If multiple SPLITMUX DVI 4RT Units are Cascaded can you make any one of the inputs full screen 1 Configure the Master hot key setting to activate with a hotkey different than the default i...

Page 108: ...1 power cable 1 cable set HW KON DVI VGA 1 adapter DVI I VGA for console 1 short PS 2 keyboard mouse USB adaptor 2 cable set HW CPU VGA 1 video cable DVI VGA length 2 0 m 1 Y cable PS 2 for mouse and...

Page 109: ......

Reviews: