Maintenance
7-8
Part 1126187_05
E
2021 Nordson Corporation
Removing the Nozzle Plate Assembly
WARNING!
Risk of burns. Use heat-protective gloves when performing this
maintenance task.
1. You should have already completed
General Disassembly
given earlier in
this section.
2. Use a 3 mm hex wrench to loosen the two stroke adjustment screws (2).
This action allows the applicator needle (8) to move freely.
NOTE:
Do not remove the stroke adjustment screws.
3. Use a 2.5 mm hex wrench to sequentially loosen and remove the two
screws (5, 6) that secure the nozzle plate (4) to the heater block
assembly (7).
4. Grasp the applicator (1) and gently loosen the nozzle plate (4), using care
to not damage the needle (8), and separate the nozzle plate from the
heater block assembly (7).
NOTE:
If you cannot separate the nozzle plate from the heater block
assembly, use a heat gun along the join line between the two parts.
CAUTION!
Do not bend the applicator needle. The applicator will not operate
as intended with a damaged needle. If you do bend the needle, then you
must replace it before bringing the applicator back into production.
1
2
3
7
4
9
5
8
6
Figure 7-6 Nozzle Plate Removal
1. Applicator
2. Adjustment screws (2)
3. O-ring
4. Nozzle plate
5. Screw
6. Screw
7. Heater block assembly
8. Applicator needle
9. Plastic needle housing
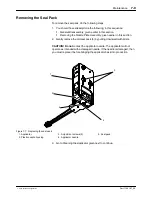
5. Go to
Removing the Seal Pack
given next to continue.
Summary of Contents for Vulcan Jet
Page 26: ...Description 2 8 Part 1126187_05 E 2021 Nordson Corporation This page intentionally left blank...
Page 162: ...Parts 9 4 Part 1126187_05 E 2021 Nordson Corporation Figure 9 2 Vulcan Jet applicator parts...
Page 163: ...Parts 9 5 Part 1126187_05 E 2021 Nordson Corporation Figure 9 3 Vulcan Jet applicator parts...
Page 171: ......
Page 172: ......


