background image


1. Installing Internal Optional Devices


Express5800/T120h    User’s Guide 

53


Chapter 2 Preparations 
 

1.6 


TPM Kit 

Install the TPM (Trusted Platform Module) kit to this machine following the procedure in 

1.6.1 Installing the TPM 

kit

When using drive encryption technologies, such as Microsoft Windows BitLocker Drive Encryption feature, you 

must enable TPM. For more information, see the Microsoft Web site. 
 

Important  Follow the procedures precisely as they are described in this section. If 

instructions are not followed, the hardware may be damaged and TPM may 

not work correctly. 


During installation or replacement of the TPM follow these guidelines. 


Do not remove the installed TPM. Once the TPM is installed, it becomes a permanent part of the system 

board. 


During  hardware  installation  or  replacement  our  service  counter  cannot  to  enable  TPM  or  encryption 

technology. For security reasons, please enable it yourself. 


When returning the system board for service replacement, do not remove the TPM from the system board. 


Trying to remove the TPM from the system board may damage or deform the TPM security rivets. If rivets 

on the installed TPM are found to have been damaged or deformed, the administrator will assume that the 

security of the system has been breached, and it will be necessary to take appropriate measures to ensure 

the integrity of the data system. 


Please  keep  the  recovery  key/password  when  using  BitLocker.  When  BitLocker  detects  the  system 

integrity may be compromised the recovery key/password is necessary for recovery mode. 


Our company will not be responsible for any data access block that was caused by improper use of the 

TPM.  Please  see  the  encryption  technology  functions  document  attached  to  each  operating  system  to 

operate the encryption functions used by TPM. 


Summary of Contents for Express5800/T120h

Page 1: ...Server Express5800 Series User s Guide Express5800 T120h EXP806 TPS I006 Chapter 1 General Description Chapter 2 Preparations Chapter 3 Setup Chapter 4 Appendix 10 202 01 101 01 April 2018 NEC Corpor...

Page 2: ...reparations Installation of additional options connection of peripheral devices and suitable location for this server Chapter 3 Setup System utility configurations and summary of EXPRESSBUILDER Chapte...

Page 3: ...4 2 Front View Without Front Bezel 25 4 3 Rear View 27 4 4 External View 28 4 5 Motherboard 29 System Maintenance Switch 30 DIMM slot 31 4 6 Internal View 32 4 7 Hot Plug Compatible Cooling Fan 33 4 8...

Page 4: ...7 Checking DIMM 84 Installation 85 Replacement Removal 86 1 12 HDD Cage 87 Installation 87 Removal 97 1 13 SAS Expander Card 98 Installing SAS expander card 98 1 14 NVMe To be released in January 2018...

Page 5: ...the rack 164 2 Installation and Connection 172 2 1 Installation 172 2 2 Connection 175 Connecting to Uninterruptible Power Supply UPS 177 Setup 178 1 Turning on the Server 179 1 1 POST 180 POST seque...

Page 6: ...ates the presence of a hazard if the instruction is ignored An image in the symbol illustrates the hazard type Prohibited Action This symbol indicates prohibited actions An image in the symbol illustr...

Page 7: ...ful to keep in mind when using this server Optical disk drive This server is equipped with one of the following drives These drives are referred to as optical disk drive in this document DVD ROM drive...

Page 8: ...Express5800 T120h User s Guide 8 POST POST described in this manual refers to the following Power On Self Test BMC BMC described in this manual refers to the following Baseboard Management Controller...

Page 9: ...Microsoft Corporation in the United States and other countries Intel and Xeon are registered trademarks of Intel Corporation of the United States Vmware is a registered trademark or a trademark of Vmw...

Page 10: ...OR A PARTICULAR PURPOSE ARE DISCLAIMED IN NO EVENT SHALL THE COPYRIGHT HOLDER OR CONTRIBUTORS BE LIABLE FOR ANY DIRECT INDIRECT INCIDENTAL SPECIAL EXEMPLARY OR CONSEQUENTIAL DAMAGES INCLUDING BUT NOT...

Page 11: ...the Unified Extensible Firmware Interface UEFI Forum s UEFI Specifications v 2 0 and later together the UEFI Specifications only as necessary to emulate an implementation of the UEFI Specifications a...

Page 12: ...t includes software developed by Greg Roelofs and contributors for the book PNG The Definitive Guide published by O Reilly and Associates zlib End User License Agreement zlib License zlib h interface...

Page 13: ...values Keep this document for future use Latest editions This document was created based on the information available at the time of its creation The screen images messages and procedures are subject...

Page 14: ...Warnings and Additions to This Document Express5800 T120h User s Guide 14...

Page 15: ...nce 2 Daily Maintenance in Maintenance Guide for details about cleaning Momentary voltage drop may occur due to lightning strike To prevent this use of UPS is recommended In the following cases check...

Page 16: ...from reflecting bright lights and to make the display contents easy to see Working without adjusting the display to a comfortable angle makes it difficult for you to maintain a proper posture and you...

Page 17: ...ter introduces the features of this server and the name of each part 1 Introduction 2 Accessories Describes the accessories of the server 3 Features Describes the features of the server and the server...

Page 18: ...latest microprocessor Intel Xeon processor With our latest technology and architecture we offer high performance and high reliability that could not be accomplished by conventional servers Furthermor...

Page 19: ...gulatory Notices Getting Started In addition to these enclosed items the following extra items may be required Operating system or application software Hardware options Drivers Hexalobular standard et...

Page 20: ...GHz 10Core Xeon Silver 4116 Processor 2 10GHz 12Core 8 Xeon Gold 5115 Processor 2 40GHz 10Core Xeon Gold 5118 Processor 2 30GHz 12Core 8 Xeon Gold 5120 Processor 2 20GHz 14Core 8 Xeon Gold 5122 Proces...

Page 21: ...on Gold 6142M Processor 2 60GHz 16Core 8 Xeon Platinum 8160M Processor 2 10GHz 24Core 8 Xeon Platinum 8170M Processor 2 10GHz 26Core 8 Xeon Platinum 8176M Processor 2 10GHz 28Core 8 Xeon Platinum 8180...

Page 22: ...re Power control feature 80 PLUS Platinum Titanium certified high efficiency power supply 7 Fan control appropriate to environment work load and configuration Silent sound design Enhanced Intel SpeedS...

Page 23: ...essor Bronze 3100 series Silver 4100 series Gold 5100 series executes one instruction simultaneously The device that mounts Gold 6100 series Platinum 8100 series executes two instructions simultaneous...

Page 24: ...3 5 1 Front Bezel Cover to protect the front side Possible to lock with the attached bezel lock key 2 Key Slot Keyhole of a key to lock the front bezel 3 LAN LINK ACT LED Indicates the status of the...

Page 25: ...ified at the time of purchase any of the following optional drives are installed DVD ROM drive DVD Super MULTI drive 5 POWER Switch LED A switch to turn the power ON OFF If pressed once the POWER ligh...

Page 26: ...DX N8151 139 2 Only compatible with built in RDX N8151 139 12 Drive Expansion Bay Option Box 2 3 5 inch drive models are compatible with 3 5 HDD cages N8154 108 2 5 inch drive models are compatible wi...

Page 27: ...ion before use 4 VGA port 5 Serial port COM Connect to a device equipped with a serial interface Not available for connecting directly to a dedicated line 6 Management LAN connector A connector compat...

Page 28: ...4 Names and Functions of Parts Express5800 T120h User s Guide 28 Chapter 1 General Description 4 4 External View 2 1 1 Side cover 2 Hood latch...

Page 29: ...slot 3 16 A connector for NVMe riser card sideband signals PCIe slot 3 17 x8 PCIe slot 2 18 NVMe riser card connector for sideband signal PCIe slot 1 19 x16 PCIe slot 1 20 Connector for TPM kit 21 Unu...

Page 30: ...eserved SW11 OFF Reserved SW12 OFF Reserved Important Do not change the system maintenance switch that says Reserved unless it is instructed by the document It may cause the device to fail or malfunct...

Page 31: ...4 Names and Functions of Parts Express5800 T120h User s Guide 31 Chapter 1 General Description DIMM slot DIMM slots are numbered in order 1 to 12 for the processor...

Page 32: ...FAN1 2 FAN2 3 FAN3 4 FAN4 FAN5 and 6 are provided as standard equipment FANs 1 to 4 are installed when configuring 2 CPUs 3 Processor CPU 1 CPU1 mandatory option 2 CPU2 option 4 DIMM option One or mo...

Page 33: ...If a redundant fan kit is added Fans 1 to 4 will be added Redundancy will be impaired if a cooling fan failure occurs or any of the cooling fans are missing If a failure occurs in the second cooling...

Page 34: ...n level is detected iLO 5 performs a normal shutdown at POST execution and OS If the server hardware detects temperature in critical level before a normal shutdown the server performs an immediate shu...

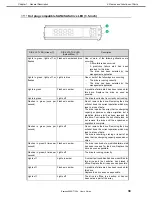
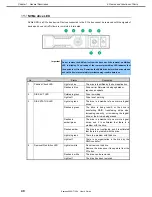
Page 35: ...ATUS LED 1 Lights in green Normal state Flashes in green once per second Restarting iLO Flashes in amber The function of the system is deteriorated Flashes in red once per second The system is in a cr...

Page 36: ...on all servers Subsystem LED status Motherboard Flashes once Processor Flashes twice Memory Flashes 3 times PCI riser card PCIe slot Flashes 4 times LOM card Flashes 5 times RAID controller Flashes 6...

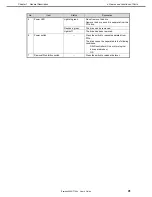
Page 37: ...supply unit exceeds the current limit value 2 iLO ACT LED Lights in green Working in operation Flashes in green Working in operation Lights off Not working 3 iLO LINK LED Lights in green Connected Lig...

Page 38: ...e or more logical drives to fail Lights off Removing the drive will not cause a failure to occur in the logical drive 4 DISK STATUS LED Lights in green The drive is a member of one or more logical dri...

Page 39: ...hich may lead to a loss of data The drive is part of an array that is undergoing capacity expansion or stripe migration but a predictive failure alert has been received for this drive To minimize the...

Page 40: ...dated or requires an update 2 DISK ACT LED Rotates in green Drive is working Lights off Drive is not working 3 DISK STATUS LED Lights in green The drive is a member of one or more logical drives Flash...

Page 41: ...ove the drive once it is separate from the PCIe bus Flashes in green The drive can be removed Lights off The drive has been removed 6 Power switch Press the switch to request separated from PCIe The d...

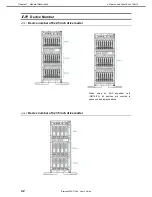
Page 42: ...120h User s Guide 42 Chapter 1 General Description 4 9 Device Number Device number of 8x2 5 inch drive model Device number of 4x3 5 inch drive model When using an SAS expander card N8116 83 all device...

Page 43: ...4 Names and Functions of Parts Express5800 T120h User s Guide 43 Chapter 1 General Description Device number of 8x2 5 inch drive model NVMe SAS...

Page 44: ...s This chapter describes preparations for using this server 1 Installing Internal Optional Devices You can skip this section if you did not purchase any optional devices 2 Installation and Connection...

Page 45: ...afely WARNING Be sure to observe the following precautions to use the server safety Failure to observe the precautions may cause death or serious injury For details see Safety Precautions and Regulato...

Page 46: ...See Chapter 3 6 Turning Off the Server Disconnect the power cord from the outlet and the server Important After disconnecting the power cord from the server wait for at least 30 seconds before instal...

Page 47: ...er 2 1 25 Drives Install power supply units See Chapter 2 1 26 Power Supply Unit Install backup device See Chapter 2 1 15 Backup Device Attach front bezel See Chapter 2 1 27 Installing Front Bezel Ins...

Page 48: ...g UID Unit ID Switch helps you to identify the target server When the server is working be sure to identify the target server by using UID Switch first before you turn off the server or disconnect a c...

Page 49: ...4 Removing Front Bezel Remove the front bezel when pressing the POWER switch or removing side cover To unlock the bezel insert the attached bezel lock key into the key slot and turn the key while pre...

Page 50: ...ations Slide the front bezel upward while it is fully opened remove the edges of the hinges 2 places on upper and lower side from the hole of the chassis and remove the front bezel from the main unit...

Page 51: ...e have ready a hexalobular driver T 15 Important For safety reasons please operate with the device laid on its side 1 See steps 1 to 5 in Chapter 2 1 2 Overview of Installation and Removal for prepara...

Page 52: ...nstalling Internal Optional Devices Express5800 T120h User s Guide 52 Chapter 2 Preparations 5 Slide the cover a little bit to the rear side of the chassis 6 Lift side cover and remove it from the ser...

Page 53: ...ent our service counter cannot to enable TPM or encryption technology For security reasons please enable it yourself When returning the system board for service replacement do not remove the TPM from...

Page 54: ...cuits will remain energized Important The surface becomes hot after use so to avoid burns please allow the drive and internal parts of the system to cool before touching Important TPM Kit once install...

Page 55: ...oard This may cause the TPM cover TPM and the mother board to malfunction or to be damaged Note also that the data stored in the TPM including the key will be deleted if the TPM is removed and attache...

Page 56: ...his manual to conduct installation and connection and turn the power supply ON Notes on Windows BitLocker After you have finished setting up BitLocker a recovery key password will be generated When Bi...

Page 57: ...you change the fan or you need to remove it follow the procedure below Important Do not pull out the fan when it rotates correctly When removing a fan using hot plugging the fan will be still running...

Page 58: ...ons Removing the redundant fan kit If you need to remove the fan of redundant fan kit only pull it out as the same steps for the standard fan To remove the fan bay of redundant fan kit follow the proc...

Page 59: ...Preparations 1 8 Installing Removing CPU Duct Installation 1 To attach the CPU duct onto the main unit align the CPU duct to the dotted lines in the diagram below 2 Press down on the blue latch of the...

Page 60: ...cables inside remove CPU duct before the work following the procedure below DIMM memory Processor CPU Fan PCI card to be mounted in the RAID exclusive slot PCI card some types of cards including SAS e...

Page 61: ...is to be installed Note Pins on the motherboard are very fragile and easily damaged To avoid damaging the motherboard do not touch the processor or processor socket contact point Note When handling th...

Page 62: ...Heat sink latch Release slot 2 1 Mark attached to the processor and heat sink 2 Parts to separate the processor and the heat sink Installation Please prepare the following before installing the optio...

Page 63: ...er on the heat sink 4 Align the pin mark 1 on the processor frame with the pin mark 1 on the heat sink attach the heat sink latch on the heat sink by gently pressing the corners of the processor frame...

Page 64: ...e processor can be installed in only one direction 7 Tighten the heat sink screws 4 PCs with a T 30 hexalobular driver in the following order 1 2 3 4 to secure 8 Make sure that the heat sink is instal...

Page 65: ...hen an additional CPU is mounted To mount an additional CPU you need to add the redundant fan kit Add a redundant fan kit following the procedure below 1 To add a redundant fan kit you need to install...

Page 66: ...Cover to attach the side cover of the server Note In order to prevent damage of the system due to improper cooling or elevated temperature please do not activate the server or enclosure without imple...

Page 67: ...g ESC until the main menu is displayed 5 After the menu below is displayed select OK to leave System Utility and move to Boot mode Replacement Removal Important Do not remove any CPU unless it is fail...

Page 68: ...ury electrical shock or equipment damage unplug the power cord and ensure no power is supplied to the server You cannot turn off the system power supply completely by the power button of the server Un...

Page 69: ...ule Wait for the heat sink to cool Use a T 30 hexalobular driver to loosen the heat sink screws 4 PCs in the following order 4 3 2 1 Note Contacts on the motherboard are very fragile and easily damage...

Page 70: ...ches on the processor frame corner Remove the processor frame from the heat sink 4 Remove thermal grease adherent to the processor with washing After the washing becomes totally dry apply new thermal...

Page 71: ...in is a key a processor can be fixed only for the one direction 9 Using T 30 hexalobular driver tighten the screws at the four corners of the high end heat sink module for CPU following the order show...

Page 72: ...server appears on the screen 4 Keep pressing ESC until the main menu is displayed 5 The menu below will appear select OK from the system utility and switch to boot mode Removal Important Do not remov...

Page 73: ...reason you can provide higher system capacity and bandwidth by installing larger capacity DIMM Hereafter the information applicable to all types is mentioned as DIMM If it is written LRDIMM or RDIMM i...

Page 74: ...ot ID for spare replacement Please see the following chart for the location of the slot number The order of installation may be different on x1CPU PROC1 configuration and x2 CPU PROC1 PROC2 configurat...

Page 75: ...11 12 1 3 4 5 6 7 8 9 10 12 20 DIMM 1 3 4 5 6 7 8 9 10 12 1 3 4 5 6 7 8 9 10 12 21 DIMM 1 3 4 5 6 7 8 9 10 12 1 3 4 5 6 7 8 9 10 11 12 22 DIMM 1 3 4 5 6 7 8 9 10 11 12 1 3 4 5 6 7 8 9 10 11 12 23 DIM...

Page 76: ...Silver 4100 Series Xeon Bronze 3100 Series 2 133MHz The operation memory speed is decided by rating DIMM speed DIMM attached on each channel processor model and speed selected on System Utility Depen...

Page 77: ...memory chips stored on DIMM breaks Memory ADDDC function of this device allows the correction of memory errors and continuation the operation even whilst failures occur in multiple DRAM devices on th...

Page 78: ...ncy by writing the same data into DIMM group mirror set composed of three channels under the same memory controller channel 1 channel 2 and channel 3 or channel 4 channel 5 and channel 6 Ex Configurat...

Page 79: ...ystem Options Memory Operations Advanced Memory Protection to Mirrored Memory with Advanced ECC Support After rebooting confirm that Advanced Memory Protection Mode Memory Mirroring with Advanced ECC...

Page 80: ...rom IML and replace DIMM one by one 2 Memory Sparing Function By making a rank of DIMM stored in the memory channel under a memory controller of each CPU stand by as a spare Memory Sparing Function ma...

Page 81: ...onfiguration BIOS Platform Configuration RBSU System Options Memory Operations Advanced Memory Protection to Online Spare with Advanced ECC Support After rebooting confirm Advanced Memory Protection M...

Page 82: ...rotection operates as Advanced ECC In this case POST s Advanced Memory Protection Mode is displayed Advanced ECC IML also records the relevant error events Notes for replacements at failure At the tim...

Page 83: ...he following features cannot be configured DIMMs with the different model numbers are mounted Note To use the memory ADDDC function mount Eight or twelve DIMMs per CPU The DIMM compatible with the mem...

Page 84: ...s and tables No Description Meaning 1 Capacity 8GB 16GB 32GB 64GB 2 Rank 1R Single rank 2R Dual rank 4R Quad rank 3 DRAM data width X4 4 bit X8 8 bit 4 Memory generation DDR4 5 The maximum speed of th...

Page 85: ...eing incorrectly inserted Do not apply too much pressure when you push a DIMM into the slot Doing so can damage the socket or terminal part Continue to install remove the internal options See Chapter...

Page 86: ...re to install dummy cover to the slots from where DIMMs are removed Important Failing to install dummy cover to vacant slot may cause malfunction of the server due to insufficient cooling effect Note...

Page 87: ...equipped with up to two disk drives Per cage four 3 5 inch hard disk drives can be equipped with maximum eight when using two cages Note The device does not operate if you install a 2 5 inch HDD cage...

Page 88: ...k bay toward you to dismantle it 4 Mount the 2 5 inch HDD cage on the device and fix the four positions of cage with the screws attached to the cage 5 With the power cable attached to the 2 5 inch HDD...

Page 89: ...or connecting SAS SATA cable see c Cable Route in this manual b Mounting on Box2 1 See steps 1 to 6 in Chapter 2 1 2 Overview of Installation and Removal for preparations 2 Unfasten four screws that s...

Page 90: ...ge connect the 2 5 inch HDD cage s power connector and the mother board s power connector for Box2 drive 5 Connect the optional built in SAS SATA cable and the power cable For connecting SAS SATA cabl...

Page 91: ...For connections only from AROC Type a Example 3 For connections from PCI cards Type a to each slot Example However this is a collection of examples for installation in each slot d Installing the side...

Page 92: ...e blank cover and blank bay 3 Mount the 3 5 inch HDD cage on the device and fix the four positions of cage with the screws attached to the cage 4 With the power cable attached to the 3 5 inch HDD cage...

Page 93: ...lling in the Box 2 3 Mount the 3 5 inch HDD cage on the device and fix the four positions of cage with the screws attached to the cage 4 With the power cable attached to the 3 5 inch HDD cage connect...

Page 94: ...x 1 and b Installing in the Box 2 3 Mount the 3 5 inch HDD cages on the Box1 and Box2 of the server and fix the four positions of each cage with the screws attached to the cage 4 With the power cable...

Page 95: ...l Devices Express5800 T120h User s Guide 95 Chapter 2 Preparations d Cable Route 1 For onboard connections Example 2 For connections from onboard and AROC Type a Example 3 For connections from onboard...

Page 96: ...Preparations 4 For connections only from AROC Type a Example 5 For connections from PCI cards Type p to each slot Example However this is a collection of examples for installation in each slot e Insta...

Page 97: ...nk cover with screws 7 See Chapter 2 1 24 Installing Side Cover to attach the side cover of the server Important For maintaining the cooling effect the blank cover should be attached 2 3 5 inch HDD ca...

Page 98: ...expander card Please prepare the following before installing the option Parts included in the option kit SAS expander card 5 cables T 15 hexalobular driver To install the components follow these step...

Page 99: ...rd will be installed and remove it 5 Connect the cables according to the table below SAS expander card Where to connect PORT1 RAID dedicated slot PCI card output PORT1 2 PORT2 PORT3 PORT4 HDD cage Box...

Page 100: ...r s Guide 100 Chapter 2 Preparations Align the PCI slot with the PCI board terminal and insert them securely 6 Install the HDD cage and cables referring to HDD cage described in this manual Cable rout...

Page 101: ...ing Internal Optional Devices Express5800 T120h User s Guide 101 Chapter 2 Preparations b For connections from PCI card Type p 7 See Chapter 2 1 24 Installing Side Cover to attach the side cover of th...

Page 102: ...with the unit follow the steps below to install NVMe cage and connect interface cards and cables Installation 1 See steps 1 to 6 in Chapter 2 1 2 Overview of Installation and Removal for preparations...

Page 103: ...arations 4 Connect the power connector of NVMe cage with the power connector for the Box 2 drive on the motherboard using power cable that is included with NVMe cage 5 Install NVMe riser card in PCIe...

Page 104: ...1 Installing Internal Optional Devices Express5800 T120h User s Guide 104 Chapter 2 Preparations 6 Connect NVMe riser card to NVMe cage with the cable Cable routes are as follows a Signal Cable...

Page 105: ...1 Installing Internal Optional Devices Express5800 T120h User s Guide 105 Chapter 2 Preparations b Power Cable 7 See Chapter 2 1 24 Installing Side Cover to attach the side cover of the server...

Page 106: ...be installed in the media bay Important To avoid static electricity see Chapter 1 1 8 Anti static Measures in Safety Precautions and Regulatory Notices Do not install a 5 25 type device that is not s...

Page 107: ...an mounted in fan bay 1 of the Redundant fan kit and then install the FAN Blank 1 See steps 1 to 6 in Chapter 2 1 2 Overview of Installation and Removal for preparations 2 Remove the fan bay of the re...

Page 108: ...ate anti static treatment There is a possibility of causing electrostatic discharge if appropriate grounding wire treatment is not conducted Please prepare the following before installing the option P...

Page 109: ...RDX device in the media bay 3 Connect USB 3 0 connector on the motherboard to USB 3 0 connector of RDX device with the supplied cable 4 Organize the cables using the cable guide etc of the main unit 5...

Page 110: ...de 110 Chapter 2 Preparations 6 Organize the cables using the cable guide etc of the main unit Install the fan bay of the Redundant fan kit to the main unit Cable routes are as follows 7 See Chapter 2...

Page 111: ...nclosure without implementing any of component or blank on all of drive bays and device bays Please prepare the following before installing the option Parts included in the option kit T 15 hexalobular...

Page 112: ...e rear end of the front end cage 3 Place the supplied cable around the cable pillar 4 Connect the connector of the signal power cable to LTO device 5 Connect the power connector of the signal power ca...

Page 113: ...1 Installing Internal Optional Devices Express5800 T120h User s Guide 113 Chapter 2 Preparations 9 Adjust cable wiring 10 Install the fan bay of the redundant fan kit to the main unit...

Page 114: ...ver to attach the side cover of the server Cable routes are as follows a When slot 3 card is installed b When slot 5 card is installed Removal The procedure for removal is the reverse of installation...

Page 115: ...for PCI Express x16 can be installed in the unit Important You must avoid static electricity to work with the procedure below For details see Chapter 1 1 8 Anti static Measures in Safety Precautions a...

Page 116: ...type 2 x16 x8 x16 x8 x16 x8 x16 x8 Slot size Dedi cated to RAID FH Available size N8103 189 RAID Controller 0MB RAID 0 1 PCI Express 3 0 x8 N8103 190 RAID Controller 2GB RAID 0 1 5 6 PCI Express 3 0...

Page 117: ...rt 25GBASE QSFP28 Adapter PCI Express 3 0 x16 4 3 2 1 N8190 163 Fibre Channel Controller 1ch PCI Express 3 0 x8 2 7 1 8 5 4 6 3 N8190 164 Fibre Channel Controller 2ch PCI Express 3 0 x8 2 7 1 8 5 4 6...

Page 118: ...inch PCIe SSD installation kit includes two riser cards Installing PCI card Important The surface becomes hot after use so to avoid burns please allow the drive and internal parts of the system to coo...

Page 119: ...lectric parts installed on the board Installing boards with dirt or oil can cause malfunction Note Make sure that the edge of a PCI card bracket is seated into the fixed slot of the riser card Dependi...

Page 120: ...stem due to improper cooling or elevated temperature please do not activate the server or enclosure without implementing any of component or blank on all of drive bays and device bays 10 See Chapter 2...

Page 121: ...2 SATA SSD installation kit should be installed Since they use the same SATA port as DVD drive only one of them can be implemented Installing M 2 SATA SSD installation kit Please prepare the followin...

Page 122: ...I card should be installed 6 Install SSD module in the M 2 SATA SSD installation kit a Insert the SSD module into the SSD slot of the M 2 SATA SSD installation kit at an angle of 45 degrees and slowly...

Page 123: ...te In order to prevent damage of the system due to improper cooling or elevated temperature please do not activate the server or enclosure without implementing any of component or blank on all of driv...

Page 124: ...the damage to electronic components please start to install the system after conducting the appropriate anti static treatment There is a possibility of causing electrostatic discharge if appropriate...

Page 125: ...arations 4 Lift straight up the blank cover on the slot where the PCI board will be installed and remove it 5 Align the PCI slot with the PCI board terminal and insert them securely 6 Connect the powe...

Page 126: ...00 T120h User s Guide 126 Chapter 2 Preparations Power cable for cache backup when mounting to slot 5 and slot 7 7 Connect the cables from ports 1 and 2 on the back plane to ports 1 and 2 on the N8103...

Page 127: ...or elevated temperature please do not activate the server or enclosure without implementing any of component or blank on all of drive bays and device bays 9 See Chapter 2 2 Installation and Connection...

Page 128: ...electronic components please start to install the system after conducting the appropriate anti static treatment There is a possibility of causing electrostatic discharge if appropriate grounding wire...

Page 129: ...e SAS SATA cable is labeled Port 1 or Port 2 respectively Connect them according to the label number 5 See Chapter 2 1 24 Installing Side Cover to install the side cover of the server Note In order to...

Page 130: ...g Internal Optional Devices Express5800 T120h User s Guide 130 Chapter 2 Preparations Removal The procedure for removal is the reverse of installation Re attach the blank cover if you operate without...

Page 131: ...the appropriate anti static treatment There is a possibility of causing electrostatic discharge if appropriate grounding wire treatment is not conducted Installing N8103 191 RAID controller Please pre...

Page 132: ...uide 132 Chapter 2 Preparations 4 Secure the RAID controller with screws 5 Connect the SAS SATA cable from the back plane to the controller port The SAS SATA cable is labeled Port 1 Port 4 respectivel...

Page 133: ...of the system due to improper cooling or elevated temperature please do not activate the server or enclosure without implementing any of component or blank on all of drive bays and device bays 7 See C...

Page 134: ...he extension battery is an extremely sensitive device Prior to installation avoid static electricity by touching the metal frame of the unit or similar Do not drop or otherwise damage the extension ba...

Page 135: ...for RAID controller a Thread the cable for additional batteries through the hole in the RAID battery holder for RAID controller marked by an arrow b Attach the additional batteries to the RAID batter...

Page 136: ...on the motherboard Note In order to prevent damage of the system due to improper cooling or elevated temperature please do not activate the server or enclosure without implementing any of component o...

Page 137: ...after conducting the appropriate anti static treatment There is a possibility of causing electrostatic discharge if appropriate grounding wire treatment is not conducted Please prepare the following...

Page 138: ...3 Pull forward the blank cover attached to the optical disk drive bay while pushing the latch and remove it 4 Secure the fixing bracket with the screws to the optical disk drive to be installed 5 Atta...

Page 139: ...ons 6 Install the optical disk drive cage that the optical disk drive has been mounted with to the main unit 7 Connect the optical disk drive connector to the onboard SATA port 5 connector on the moth...

Page 140: ...ng or elevated temperature please do not activate the server or enclosure without implementing any of component or blank on all of drive bays and device bays 9 See Chapter 2 2 Installation and Connect...

Page 141: ...g a RAID system The number of hard disk drives required varies in each RAID level If the optional RAID Controller N8103 189 195 is used the RAID System cannot be built in RAID5 RAID6 RAID50 RAID60 RAI...

Page 142: ...y reasons please operate with the device laid on its side Place the side cover straight on the unit while pulling up the lever of the side cover so that it can be inserted securely into the frame At t...

Page 143: ...1 Installing Internal Optional Devices Express5800 T120h User s Guide 143 Chapter 2 Preparations Place the server vertically and rotate the 4 stabilizers...

Page 144: ...isk drive please install it in the bay with the smallest device number NVMe SSD is a PCIe bus device Devices mounted on the PCIe bus cannot be removed without the device and the bus completing stoppin...

Page 145: ...s capacity rotational speed and standard for each Disk Array See Chapter 2 1 2 Overview of Installation and Removal for preparations Locate the slot where you install the hard disk drive Install hard...

Page 146: ...it all the way until the handle s lock touches the frame Hold the tray firmly with both hands Close the handle slowly The tray is locked making a clicking sound Note When you push the drive into the...

Page 147: ...1 Confirm the status of the drive from the combination of the LEDs of the hot plug SAS drive 2 Back up all server data in the drive 3 Unlock the handle of the tray Grasp the handle and slowly pull it...

Page 148: ...the system due to improper cooling or elevated temperature please do not activate the server or enclosure without implementing any of component or blank on all of drive bays and device bays 1 Remove t...

Page 149: ...uct be transferred to a third party without erasing the data To remove the components follow these steps 1 Press the power button The LED of the removal prohibit button lights up and flashes Do not pr...

Page 150: ...power supply unit Note The both two power supply units installed in the server must have the same capacity Make sure that the two power supply units have the same part number and the same label color...

Page 151: ...avoid burns please allow the drive and internal parts of the system to cool before touching Note Keep the removed blank cover for future use 3 Insert the power supply unit until it is locked with clic...

Page 152: ...ps below to install a power supply unit Note The both two power supply units installed in the server must have the same capacity Make sure that the two power supply units have the same part number and...

Page 153: ...Remove the blank cover of power supply unit Important The surface becomes hot after use so to avoid burns please allow the drive and internal parts of the system to cool before touching Note Keep the...

Page 154: ...rnal Optional Devices Express5800 T120h User s Guide 154 Chapter 2 Preparations 3 Remove the terminal as shown in the diagram below 4 Attach the ground cable green to the terminal 5 Remove the termina...

Page 155: ...ew on the terminal block connector 7 Take the ground cable attached to the terminal in step 3 and attach it to the power unit DC using a screw Important Make sure the ground cable is attached before a...

Page 156: ...9 In the same manner plug the return cord DC to the right of the terminal block connector and loosen the screw 10 After connecting the two cables to the terminal block connector connect them to the po...

Page 157: ...DC source on will enable the LED on the power unit DC to flash Power supply unit 2 Power supply unit 1 15 Turn on the power of the server 16 Check that there are no errors regarding the power unit in...

Page 158: ...of power supply units fails the failing power supply unit can be replaced with the system power on 1 Check the power supply unit whose AC POWER LED lights in amber or flashes 2 Power off the server 3...

Page 159: ...lling Front Bezel When installing the front bezel insert the edges of the hinges at the left end of the front bezel into the frame hole on the front left side of the unit and then close the front beze...

Page 160: ...ts tower to rack conversion The tower to rack conversion option kit contains the following Tower to rack conversion kit 1 Bracket left and right will not be used 2 Screw 1 T 15 x3 3 Nut cage x4 will n...

Page 161: ...k surface when extended from the rack To avoid the danger of electric shock or equipment damage please note the following Do not disable the grounding plug on the power cable For safety reasons the gr...

Page 162: ...quisites Before preparing the server for rack conversion make sure you have the following Server T 15 screwdriver Procedure 1 Remove the front bezel 2 Power down the server 3 Remove all power a Remove...

Page 163: ...Optional Devices Express5800 T120h User s Guide 163 Chapter 2 Preparations b Place the server on the side 5 Remove the four server feet from the server a Loosen the screws from the foot b Remove the...

Page 164: ...stalled for both round hole and square hole rack shelf Prerequisites Before installing the component make sure you have the following Rail Server tray Cable management arm T 15 Screwdriver Procedure 1...

Page 165: ...120h User s Guide 165 Chapter 2 Preparations 2 Attach the inner rails on both sides of the server tray 3 If installed unlock and fully open the server rack door 4 Check the front rear left and right s...

Page 166: ...Release the latch and the rail gets locked automatically on the rack rear column 6 Install the front end of the left outer rail a Press the latch on the front rail kit b Align the pins to the desired...

Page 167: ...20h User s Guide 167 Chapter 2 Preparations 8 Install the tray onto the outer rails in the rack shelf 9 Push the tray till it stops midway 10 Secure the server on the tray a Press the blue latch on ea...

Page 168: ...800 T120h User s Guide 168 Chapter 2 Preparations b Place the server on the tray c Adjust the server position until the rear panel fits perfectly to the tray bracket d Tighten three T 15 screws to fir...

Page 169: ...20h User s Guide 169 Chapter 2 Preparations Attach the cable management arm to the rail a Attach the arm with two latches to the inner and outer rails to the left of the rack b Attach the other arm to...

Page 170: ...il and the cable management arm This operation requires two people One person to slide the server tray and another person to observe the cable management arm a Pull the server tray all the way out fro...

Page 171: ...1 Installing Internal Optional Devices Express5800 T120h User s Guide 171 Chapter 2 Preparations 16 TIghten the wing screw on the server tray 17 Attach the front bezel...

Page 172: ...Notices Do not use in places other than specified Do not connect the ground wire to a gas pipe CAUTION Be sure to observe the following precautions to use the server safely Failure to observe the pre...

Page 173: ...t securely by two or more persons and put it slowly and gently in the installation location Important Do not lift hands on the front bezel on the front side The front bezel may come off and fall causi...

Page 174: ...n is connected Place where intense vibration may be generated Place where some objects may be fallen Place near a device generating intense magnetic field such as TVs radios broadcast communication an...

Page 175: ...precautions to use the server safety Failure to observe the precautions may cause death or serious injury For details refer to Safety Precautions and Regulatory Notices Do not hold the power plug wit...

Page 176: ...ation line Tips The serial port cannot be used to connect with leased line Display unit USB 3 0 device USB 3 0 device Hub switching hub etc Device with serial interface 1000BASE T Hub switching hub et...

Page 177: ...e ties Make sure that no pressure is applied on the plug of power cord Connecting to Uninterruptible Power Supply UPS To connect the power cord of the server to a UPS use the connector output on the r...

Page 178: ...tion of system utility Describes how to set up the system 3 iLO 5 Describes iLO 5 installed in the server 4 EXPRESSBUILDER and Starter Pack EXPRESSBUILDER helps you to install Windows and maintain the...

Page 179: ...irm that power supply controller is powered on when the power cord is connected to power supply controller such as Uninterruptible Power Supply UPS Remove Front Bezel When the STATUS lamp flashes gree...

Page 180: ...urned on POST starts and an initialization message is displayed The message to tell initialization of a memory and a PCI device Note While the initialization messages are being displayed the screen ma...

Page 181: ...ed utilities see instruction documents attached to each option board Necessary key inputs are different depending on option boards installed so you are requested to operate according to messages 4 The...

Page 182: ...of Primary Boot Controller Configuration of Memory Option Selection of language Start of pre boot environment such as built in UEFI shell or EXPRESSBUILDER For details see Chapter 2 1 System Utilitie...

Page 183: ...In case you cancel your change and exit press ESC key Tips To put the setting back to the default values press F7 key Execute it under the control of Platform Configuration RSBU The default values are...

Page 184: ...the value of the selected item You cannot use this key when a menu which has on the left is selected Enter key Determines the selected parameter Esc key Cancels pop up window On the submenu pressing t...

Page 185: ...tility Press Esc key to go back to the original screen F7 key Displays the following screen To put the parameters of System Utility back to the default setting select Restore Defaults and Reboot It ac...

Page 186: ...5800 T120h User s Guide 186 Chapter 3 Setup F12 key Displays the following screen When you choose Yes the current settings are saved and then a message urging to restart appears The server will restar...

Page 187: ...BSU System Options USB Options Internal SD Card Slot to Disabled At the time of shipment Internal SD Card Slot is set to Disabled Setting up the Time Format in accordance with your OS If you use Windo...

Page 188: ...M XX is PCI slot number of the installed option board Boot Set the Boot Mode to UEFI Mode according to your OS Change System Configuration BIOS Platform Configuration RBSU Boot Options Boot Mode to UE...

Page 189: ...nux Chapter 1 Installing Linux Use Wake on LAN WOL Set enable or disable of a and b below When using the built in network controller the setting in b is not reflected a System Configuration Network de...

Page 190: ...ble TPM with the TPM management module after setting Intel R TXT Support to Enabled to start OS You may not be able to change TPM Support and TXT Support In that case execute F7 Load Defaults UPS Powe...

Page 191: ...e power is turned OFF While POST Immediately after POST Tips After completion of POST execution or the powering OFF it may take several minutes to reach downloadable state Please wait for a while to s...

Page 192: ...og In iLO of the controlled server Initial user name and initial password which are required to log in are written on a slide tag attached to the controlled server 4 Execute types command and confirm...

Page 193: ...4 Tips The serial number of system information and product ID are not restored 7 When the power of device is OFF make it ON Or in case OS is running reboot Tips Since the changes of system configurat...

Page 194: ...n the time of restoring and the time of backup You cannot restore some system configurations in case there is a difference in hardware configuration between the time of back up and that of restore If...

Page 195: ...SNMP notification Email alert and notifications in Remote Syslog Active Health System Log AHS Log Download Active Health System Log In case the support is needed AHS Log file may need to be sent to N...

Page 196: ...e OS only Pre OS only Global Team Collaboration by 6 server administrators at the maximum via IRC Recording and playback of video via IRC Recording and playback of Virtual Serial Port Remote Console o...

Page 197: ...OST following Chapter 3 1 1 1 POST sequence After a while the following message is displayed on the lower part of the screen Press the F9 key while the message is being displayed to launch System Util...

Page 198: ...t specialized LAN connector to connect to the network Follow the setting in Step 4 to access iLO5 from Web browser of the administrator PC iLO5 contains default user name password and DNS name set at...

Page 199: ...ange password without fail at the time of initial setup If you use the initial password unchanged and then you suffer unauthorized access we will not hold any responsibility at all Even if you change...

Page 200: ...tall SPP automatically when installing OS SPP must be installed after installing OS Application installation Installs NEC ESMPRO RESTful Interface Tool and other applications Manuals Stores manuals fo...

Page 201: ...g Software Components Express5800 T120h User s Guide 201 Chapter 3 Setup 5 Installing Software Components Continue to install software components such as OS See the instructions below Installation Gui...

Page 202: ...supplied to the system even if the server is in standby mode When shutting down the server use one of the following methods Press and release the POWER switch This method shuts down applications and...

Page 203: ...Express5800 T120h User s Guide 203 NEC Express5800 Series Express5800 T120h Appendix 1 Specifications 2 Glossary 3 Revision Record 4 4...

Page 204: ...ts exclusive use for RAID controller Graphics Built in chips Video RAM Internal management controller chip 16MB Graphics and resolution 1677 million colors 640x480 800x600 1 024x768 1 280x1 024 1 600x...

Page 205: ...s Server 2012 R2 Datacenter Microsoft Windows Server 2016 Standard Microsoft Windows Server 2016 Datacenter Red Hat Enterprise Linux 7 3 x86_64 or later VMware ESXi 6 0 Update 3 or later VMware ESXi 6...

Page 206: ...Xeon Gold 6140 Processor 2 30 GHz 18C 36T 24 75MB TDP 140W 4 Xeon Gold 6142 Processor 2 60 GHz 16C 32T 22MB TDP 150W Xeon Gold 6144 Processor 3 50 GHz 8C 16T 24 75MB TDP 150W Xeon Gold 6146 Processor...

Page 207: ...0 This is sometimes abbreviated as 6lobe iLO A built in controller that supports the IPMI version 2 0 protocol The controller is called as iLO5 because this server adopts a generation 5 version contro...

Page 208: ...must be installed before using OS on the server Starter Pack is provided as an optional product and ISO data on our website System Maintenance Switch A DIP switch on motherboard This switch can enabl...

Page 209: ...3 Revision Record Express5800 T120h User s Guide 209 Chapter 4 Appendix 3 Revision Record Document Number Date Issued Description 10 202 01 101 01 November 2017 Newly created April 2018 For Taiwan...

Page 210: ...de April 2018 NEC Corporation 7 1 Shiba 5 Chome Minato Ku Tokyo 108 8001 Japan Obligatory Applicant 167 7 Address NEC Corporation 2018 The contents of this manual may not be copied or altered without...

Reviews: