Section 2: PCB Installation and Startup
Aspire S Hardware Manual
Section 2: PCB Installation and Startup
◆
2-7
2
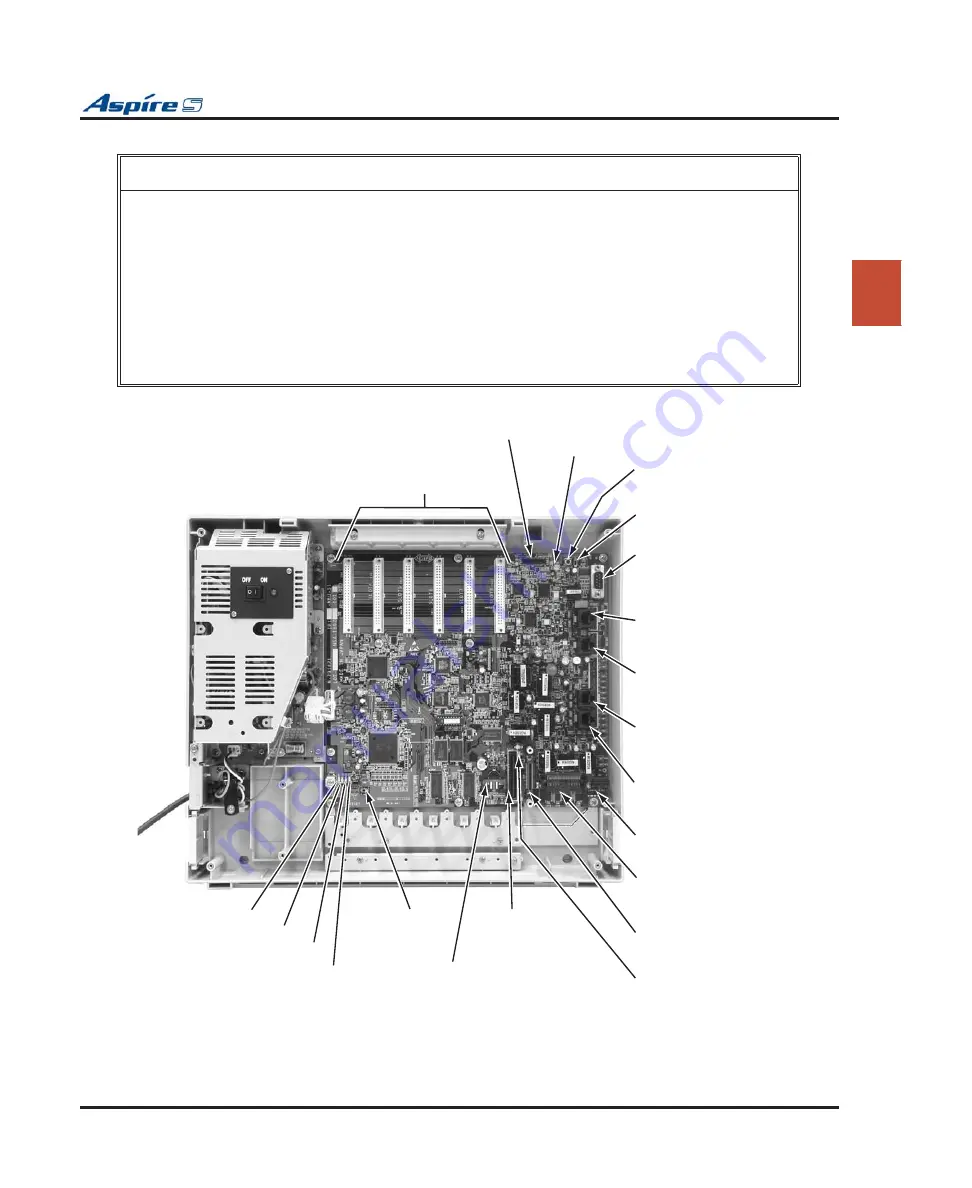
Figure 2-3: CPU
! IMPORTANT !
While the system is powered up, data may be written to the S-RAM or
fl
ash memory at any time. Before pow-
ering down the system, verify that of the 4 LEDs in the lower left corner of the CPU, only LD2 is
fl
ashing. This
LED is the farthest right of the LEDs. It should be
fl
ashing 0.5 seconds on/off (a slow
fl
ash). If it’s
fl
ashing fast
or if any other LEDS are
fl
ashing on the CPU, wait until they stop or else the system data may be corrupted.
Turning off the power when other LEDs are
fl
ashing may corrupt the
fl
ash or S-RAM data.
If the
fl
ash memory
becomes corrupted, the system may not come up. If the S-RAM data is corrupted, the telephones may have
erratic operation.
When powering the system up or down, wait 10 seconds before pressing the button again. This allows the sys-
tem to complete the startup/shutdown process.
0893130-23
CN1
Serial Cable
Connector
(D-Sub 9-pin male)
Slots 3-8
CN4
DSPDB Connector
LD6, LD7
CN23
Audio In (BGM/MOH)
and General Purpose Relay
CN22
Connector for analog
terminals (SLI1,SLI2)
CN21
Connector for digital
phones (ESI5 - ESI8)
CN20
Connector for digital
phones (ESI1 - ESI4)
CN7
ENTU Connector
CN5
Compact Flash Card
Connector
CN6
ENTU Connector
LD5
Compact Flash Card
LED
CN30
ROM Board
Connector
BT1
Battery
(CR2032 3.0V)
SW4
Boot Code
Update Switch
LD2
LD4
LD3
LD1
SW1
Load Button
SW3
Serial Port Switch


