


Disk Image Backup and Recovery Tool
6-87
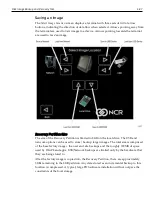
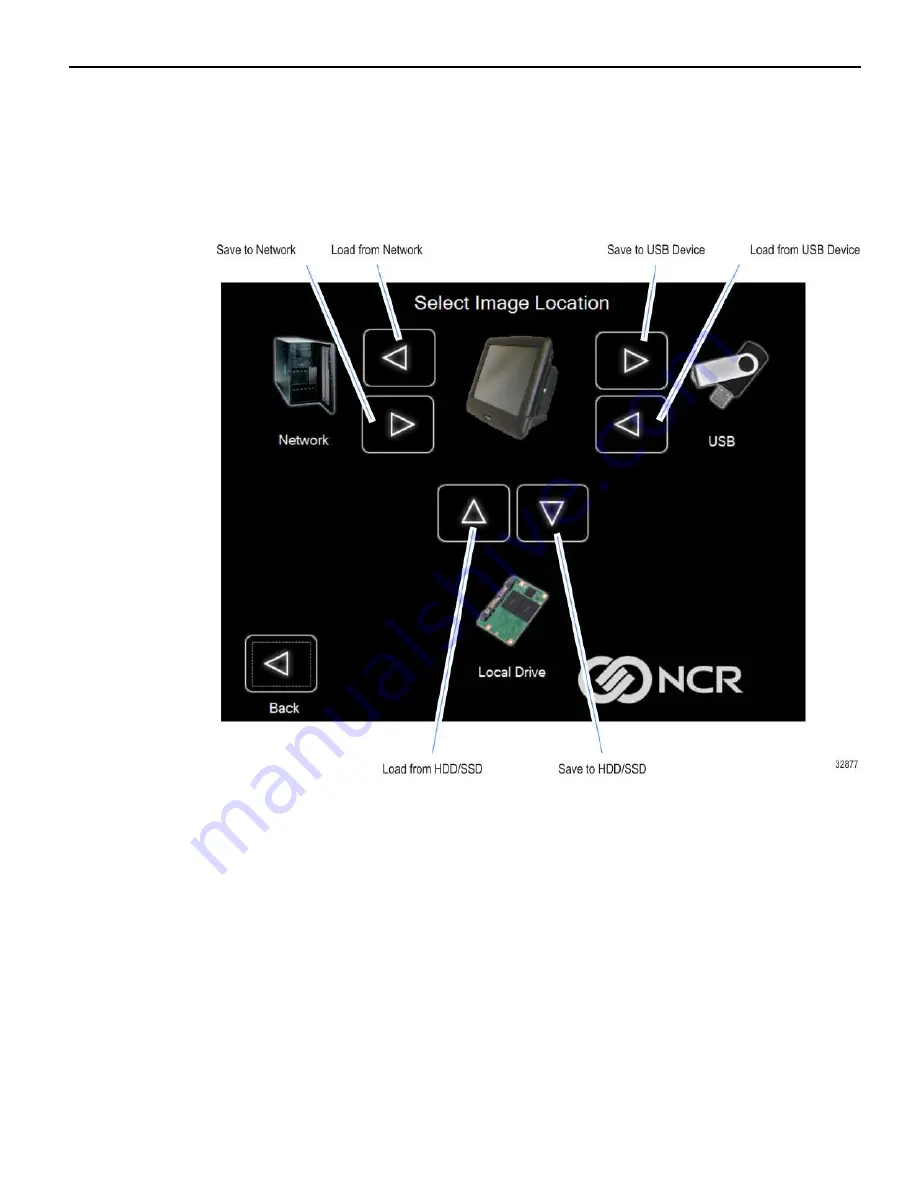
Saving an Image
The
Select Image Location
screen displays a terminal with three sets of
In/Out
arrow
buttons, indicating the direction of data flow when selected. Arrows pointing away from
the terminal are used to
Save
images to a device. Arrows pointing towards the terminal
are used to
Load
an image.
Recovery Partition Size
The size of the Recovery Partition is limited to 8GB on the local drive. The USB and
network options can be used to store / backup larger images. The total size is comprised
of the base factory image + the user and site backups and the roughly 300MB of space
used by WinPE and apps. USB/Network backups are limited only by the hardware that
they are being stored to.
After the factory image is copied into the Recovery Partition, there are approximately
3GBs remaining in the 8GB partition. Any data stored as an incremental backup to this
location is compressed. A typical, large POS software installation will not outpace the
constraints of the local storage.
Summary of Contents for POS XR8
Page 1: ...User Guide NCR POS XR8 XR8c 7607 B005 0000 2436 Issue C ...
Page 9: ...vii Touch Screen Cleaning Procedures 141 ...
Page 27: ...Chapter 2 External Connectors Motherboard Release 1 x Release 2 x Display Port Connections ...
Page 28: ...2 18 External Connectors Release 3 x XR8c ...
Page 42: ...2 32 ...
Page 59: ...Hardware Installation 3 49 24V Powered USB and RS232 Cables ...
Page 61: ...Hardware Installation 3 51 24V Powered USB and RS232 Cables ...
Page 70: ...3 60 Hardware Installation NCR 5932 5715 Big Ticket USB Keyboard ...
Page 72: ...3 62 Hardware Installation NCR 5932 6674 POS Compact Alphanumeric USB Keyboard ...
Page 77: ...Hardware Installation 3 67 3 Disconnect the SATA Power connector from the Drive ...
Page 78: ...3 68 Hardware Installation 4 Unscrew the Drive from the Hard Drive chassis Retain the screws ...
Page 79: ...Hardware Installation 3 69 5 Slide the drive out of the chassis bracket ...
Page 80: ...3 70 Hardware Installation 6 Slide in the new drive and secure with the retained screws ...
Page 81: ...Hardware Installation 3 71 7 Connect the SATA Power connector to the Drive ...
Page 82: ...3 72 Hardware Installation 8 Replace the Sled Cover and reconnect power to the terminal ...
Page 92: ...5 82 ...
Page 130: ...7 120 ...
Page 147: ...Configuring a Second HDD for RAID 10 137 7 Select Next ...
Page 152: ...11 142 ...


