


7-108
BIOS Setup
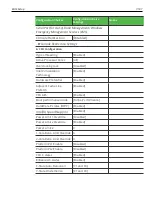
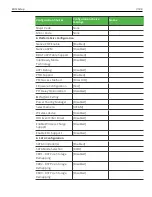
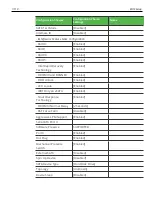
Configuration Choices
Configuration Choice
Settings
Notes
Package C state demotion
[Disabled]
Package C state
undemotion
[Disabled]
CState Pre-Wake
[Enabled]
Package C State limit
[AUTO]
CFG lock
[Enabled]
►
Power Limit 3 Settings
.Power Limit 3 Override
[Disabled]
►
Power Limit 4 Settings
.Power Limit 4 Override
[Disabled]
►
CPU Thermal Configuration
.CPU DTS
[Disabled]
.TCC Activation Offset
0
.ACPI 3.0 T-States
[Disabled]
Intel TXT(LT) Support
[Disabled]
Debug Interface
[Disabled]
Debug Interface Lock
[Enabled]
SW Guard Extensions (SGX) [Software Controlled]
Select Owner EPOCH input
type
[No Change in Owner
EPOCHs]
PRMRR Size
[AUTO]
►
Intel TXT Information
Chipset
Production Fused
BiosAcm
Production Fused
Chipset Txt
Supported
Cpu Txt
Supported
Error Code
None
Class Code
None
Summary of Contents for POS XR8
Page 1: ...User Guide NCR POS XR8 XR8c 7607 B005 0000 2436 Issue C ...
Page 9: ...vii Touch Screen Cleaning Procedures 141 ...
Page 27: ...Chapter 2 External Connectors Motherboard Release 1 x Release 2 x Display Port Connections ...
Page 28: ...2 18 External Connectors Release 3 x XR8c ...
Page 42: ...2 32 ...
Page 59: ...Hardware Installation 3 49 24V Powered USB and RS232 Cables ...
Page 61: ...Hardware Installation 3 51 24V Powered USB and RS232 Cables ...
Page 70: ...3 60 Hardware Installation NCR 5932 5715 Big Ticket USB Keyboard ...
Page 72: ...3 62 Hardware Installation NCR 5932 6674 POS Compact Alphanumeric USB Keyboard ...
Page 77: ...Hardware Installation 3 67 3 Disconnect the SATA Power connector from the Drive ...
Page 78: ...3 68 Hardware Installation 4 Unscrew the Drive from the Hard Drive chassis Retain the screws ...
Page 79: ...Hardware Installation 3 69 5 Slide the drive out of the chassis bracket ...
Page 80: ...3 70 Hardware Installation 6 Slide in the new drive and secure with the retained screws ...
Page 81: ...Hardware Installation 3 71 7 Connect the SATA Power connector to the Drive ...
Page 82: ...3 72 Hardware Installation 8 Replace the Sled Cover and reconnect power to the terminal ...
Page 92: ...5 82 ...
Page 130: ...7 120 ...
Page 147: ...Configuring a Second HDD for RAID 10 137 7 Select Next ...
Page 152: ...11 142 ...


