


9-128
Configuring AMT
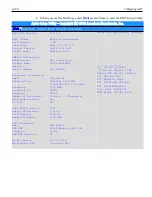
2. When you see the NCR logo select
[Del]
several times to start the BIOS Setup Utility.
Aptio Setup Utility - Copyright (C) 2016 American Megatrends, Inc.
Main ,
Advanced . Chipset Boot . Security . Save & Exit
NCR BIOS Version
BIOS Vendor
Core Version
Compliancy
Project Version
Access Level
SMBIOS Information
Manufacturer
Product Name
Version
Serial Number
Processor Information
Name
Brand String
Frequency
Processor ID
Stepping
Number of Processors
Microcode Revision
GT Info
IGFX VBIOS Version
Memory RC Version
Total Memory
Memory Frequency
PCH Information
Name
PCH SKU
Stepping
LAN PHY Revision
ME FW Version
ME Firmware SKU
2.0.4.X
American Megatrends
5.XX
UEFI 2.4; PI 1.3
OACCM 0.04 x64
Administrator
NCR Corporation
7607-1000-8801
54-12345671
Skylake DT
Intel(R) Core(TM)
i3-6100TE CPU @ 2.70GHz
2700 MHz
506E3
R0/S0
2Core(s) / 4Threads(s)
6A
GT2
1033
1.6.0.1
8192 MB
2133 MHz
SKL PCH-H
PCH-H Desktop Q170 SKU
31/D1
B2
11.0.0.1197
Corporate SKU
Choose the system default language
___________________
→←: Select Screen
↑↓/Click: Select Item
Enter/Dbl Click: Select
+-: Change Opt.
F1: General Help
F2: Previous Values
F9: Load Defaults
F10: Save and Exit
ESC/Right Click: Exit
Summary of Contents for POS XR8
Page 1: ...User Guide NCR POS XR8 XR8c 7607 B005 0000 2436 Issue C ...
Page 9: ...vii Touch Screen Cleaning Procedures 141 ...
Page 27: ...Chapter 2 External Connectors Motherboard Release 1 x Release 2 x Display Port Connections ...
Page 28: ...2 18 External Connectors Release 3 x XR8c ...
Page 42: ...2 32 ...
Page 59: ...Hardware Installation 3 49 24V Powered USB and RS232 Cables ...
Page 61: ...Hardware Installation 3 51 24V Powered USB and RS232 Cables ...
Page 70: ...3 60 Hardware Installation NCR 5932 5715 Big Ticket USB Keyboard ...
Page 72: ...3 62 Hardware Installation NCR 5932 6674 POS Compact Alphanumeric USB Keyboard ...
Page 77: ...Hardware Installation 3 67 3 Disconnect the SATA Power connector from the Drive ...
Page 78: ...3 68 Hardware Installation 4 Unscrew the Drive from the Hard Drive chassis Retain the screws ...
Page 79: ...Hardware Installation 3 69 5 Slide the drive out of the chassis bracket ...
Page 80: ...3 70 Hardware Installation 6 Slide in the new drive and secure with the retained screws ...
Page 81: ...Hardware Installation 3 71 7 Connect the SATA Power connector to the Drive ...
Page 82: ...3 72 Hardware Installation 8 Replace the Sled Cover and reconnect power to the terminal ...
Page 92: ...5 82 ...
Page 130: ...7 120 ...
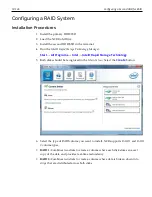
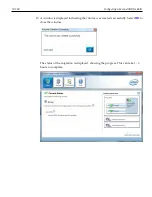
Page 147: ...Configuring a Second HDD for RAID 10 137 7 Select Next ...
Page 152: ...11 142 ...


